
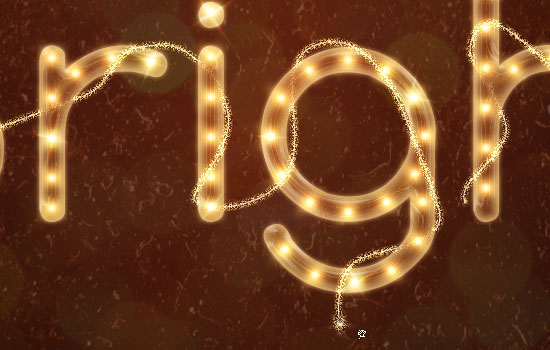
Bright Rope Light Text Effect
This tutorial will show you how to use Layer Styles, the Pen Tool, and a couple of brushes to create a bright sparkling rope light inspired text effect.
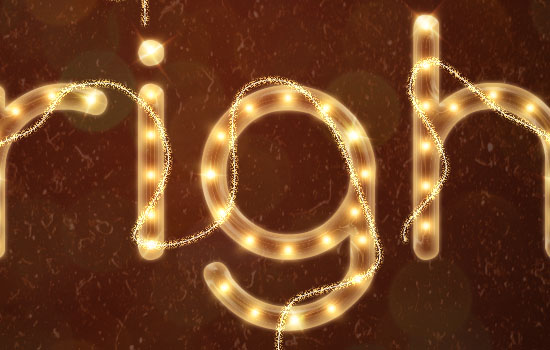
The Final Result

Tutorial Details
- Software Used : Photoshop
- Version : CS6 Extended
- Time : 1:15 – 1:45
Resources
- Comfortaa-Regular font.
- Orange Galaxy Texture by natureflowerstock.
- 25 Contours by jen-ni.
- Sparklies Photoshop Brushes by redheadstock.
- Loving the sparkle paper by ExposeTheBeauty.
Step 1
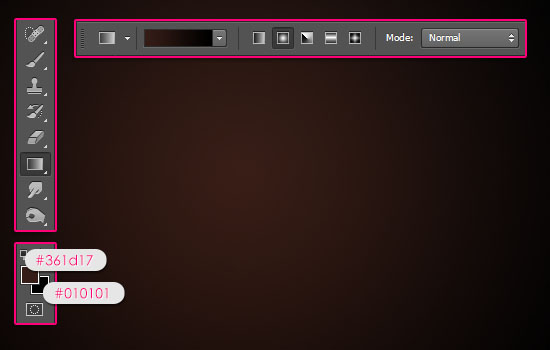
Create a 1280 x 1024 px document, set the Foreground color to #361d17 and the Background color to #010101. Pick the Gradient Tool, click the Radial Gradient icon in the Options bar, then click and drag from the center of the document to one of the corners.
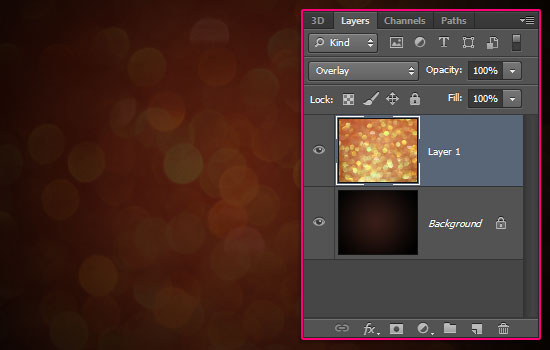
Place the Loving the sparkle paper image on top of the Background layer, resize it so that it fits inside the document, then change its layer’s Blend Mode to Overlay.
Step 2
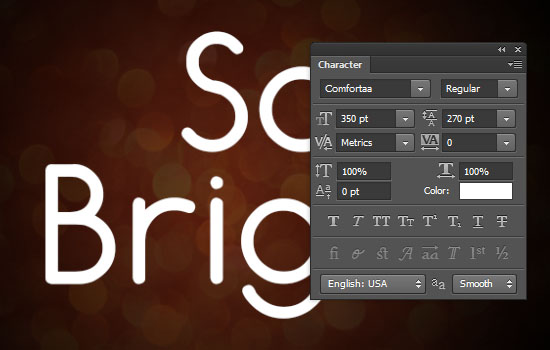
Create the text in white using the font Comfortaa-Regular. The font Size is 350 pt, and if you are creating more than one line of text, change the Leading value to something between 270 and 300 pt.
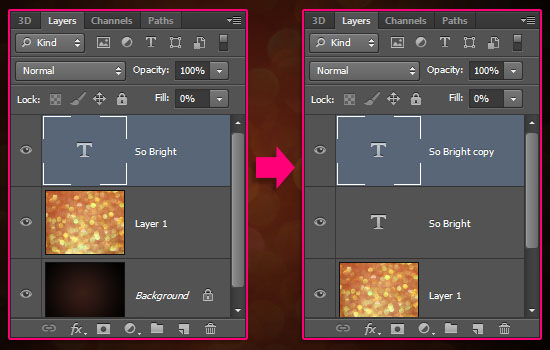
Change the text layer’s Fill value to 0, then duplicate it.
Step 3
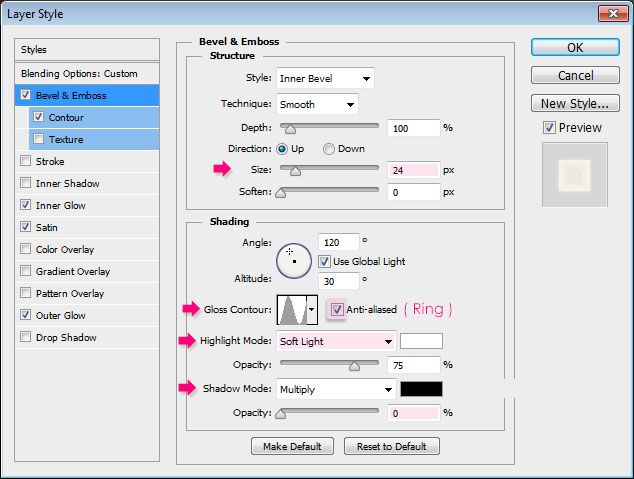
Double click the original text layer to apply the following Layer Style:
– Bevel and Emboss
- Size : 24
- Gloss Contour : Ring
- Check the Anti-aliased box
- Highlight Mode : Soft Light
- Shadow Mode – Opacity : 0%
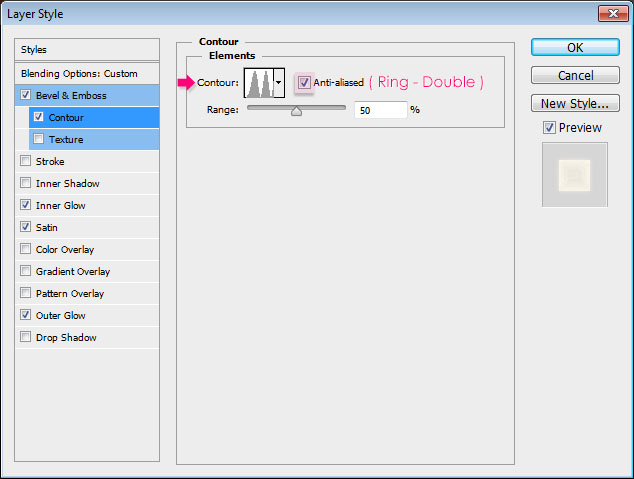
– Contour
- Contour : Ring – Double
- Check the Anti-aliased box.
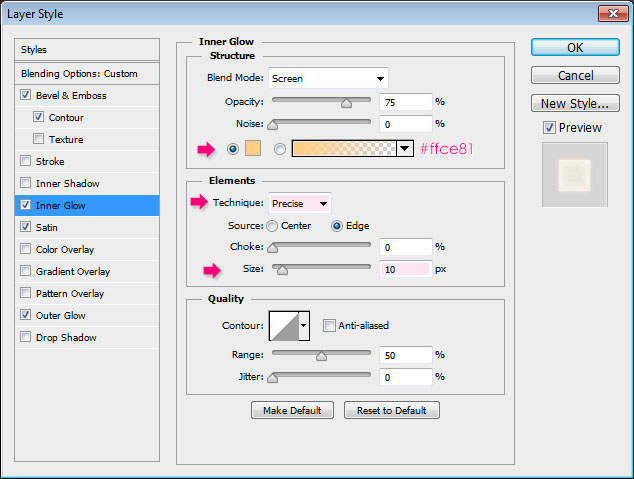
– Inner Glow
- Color :
#ffce81 - Technique : Precise
- Size : 10
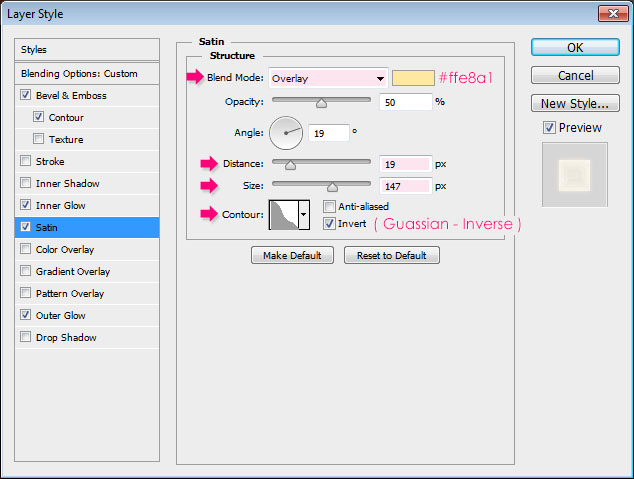
– Satin
- Blend Mode : Overlay
- Color :
#ffe8a1 - Distance : 19
- Size : 147
- Contour : Guassian – Inverse
– Outer Glow
- Color :
#ffbc81 - Range : 100%

This will create the first part of the semi-transparent rope.

Step 4
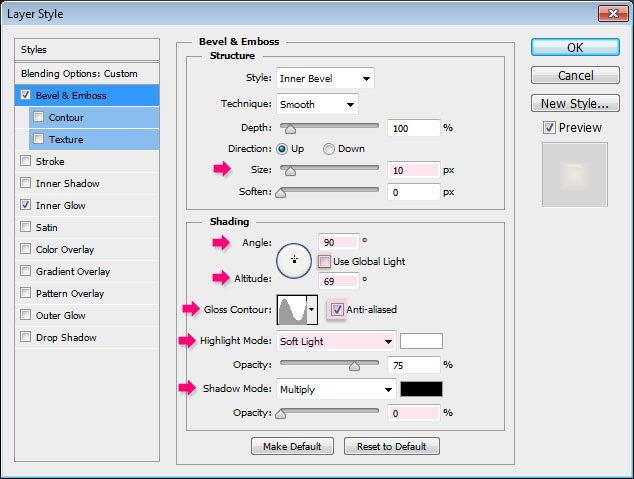
Double click the copy text layer to apply the following Layer Style:
– Bevel and Emboss
- Size : 10
- Uncheck the Use Global Light box
- Angle : 90
- Altitude : 69
- Gloss Contour : Use the one shown below from the 25 Contours pack
- Highlight Mode : Soft Light
- Shadow Mode – Opacity : 0%
– Inner Glow
- Color :
#e2b452 - Technique : Precise
- Source : Center
- Size : 54
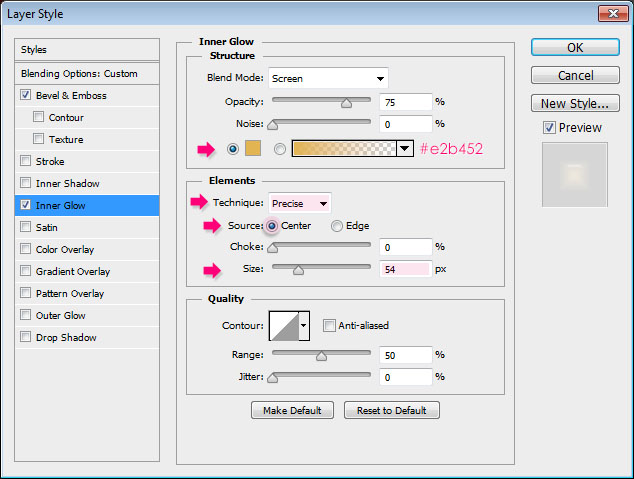
This will create the second part of the rope, adding more gloss and shine details.

Step 5
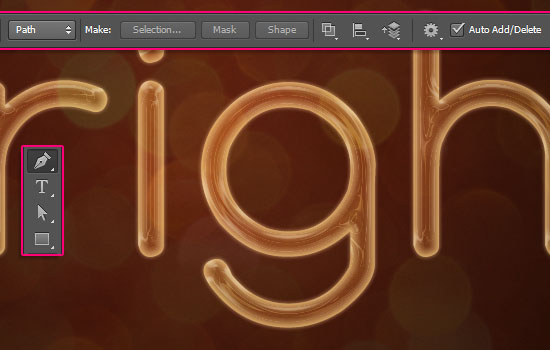
This is the ‘kinda’ difficult part, where we are going to use the Pen Tool to create a work path inside each one of the letters. So here are a couple of notes and tips for using the Pen Tool.
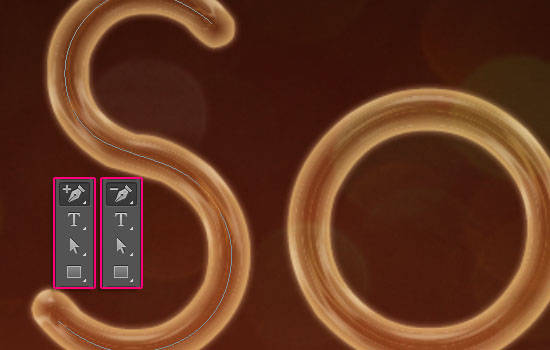
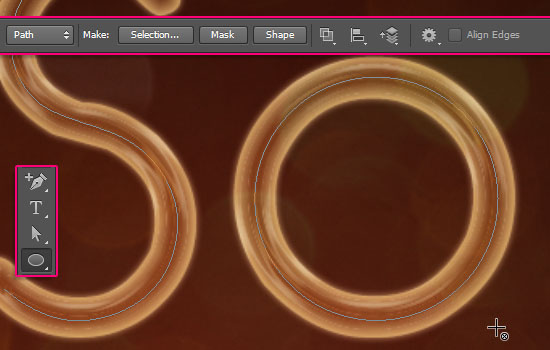
First off, select the Pen Tool, then choose Path in the Options bar at the top, and make sure that the Auto Add/Delete box is checked.
To add anchor points, you need to click once. No path will be created until the mouse button is clicked again.
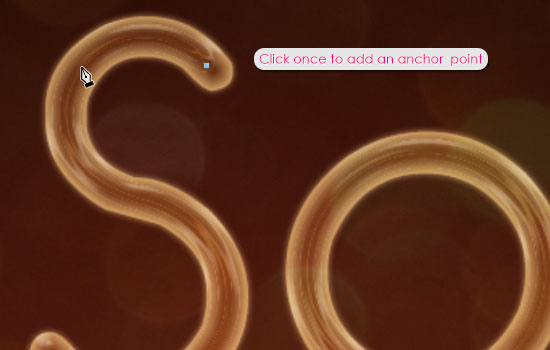
If you check the Rubber Band box in the Options bar, you can see how the path will look like before you click to add an anchor point. So if you find this helpful, go ahead and check that option, cause we’re going to be adding many paths!
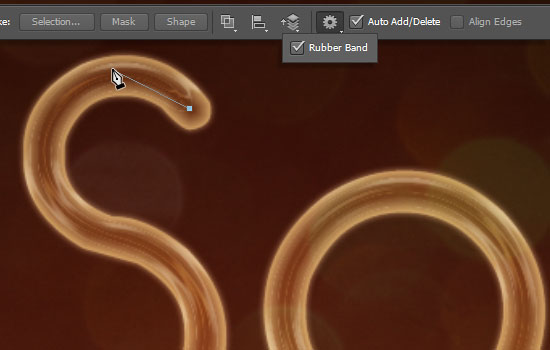
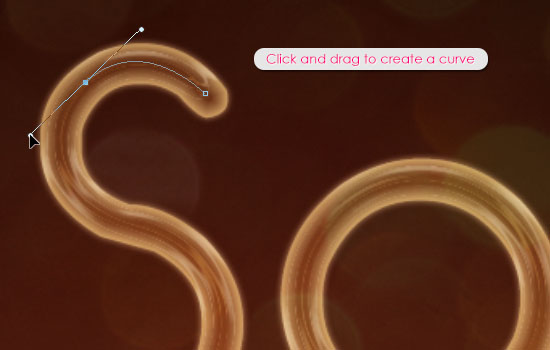
Clicking right away to add anchor points creates a straight line path. To create curves instead, you need to click and drag when you add the anchor point.
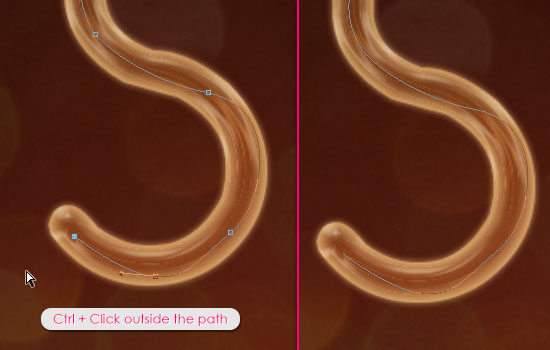
When you create the path, and you are ready to create a new separate one, press and hold the Ctrl/Cmd key, then click anywhere outside the path, then release the Ctrl/Cmd key. This will keep whatever path(s) you have, and enable you to add new ones separately.
Use this whenever you’re done with a letter’s path and ready to create another’s.
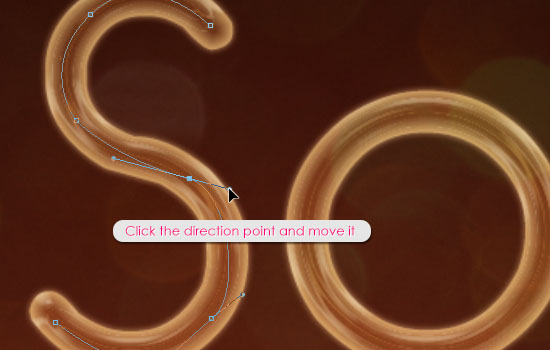
Don’t waste so much time in perfecting the path, because once the basic shape is created, you can use the Direct Selection Tool to modify your anchor points.
Click the path first to show the anchor points, then, whenever you click any of those points, you can move it around.
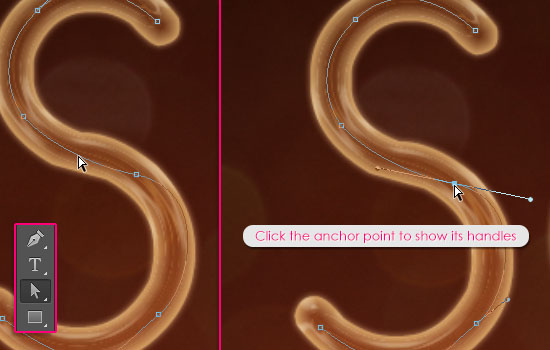
Once the anchor point is selected, you can see the two little handles (direction lines) that control it. Click the point at the end of the handle and move it slightly to the sides if you want to change the direction (or the orientation) of the path, and move it out and in to make the curve wider or narrower.
You can also use the Add Anchor Point Tool and the Delete Anchor Point Tool to add or remove anchor points along the path(s). Take your time with creating the paths, this is an important step to get a good result.
Step 6
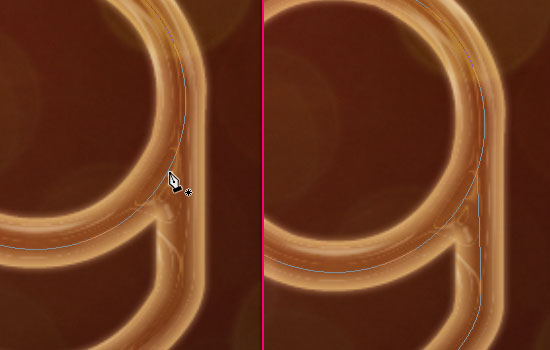
You can as well use the Ellipse Tool, choosing Path in the Options bar, to create the round parts, as it’s easier, faster, and more accurate. To get a perfect circle, press and hold the Shift key while creating the circle.
You can create the round part of the letter then use the Pen Tool again to continue the rest.
Step 7
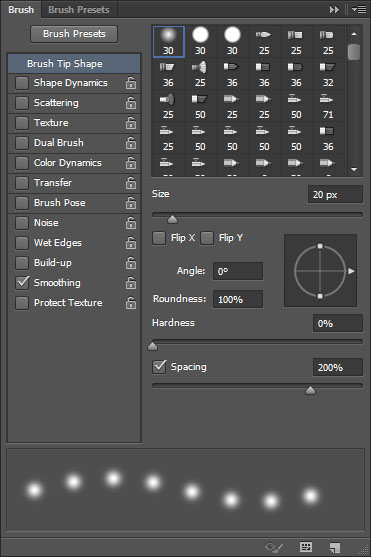
Once the paths are all ready, pick a 20 px soft round brush.
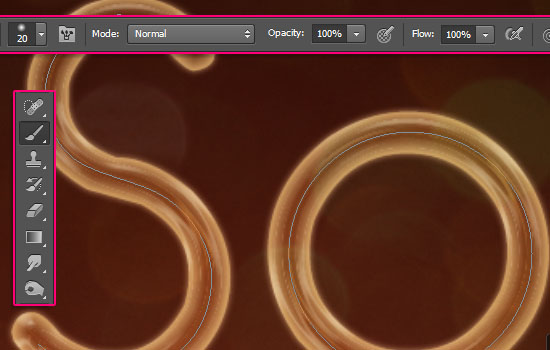
In the Brush panel (Window > Brush), set the Spacing to 200%. Smaller values create closer dots.
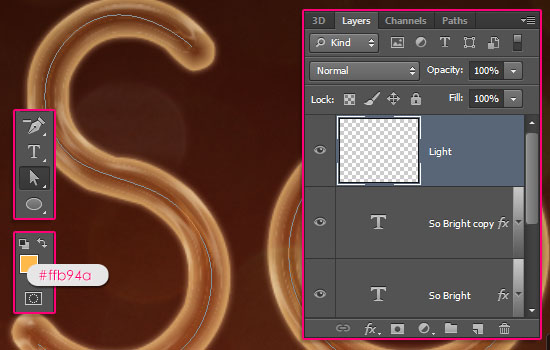
Set the Foreground color to #ffb94a, create a new layer on top of all of layers, call it Light, and pick the Direct Selection Tool. Make sure no path or anchor points are selected by clicking anywhere outside all the paths.
Right click any work path then choose Stroke Path.
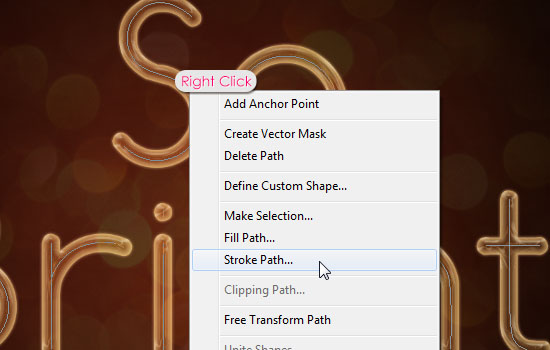
Choose Brush from the Tool drop down menu and make sure that the Simulate Pressure box is un-checked.
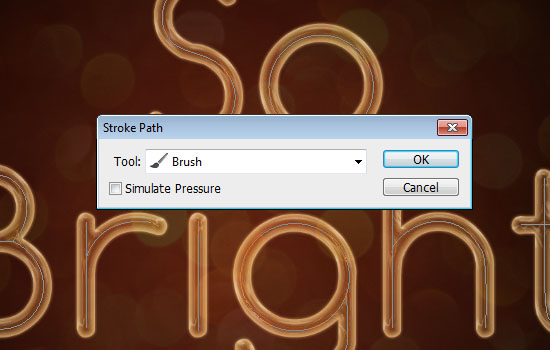
This will stroke the path with the dots brush. Hit Enter/Return to get rid of the path.

Step 8
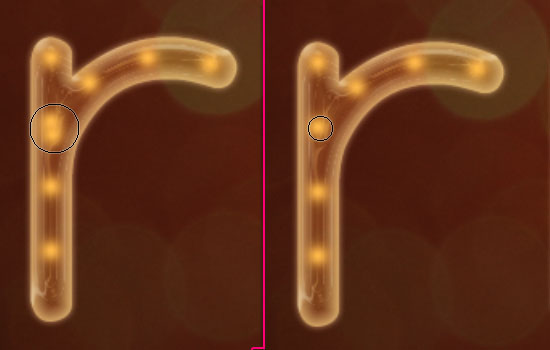
Pick the Eraser Tool. Choose a soft round brush with a Size of 30 or 40 px. Erase any overlapping or unwanted dots.
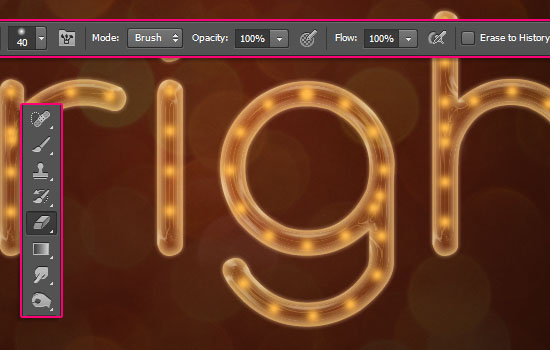
You can then use the Brush Tool to fill in the empty spaces with more dots.
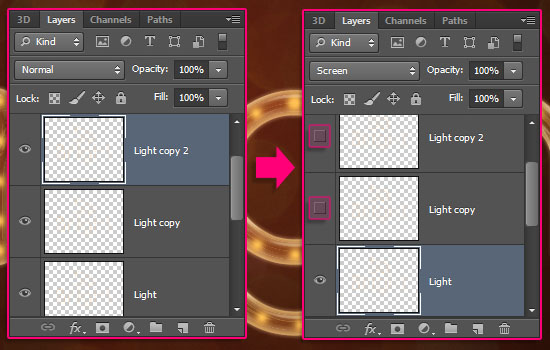
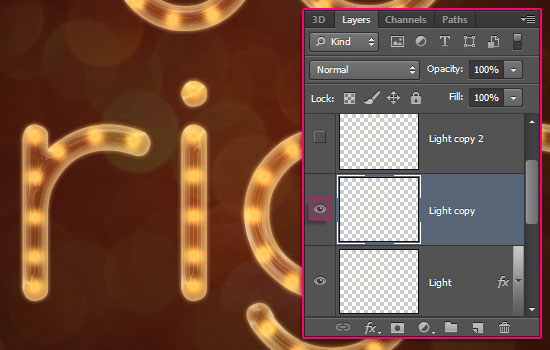
When done, place the Light layer between the two text layers.
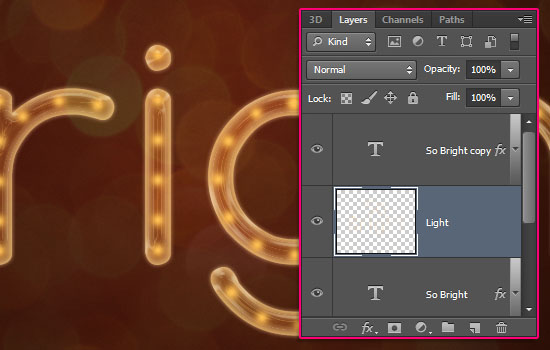
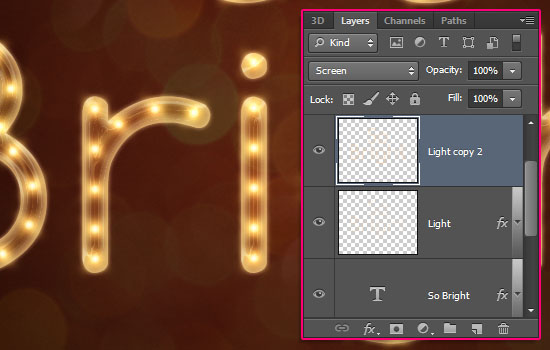
Duplicate the Light layer twice to create two copies, then make those copies invisible by clicking the eye icon next to each one of them.
Step 9
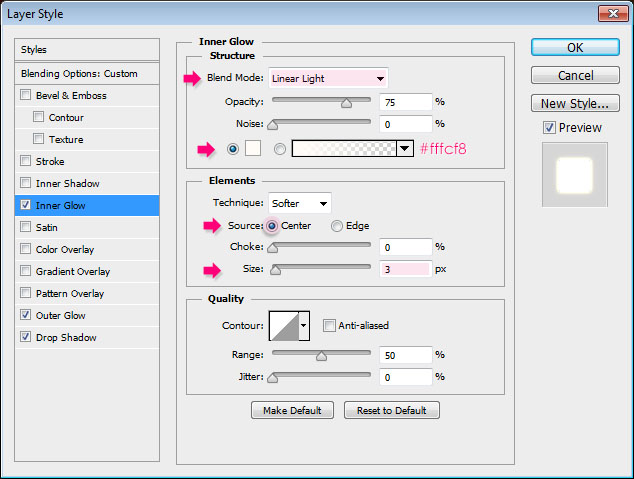
Double click the original Light layer to apply the following Layer Style:
– Inner Glow
- Blend Mode : Linear Light
- Color :
#fffcf8 - Source : Center
- Size : 0
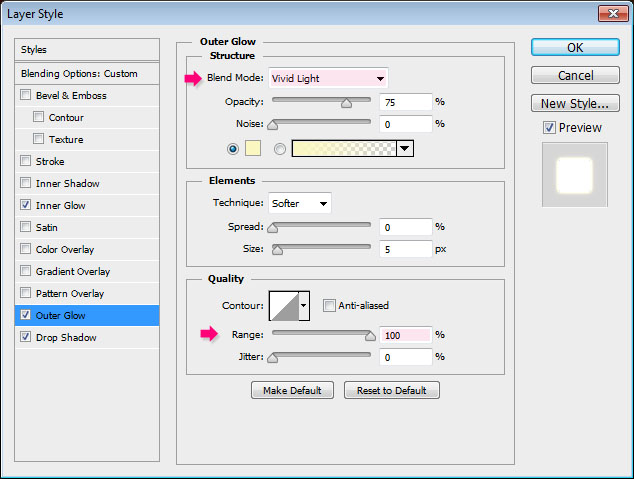
– Outer Glow
- Blend Mode : Vivid Light
- Range : 100%
– Drop Shadow
- Blend Mode : Overlay
- Color :
#ffe8a3 - Distance : 0
- Size : 10
This way we can use the Drop Shadow to intensify the glow effect even more.
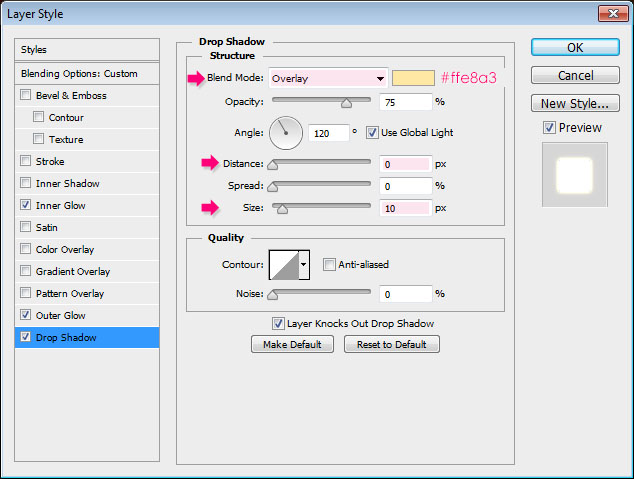
This will add beautiful glow to the light dots.

Step 10
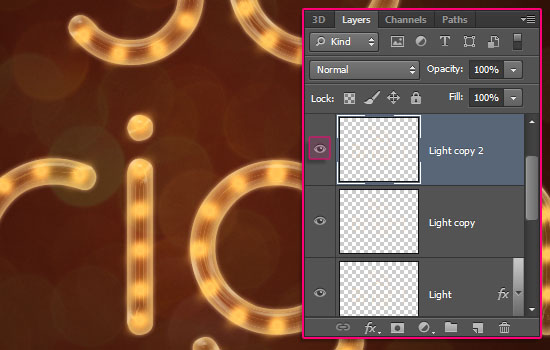
Select the first Light copy layer, and make it visible by clicking the empty square next to it.
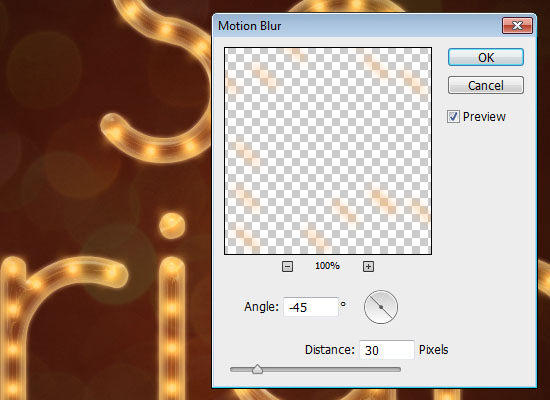
Go to Filter > Blur > Motion Blur, set the Angle to 45, and the Distance to 30.

Select the second Light copy layer, and make it visible as well.
Go to Filter > Blur > Motion Blur, set the Angle to -45, and the Distance to 30.
Select both copy Light layers (select one, then Ctrl/Cmd + click the other), and go to Layer > Merge Layers to merge them in one layer.
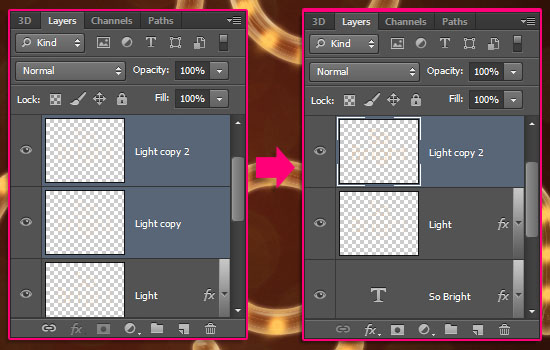
Change the merged layer’s Blend Mode to Screen.
Step 11
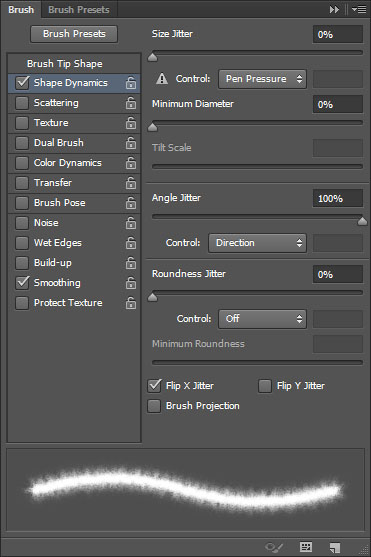
No glowing effect is complete without sparkles! So create a new layer on top of all layers and call it Sparkles, then change its Blend Mode to Overlay, and set the Foreground color to #fffdef.
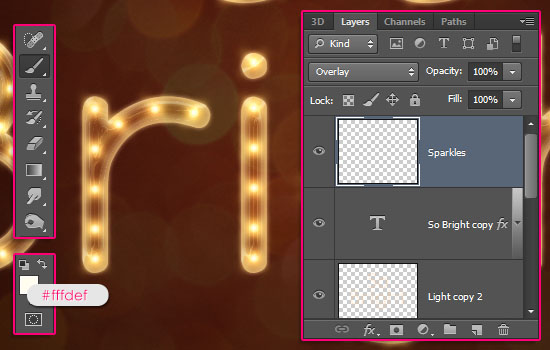
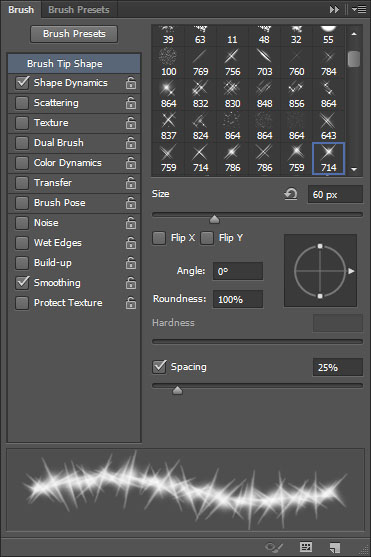
Choose one of the Sparklies Photoshop Brushes then open the Brush panel to modify its Settings.
Brush Tip Shape
Shape Dynamics
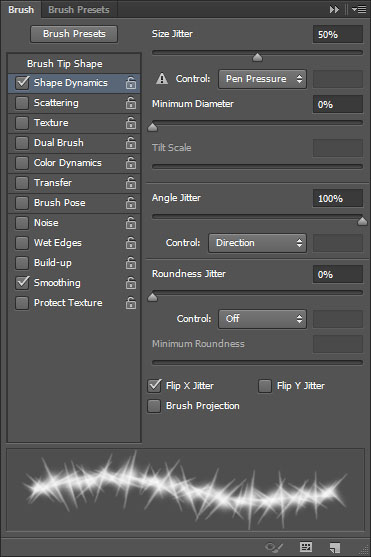
These Settings will help create sparkles with different sizes and angles with every click (add variation).
Add some sparkles over a couple of the light dots. Just a couple.

Place the Orange Galaxy Texture image on top of all layers, resize it, then change its layer’s Blend Mode to Lighten and its Opacity to 20%.
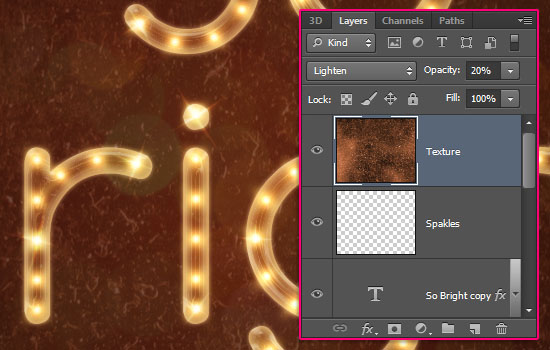
Go to Image > Adjustments > Levels, and change the Shadows value to 30 to darken the image a bit.

Step 12
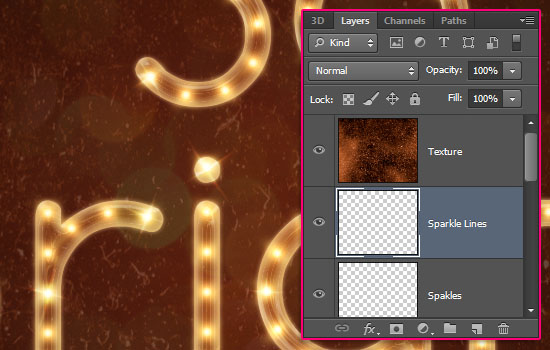
This step is optional, but it makes the final effect more fancy and fun. Create a new layer right on top of the Sparkles layer and call it Sparkle Lines.
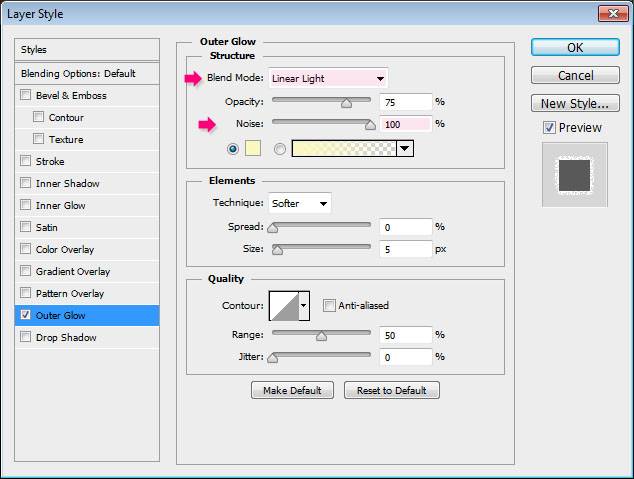
Double click the Sparkle Lines layer to apply an Outer Glow effect:
- Blend Mode : Linear Light
- Noise : 100%
The noise will make the glow look frizzy.
Set the Foreground color to #fffdef, and pick a soft round 1 px brush.
Then, use the Pen Tool to draw some random paths over the letters. Keep those paths close to the letters so they are not all over the place.
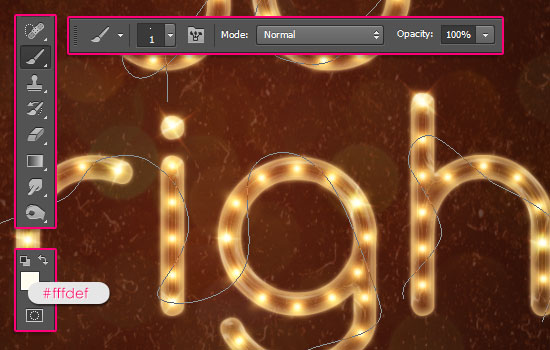
Stroke the paths just like you did before. Hit Enter/Return to get rid of the paths afterwards.
Step 13
Ctrl/Cmd + click a text layer’s thumbnail to create a selection.
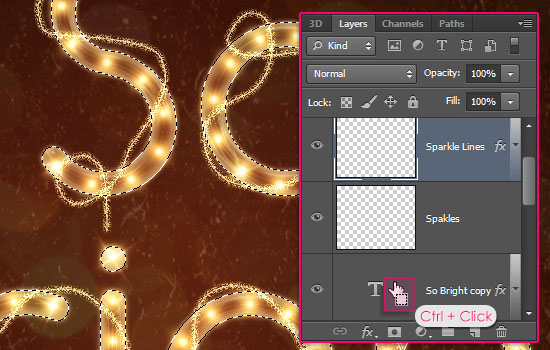
Pick the Eraser Tool, and set the Opacity value in the Options bar to 85%. Then, start erasing the parts that are supposed to be behind the light rope.
Oh, and don’t forget to set the Eraser Tool‘s Opacity back to 100% when you’re done 🙂
The 85% opacity will not erase the line completely, as the light rope is not supposed to be opaque. So it’s important to not go over the same line twice. You can undo and re-erase, but don’t erase the same area more than once.
You can use the brush to add any missing parts again.

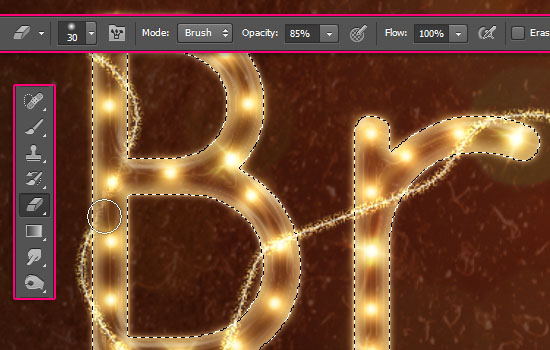
Pick the Star 42 pixels brush tip and modify its Settings in the Brush panel as below:
Brush Tip Shape
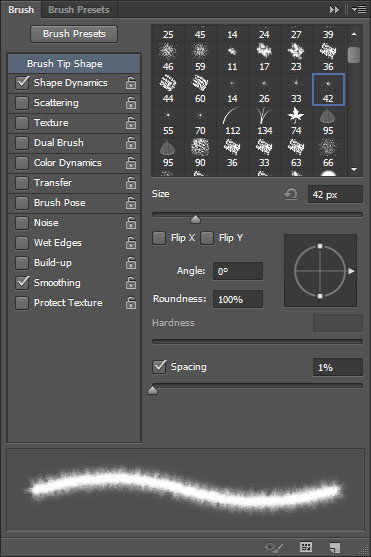
Shape Dynamics
Click once to add the brush to the sparkling lines tips (ends).
And that’s it!
Hope you enjoyed the tutorial and found it useful.
Did you enjoy this post? Please consider donating to help us cover our server costs.


amazing
really useful
Glad you found it so.
Thanks a lot for the comment.
Awesome….cant wait to try this tutorial…Your tutorials are very easy to follow. Thx…
That’s great to know!
Thank you very much for the amazing comment.
I really like this and would love to be able to make something like this in Photoshop CS5.1 but I´m having so much trouble downloading the 25 Contours by jen-ni 🙁 it´s a .rar file and I have to have it as a .shc for me to be able to use them, is there any way I can change the .rar to .shc???
Thank you for this awesome tutorial and I´m looking forward for you´r answer and/or help
Tora
If you extract the .rar file (right click the .rar file -> Extract here), you’ll get the .shc file. You need to have an archiving program such as winrar or winzip to extract the compressed files with the .rar or .zip extensions.
Hope this helps. Please feel free to add a reply if the problem still exists.
Thank you for the kind words 🙂
You are so kind 🙂 Still having trouble 🙁 I´m on a Mac and do not have winrar or winzip just the “mac-thing” LOL to unzip zipped files and I have never had trouble before. Maybe there is a way to do this. When I download I get a whit/orange “VLC-cone” and somehow I can´t unziped that
For Mac you can try UnRarX or The Unarchiver. Those are some free Mac archiving apps.
Problem is I can’t upload the .shc file as it is not mine. But I hope the linked software will solve the issue.
Please still feel free to add a reply with any updates 🙂
I tried and got nice result. I want to point out some typing mistakes. In Step 1 you loaded “loving the sparkle paper” but u wrote “Orange Galaxy Texture”. Similarly, in Step 11 you loaded “Orange Galaxy Texture” but u wrote “Loving the sparkle paper”.
In Step 3 you wrote that “Double click the original text layer to apply the following Layer Style”. In Step 4 you wrote that again “Double click the original text layer to apply the following Layer Style” instead of double click on text copy layer.
Hope u ll correct these typing mistakes. 😀
Fixed now!
Thank you very much for pointing them out and for the comment 🙂
Hey guys , nice Tutorial. It would be nice if you can add up there the time that takes to make the style , thank you for awesome tuts!!
We’ll definitely take adding the time into consideration. But for this one, it might take an hour to two hours, just because you need to create paths and this might be a bit time consuming.
Hope this helps.
Thank you very much for the kind comment and for the suggestion.
Wow! Great post. Very easy step by step explain. Thanks for share this nice post.
Glad you found it easy to follow.
Thanks a lot for the kind words.
Thanks so much for this tutorial! I was able to do my own rendition of it and use for our company’s intranet for the holidays.
That’s awesome! Hope they liked it 🙂
Thanks a lot for the comment.
Took me a while but got there in the end. 🙂 Also, for those who don’t like paths or aren’t really familiar with the pen tool, you could use the brush to draw the dots (admittedly, they probably won’t be evenly spaced but could save time). Same with the “tinsel” around the letters at the end. I do know how to use the pen tool but found it easier to draw it using the brush. Still a great tutorial. Thanks for going to the trouble to write it and post it 😀
Glad you did 🙂
You can certainly draw them using the brush tool, but I find that paths give a more accurate result, even though it might be a bit more time consuming. But whatever you prefer.
Thank you very much for the comment and the tip 😀
Wow, wonderful tutorial Thanks for shearing with us. It is really useful for me.
Very glad to know that!
Thank you very much for the comment.
Thank you for posting this awesome tutorial, it is amazing how realistic that rope light looks!
Very glad you like it!
Thanks a lot for the awesome comment 🙂
Wow.. wow… Just Wow..
Most amazing…
I feel proud to visit this Amazing site..
Thanks a lots to such a nice tuts…
Thanks to All of your team…
Nothing can express how much your words mean!
That is really one special comment.
Thank you very much for all the support, it really means a lot.
In my Photoshop C3 the 350pt or 270pt caracter seems too much great for the imagine. Where am I wrong?
Are you using the same document dimensions mentioned in the tutorial? Is the text you are working on longer? If so, you’ll need to increase the dimensions of the document until the text fits.
Also, please go to Image -> Image Size, and check that the Resolution is set to 72. If not, create a new document with that resolution.
Hope this helps.
If the problem still exists, please feel free to leave another reply with any more details.
The error was really in the resolution. Excuse if I will ask stupid questions, but despite mine over 60 years, am learning now thanks to your tutorials and I amuse a lot! I have now taken back the job, I hope that everything is all right. Thanks!
Questions are never stupid if they help you learn something new 😉 Glad the problem was solved.
Really happy to know that you’re enjoying the tutorials and finding them helpful.
Thank you very much for the kind comment 🙂
I could not get the brightness in step 9
Apply the style shown and simply not shine like yours
This is my image after applying the style to shine
http://img32.imageshack.us/img32/9135/12b.JPG
You seem to be using a different font. This might be the cause of the problem, because if you’re using a different font or font size, you might need to modify the Layer Style values for the font/font size you’re using.
Also, did you change the Inner Glow Source to Center? If you did, you can play around with the Glow effects’ Size values and see if you can get any brightness at all.
Please feel free to add a comment with any updates if the problem still exists.
thats really great design. I see that and look professional. are you will post with video format later? this is my blog Kamera Top, Hp Kamera Bagus
Why I didn’t find this wonderful tutorial before! Thanks a lot for this.
I am really glad and so much happy to find this website also. Actually this full with gold 🙂
Very glad you’re enjoying the tutorials.
Many thanks for the wonderful comment 🙂
Hello Rose! Thanks for your reply also!
Actually I am looking for “Raster To Vector Conversation” Tutorials (Character Design). Can you help me on this?
I’d really like to help, but unfortunately, I’m not that familiar with the subject. I’m sure you can get different results if you google a couple of related keywords though, so hopefully that helps 🙂
Thank you so much!!!! Your tutorial and this effect are perfect!
Very glad you like it!
Thank you very much for the kind comment 🙂
Hi Rose….thank you once again…as always beautiful tut…xoxox
Very nice!
Thanks a lot for the comment and for sharing your work 🙂
thanks for share good tutorial.