
Sparkling Glass-Textured Text Effect
Photoshop’s Filters can be used to create nice textures easily and quickly. This tutorial will show you how to create a simple glass texture, then use it with a couple of Layer Styles to create a sparkling shiny text effect.
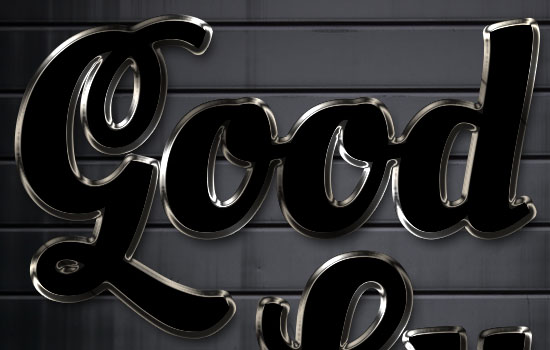
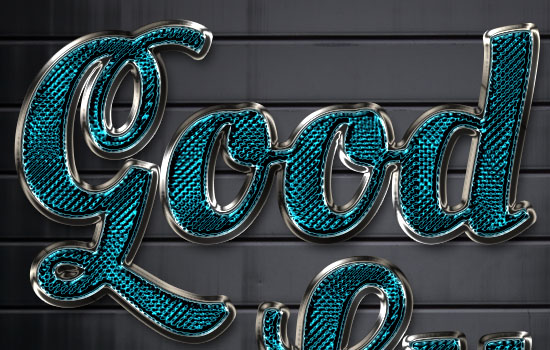
The Final Result

Tutorial Details
- Software Used: Photoshop
- Version: CC (CS3+ versions can be used as well)
- Time: 0:30 – 0:45 Hours
Resources
- Oleo Script font.
- Metal Rollgate by Limited-Vision-Stock.
- gradient-shapes for Photoshop by ilnanny (Load the CHROMES.grd file).
Step 1
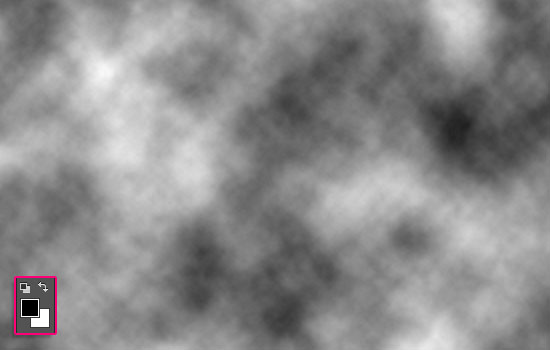
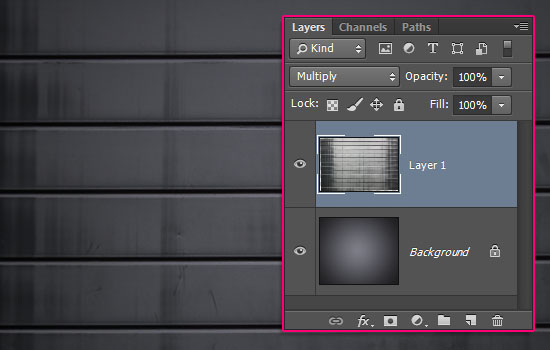
Create a new 1000 x 837 px document, and set the Resolution value to 200. Create a new layer on top of the Background layer, set the Foreground and Background colors to Black and White, then go to Filter > Render > Clouds.
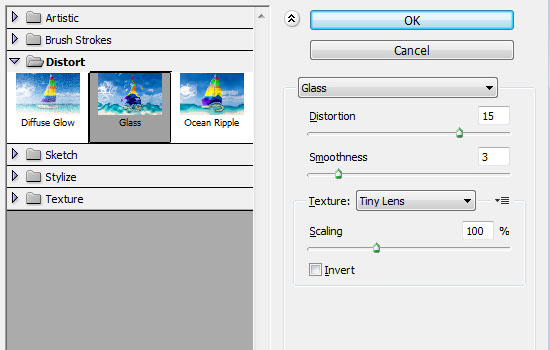
Go to Filter > (Filter Gallery) > Distort > Glass, and use the values below:
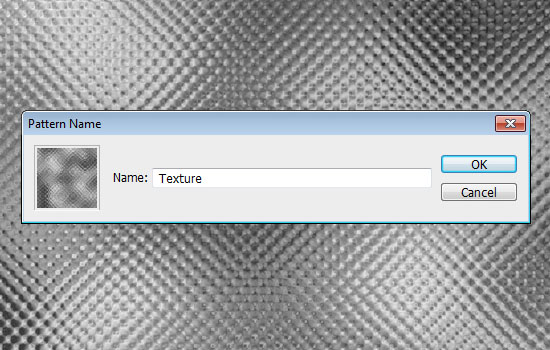
This will create the texture. Go to Edit > Define Pattern, and type in a name for the texture pattern. You can then delete the layer, or just make it invisible if you want to keep it.
Step 2
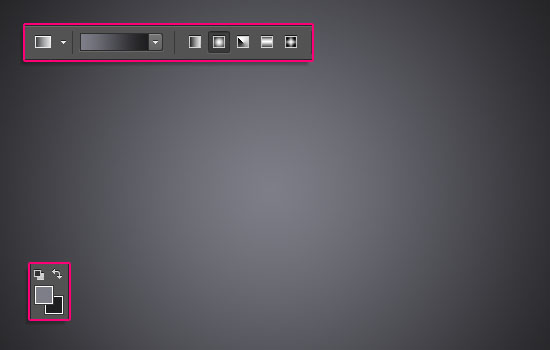
Set the Foreground color to #7e7e88 and the Background color to #1e1e20. Pick the Gradient Tool, choose the Foreground to Background gradient fill, and click the Radial Gradient icon.
Then, click and drag from the center of the document to one of the corners to create the background gradient.
Place the Metal Rollgate texture on top of the Background layer, and change its layer’s Blend Mode to Multiply.
Step 3
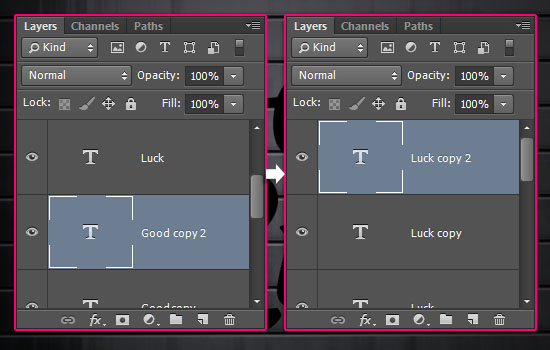
Create the text in Black. If you’re creating more than one line of text, make sure to place each one in a separate layer.
The font used is Oleo Script, and the Size is 100pt.

Create two copies of each text layer you have.
Step 4
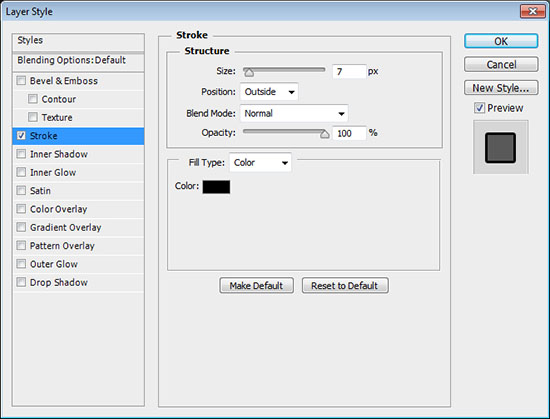
Double click the first original text layer to apply a Stroke effect.
- Size :7
- Color :
#000000
You’ll then need to apply the same Layer Style to the other original text layers you have.
So right click the styled layer, choose Copy Layer Style, then select all the other layers you want to apply the Layer Style to, right click one of them, and choose Paste Layer Style.
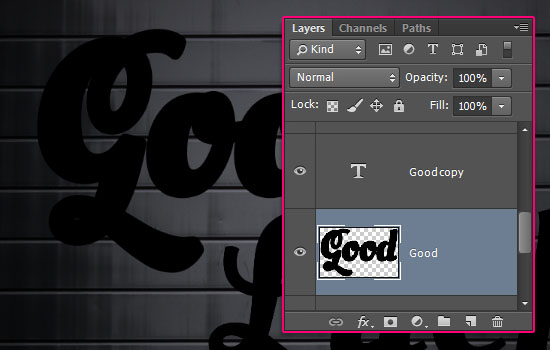
Then, for all the original text layers, select them and go to Layer > Rasterize > Layer Style.
If you’re using < CS6 versions, you’ll need to group each of those layer (Layer > Group Layers), then merge the group (Layer > Merge Group).
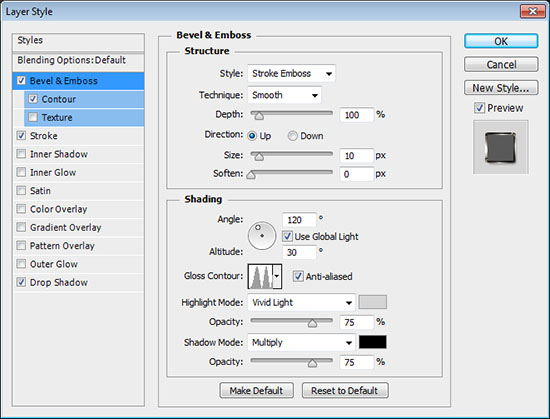
Step 5
Double click the first copy text layer to apply the following Layer Style:
– Bevel and Emboss
- Style :Stroke Emboss
- Size :10
- Gloss Contour :Ring – Double
- Check the Anti-aliased box
- Highlight Mode :Vivid Light
- Color :
#d5d5d5
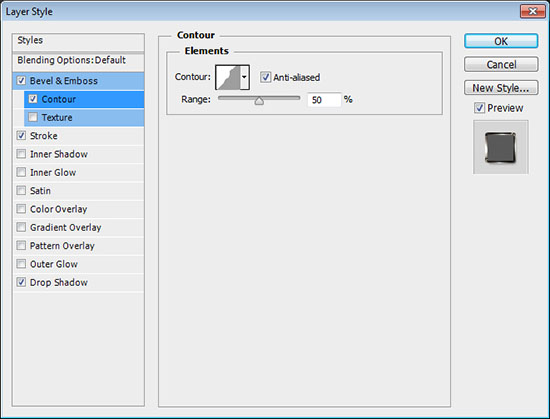
– Contour
- Contour :Notched Slope
- Check the Anti-aliased box.
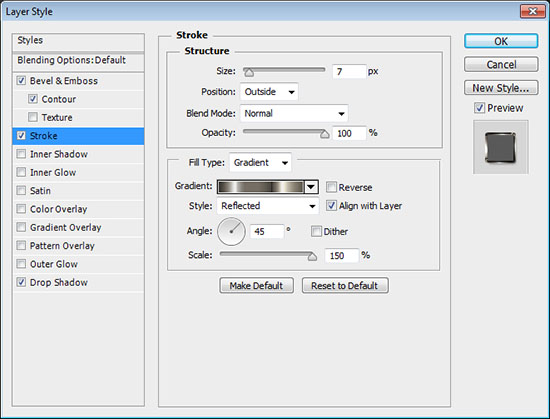
– Stroke
- Size :7
- Fill Type : Gradient
- Style :Reflected
- Angle :45
- Scale :150%
- Use the stove pipe 60 gradient.
– Drop Shadow
- Distance :10
- Spread :10
- Size :15
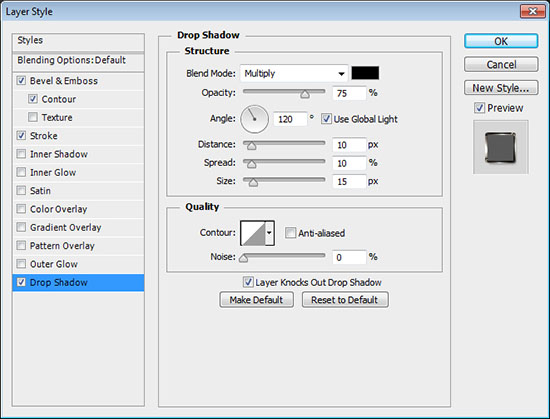
This will create the shiny stroke. Don’t forget to apply the Layer Style to the other first copy text layers you have.
Step 6
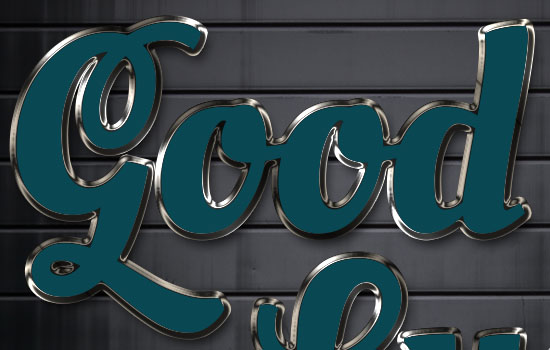
Change the second copy text layers’ color to any color of your choice. Just make sure it’s a slightly dark one, and keep in mind that you can go back and change the color after applying the Layer Style as well.
The color used here is #0a4752.
Double click the second copy text layer to apply the following Layer style:
– Bevel and Emboss
- Size :7
- Gloss Contour :Ring
- Check the Anti-aliased box
- Highlight Mode :Vivid Light
- Shadow Mode :Color Burn
- Color :
#595959
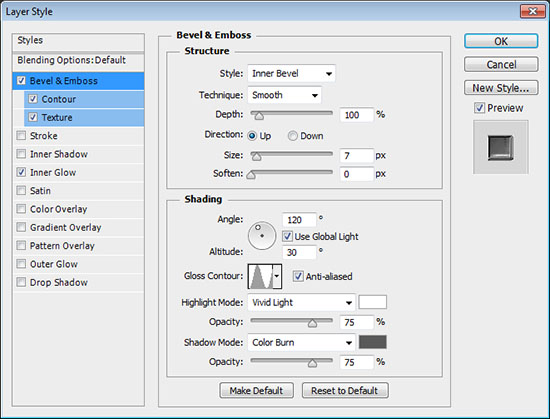
– Contour
- Contour :Cone – Inverted
- Check the Anti-aliased box.

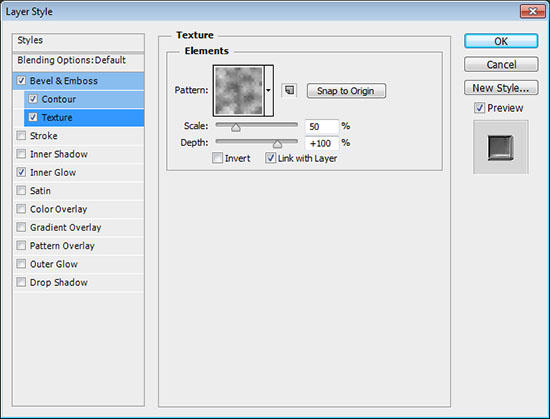
– Texture
- Pattern :Use the pattern you defined at the beginning of this tutorial.
- Scale :50% – But you can choose any other value you like as well.
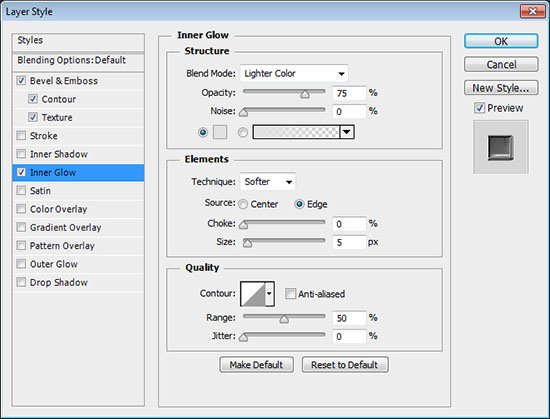
– Inner Glow
- Blend Mode :Lighter Color
- Color :#e1e1e1
This will style the main text. Apply the same Layer Style to the other second copy text layers you have.
Step 7
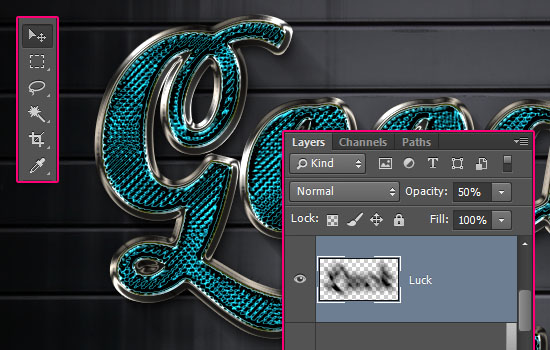
Select the original rasterized text layer, then go to Filter > Blur > Motion Blur, change the Angle to -50 and the Distance to 90. Repeat for the other similar layers.
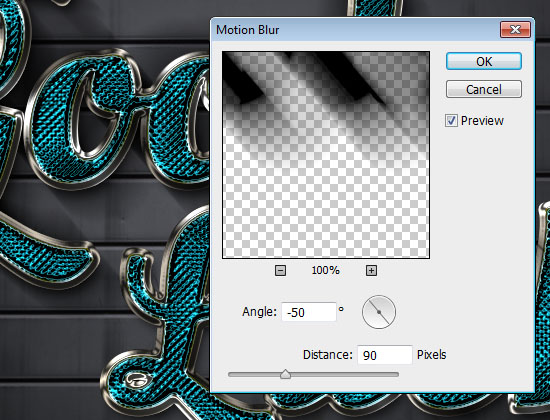
Next, change the blurred layers’ Opacity to 50%, and with the Move Tool selected, you can click and drag to move the blurred part, or use the Arrow Keys to do so, so that the shadows start from the letters’ edges, and extend to the bottom right.
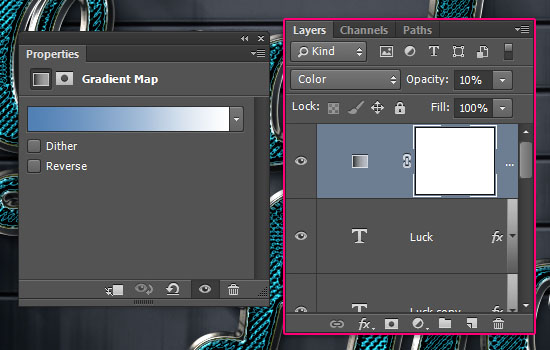
Once you’re done, click the Create new fill or adjustment layer icon down the Layers panel and choose Gradient Map.
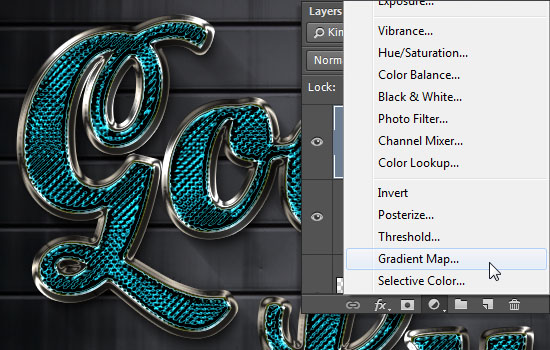
Make sure that the adjustment layer is on top of all layers, then change its Blend Mode to Color and its Opacity to 10. Use the colors #507fb4 to the left and #ffffff to the right to create the gradient. This will add a very subtle color adjustment to the final result.
And you’re done!
Super easy, and hopefully helpful 🙂
Did you enjoy this post? Please consider donating to help us cover our server costs.


Awesome as always!
Congrats!
Glad you like it!
Thank you very much 🙂
The font used is listed in the Resources section for free download.
What kind of other font are you looking for please? This is one of the effects that can work well on many different fonts, but bolder fonts look definitely better.
Please feel free to add in more details.
Thanks a lot for the comment.
You’re very welcome 🙂
Thanks for the comment.
i can’t find in Step#5 Stroke.. plx Tell How to do That 🙂
Use the stove pipe 60 gradient.
Please check the last item in the Resources section. The gradient is in the mentioned grd file.
Hope this helps.
How do we get the notched slope contour? I couldn’t find it in my photoshop.
Please check this link to load the contours.
Hope this helps 🙂
Awesome as always!
Congrats!
Thank you very much for the kind comment 🙂
im currrently using cs6 and starting out fresh in photoshop but im stuck on Step 6 how do i change the color?!
You can open the Character panel (Window > Character), and click the color box there to change the text color.
Hope this helps 🙂
This did not work
Why not, please?