
3D Ribbon Wrapped Text Effect
This tutorial will explain how to use the Opacity texture map to create a ribbon-wrapped 3D text effect in Photoshop CS5 environment. Then, it will explain how to create the confetti brush and its layer Layer Style.
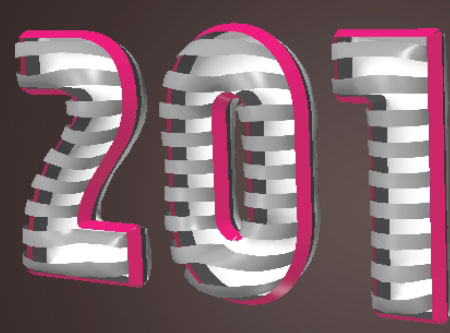
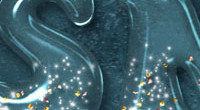
The Final Result

Tutorial Details
- Software Used : Photoshop
- Version : CS5 Extended
- Time : 1:00 – 1:45
Resources
- Familian font.
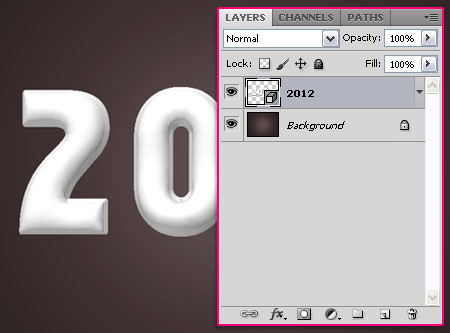
To all textuts‘ readers, followers, subscribers, and fans. Thank you for making 2011 an amazing year with all your support.
Hope 2012 will be an awesome year for each and every one of you.
Don’t forget to send me any notes, suggestions or ideas through the contact form.
Best regards,
Rose
.
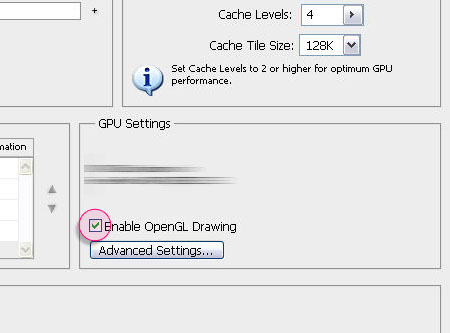
Enabling OpenGL
The Repoussé will not work unless OpenGL is enabled. So go to Edit -> Preferences -> Performance, and make sure Enable OpenGL Drawing (under GPU Settings) is checked.
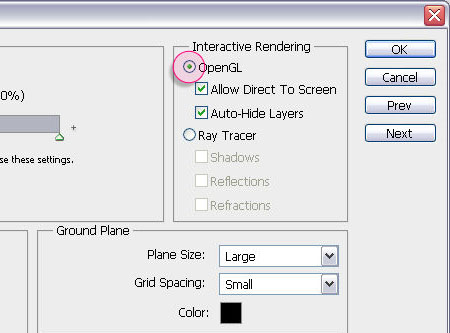
Also, go to Edit -> Preferences -> 3D, and make sure OpenGL (under Interactive Rendering) is enabled.
Step 1
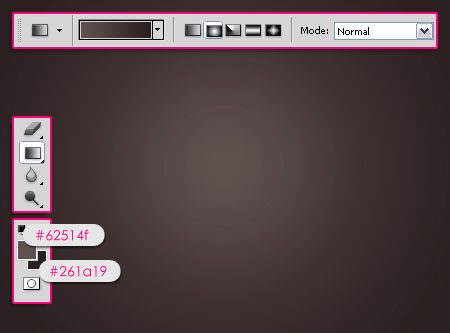
Create a new 1024 x 768 px document. Set the Foreground color to #62514f, and the Background color to #261a19, then, create a Radial Gradient from the center of the document to one of the corners.
Create the text in White. The font used in Familian, and the Size is 370 pt.

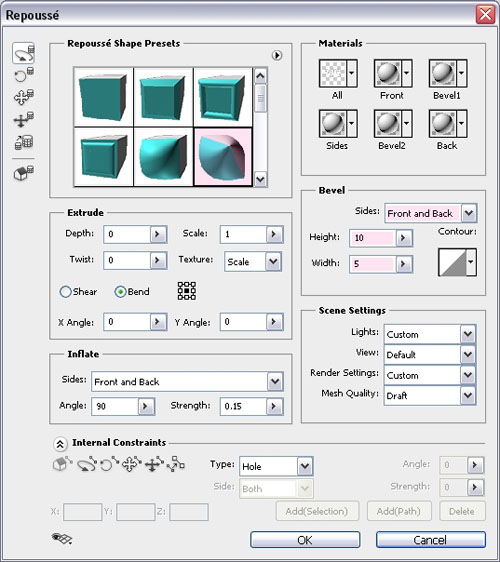
Go to 3D -> Repoussé -> Text Layer.
A dialog box will appear telling you that this will rasterize the type layer, and you will no longer be able to modify your text. So if you are sure you don’t need to modify your text, click yes and continue.
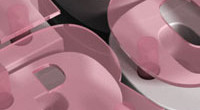
Under the Repoussé Shape Presets, choose Inflate Sides. Then, under Bevel, choose Front and Back from the Sides drop down menu, set the Height to 10 and the Width to 5.
This is what the text should look like.

Notice also how the text layer’s thumbnail changes as the text is a 3D object right now.
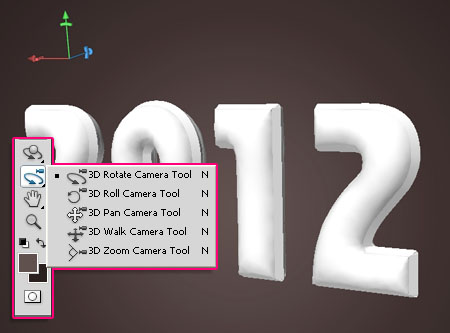
In the Toolbox, select the 3D Rotate Camera Tool, and rotate the view of the 3D scene. You can use the other 3D Camera Tools as well until you like the angle of the camera. (Remember, we are changing the camera angle, NOT the object’s position.)
You can find some tips on how to use the 3D Camera Tools here.
Step 2
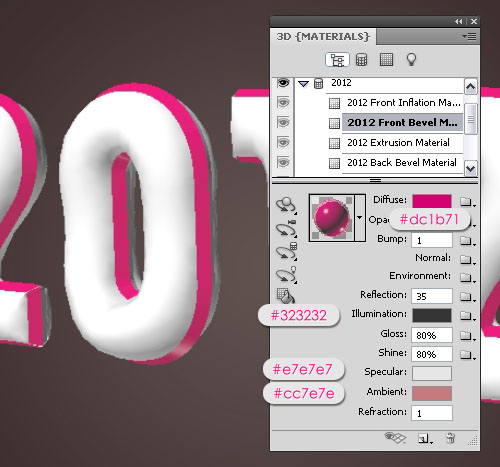
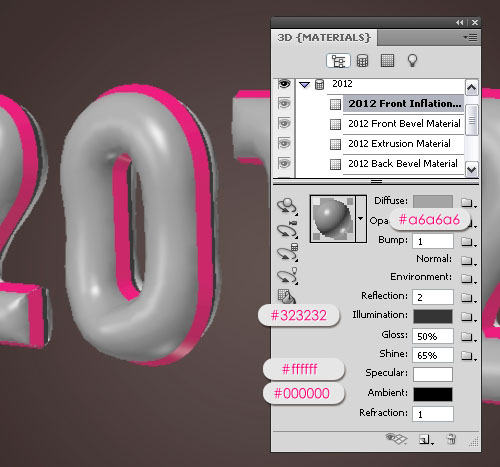
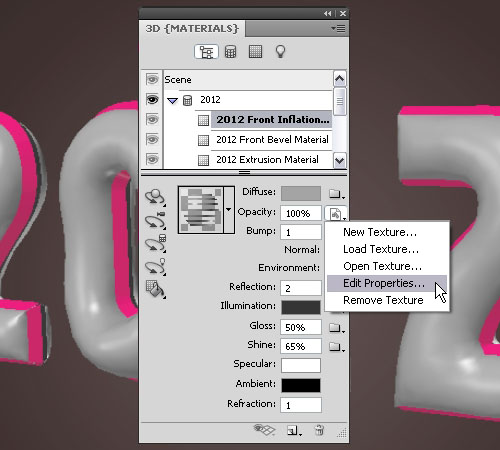
Next, we are going to modify the materials for the different sides of the 3D text. So open the 3D Panel (Window -> 3D), and expand the 3D object (click the arrow to its right) to view its different materials. Click each material name to modify its settings as shown below:
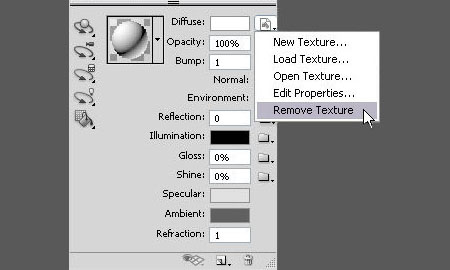
Note: You might need to Remove the Diffuse Texture for each one of the materials before assigning the new values.
Front Bevel Material: Change the Diffuse color to #dc1b71, the Reflection to 35, the Illumination color to #323232, the Gloss to 80%, the Shine to 80%, the Specular color to #e7e7e7, and the Ambient color to #cc7e7e.
Back Bevel Material: Change the Diffuse color to #3e3e3e, the Reflection to 35, the Illumination color to #323232, the Gloss to 80%, the Shine to 80%, the Specular color to #e7e7e7, and the Ambient color to #000000.

Front Inflation Material: Change the Diffuse color to #a6a6a6, the Reflection to 2, the Illumination color to #323232, the Gloss to 50%, the Shine to 65%, the Specular color to #ffffff, and the Ambient color to #000000.
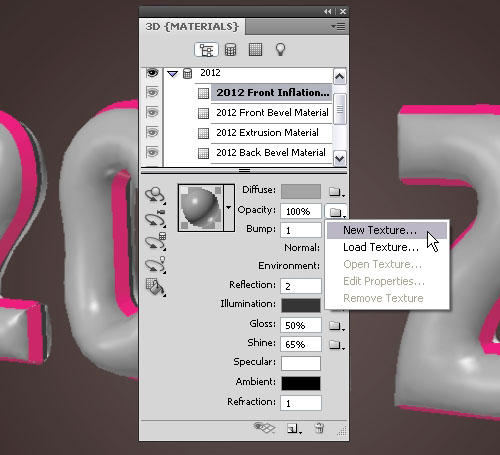
Now, we are going to create the ribbon-like texture, using an Opacity Texture. So click the folder icon next to the Opacity option, and choose New Texture.
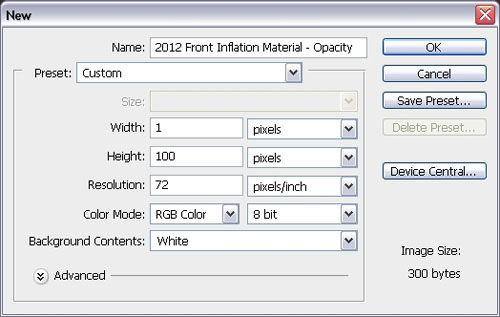
Create a new 1 x 100 px document with a White background.
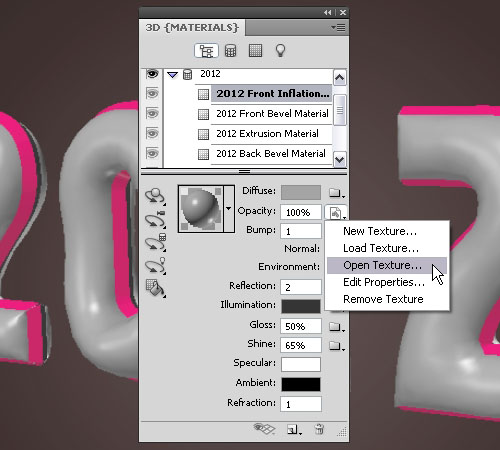
The folder icon will become a Texture Map icon, click it and choose Open Texture.
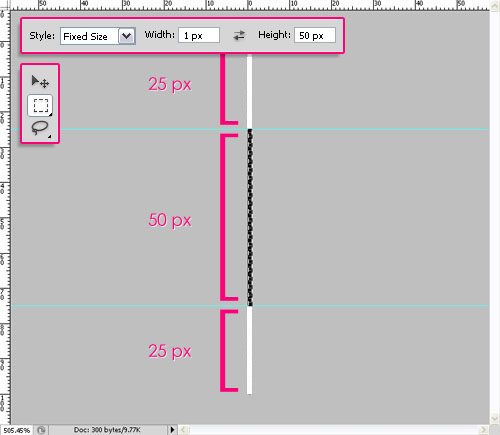
Create a 50 px (Height) selection in the middle of the document and fill it with Black. This will leave a 25 px (Height) White areas in the top and the bottom of the document.
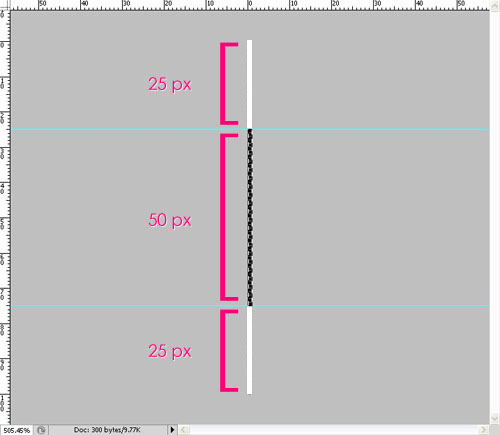
Tip: You can use a Fixed Size Rectangular Marquee Selection.
Save the changes, close the texture map file, and go back to the original document.
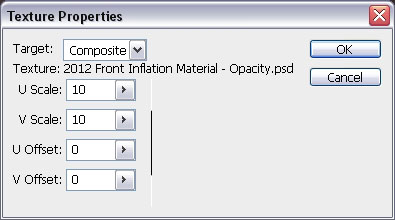
Click the texture map icon and choose Edit Properties.
Set both the U Scale and V Scale to 10.
The trick here is that the White areas will create complete opacity and the Black areas will create complete transparency.
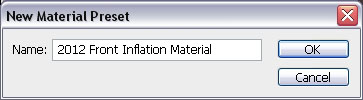
Instead of repeating all these steps, you can save the material and re-apply it with one click. To do so, expand the Material Presets box, then, from the pop-up menu icon, choose New Material.
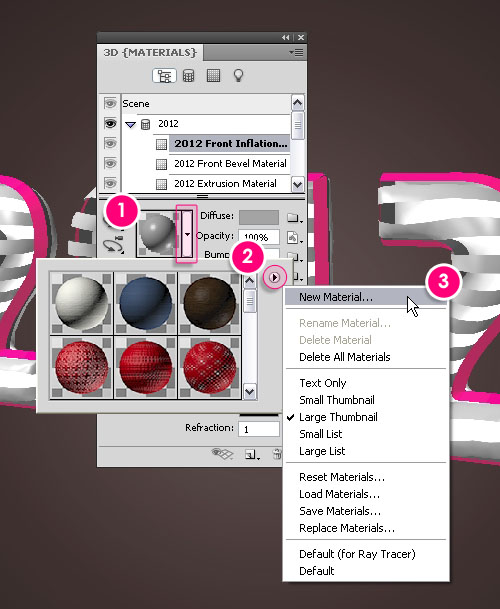
Type in a name for the material and click OK.
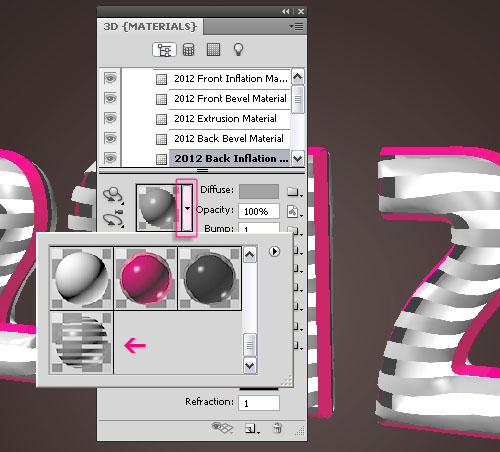
Now, when you scroll down the Material Presets box, you’ll find the new material. Choose the Back Inflation Material and click the material you just saved to apply it to the Back of the 3D text.
Step 3
In the 3D Panel, click the Create a new light icon at the bottom, then choose New Point Light.
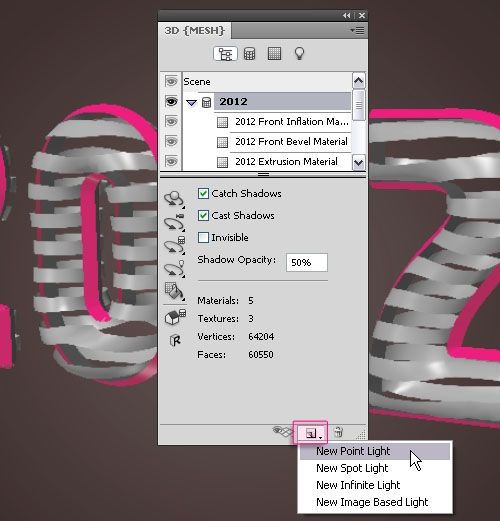
This will enhance the overall lighting of the scene.

Scroll down the Materials area to see the four lights you have and modify their settings.
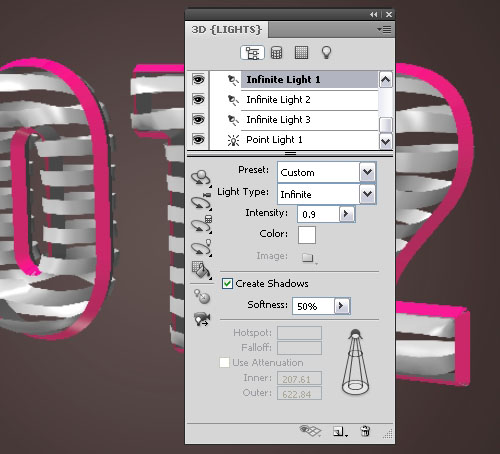
Infinite Light 1: Set the Shadow Softness to 50%.
(leaving the value at 0% will result in faster rendering, but the shadow edges will be hard. So if you have no problem with hard edges you can leave the softness at 0%.)
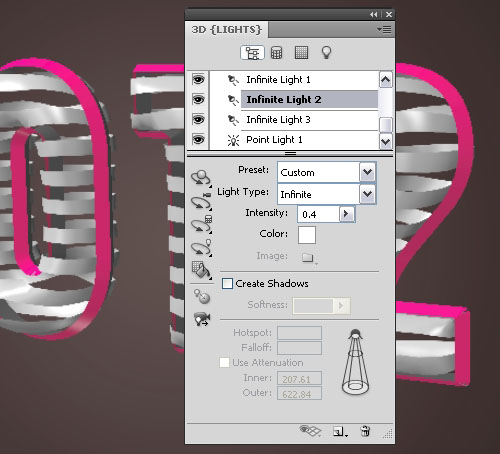
Infinite Light 2: Un-check the Create Shadows box.
Infinite Light 3: Un-check the Create Shadows box as well, we don’t want all four lights to create so many different shadows.
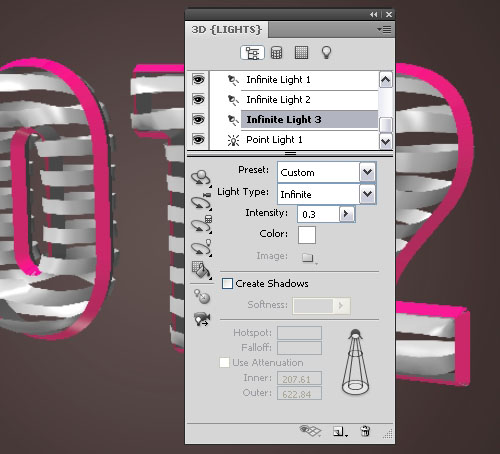
Point Light 1: The default settings are good.

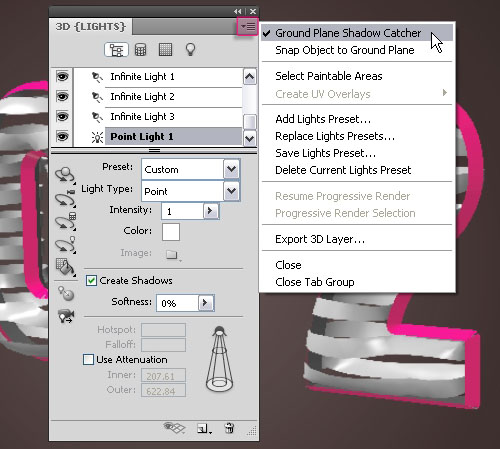
In order for the shadows to be rendered on the ground without the need to create a surface or a plane, click the pop-up menu arrow in the top right corner of the 3D Panel, then click the Ground Plane Shadow Catcher option.
Once you’re done creating the scene, it’s time to render it. Click Scene at the top of the 3D Panel, then choose Ray Traced final from the Quality drop down menu.
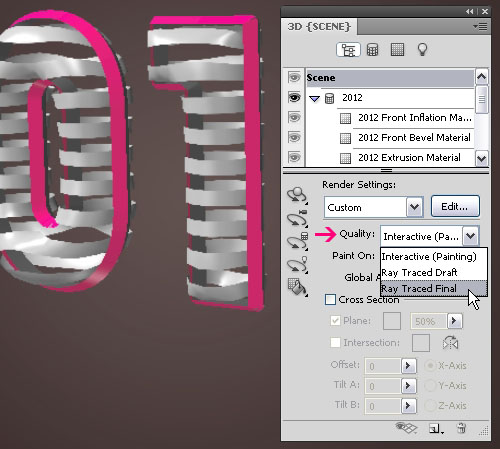
The rendering process might take a couple of hours, but you can click anywhere inside the document to stop rendering whenever you want.

Step 4
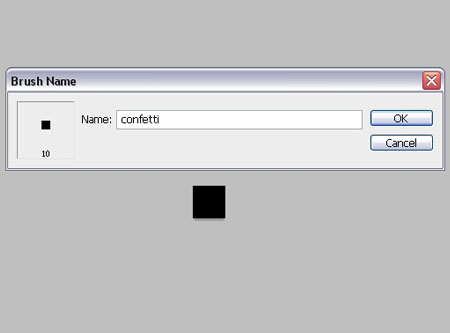
To create the confetti brush, create a new 10 x 10 px document, and fill it with Black. Then go to Edit -> Define Brush Preset, and type in a name for the brush. Close this document and go back to the original one.
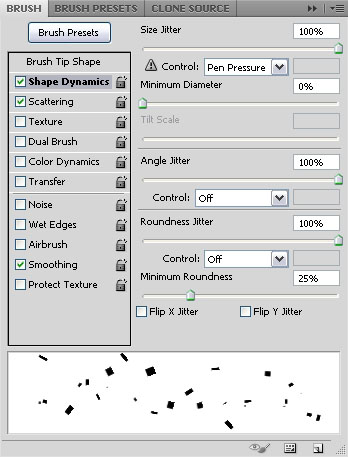
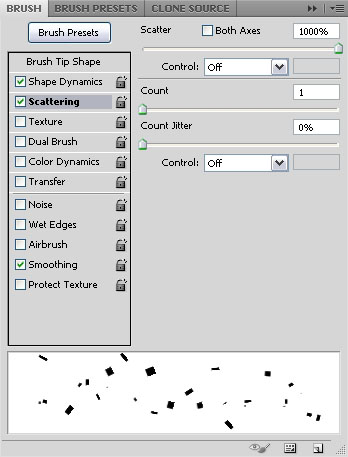
Open the Brush panel (Window -> Brush), choose the square brush you’ve just created, and modify its settings as shown below:
Brush tip Shape:
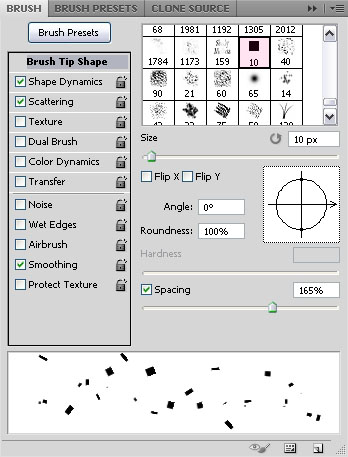
Shape Dynamics:
Scattering:
Create a new layer on top of all layers and call it Confetti.
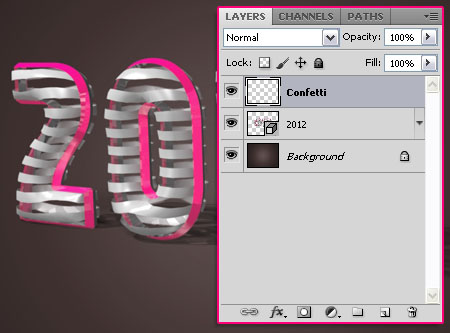
Duplicate the Confetti layer, and drag the copy right below the 3D text layer.
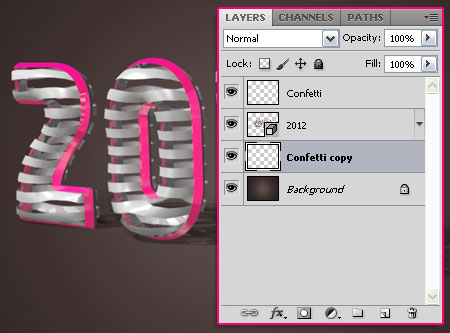
Select the original Confetti layer, and use the brush to scatter some confetti in the upper part around the text. Do not add any near the ground, as we are going to apply different shadow settings for the confetti on the ground.

Click the Confetti copy layer and fill the lower area with confetti.

Step 5
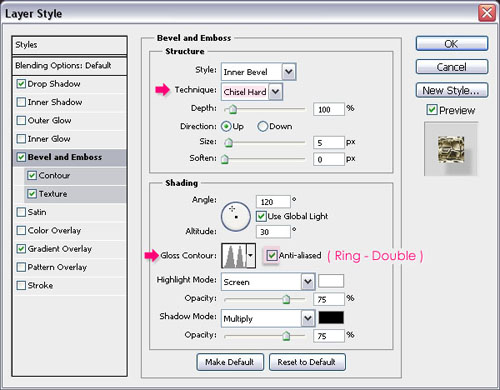
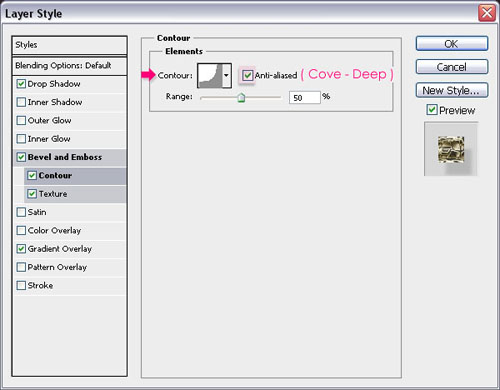
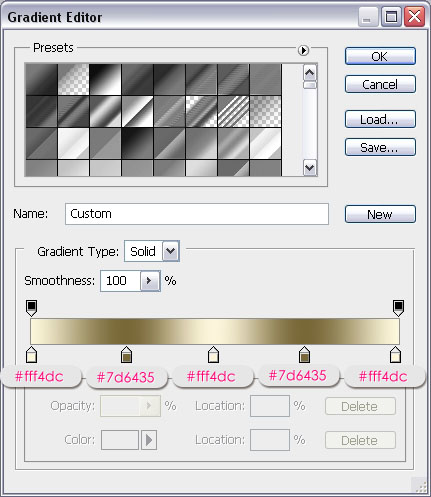
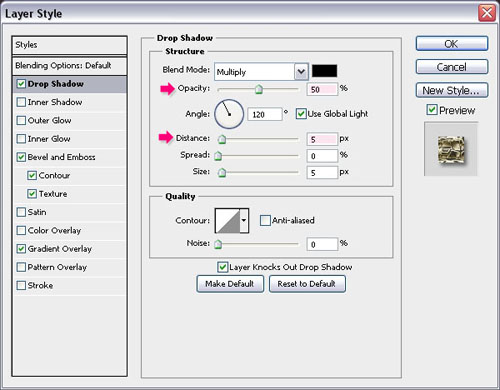
Double click the Confetti layer to apply the following Layer Style:
– Drop Shadow
- Opacity : 15%
- Distance : 30

– Bevel and Emboss
- Technique : Chisel Hard
- Gloss Contour : Ring – Double
- Check the Anti-aliased box
– Contour
- Contour : Cove – Deep
– Texture
- Pattern : Metallic Snakeskin

– Gradient Overlay
- Style : Reflected
- Click the Gradient box to create the gradient
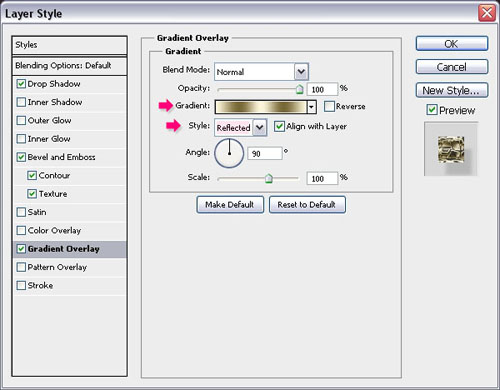
The Gradient uses two colors #fff4dc and #7d6435. But you can create other gradients using whatever colors you want.
This is what you should get.

Notice that the shadow of the confetti floating in the air is far from the text and the ground, but that can’t be the case for the confetti touching the ground. So copy and paste the Layer Style to the Confetti copy layer (Right click the Confetti layer, choose Copy Layer Style, then right click the Confetti copy layer, and choose Paste Layer Style.).
Then, double click the Confetti copy layer to modify the Drop Shadow effect:
- Opacity : 50%
- Distance : 5
This will add a darker and closer shadow for the confetti on the ground.

And that’s it! Hope you enjoyed the tutorial.
Did you enjoy this post? Please consider donating to help us cover our server costs.


Looks great! Happy New Year 🙂
Thanks a lot, and Happy New Year 🙂
Nice tutorial…^^
Happy New Year.
Thank you ^_^
Happy New Year to you too 🙂
Your tuto gave us a lot of joy and excitment. We begin to understand the 3D effects in Photoshop. It’s great. Thanks a lot. Isabelle and Nicole Mathieu (Habay-La-Neuve, Belgium)
Thank you very much for the kind words.
So glad you found the tutorial useful.
Best wishes to you and your family 🙂
Awesome tutorial with nice Creative result
Thanks so much for making Photoshop more interesting
I learn new trick of 3d in Photoshop
Thanks Again
keep up good work
God bless you 😀
Thank you so very much for your kind words.
This really means a lot 🙂
So glad you learned something new.
Cheers!
I LIKE this text effect tutorial.I have improved much commands on 3d text.
That’s great to know!
Thanks a lot for the comment 🙂
Awesome!
Happy New Year!
Thank you!
Happy New Year to you too 🙂
awesome works….
Thank you 🙂
Enjoyed working this one out!
Good to know!
Thanks a lot 🙂
It would be pleasure for me if you could possibly tell me what font did you used in text “New year…New Start” ?
Sure, it is P22ZanerThree.
Regards 🙂
Thanks so much for sharing this!
You’re welcome.
Thanks for the comment 🙂
Hi Rose, happy new year, Thank you for sharing your tuts. I like all of them.
I can’t do this. I do all in step 2, but my text don’t change, maybe I miss something.
Anyway is a great tut.
You rocks!!!!
I hope you can understand, my englsh is terrible :S
Hello Hayde,
Happy New Year to you too 😀
Do you mean that the color does not change?
If so, did you make sure to “Remove Texture” for each material before applying the changes?
If you removed the texture but the problem still exists, please feel free to add a reply.
Thank you very much for the nice comment 🙂
this is realy awesome tut, thanks for sharing
You’re welcome.
Thanks for leaving a comment.
Without looking on whole tutorial I am commenting…
Awesome… Beautiful… Well done!
Thank you so much!
This really means a lot 😀
So attractive,am so happy to get improved with the tutorial
Glad you do 🙂
Thanks a lot for the comment.
Am erick and am from Tanzania,i just used photoshop cs5 to another computer for a friend of mine but am in need with that program,how can i get it?????just gimmie the idea or tell me through ma email address for more talking.Thanks so big for the tutorial
Hello Erick,
Thank you for the comment.
Actually, the only way you can get it is to buy it.
Check out the Adobe Downloads page for more details.
Hope this helps.
Best regards.
super good ,sir.
Thank you 🙂
(I’m a girl though ^_^)
Bro,
you are a man.
thanks
Thanks for the support (I’m a girl though 🙂 )
Thanks., you give the best tutorials, you take the time to explain them to people, some people are new so its hard, but whit your tutorials its easy to make something great.
keep up the good work 🙂
Sven
Thank you so much for you kind words, I really appreciate the support.
So glad you find the tutorials useful as well.
Regards.
Wow! Great tutorial. Thanks for share.
Glad you like it.
Thanks for the comment.
Great tutorial… where do i find the snakeskin texture pattern?
It comes with Photoshop but you need to load it.
So go to Edit -> Preset Manager, and choose “Patterns” from the “Preset Type” drop down menu. Then, click the little arrow to the right of the Preset Type drop down menu, and click “Patterns” near the bottom of the pop-up menu. When the dialog box appears after that, just click Append, and you’ll get the pattern 🙂
Hope this helps.
Thanks for the comment.
nice
Thanks!
Could you kindly offer us an updated version using CS6 3D tools? Thank you very much!!
Will make sure to schedule that sometime soon indeed.
Thanks for the comment 🙂
WEBMEDIA INSTITUTE
Amazing outcome! Nice color variation, too.
Thanks a lot for sharing your work 🙂