
Light Tubes Text Effect
In this tutorial, we are going to use Photoshop layer Layer Styles and brushes to create a nice glossy text effect, with some light tips around the letters.
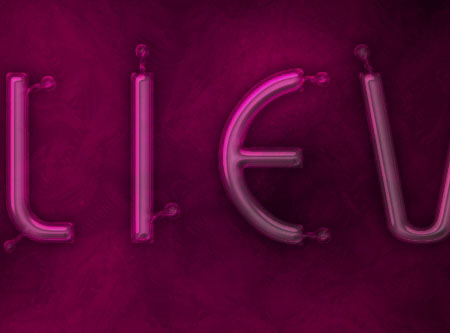
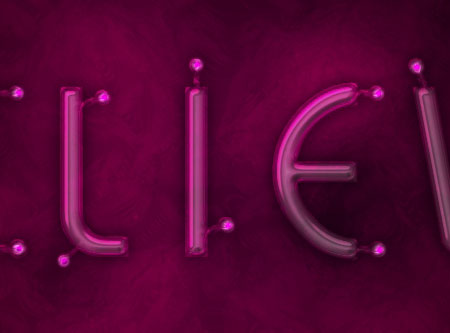
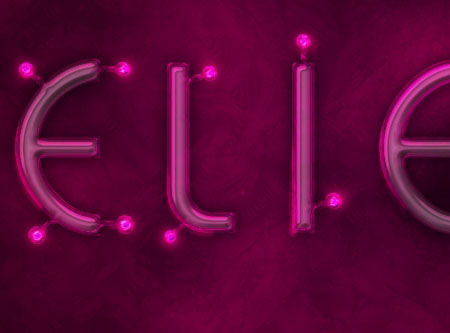
The Final Result

Tutorial Details
- Software Used : Photoshop
- Version : CS5 Extended
- Time : 0:30 – 1:15
Resources
- Xpressive font.
- Sparkles Brush.
- Sparklies Photoshop Brushes by redheadstock.
Step 1
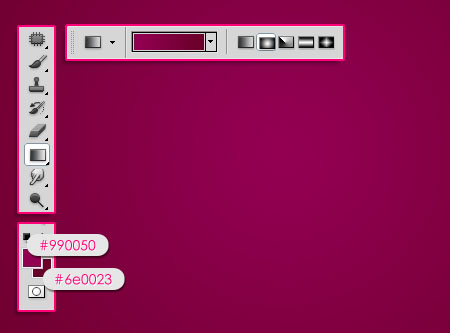
Create a new 1024 x 768 px document. Set the Foreground color to #990050, and the Background color to #6e0023, then, create a Radial Gradient from the center of the document to one of the corners.
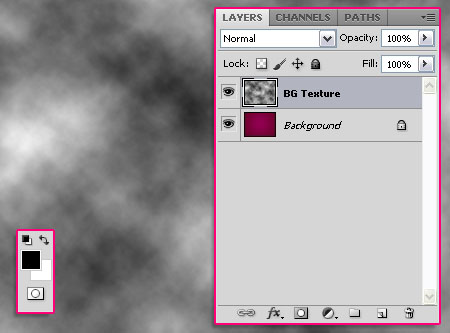
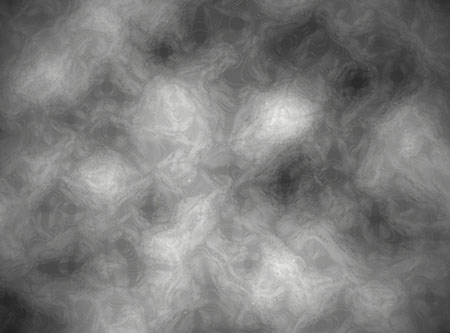
Set the Foreground and Background colors back to Black and White. Create a new layer on top of the Background layer and call it BG Texture, then go to Filter > Render > Clouds.
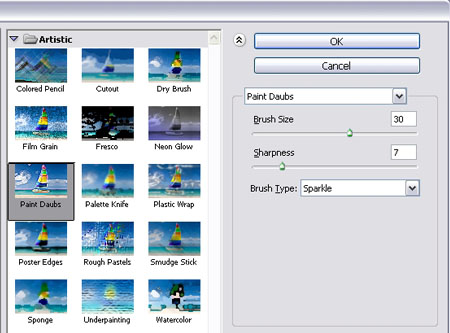
Go to Filter > Artistic > Paint Daubs, and change the values as shown below:
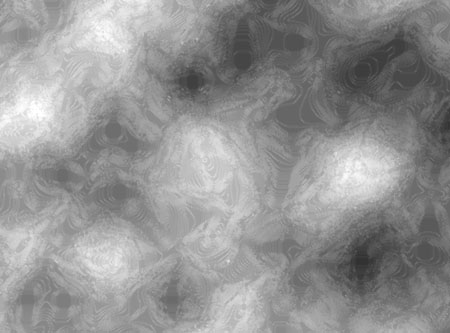
This will create a nice texture.
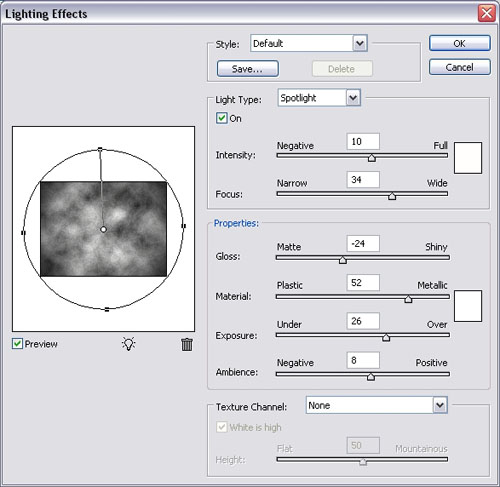
Go to Filter > Render > Lighting Effects, and modify the values as shown below:
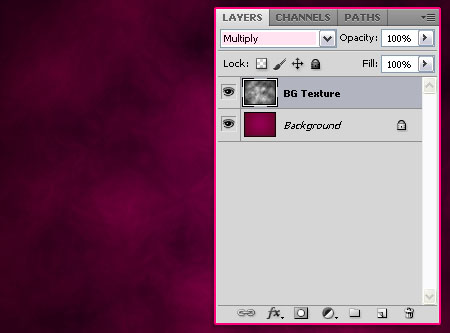
Finally, change the BG Texture layer’s Blend Mode to Multiply.
Now, create the text in White. The font is Xpressive, and the Size is 250 px. Also, change the Tracking value in the Character panel (Window > Character) to 200 so that there is enough space between the letters.

Step 2
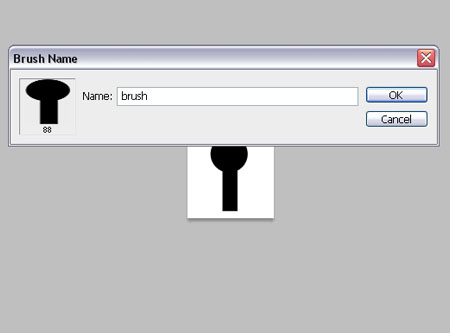
Open a new 100 x 100 px document. Create the shape below, using the Ractangular Marquee Tool and the Elliptical Marquee Tool, then fill it with Black, OR, simply use the Rectangle Tool and Ellipse Tool to do so.

Once you’ve created the shape, go to Edit > Define Brush Preset, and type in a name for the brush.
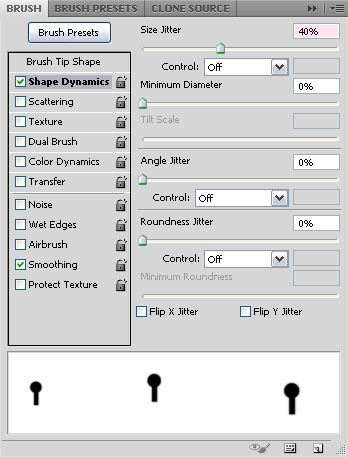
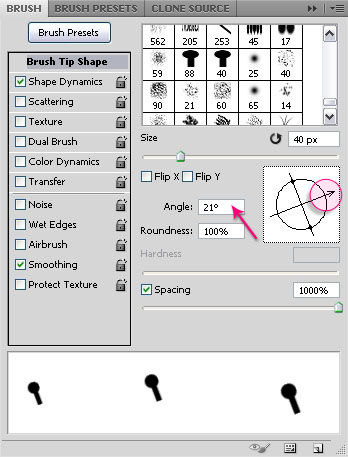
Open the Brush panel (Window > Brush), and modify the Settings as shown below:
Shape Dynamics
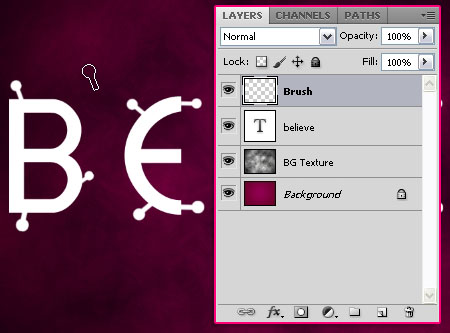
Back to the original document, create a new layer on top of all layers, and call it Brush. With the white color, start adding some tips around the letters.
In order to rotate the brush, you need to change the Angle value under the Brush Tip Shape tab, or simply move the small arrow in the Angle preview box.
Once you’re done with the tips, duplicate the text layer, and make the original one invisible (by clicking the eye icon next to it).
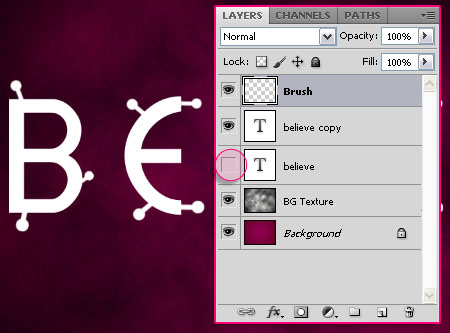
Select the Brush layer and the copy text layer, then go to Layer > Merge Layers. Rename the merged layer to text, and change its Fill value to 0.

Step 3
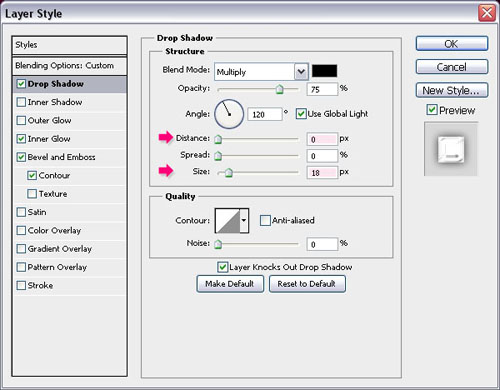
Double click the text layer to apply the following Layer Style:
– Drop Shadow
- Distance : 0
- Size : 18
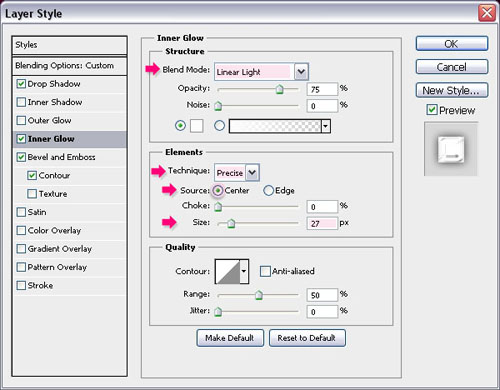
– Inner Glow
- Blend Mode : Linear Light
- Technique : Precise
- Source : Center
- Size : 27
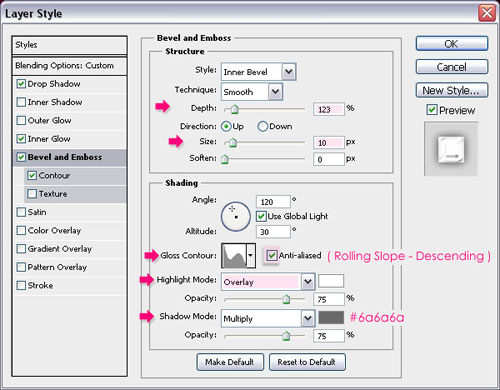
– Bevel and Emboss
- Depth : 123
- Size : 10
- Gloss Contour : Rolling Slope – Descending
- Check the Anti-aliased box
- Highlight Mode : Overlay
- Shadow Mode – Color :
#6a6a6a
– Contour
- Contour : Rolling Slope – Descending
- Check the Anti-aliased box.
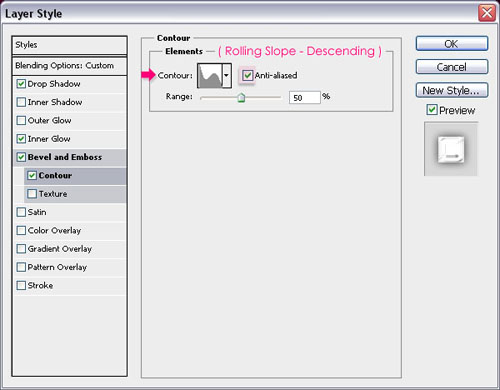
The text should look like a glass tube after the Layer Style is applied.
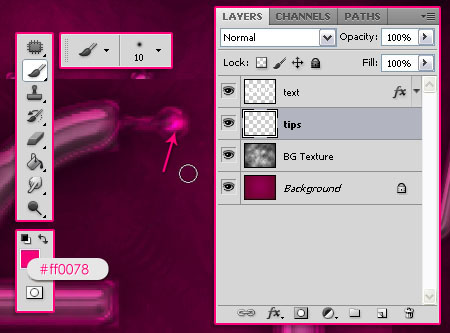
Step 4
Create a new layer right below the text layer and call it tips. Pick a soft round brush with a similar size to the tips you’ve created, in this case, it is 10 px. Set the Foreground color to #ff0078, and start adding dots right where the circular tips are.
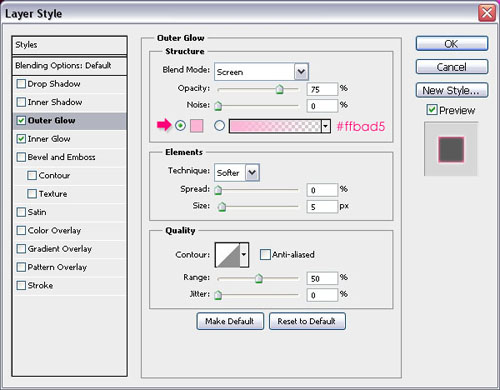
After you add the dots to all the tips, double click the tips layer to add the following Layer Style:
– Outer Glow
- Color :
#ffbad5
– Inner Glow
- Blend Mode : Vivid Light
- Color :
#ffbad5
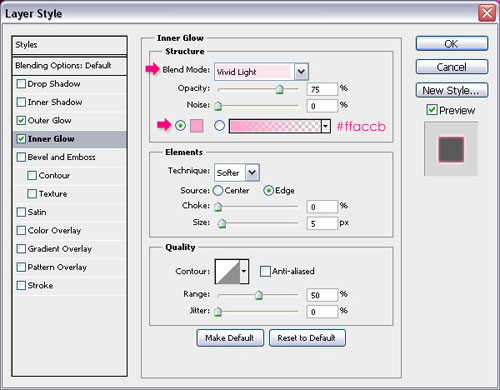
This should add a nice glow to the tips.
Step 5
Create a new layer below the tips layer and call it Light. Increase the brush Size to 30 px, and add more dots where the tips are.
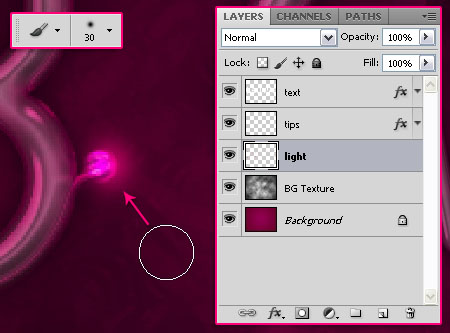
This will add more glow around the tips as if they are emitting some light.
You can play around with the size of the brush or the colors you choose as well.
Step 6
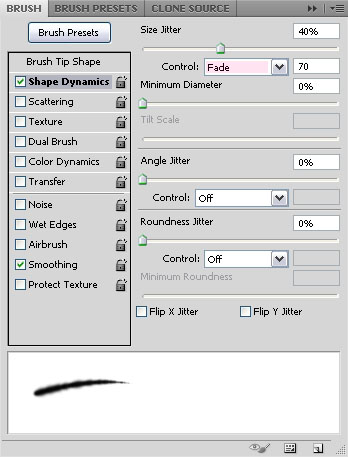
Once again, set the Brush Size to 10 px, and change the Spacing to 25%.

Shape Dynamics
Right click the original text layer and choose Create Work Path.
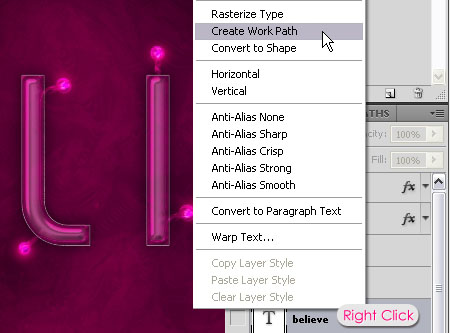
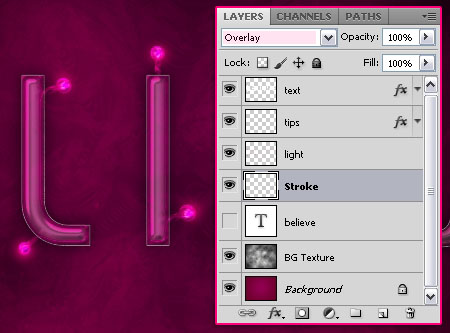
Create a new layer below the Light layer and call it Stroke, then change its Blend Mode to Overlay.
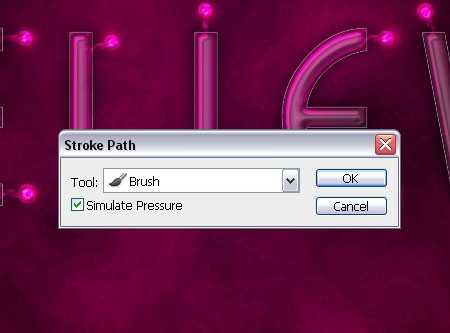
Set the Foreground color to #ffe0f3, pick the Direct Selection Tool, right click the path, and choose Stroke Path.
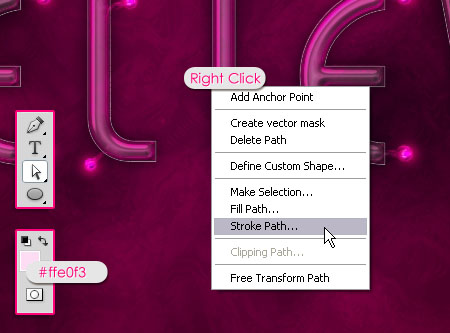
Choose Brush and check the Simulate Pressure box.
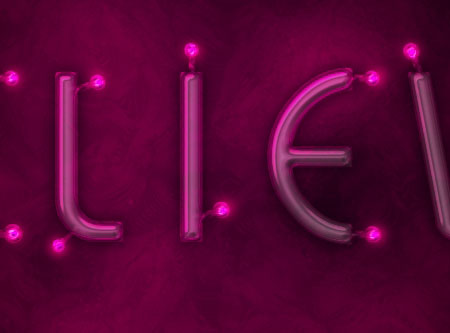
This will add a simple glow to some of the text edges and corners.
Step 7
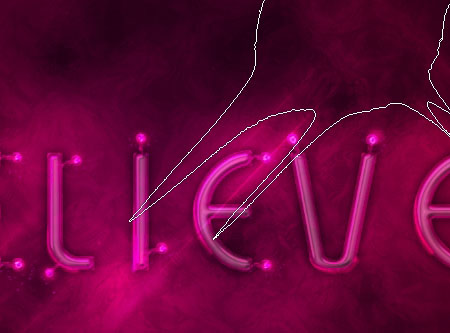
Pick the Ellipse Tool and click the Paths icon in the Options bar at the top. Start adding circles around the tips. Then, create a new layer on top of the Stroke layer and call it Sparkles.
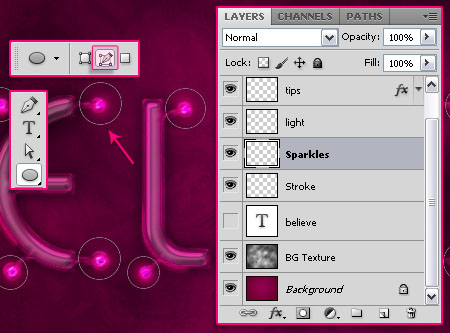
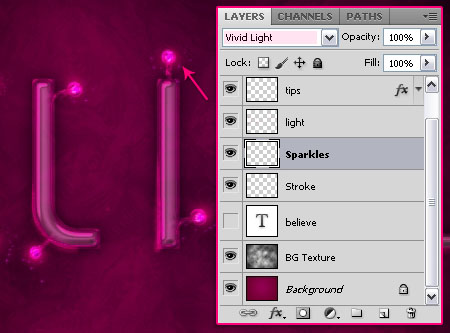
Stroke the circles with this Sparkles Brush the same way you stroked the path in the previous step (Step 6). Then, change the Sparkles layer’s Blend Mode to Vivid Light.
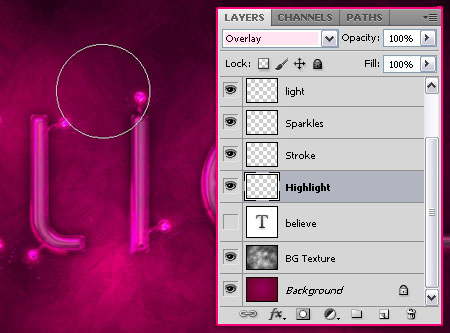
Create a new layer below the Stroke layer and call it Highlight, then change its Blend Mode to Overlay. Pick a big soft round brush, and with the Foreground color still set to #ffe0f3, start adding some highlight spots around the text.
Create a new layer on top of all layers and call it Sparkles 2, then change its Blend Mode to Overlay as well. Pick a big sparkles brush from the Sparklies Photoshop Brushes pack.
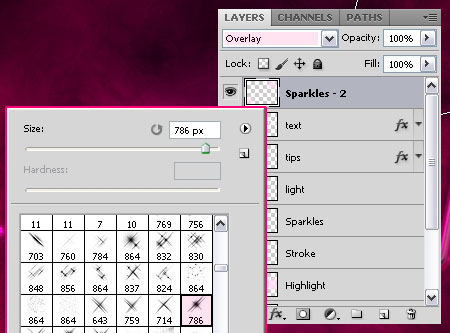
Use the brush to add more glowing highlights.
And that’s it.
Did you enjoy this post? Please consider donating to help us cover our server costs.


very nice tutorial.. 🙂
but i am stuck in step3.. after apply layers styles text stays white..any idea what i am doing wrong….?
Hello Junaid,
Seems I forgot to mention changing the Fill value of the merged layer to 0%. Added that now, sorry for the inconvenience!
Thanks for pointing this out and for the comment 🙂
In the Layers Panel, the Fill should be 0%.
Yep!
Thank you!!! this my job http://zalil.ru/31573012
Nice job!
Thanks for the link and for leaving a comment 🙂
Great tutorial.
Thanks 🙂
Thank you for the great tutorial. I know this must be like second nature to you, but this is the first text tutorial that I have ever completed and I applaud you for going back and clearing up the “fill” amount. Little things like that can really sidetrack me when I am a total “noob.” Thanks again.
Hello Josh,
Thank you so much for your comment.
I’m glad you were able to complete the tutorial, hopefully you’ll check out some other tutorials as well 🙂
Regards.
Mantap ! Top markotop ! terima kasih tutorialnya !
You’re welcome.
Terima kasih for the comment 🙂
That’s nice
Thanks !!!
You’re welcome 🙂
Thanks for the comment.
Nice tutorial tfs
Thanks for the comment.
Great tutorial, fantastic effect! Thank you! Here is my result:
http://i294.photobucket.com/albums/mm106/almavez/alma/tutorials/LightTubesTextEffect.jpg
Very nice outcome, I like the colors as well.
Thanks for the comment and the link 🙂
Thanks a lot. A very clear tutorial!!! Enjoyed it and learned in an easy way. Now it’s my turn to play with colors!!!
That’s great to know.
Have fun with the colors 😉
Thanks a lot for the comment 🙂
Thanks a lot for all of the tuts! Very detailed and easy to understand.
You’re welcome!
Thank you so much for the comment 🙂