Metallic Marble Text Effect
Posted by textuts | On 15 January, 2013 | In Simple Photoshop Text Effect TutorialsThis tutorial will explain how to create a luxurious glossy metallic marble textured text effect, using Layer Styles, and a simple pattern.
The Final Result
Notes:
Tutorial Details
- Software Used : Photoshop
- Version : CS6 Extended
- Time : 0:30 – 1:00
Resources
- RiotSquad font.
- MMarble pattern, created using Filter Forge’s Sci-Fi Mega Metal 1 filter by Ronjonie.
- Concrete wall 2 pattern.
- Plastic texture 1 by Patterns-stock.
- gradient-shapes for Photoshop by ilnanny.
Step 1
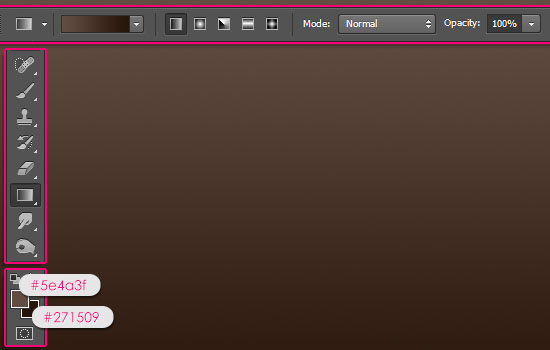
Create a new 1152 x 864 px document. Set the Foreground color to #5e4a3f and the Background color to #271509. Pick the Gradient Tool, click the Linear Gradient icon in the Options bar, then click and drag from the top to the bottom of the canvas.

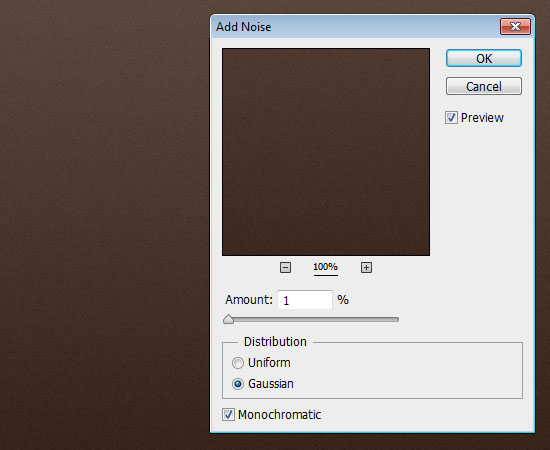
Go to Filter > Noise > Add Noise. Set the Amount to 1, choose the Gaussian Distribution, and check the Monochromatic box.

Step 2
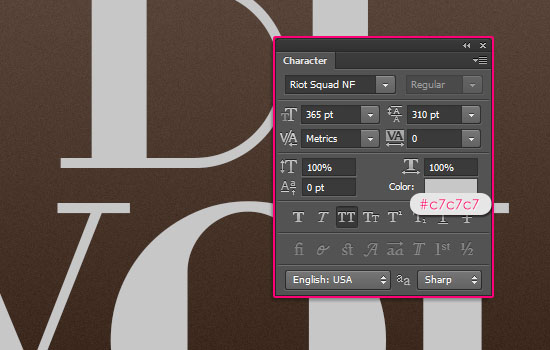
Create the text in All Caps using the font RiotSquad. The font color is #c7c7c7, the font Size is 365, and if you have more than one line of text, set the Leading value to something around 310 pt.

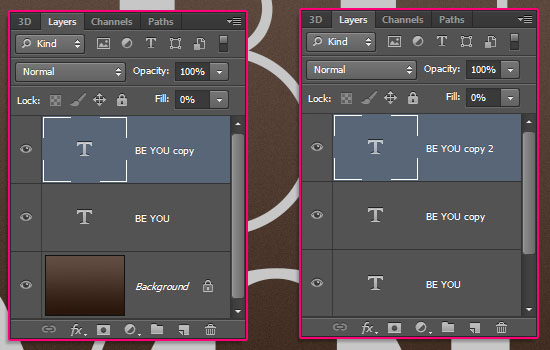
Duplicate the text layer, and change the copy’s Fill value to 0. Then, duplicate the copy layer.

Step 3
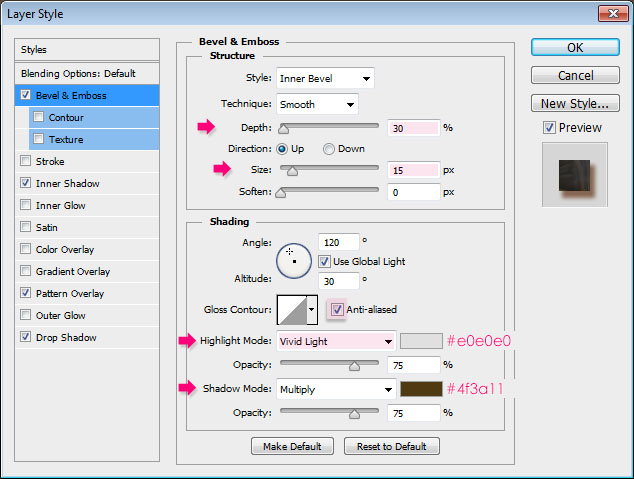
Double click the original text layer to apply the following Layer Style:
– Bevel and Emboss
- Depth : 30
- Size : 15
- Check the Anti-aliased box
- Highlight Mode : Vivid Light
- Color :
#e0e0e0 - Shadow Mode – Color :
#4f3a11
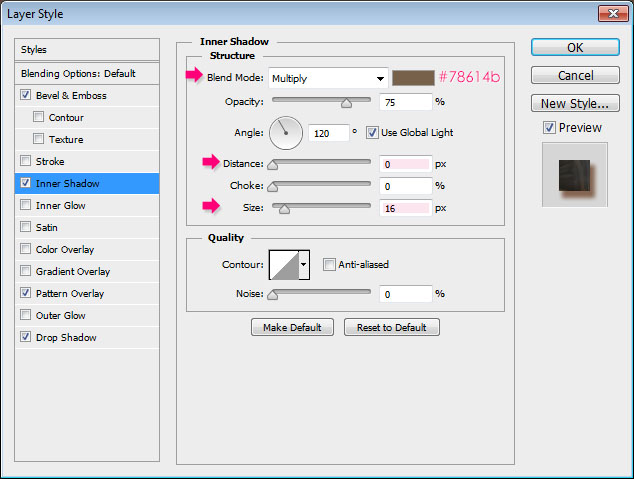
– Inner Shadow
- Color :
#78614b - Distance : 0
- Size : 16
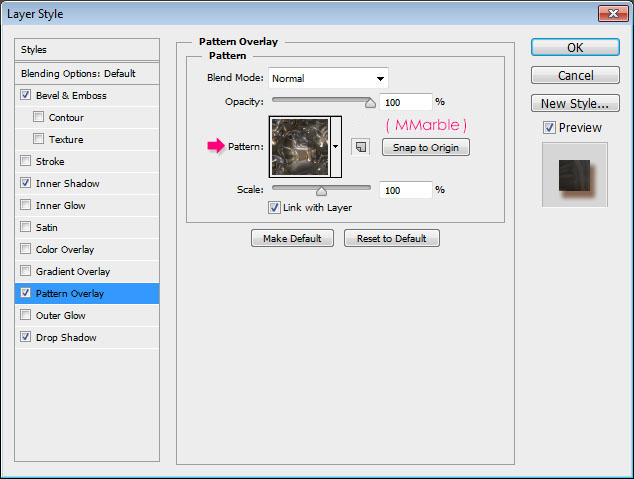
– Pattern Overlay
- Pattern : MMarble
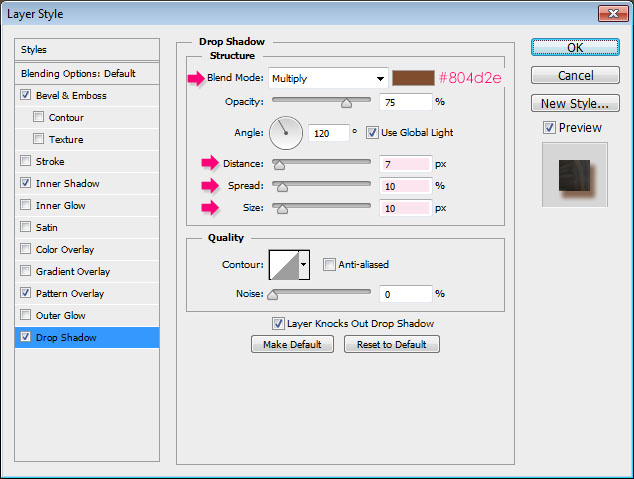
– Drop Shadow
- Color :
#804d2e - Distance : 7
- Spread : 10
- Size : 10
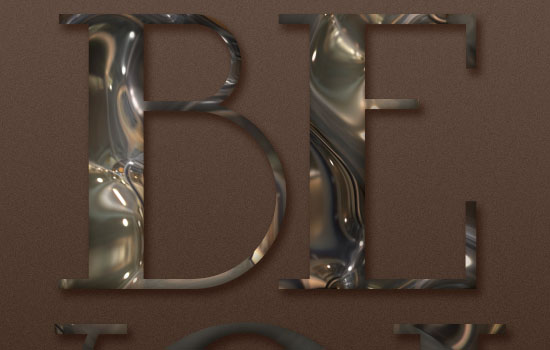
This will create the marble textured part of the text.

Step 4
Double click the first copy text layer to apply the following Layer Style:
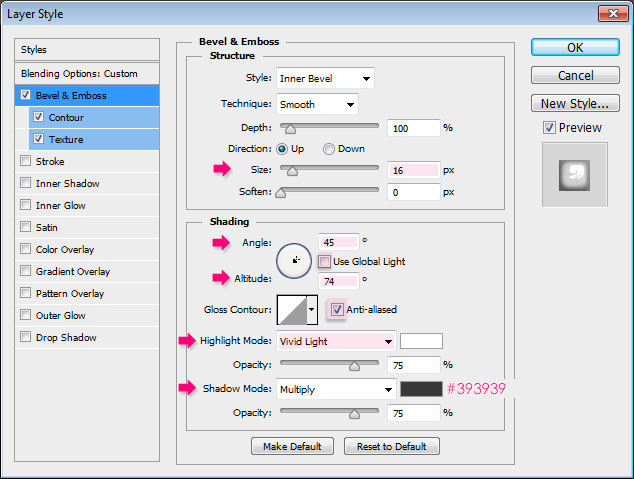
– Bevel and Emboss
- Size : 16
- Uncheck the Use Global Light box
- Angle : 45
- Altitude : 74
- Check the Anti-aliased box
- Highlight Mode : Vivid Light
- Shadow Mode – Color :
#393939
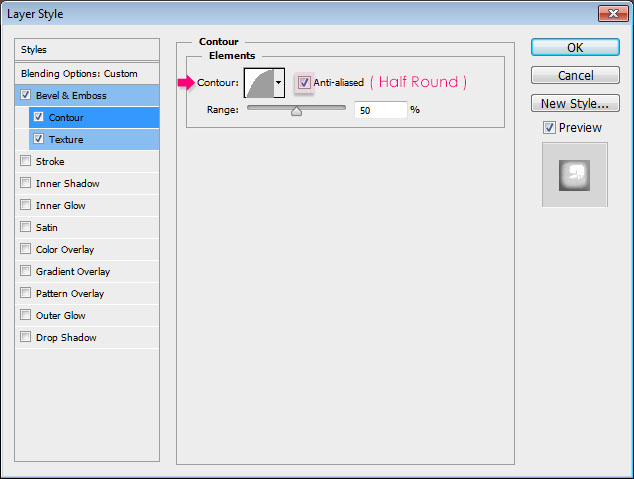
– Contour
- Contour : Half Round
- Check the Anti-aliased box.
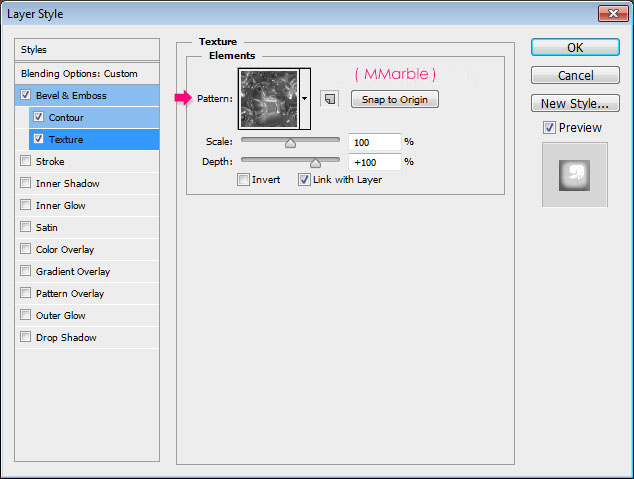
– Texture
- Pattern : MMarble
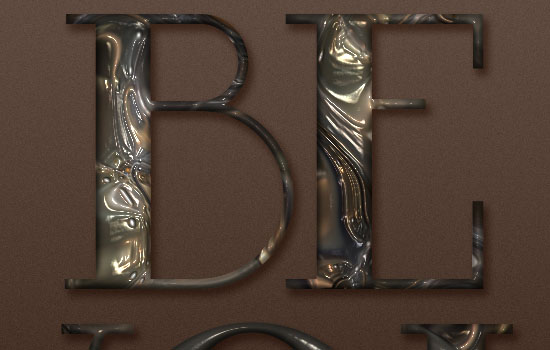
This will add a simple 3D texture based on the pattern used.

Step 5
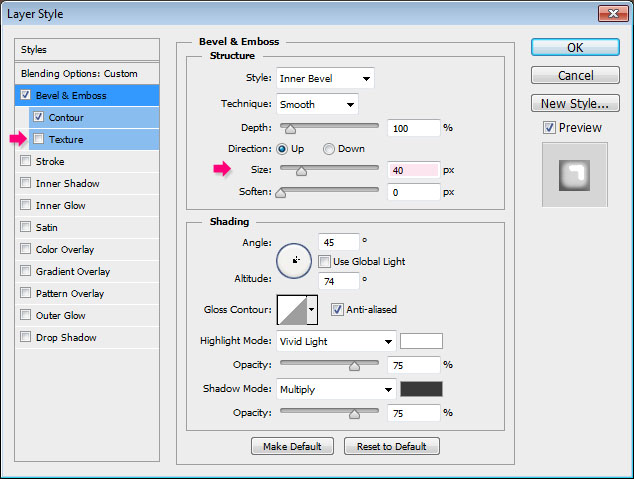
Right click the first copy text layer, choose Copy Layer Style, then right click the second copy text layer, and choose Paste Layer Style.
Double click the second copy text layer, change the Bevel and Emboss effect’s Size value to 40, and un-check the Texture box.
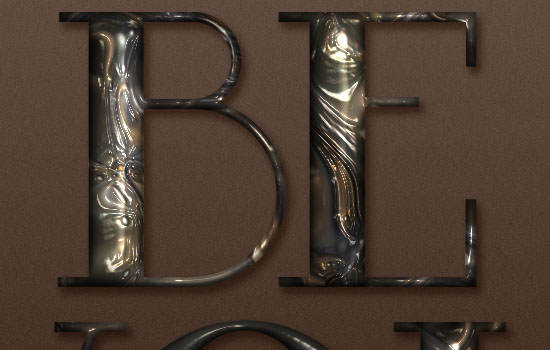
This will add a glossy top layer.

Step 6
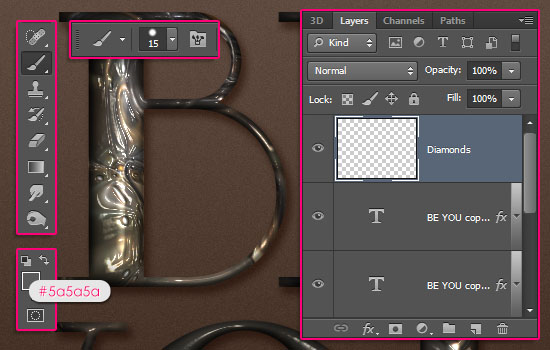
Pick the Brush Tool, and choose a hard round 15 px brush. Set the Foreground color to #a5a5a5, and create a new layer on top of all layers then call it Diamonds.

Double click the Diamonds layer to apply the following Layer Style:
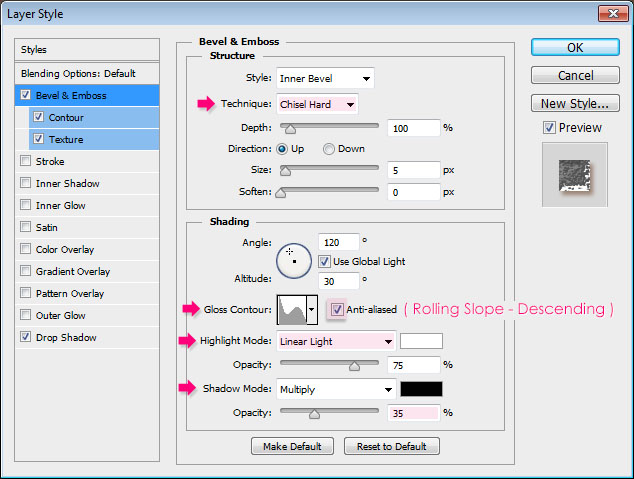
– Bevel and Emboss
- Technique : Chisel Hard
- Gloss Contour : Rolling Slope – Descending
- Check the Anti-aliased box
- Highlight Mode : Linear Light
- Shadow Mode – Opacity : 35%
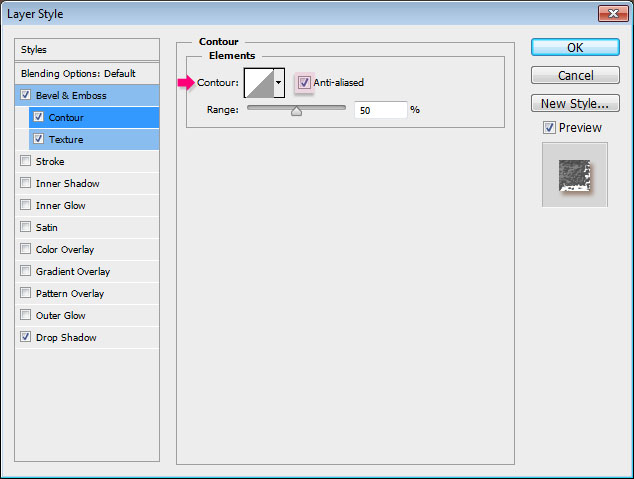
– Contour
- Check the Anti-aliased box.
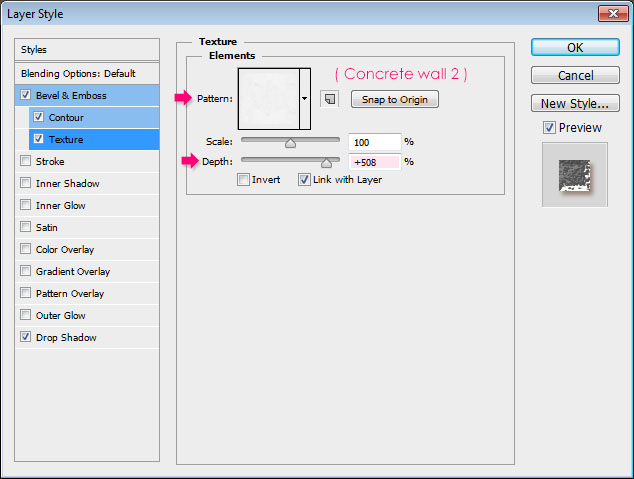
– Texture
- Pattern : Concrete wall 2
- Depth : 508%
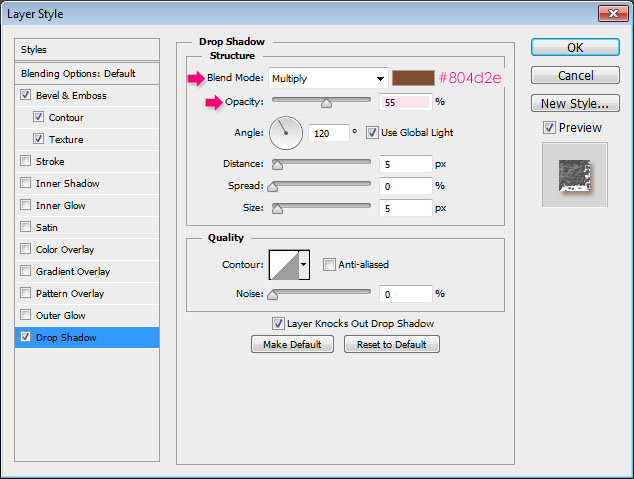
– Drop Shadow
- Color :
#804d2e - Opacity : 55%
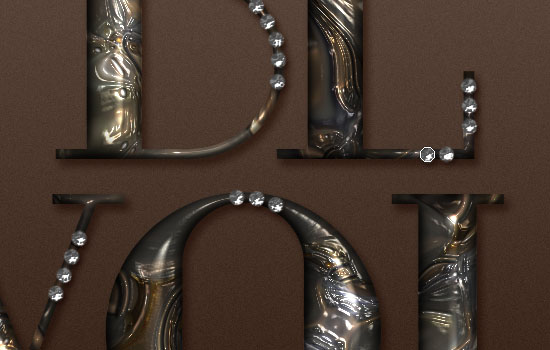
Now, using the Brush Tool, start adding some dots to create small diamonds on the thin parts of the letters. Do not fill them with diamonds, just try to spread the diamonds evenly instead.

Step 7
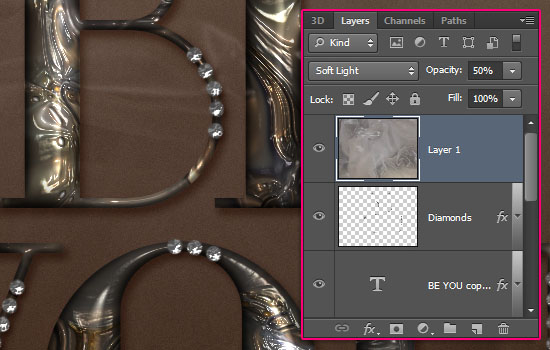
Place the Plastic texture 1 image on top of all layers, resize it so that it fits within the canvas, then change its Blend Mode to Soft Light, and its Opacity to 50%.

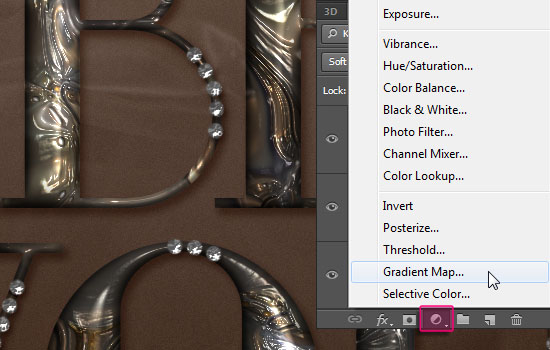
Click the Create new fill or adjustment layer icon down the Layers panel and choose Gradient Map.

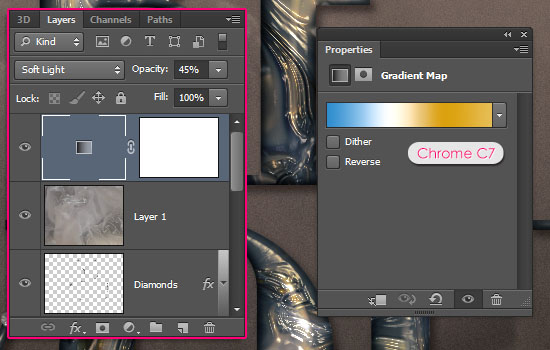
Change the adjustment layer’s Blend Mode to Soft Light, and it’s Opacity to 45%. Then use the Chrome C7 gradient found in the FOILS.grd file in the gradients pack.

We’re done! Very simple and quick, yet neat and elegant. Hope you liked it.
Did you enjoy this post? Please consider donating to help us cover our server costs.






Very elegant and beautiful indeed. You create magic and make it look so simple. Loved it.
That’s so nice of you to say, and I’m super happy you liked it 😀
Thank you very much for the kind words.
This is gorrrrgeous! Thank you so much, was pretty easy too! 🙂 Will definitely be using the awesome diamond setting in the future, I would never have thought of that :3
That’s so kind of you to say 😀 Great to know you found the technique useful as well.
Thank you very much for the comment.
Excellent tutorial.. I got nice result.. I’m your big fan and like your tutorials because they are easy to follow. I check your site almost daily for update. I requested you a tutorial (Zipper Text Effect). When will you work on it?
That is really so special, and it sure means a lot!
I do remember the request, and it is on the “to-do” list indeed. Thing is, the tutorials are scheduled for publishing a couple of weeks beforehand. So this one should be published late February to early March.
Thank you very much for all the support.
Regards.
like your tutorials because they are easy to follow.
Agree 🙂
keep up the good job waiting for your new tutorial 🙂
Rana
Thank you so very much for the kind words and for the support.
Cheers 🙂
A very lovely effect!
(And there is something deliciously satisfying about blooping out perfect little diamonds in quick succession like this. Cool tip.)
Thank you for your wonderful tut.
You’re just awesome! Thank you very much for the kind words 🙂
Always a pleasure reading your comments and checking out your work.
Thank you once again.
Thank you very much, that means a lot to me. 🙂
You’re very welcome 🙂
Thanks for this tutorial. Clear and easy. I got some nice effects with it. I was surprised when I got to the diamonds. That is slick!
Glad you liked it!
Thank you so much for the kind comment 🙂
wooow your amazing and really easy to create awesome text … love you dude… thankx a lot
Thank you very much!
(I’m a girl though =) )
Appreciate the support.
Very nice, just so you know, you need to correct Step 5 (says Step 3, should be Step 5)
…thank you for this wonderful great tutorial!!!!
Ooops! Fixed now ^_^
Thanks a lot for pointing that out and for the comment 😀
Recently, I have been going throw a typography in photoshop craze and this site is EXACTLY what I was looking for. It is my heaven! I love this site! Your tutorials are very detailed and simple to follow along with. I’ve been making personal banners for my friends using almost textuts tutorials! I love how you guys also use external resources!
Speaking of resources, for some of your tutorials, you use brushes or patterns that aren’t compatible for CS6. Could you place a resources page on your site which could include CS4-CS6 compatible alternatives for certain brushes? I think that would be a really nice addition for all us photoshoppers out there!
Thank you, Haley 🙂
This really means a lot! Much more than words can say!
Very glad to know that you like the tutorials and find them helpful 🙂
As for the brushes, I’m not quite sure what you mean by the compatibility issue. Maybe you need to load them in the Preset Manager?
If this is not what you mean, please feel free to add a reply with an example, and I’ll make sure to do whatever is possible.
Thank you very much once again Haley 😀
This is my first text tut — thank you for the most fantastic instructions! With each screen I learned so much. Haven’t used in on my site yet — but I will!!
That’s awesome to know!
Really happy you liked it and found it helpful.
Please feel free to share your outcome with us 🙂
Thanks a lot for the comment.
So easy to follow and nothing left for me to truy to figure out what I missed,THANK YOU!
Great to know that!
Many thanks for the kind words.
weri nays
Thanks!
How can I install the concrete wall 2 pattern?
After you download and unzip the linked file, open the “concrete_wall_2.png” image with Photoshop, then go to Edit -> Define Pattern, and click OK.
This will add the image as a pattern to your Patterns preset, and you’ll be able to use it as in the tutorial.
Hope this helps.
Thank you very much.
You’re very welcome 🙂
Thank you for the tutorial. It is very easy to follow, but I don’t know why i can’t the diamonds right. I did everything in order but still they are flat and not shiny. Can you help me with this?
Are you using the same settings mentioned in the tutorial? Any changes in the sizes make a difference.
So if you are using the same settings, you might want to check that the Resolution of the document (Image -> Image Size) is set to 72. If not, you’ll need to create a new document with that resolution.
Hope this helps. If the problem still exists, please feel free to leave a reply.
Thanks a lot for the comment.
Hi great tutorial, but i have a problem and it seems im the only one experiencing it..
when i open and unzip the “concrete wall” file there isnt actually a pattern in there? just the images of it.
its not a problem as i can make it into a pattern myself, i was just unsure if it was a common error or my mac being an arse as usual
The file contains images of the pattern only, so there are no problems at all 😉
You just need to open the image in Photoshop, then go to Edit > Define > Pattern, and type in a name for the pattern. It will then be added to the preset and will appear in the Layer Style box as well.
Hope this helps.
Thanks for the comment 🙂
Love this text effect. It is truly elegant & beautiful! Thanks for the tut!
Really glad you do.
Thank you very much for the lovely comment 🙂
from rihana’s music…
That’s cool! Nice work.
Thanks for sharing it 🙂
Thank you once again……so beautiful tut….xoxox
This is lovely!
Thanks a lot for the comment and for sharing your work 🙂
Thank you for that great tutorial. It’s a very cool effect. That’s my result. I added some glitter on the letters and made my diamonds sparkle.
That’s very lovely! Well done indeed 🙂
Thank you for the kind words and for sharing your work.
Thank you so much for a great tutorial.