
Glossy Futuristic Text Effect
A simple way for creating a super glossy reflective text effect, and adding a nice texture for a more futuristic appearance.
The Final Result

Tutorial Details
- Software Used : Photoshop
- Version : CS5 Extended
- Time : 0:30 – 0:45
Resources
- Background Image.
- Alba font.
Step 1
Open the Background Image, and create the text using the color #77a5c2. The font used is Alba, and the Size is 500 px.
Duplicate the text layer, and change the copy’s Fill value to 0.
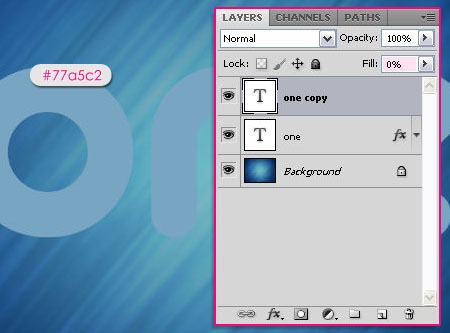
Double click the original text layer and apply the following Layer Style:
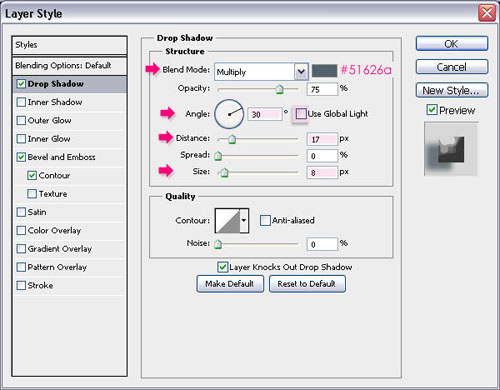
– Drop Shadow
- Color :
#51626a - Uncheck the Use Global Light box
- Angle : 30
- Distance : 17
- Size : 8
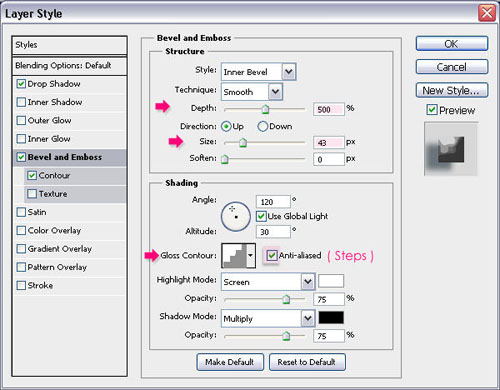
– Bevel and Emboss
- Depth : 500
- Size : 43
- Gloss Contour : Steps
- Check the Anti-aliased box
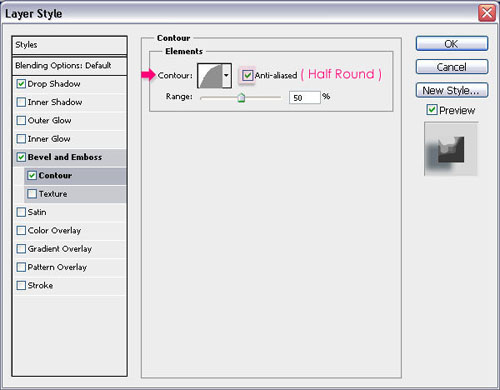
– Contour
- Contour : Half Round<
- Check the Anti-aliased box.
The result should look like this.

Step 2
Double click the copy text layer to add another Layer Style:
– Bevel and Emboss
- Depth : 215
- Size : 18
- Gloss Contour : Cove Deep
- Check the Anti-aliased box
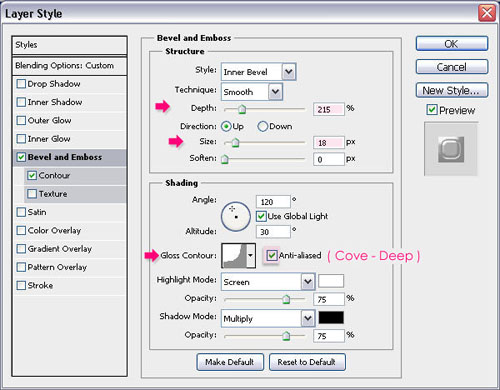
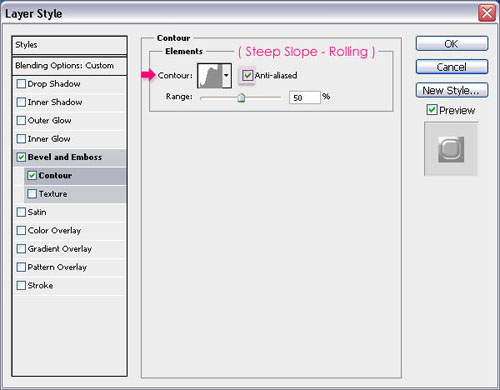
– Contour
- Contour : Steep Slope Rolling
- Check the Anti-aliased box.
The text should look more glossy now, and even more reflective.

Step 3
Create a new layer between both text layers and call it texture. Ctrl/Cmd + click one of the text layers’ thumbnail to create a selection.
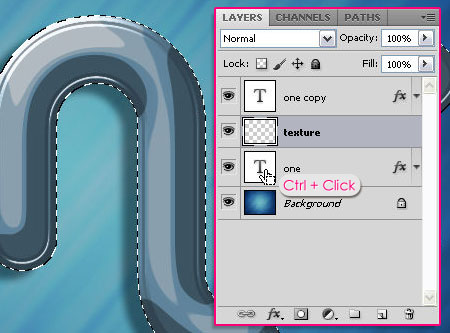
Set the Foreground color to #164b7c and the Background color to #b2ebfc. Go to Filter > Render > Clouds. Then press Ctrl/Cmd + D to get rid of the selection.

Go to Filter > Brush Strokes > Crosshatch, and change the Stroke Length to 50, the Sharpness to 20, and the Strength to 1.

You should get a similar texture to this.

Finally, change the texture layer’s Blend Mode to Overlay.
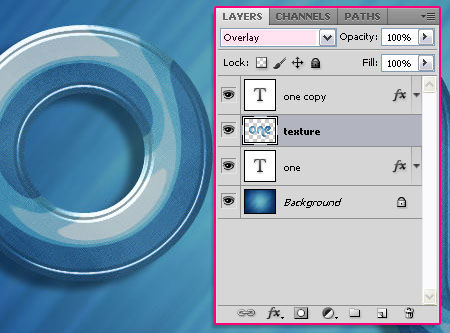
This is the final result.
Did you enjoy this post? Please consider donating to help us cover our server costs.


Very nice Tutorial, good-looking outcome.
I did it a bit different. Instead of just selecting the text and fill it for the texture, i used a layer mask to have it editable!
Layer masks are definitely better for a more editable effect. Thanks for the comment and the tip!
Thanks..^^
You’re welcome!
I love your text effect! Keep up the good work!
Thanks a lot!
very cool !!
nice tutor
Glad you liked it.
Thank you.
me gusta
gracias!
Lovely text effect and easy to follow instructions. Many thanks.
You’re welcome. Many thanks for the comment.
Adorei o efeito já estou virando fã deste site muito bom wonderful =°)
Thank you so much for the support, I really appreciate it.
Cheers 🙂
Very helpful tutorial. Thanks
you’re welcome.
Thanks for the comment.
brilliant tutorial thanks
You’re welcome 🙂
Thanks for the comment.
Hey, i dont have Contour: Steep Slope – Rolling, Log, Steps… 🙁 WHY?
P.S. I love tutorial ? 😀
Hello Emir,
Please check this image to see how to get the Contours used.
Hope this helps.
Thanks for the comment 🙂
hiii.. nice trick n tutorial,btw iam shared this tutorial on my blog..
Glad you liked it 🙂
Thanks for leaving a comment.
Your tutorial is so great! And the details you included! Hoping to read more. 🙂
Thank you so much for the comment 🙂
I cud not undersytand the step 3
“Create a new layer between both text layers and call it “texture”. Press the Ctrl key and click on one of the text layers icon to create a selection.”
what does the above sentence mean ? If I Press the Ctrl key and click on one of the text layers icon then I cud not apply the filter-> render technique…
You need to click the “texture” layer once again after clicking a text layer’s icon, so that the “texture” layer becomes active instead of the text layer.
Hope this helps.
Awesome tutorial man! Love it. Easy to learn. Steps are easy to understand. Keep it up!
Thank you so much for the nice comment and the support 🙂
(I’m a girl though)
nice tutorial, just one thing, in bevel and emboss and getting mix result, in technique I have to use a different mode to get the same effect, or is it just my version?
What technique works for you?
If the size of your text is not as the one used in the tutorial you might get a different result as well.
Hope this helps.
Thanks for the comment.
Awesome! Amazing logo and really nice explained! Thanks
Glad you like it.
Thanks a lot for the kind words.