
Glossy Particles-Textured Text Effect
This is a very simple way to create a nice glossy particles-textured text effect, using two Layer Styles, and two Filters.
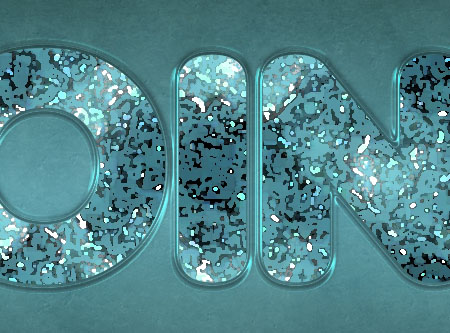
The Final Result

Tutorial Details
- Software Used : Photoshop
- Version : CS5 Extended
- Time : 0:30 – 0:45
Resources
- Insaniburger font.
- Grungy seamless tiling cement by LANBO.
- Modified Glitter Brush.
Step 1
Create a new 1024 x 768 px document. Set the Foreground color to #6fb1bf, and the Background color to #2a4d53, then, create a Reflected Gradient from the center of the document to the bottom.
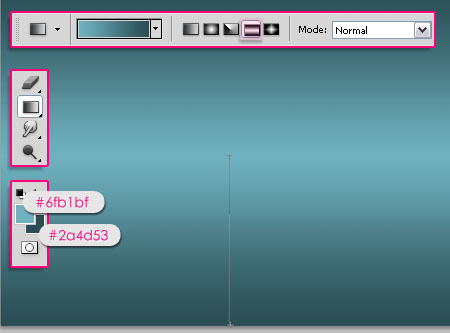
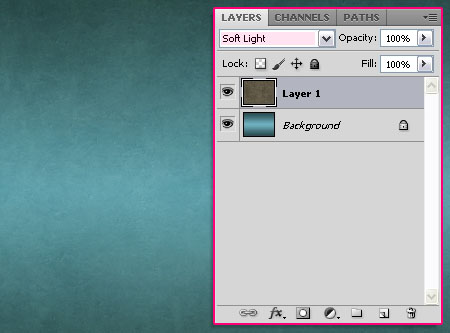
Place the Grungy seamless tiling cement texture on top of the Background, and change its Blend Mode to Soft Light.
Step 2
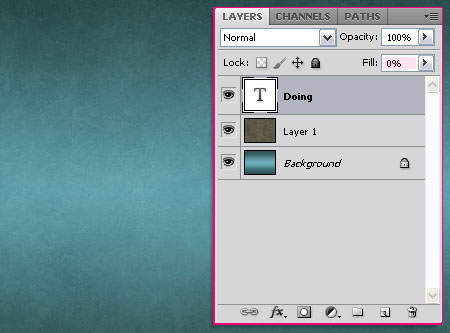
Create the text in White. The font used is Insaniburger and the Size is 345 px.

Change the text layer’s Fill value to 0.
Duplicate the text layer.
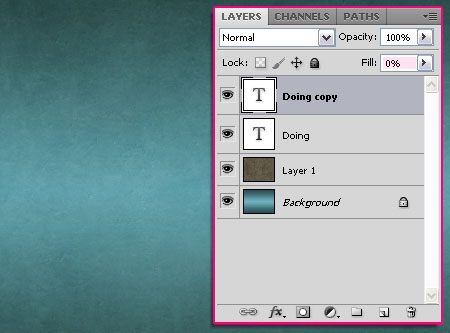
Create a new layer below the two text layers and call it Texture. Press the Ctrl/Cmd key, and click a text layer’s thumbnail to create a selection. Set the Foreground color to #164b7c, and the Background color to #b2ebfc.

Step 3
With the Texture layer selected (active), go to Filter -> Render -> Clouds. Press Ctrl/Cmd + D to get rid of the selection.

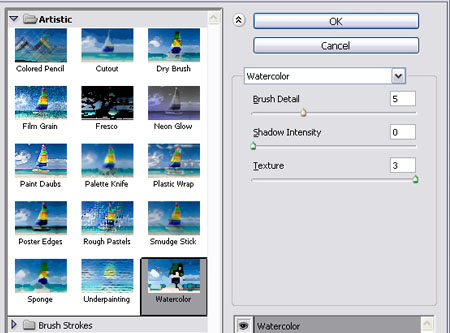
Go to Filter -> Artistic -> Watercolor. Change the Brush Detail to 5, the Shadow Intensity to 0, and the Texture to 3.
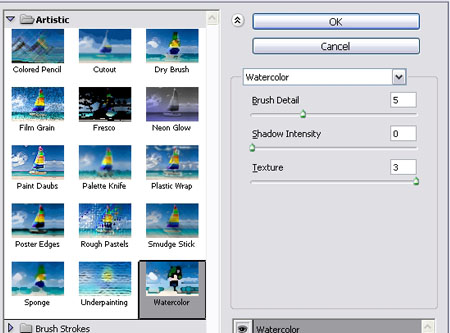

Go to Filter -> Artistic -> Paint Daubs. Change the Brush Size to 6, the Sharpness to 5, and choose Sparkle from the Brush Type drop down menu.


Once again, go to Filter -> Artistic -> Watercolor, and apply the same values.

Step 4
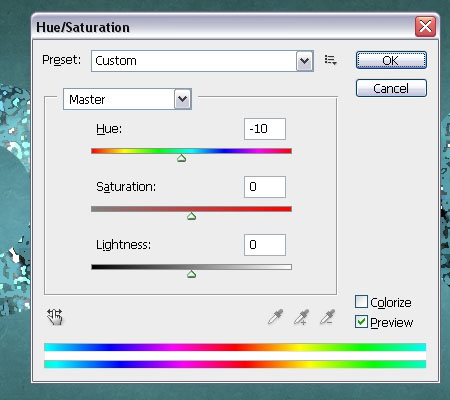
Go to Image -> Adjustments -> Hue/Saturation, and change the Hue value to -10. This will match the texture color with the Background color.
Double click the original text layer to apply the following Layer Style:
– Bevel and Emboss
- Style : Outer Bevel
- Size : 11
- Uncheck the Use Global Light box
- Angle : -104
- Altitude : 48
- Gloss Contour : Ring
- Check the Anti-aliased box
- Highlight Mode :
- Color :
#1dfcff - Opacity : 100%
- Shadow Mode – Color :
#919191

– Contour
- Contour : Cone – Inverted
- Check the Anti-aliased box.
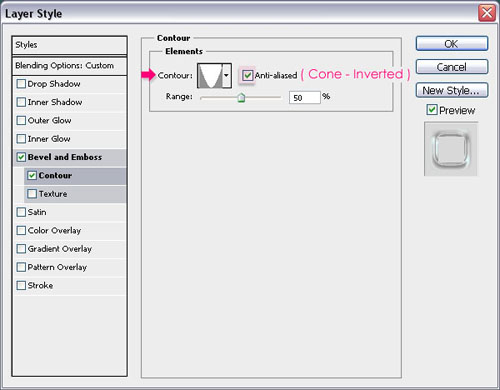
This will create the glossy stroke of the text effect.
Now click the copy text layer to apply another Bevel and Emboss effect:
– Bevel and Emboss
- Depth : 500
- Size : 20
- Uncheck the Use Global Light box
- Angle : 120
- Altitude : 48
- Gloss Contour :
- Check the Anti-aliased box
- Highlight Mode : Vivid Light
- Color :
#ffffff - Shadow Mode – Color :
#707070
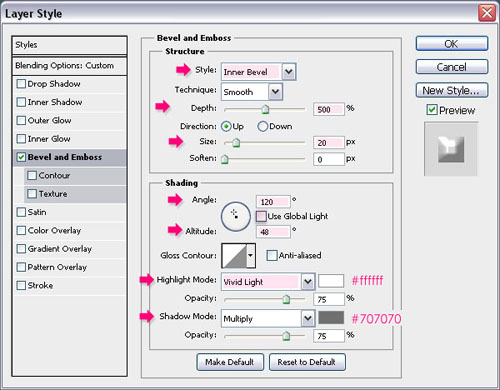
This will create the awesome glossy effect.

Step 5
Finally, set the Foreground color to #ffffff and the Background color to #b2ebfc, create a new layer on top of all layers and call it Glitter and change its Blend Mode to Vivid Light.
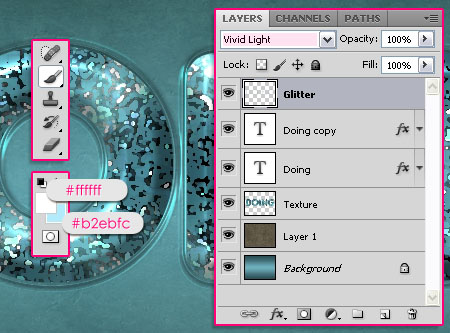
Use the Modified Glitter Brush to add some glitters inside the text. The effect is subtle, but really nice.

And this is the Final Result!
Did you enjoy this post? Please consider donating to help us cover our server costs.


Very nice tutorial!
Thanks a lot 🙂
Started the tutorial when i got to step 3 clicked on the filter then i discovered that the artistic was greyed out could not use it, is there another way around, or what am i doing wrong?? Using Photoshop 7
Hello William,
First, please make sure that the “Texture” layer is selected (active) before applying the filters. If it is, then go to Image -> Mode, and make sure that RGB and 8 Bits/Channel are ticked.
Hope this helps.
Very nice effect! Reminds me of nail polish 🙂
Cool! It really does somehow!
Thanks for the comment 🙂
It looks great!
Nice! tY!
You’re welcome.
Thanks for the comment.
Thank you 🙂
Nice tutorial.,it really help a lot in our banner or wallpaper.,
So glad you found it useful.
Thanks for the comment 🙂
Very Cool. Thanks
You’re welcome!
Thanks for the comment.
I love text tutorials.I will try this one to. Here is also another great 3D text photoshop tutorial http://www.prodezen.com/tutorials/Photoshop/Cool-3D-Text-Photoshop-Tutorial/Up-Cool-3D-Text-Photoshop-Tutorial.html
Nice tutorial 🙂
Thanks for the comment and the link.
Now this one is definitely my favorite tutorial so far!
Ooo! That’s great to know!
Thanks a lot 🙂
Muy bueno el tutorial excelente trabajo. Gracias……
Glad you liked it.
Muchas Gracias for the comment 🙂
Wow, this is very nice tutorial. I want to try to create this right now. Love the blue color you choice, make the font look awesome! thanks
That’s really great to know.
Thank you very much for your kind words 🙂
Very cool! Thanks a lot 🙂
You’re welcome.
Thanks for leaving a comment 🙂
Thanks for a great tutorial.
It is so easy to follow step by step.
Now I will try to do a whole alpha with this technique.
Thank you so much for the comment 🙂
Hope it turns out great 😉
Cheers!
umm, i downloaded the modified brush…. i opened it, came on the photoshop, then i followed your tut, then when i got to the glitter bit, i dont know which one is the modified brush because there is lots of presets now! could you please help me?
Hello Ahmmed,
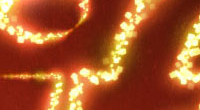
After you load the Brush, select the Brush tool, then, in the Options bar at the top, click the Brush Preset Picker and scroll down. The last brush is the one you last added. (Check this image for reference).
After you select the Brush, you can go to the Brush panel to modify its settings if you need to.
Hope this helps.
Please feel free to add a reply if the problem still exists.
Regards.
the problem still presists……in your picture, you no. 10 and square shaped pic but on mine it is No. 14 and has picture of a dust/leaf thing…..i tried downloading it agai but im still getting the same one!!
That’s exactly the brush you need. Just click it and paint some glitter inside the letters.
Did you try doing that?
Nice Tutorial
Thank you.
Thank’s 🙂
You’re welcome 🙂
This is just GREAT! Jeezz, how much I love your tuts!
So, I’ve tried and made my own version with your help then: http://mjumpringles.deviantart.com/#/d4yb862
Thank you so much, this really means a lot.
Beautiful outcome as well. I like how you added your own touch to the effect.
Thanks a lot for the comment and the link 🙂
Awesome result !!! great tutorial
Happy you like it.
Thanks a lot for the comment.
Can I make a Video Tutorial Of It ?
Sorry for that, but this is not allowed. It is a form of redistributing the material on the site which violates the copyright terms.
Thanks for asking.
thank you…Your training is very smooth and even novice users can easily benefit from the training they need .
very very thank’s
It’s great to know you found the tutorials easy to follow.
Thank you so much for your kind words.
This is absolutely a very useful tutorial. Most often we need to do this. Thank you for sharing a very helpful tutorial. I found some more very useful tutorials from http://blog.phototrims.com you can check it out.
Hello there…
Your tutorial is simple and the result is great! I have done it up to the last step with the brush. I’ve installed your brush, but it has not worked, because I have PS 7 🙁 My question is, is it possible to send this brush as psd-file to me, so I can make my brush of it?
Kind regards,
Sevan Wien