
Royal 3D Text Effect in Photoshop CS6
This tutorial will explain how to use the new 3D tools in Photoshop CS6 to create an elegant royal 3D text effect.
Some details will be added to clarify a couple of steps, so that the process is a pretty easy one to follow. Hope you enjoy it.
The Final Result

Tutorial Details
- Software Used : Photoshop
- Version : CS6 Extended
- Time : 1:15 – 2:30
Resources
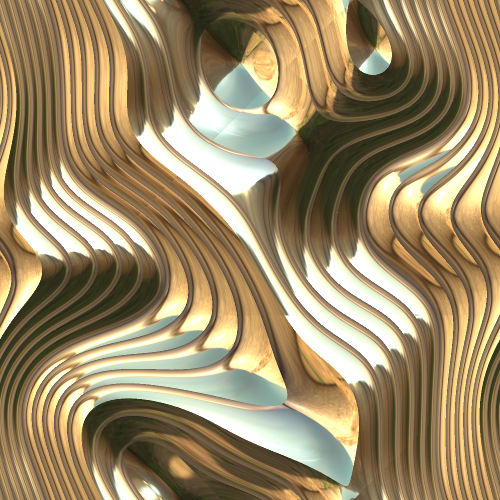
- Smooth Metal by PavStock.
- Dunkin Sans font.
The following Filter Forge filters were used to create the textures in this tutorial:
- Onduline by Guss.
- Sci-Fi Mega Metal 10 by Ronjonie.
- Knitted Fabric by Constantin Malkov.
The Textures Used: (Right click to save)
- Front Inflation Material Bump Texture
- Extrusion Material Bump Texture
- Background Material Bump Texture
Hope 2013 will be a wonderful year for all of you.
Don’t forget to send me any notes, suggestions or ideas through the contact form.
Best regards,
Rose
.
The 3D Settings
Just make sure to check the 3D Settings under Edit > Preferences > Performance, and Edit > Preferences > 3D.
Default values should work fine, but if anything seems to be not working properly you can always check those Settings.
Step 1
Create a new 1600 x 1200 px document and fill the Background with Black.
Create the text in white using the font Dunkin Sans. The font Size is 400 pt and the text is better written in All Caps (if you’re not using only numbers).

Step 2
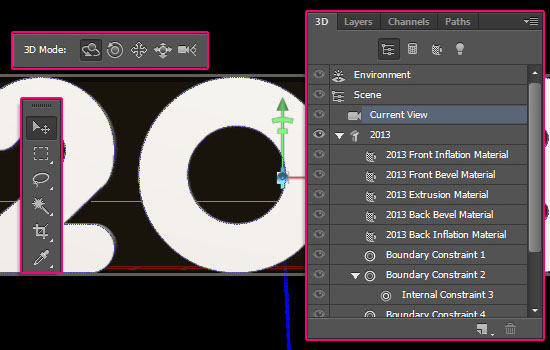
With the text layer selected, go to 3D > New Extrusion from Selected Layer. This will instantly convert the text layer into a 3D layer. All the 3D scene elements can be found in the 3D panel (Window > 3D).
Click the main mesh name to edit its Settings.
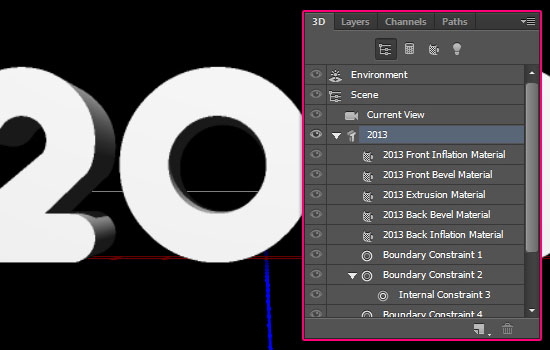
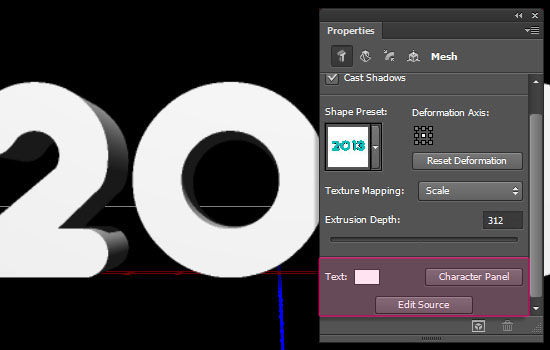
The 3D Mesh Settings and attributes can be accessed and modified through the Properties panel (Window > Properties). If you scroll down the Properties panel you’ll find the Character Panel button, which opens the Character Panel, and the Edit Source button.
The Edit Source will open the original text layer in a separate window so that you can modify it as you wish. Then, you can save your changes (File > Save), close that window (File > Close), then go back to the 3D mesh document, which will be automatically updated with any changes you made.
This is one of the great options available in the Photoshop CS6 3D environment. The design can be edited and reused instead of having to reapply all the Settings to recreate the 3D object. Makes life much easier!
(This option doesn’t exist in CS5, where the text layer is rasterized before it’s converted to a 3D layer, hence, it can’t be modified.)
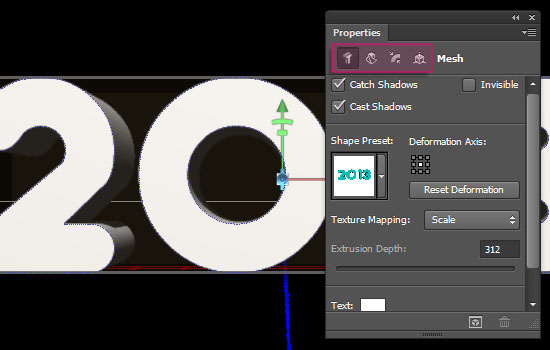
The four icons at the top of the Properties panel are like mini tabs for different properties. They are (from left to right): Mesh, Deform, Cap, and Coordinates.
Always pay attention to which icon is selected so that you get the right properties.
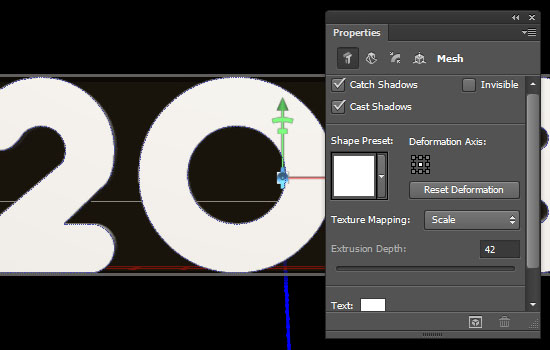
Start modifying the 3D mesh by changing the Extrusion Depth to 42.
Step 3
Moving the different elements inside the 3D scene is much MUCH easier in CS6. No special tools are needed, you can do it all using the Move Tool.
In this tutorial we are not going to move the mesh itself. We are just going to move the camera, which means we’ll be changing the view.
Select the Current View in the 3D panel, and pick the Move Tool. You’ll notice a couple of new icons appear to the far right. Those tools are the Rotate, Roll, Drag, Slide, and Scale (Zoom in and out) the 3D Object Tools.
All you need to do is select the icon that you want to work with, click and drag inside the document, and move the selected 3D object around.
The different elements of the 3D scene can be selected either through the 3D panel, or by clicking them directly in the 3D scene with the Move Tool. So make sure not to click the 3D mesh itself while changing the camera view.
You’ll need some time to get used to moving the 3D objects around, but you’ll get used to it pretty fast. Mush easier and faster than in CS5 actually.
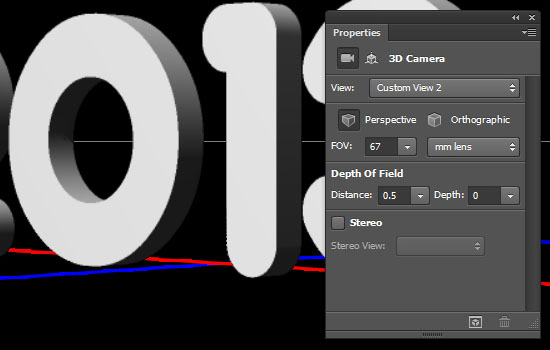
In the Properties panel, you can see that the camera Settings are now shown since the Current View is selected. You can change the camera view from here as well.
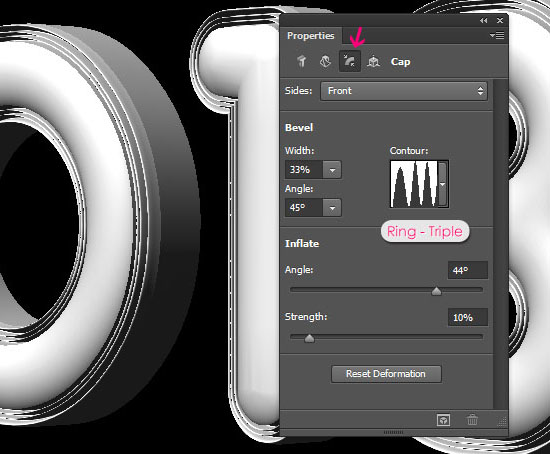
Once you get a camera view that you like, click the main 3D mesh name (2013) again in the 3D panel, then, in the Properties panel, click the Cap icon.
Under Bevel, change the Width to 33 and the Angle to 45. Under Inflate, change the Angle to 44 and the Strength to 10. Finally, choose the Ring – Triple contour.
Step 4
Next, we are going to create the materials used. Start by clicking the Front Inflation Material tab in the 3D panel, then go to the Properties panel to modify the Settings.
If you see any texture icon for any of the values (instead of the folder icon), click it and choose Remove Texture.
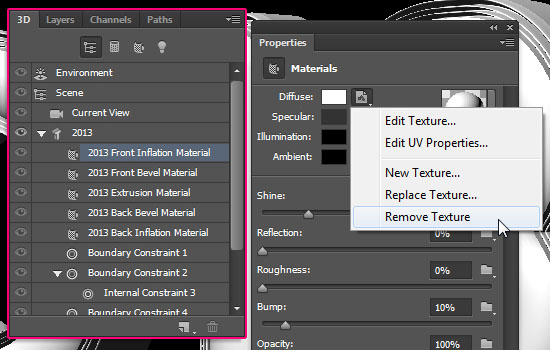
Change the Diffuse color to #62603e and the Specular color to #bbb08c. Then change the rest of the values as shown in the image below.
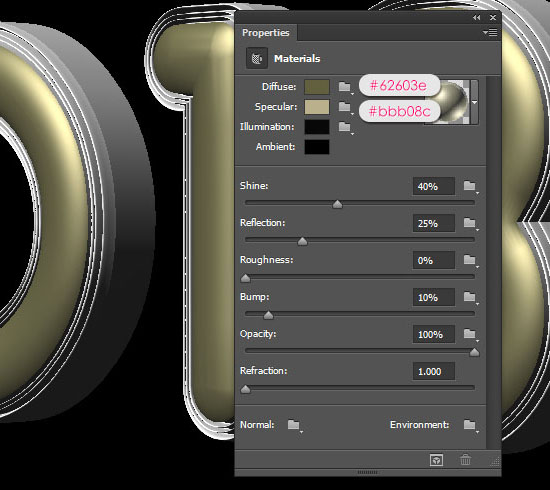
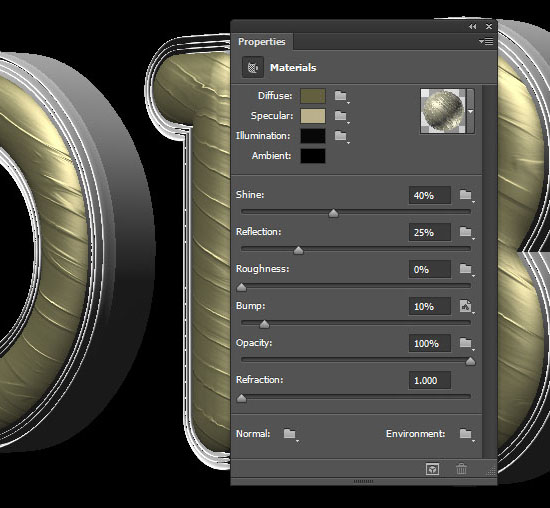
Click the folder icon next to the Bump value and choose Load Texture. Then, choose the Front Inflation Material Bump Texture image.

This will create an illusion of 3D folds inside the text.
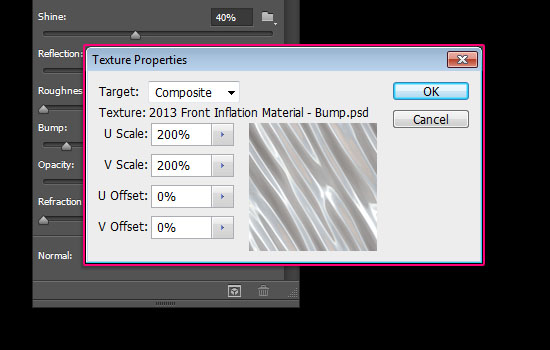
If your text doesn’t look the same, click the texture icon next to the Bump value and choose Edit UV Properties.
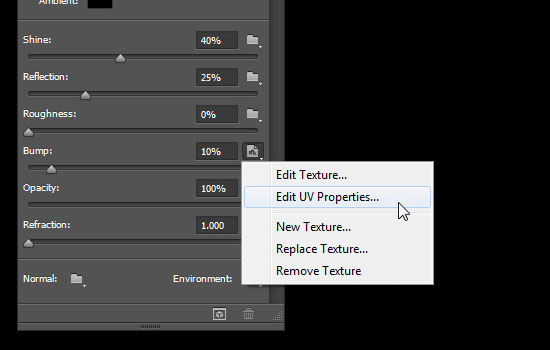
Set both the U Scale and V Scale values to 200%, and both the U Offset and V Offset values to 0.
Step 5
Next, click the Front Bevel Material in the 3D panel and go to the Properties panel. Change the Diffuse color to #a38228 and the Specular color to #bbb08c. Then, change the other values as shown below.

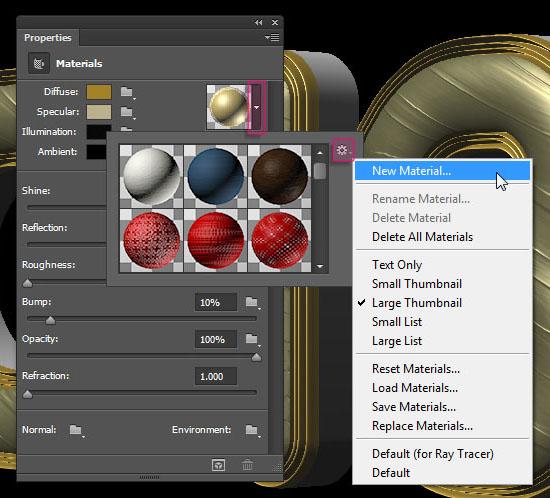
Click the Material picker box, then click the pop-up menu icon to the top right corner and choose New Material.
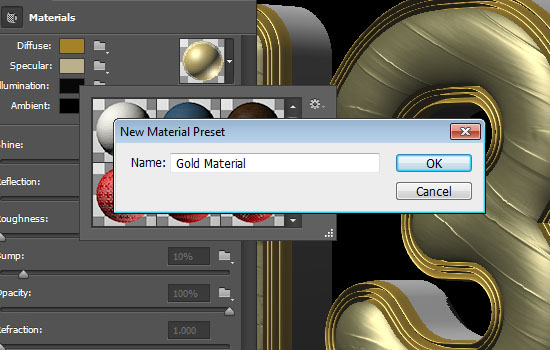
Type in a name for the material and click OK.
Now, when you scroll down the Material picker, you’ll find the material you saved, and you can apply it to any surface by clicking it.
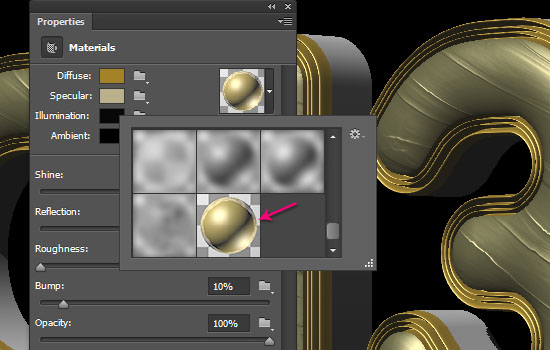
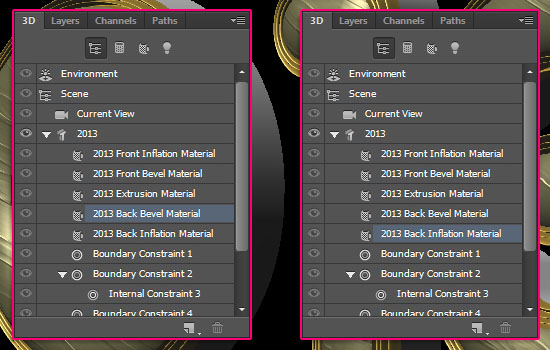
Apply the saved material to the Back Bevel Material and Back Inflation Material. (Select each one from the 3D panel, then click the material’s icon from the Material picker in the Properties panel to apply it).
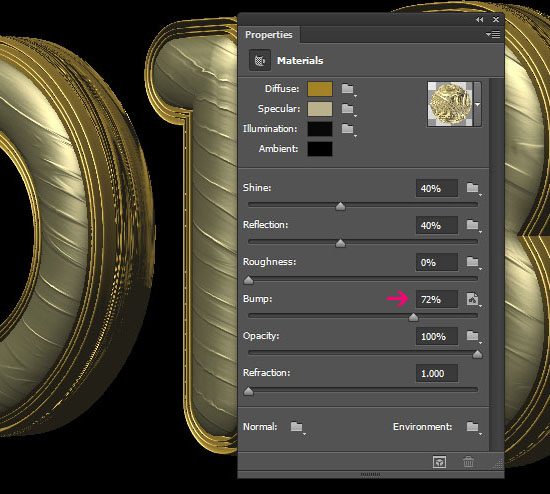
Step 6
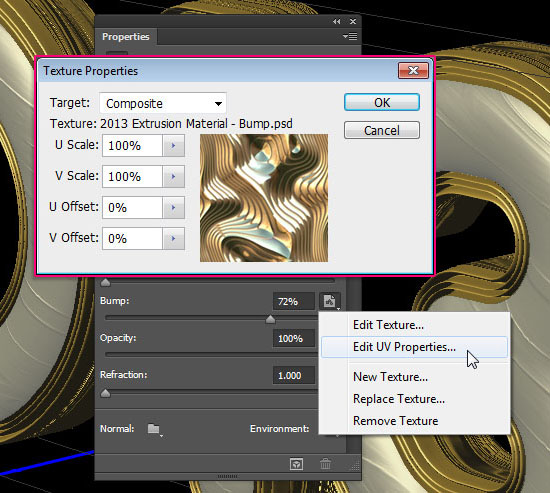
Click the Extrusion Material in the 3D panel, and apply the saved material once again. Then, increase the Bump value to 72% and load the Extrusion Material Bump Texture image like you did before.
For the UV Properties, set the U Scale and V Scale values to 100%, and the U Offset and V Offset values to 0.
This concludes working with the materials.
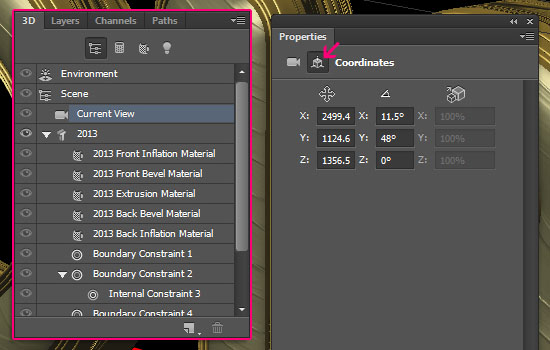
Step 7
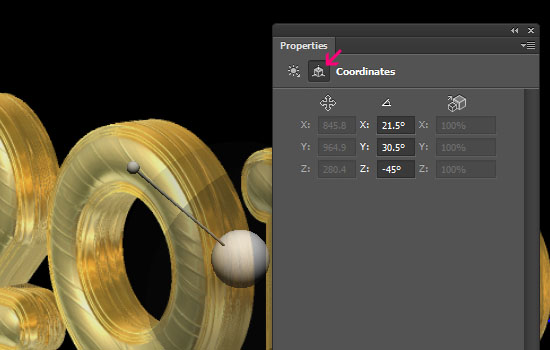
Click the Current View in the 3D panel, then click the Coordinates icon in the Properties panel. You can enter the values for the camera position here instead of moving the camera using the Move Tool.
The values below are the ones used in the tutorial.
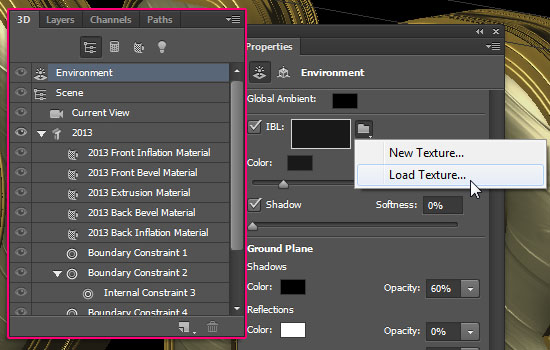
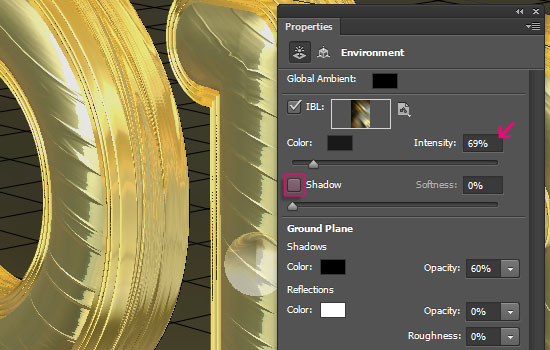
Now click the Environment tab in the 3D panel. Check the IBL (Image Based Light) box, then click the folder icon next to it and choose Load Texture. Open the Smooth Metal texture.
Un-check the Shadow box, and reduce the Intensity to 69%.
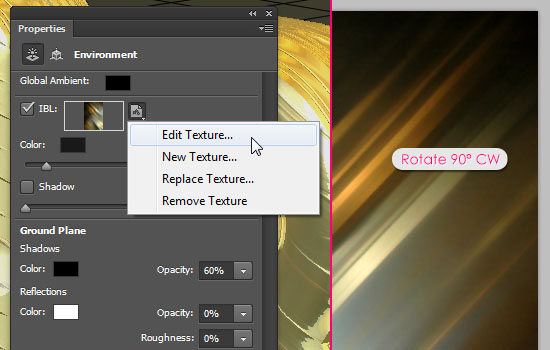
Click the IBL texture icon and choose Edit Texture. This will open the texture in a new window. Go to Image > Image Rotation > 90° CW.
Go to File > Save, then File > Close to save the changes and go back to the original document.
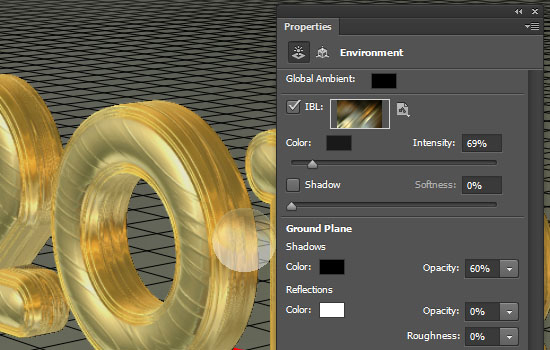
The texture acts like a surrounding environment for the 3D mesh. So it affects the reflections and the coloring in the scene.
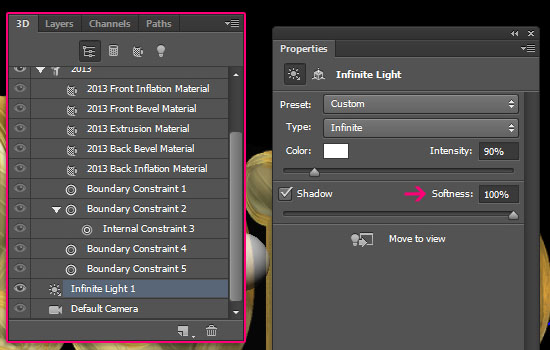
Click the Infinite Light 1 in the 3D panel, then change the Shadow Softness to 100% in the Properties panel. This will make the shadows more feathery rather than harsh.
Click the Coordinates icon in the Properties panel. Again, you can control the positioning of the light through these values or by moving the light in the scene using the Move Tool.
That’s it for the text.
Step 8
Create a new layer on top of the 3D layer then fill it with the color #310303 using the Paint Bucket Tool.
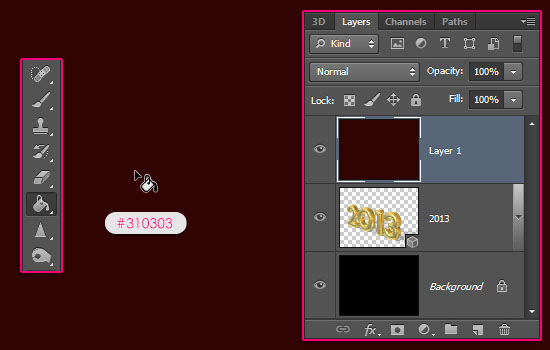
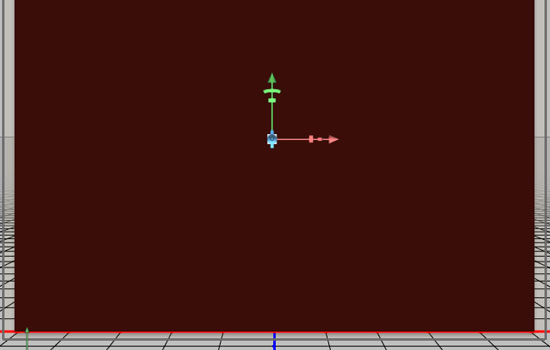
Go to 3D > New Mesh From Layer > Postcard. This will convert the layer to a 3D object (plane).
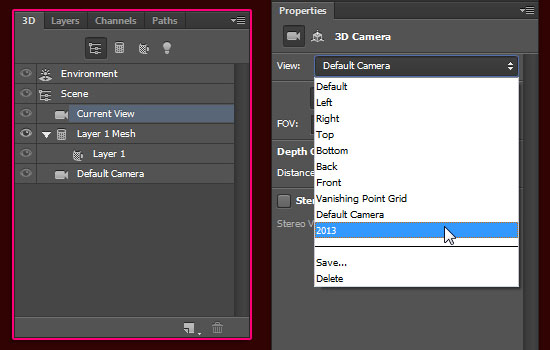
In the 3D panel, click Current View. Then, in the Properties panel, choose the name of the other (text) 3D layer you have in the View drop down menu.
This will make the camera positions of both 3D layers the same, which is a good thing to do before merging them in one layer (scene).
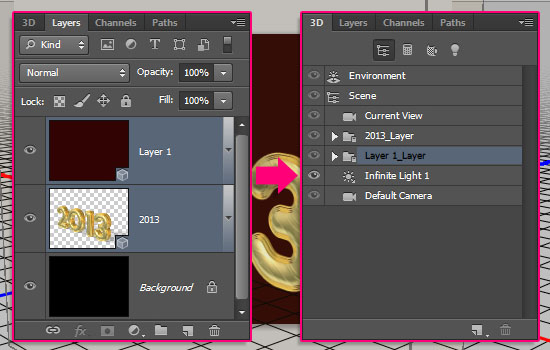
Back to the Layers panel, Ctrl/Cmd + click both 3D layers to select them. Then go to 3D > Merge 3D Layers. This will place the two 3D objects in one layer, which means they are both now in the same scene as well.
So if you open the 3D panel, you can see both objects listed there. You can still select and modify each one separately though.
(Click the arrow icons to the left to expand/collapse the 3D objects’ lists.)
Step 9
Select the new layer’s name in the 3D panel to modify the material’s Settings.
The Diffuse material is already applied as a texture using the fill color.
Change the Specular color to #894814 and the rest of the values as shown below.
Use the Background Material Bump Texture image for the Bump.
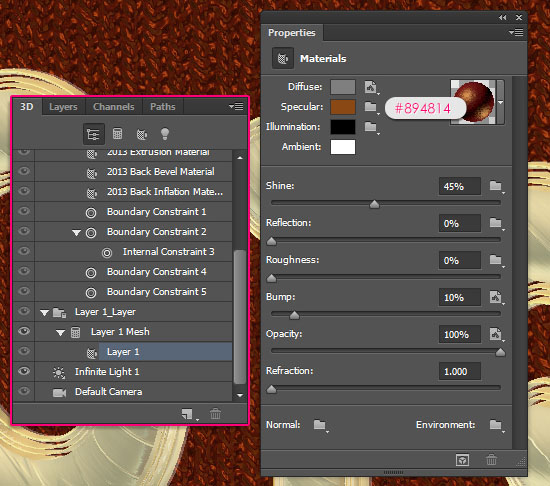
For the UV Properties set the U Scale and V Scale to 300%, and the U Offset and V Offset to 0.

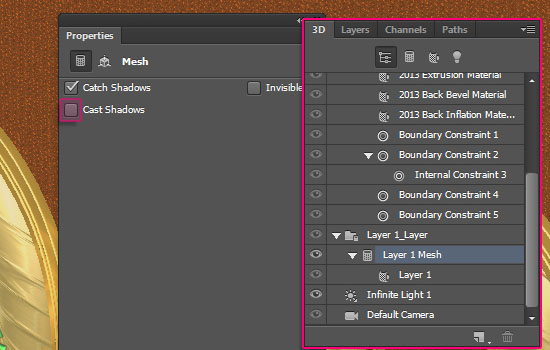
Select the layer’s mesh name in the 3D panel, then un-check the Cast Shadows box in the Properties panel.
Next we need to separate the text from the 3D plane (postcard). If you click the Coordinates icon, you can use the values in the images below. But you can go ahead and use the Move Tool to select and move the objects in the 3D scene.
Just make sure not to rotate them. If you want to rotate the view then change the camera’s rotation values.
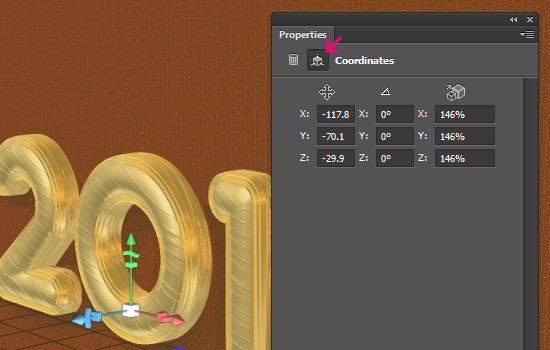
If you want to move the 3D mesh, select it in the 3D panel then click the Coordinates icon in the Properties panel and type in the values you want.
(Or move it in the scene using the Move Tool).
The idea is to make the 3D mesh look like it’s hung on the plane. So there shouldn’t be much space between the two objects.

Step 10
Once you like how the 3D scene looks and you’re done modifying it, click the Render icon down the 3D panel.
The rendering might take some time. You can check the progress in the status bar at the bottom.
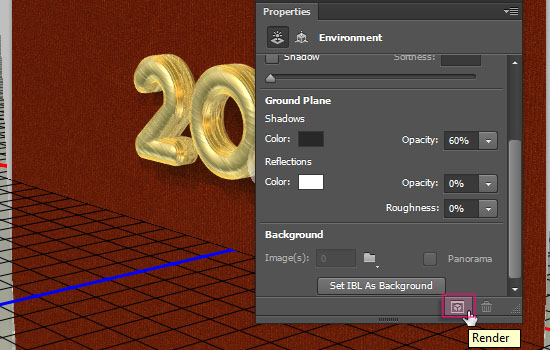
You should get an awesome 3D text now!

Step 11
Set the Foreground color to #7d7d7 and the Background color to White. Pick the Gradient Tool. In the Options bar, choose the Foreground to Transparent fill, click the Radial Gradient icon, and check the Reverse box.
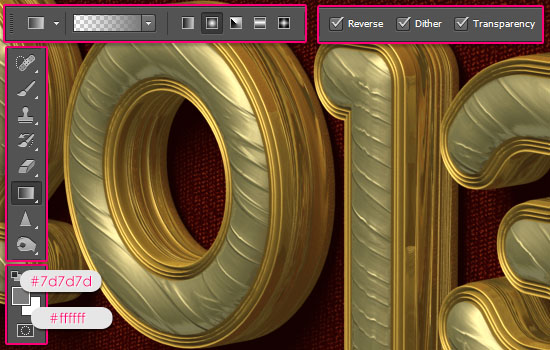
Create a new layer on top of all layers, and change its Blend Mode to Multiply. Then click and drag from the center of the document to one of the corners to create the gradient.
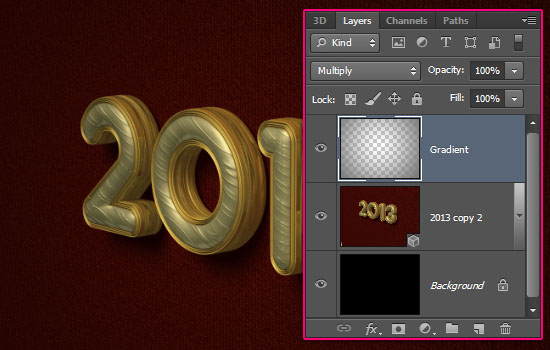
Click the Create new fill or adjustment layer icon down the Layers panel and choose Gradient Map.
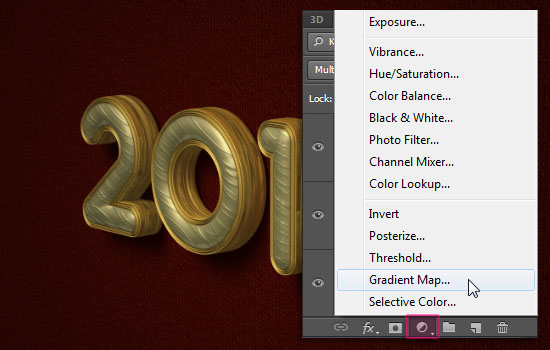
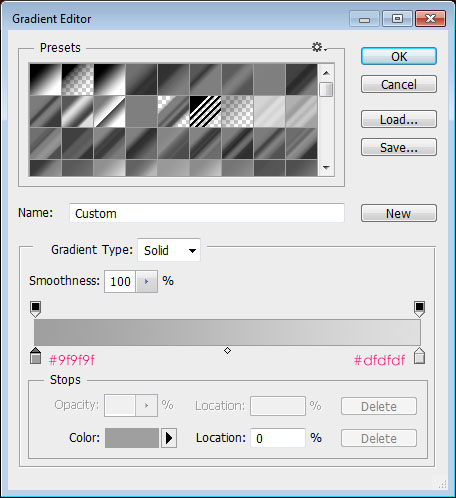
Change the adjustment layer’s Blend Mode to Overlay and it Opacity to 45%. Click the Gradient box to create the gradient used.
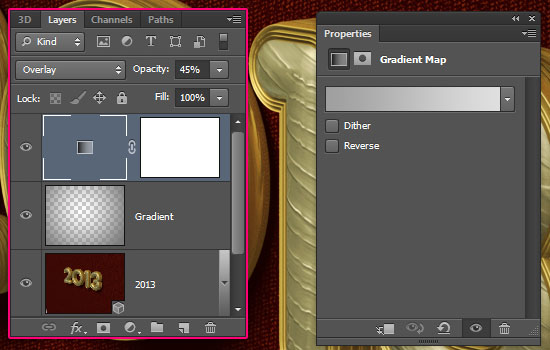
The two colors used are #9f9f9f to the left and #dfdfdf to the right.
And that’s it!
Hope this was a helpful introduction to the 3D basics in Photoshop CS6. Please feel free to leave any questions or suggestions below.
And …. Happy New Year 😀
Did you enjoy this post? Please consider donating to help us cover our server costs.


Very nice work. (^_^)
Thank you very much 🙂
hi
Hello! 🙂
I like It ^^
Thanks a lot ^_^
i love the effect!
one question though,
i can’t make all these happen if cs6 is not extended, and without the filter forge??
You don’t need Filter Forge since the textures are provided in the Resources section. But you need CS6, and with some work around the settings you can achieve the effect in CS5. The thing about CS5 is that it has a different interface, so you’ll need to search for the settings in different places, and maybe under different names.
You can check out our other CS5 3D tutorials for help if you like.
Please feel free to add any other questions you have.
Thanks for the comment 🙂
just awsome !!
Thank you very much! 🙂
i like this one because it is 2013
Glad you do!
Thanks for the comment.
Really Great Job,, I have a little problem,, apparently my video card can’t take 3D effects perfectly,, Im facing a problem when trying to “merge 3D layers” of the text and background is that the GPU reached it’s limit,, I searched all over the internet to find a solution but it seems to be a hardware issue,, any suggestion how can I continue the design without this step. Thank You
I wish I can help you, but it most probably is a hardware issue. Even though I find it pretty weird since there are only two layers.
You might want to check the settings under Edit -> Preferences -> 3D to see if you can increase the available VRAM, and you can as well check the Performance settings (also under Preferences).
If you want to skip the whole second layer steps, you can go ahead and render the scene immediately, or change the Environment settings as you like (in the 3D panel), then render the 3D mesh on ground instead of on a wall.
Hope this helps.
Thank you for the comment.
I f*ing freaking out, the text is sinking into background, half is seen, half is invisible
Now it became very dark, when i render 🙁
If the values in the tutorial did not work for you, you can go ahead and use the Move Tool to drag the mesh outwards until it no longer sinks into the background.
When both meshes are separated, the rendering should work fine.
Please try that out, and feel free to add another reply if the problem still exists.
THE TEXT EFFECT IS SUPPER
BUT
IT WILL WORK IN THE VERSION 7 ARE NOT?
You need Photoshop CS6 Extended. If you are using the CS5 version, you’ll need to search for some settings as they are not in the same locations.
Hope this helps.
Thank you for the kind comment.
Dear Rose sir Marvelous Oh wonderful the 2013 gold letters I never see such a beautiful text I want 3D Royal PSD file. I have only photo shop_7.It is very difficult to me to follow such cs6 .So please show the PSD file.please Siir
Very nice Job. Thank´s a lot. Had my Problems with the language.
Im German. But it tourned out ok.
Glad it did!
Danke schön for the kind words 🙂
how to use the font after download?
Just copy and paste it into your “Fonts” folder, and you’ll be able to use it.
Try googling “installing fonts”, and you’ll get many results for more details.
Hope this helps.
You’re master of desiging now i agree really when i saw your work it’s amazing… really good
This means a lot!
Thanks a bunch.
Great job mate – thanks a lot!!!
Glad you liked it.
Thank you for the comment.
Can you plzz tell me the font name from: “Be awesome” text ?
Ohh and by the way … you are awesome !
Sure, it is TheNautiGal. It is not a free font though.
And thank you! You’re even more awesome! 😀
Hello. Thank so many nice tutorials.’ll Let you film the train.
Glad you like them.
Thank you for leaving a comment.
hi
you are number one.
thank you very much.
You’re welcome!
Thanks a lot for the comment.
I really like it so much………..
Glad you do 🙂
Thanks for the comment.
Apparently when I reach the part where I merge the layers into one …I cant see the text at all. It became really odd after I select ‘2013’ as the current view. Whats wrong? I have been scratching my head the whole night.T_T
You need to change the camera view before merging, and it is normal not to see the text, since the meshes are in separate layers. But even if this happens after merging them (make sure to merge them by going to 3D -> Merge 3D Layers), you can reposition the background layer.
Can you see the text if you move the background mesh?
Please check how to get them here.
Hope this helps 🙂
Perfect, thanks! 🙂
You’re very welcome 🙂
NOTE: You can edit the double ring contour and easily turn it into a triple and save. As for the rest, I was unable to do some of these things or they didn’t turn out the same, but I was still very happy with the results, even more than yours. I had problems with the render time and computer freezes if I tried to multitask, but got it done in 2+ hours the last time. Tell me what you think? http://bit.ly/1IXVJ8B
Oh wow! That’s a wonderful result, the contrast and depth of the final image are very interesting!
Thank you very much for sharing your work and for the comment 🙂
Choose the double ring, then use the cursor to add nodes and adjust the line so that you have a triple ring as shown, save with a new contour name. Easily done.