
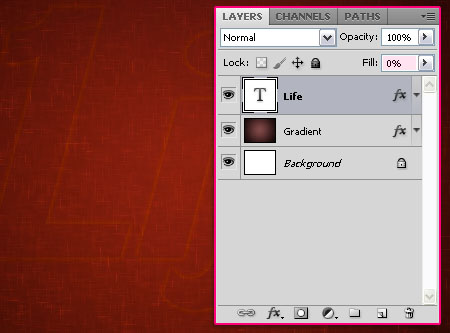
Shiny Sparkles Text Effect
This tutorial will explain a very simple way for creating a nice glowing sparkles text effect, using a couple of brushes and glow Layer Style.
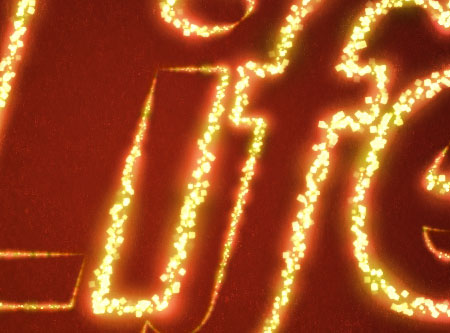
The Final Result

Tutorial Details
- Software Used : Photoshop
- Version : CS5 Extended
- Time : 0:30 – 0:45
Resources
Step 1
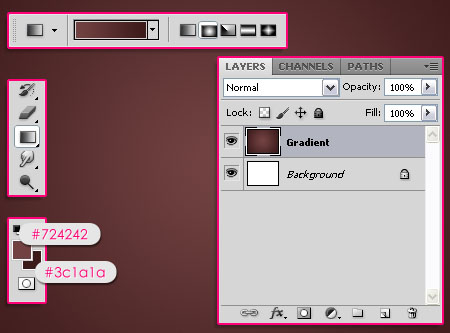
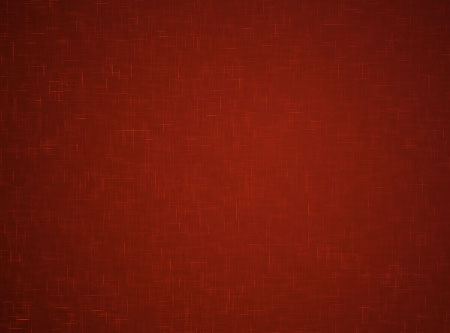
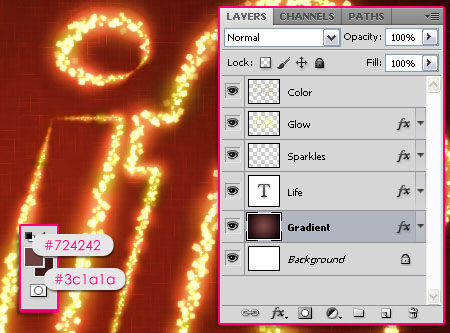
Create a new 1024 x 768 px document. Create a new layer on top of the Background layer and call it Gradient. Set the Foreground color to #724242, and the Background color to #3c1a1a, then, create a Radial Gradient from the center of the document to one of the corners.
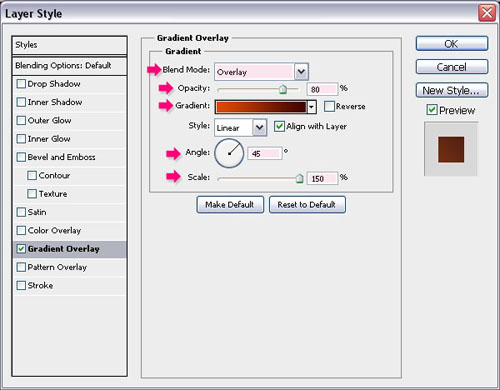
Double click the Gradient layer to add a Gradient Overlay effect:
– Gradient Overlay
- Blend Mode : Overlay
- Opacity : 80%
- Angle : 45°
- Scale : 150%
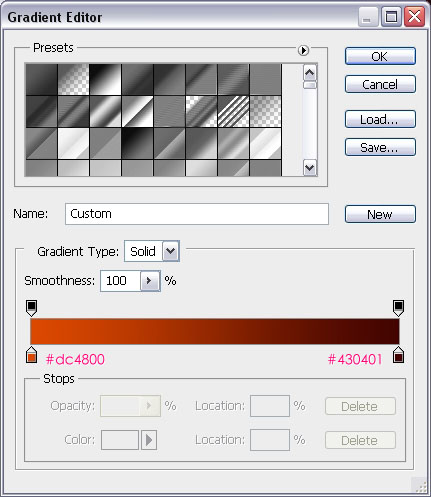
- Click the Gradient box to create the gradient
Use the colors #dc4800 (to the left) and #430401 (to the right) to create the Gradient.
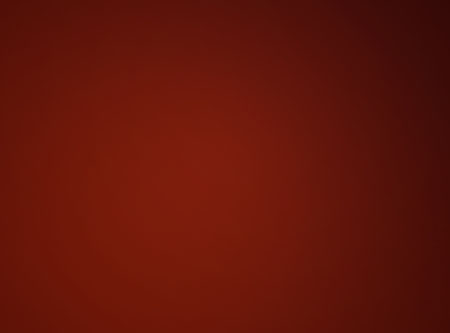
This is what you should get.
Go to Filter -> Sketch -> Water Paper, and set the values as shown below:
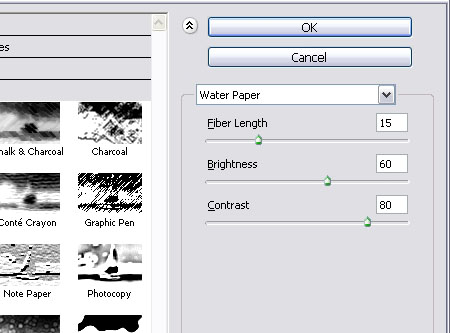
This will add some nice looking sparkles to the Background.
Step 2
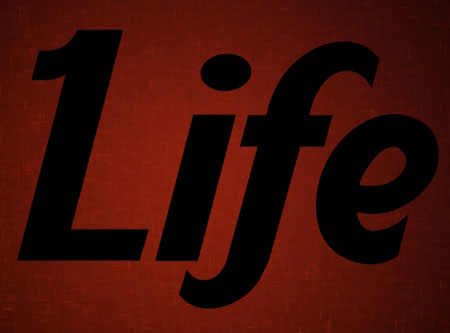
Create the text in Black. The font used is Aardvark Cafe and the Size is 500 px.
Double click the text layer and add an Outer Glow effect:
– Outer Glow
- Blend Mode : Vivid Light
- Color :
#a6dc6b - Size : 10
- Range : 100%
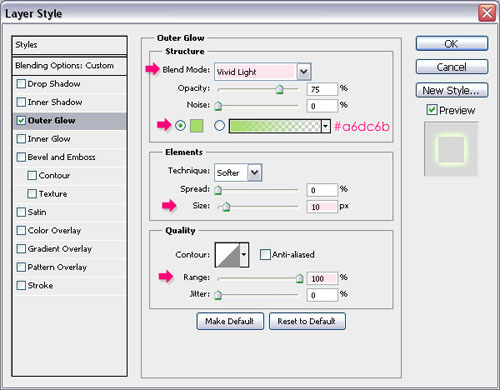
Change the text layer’s Fill value to 0. The text should have a very subtle glow.
Step 3
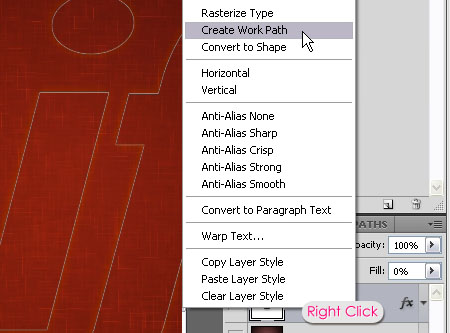
Right click the text layer and choose Create Work Path.
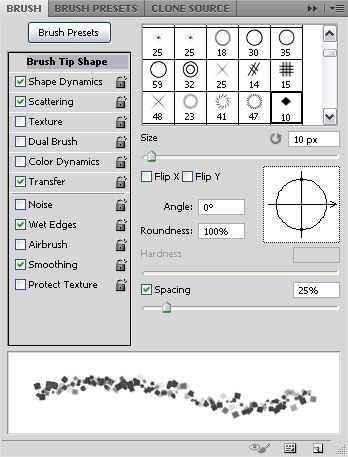
Download the Modified Diamond Sparkles Brush. It is a simple diamond brush, and you can check its Settings after you load into the Brush panel (Window -> Brush). Select this brush before moving on to the next step.
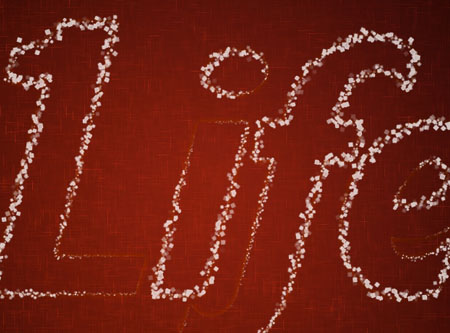
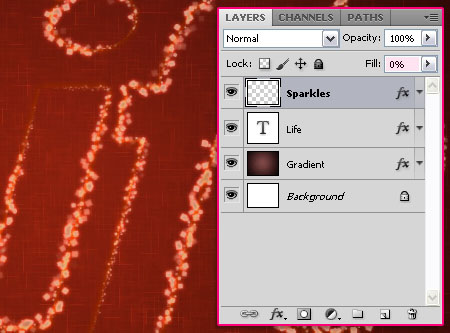
Create a new layer on top of all layers and call it Sparkles. Set the Foreground color to White, and pick the Direct Selection Tool.
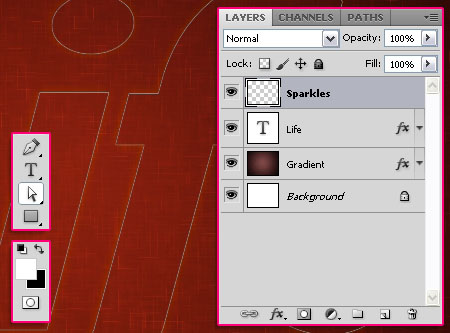
Right click the path and choose Stroke Path.
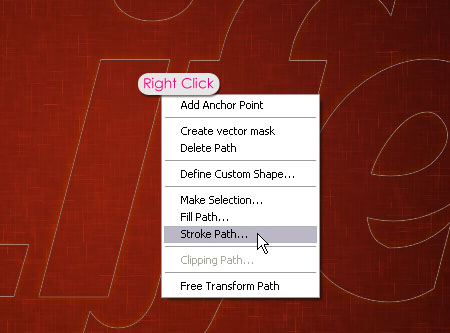
Choose Brush from the Tool drop down menu, and check the Simulate Pressure box.
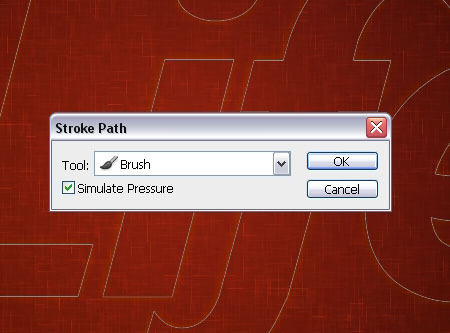
This will stroke the path with the sparkles brush. Hit Enter/Return to get rid of the path.
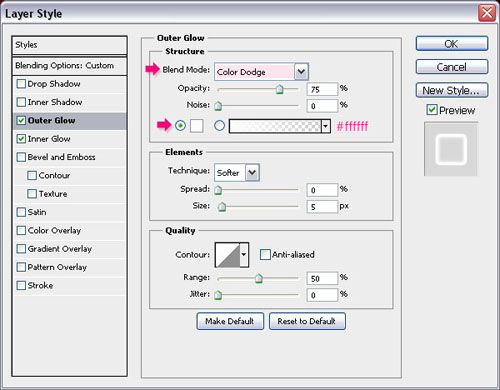
Double click the Sparkles layer to apply the following Layer Style:
– Outer Glow
- Blend Mode : Color Dodge
- Color :
#ffffff
– Inner Glow
- Color :
#f4edd3
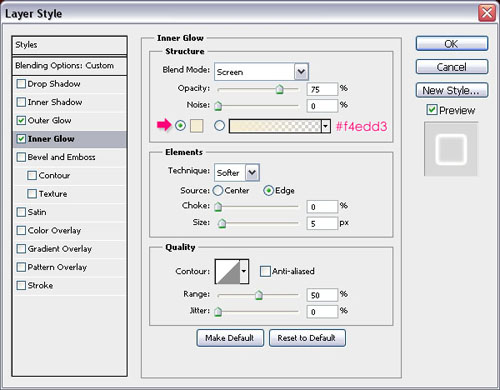
This will add a simple glow to the sparkles. Change the Sparkles layer’s Fill value to 0.
Step 4
Choose a soft round brush, and change its Setting as shown below.
Brush Tip Shape
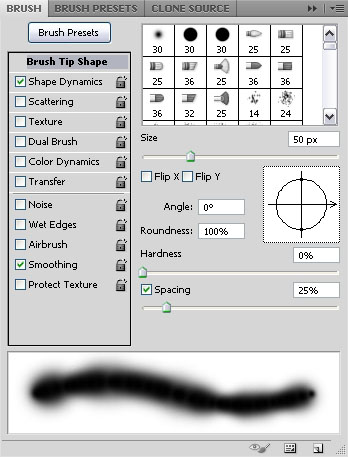
Shape Dynamics
Create a work path once again (right click text layer -> Create Work Path), create a new layer on top of all layers and call it Glow, set the Foreground color to #f8ff99, and stroke the path (right click the path -> Stroke Path) with the brush, and hit Enter/Return.
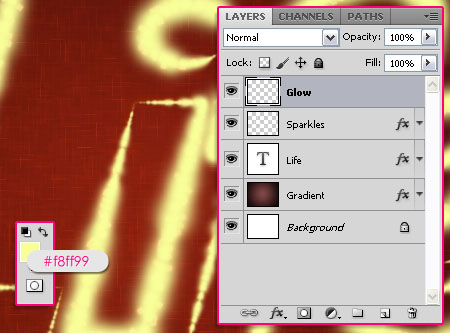
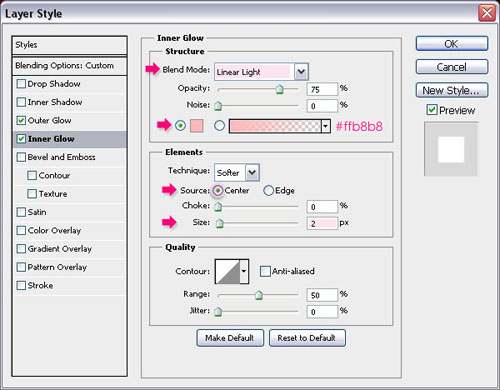
Double click the Glow layer to apply the following Layer Style:
– Outer Glow
- Blend Mode : Soft Light
- Color :
#ffffff - Size : 2

– Inner Glow
- Blend Mode : Linear Light
- Color :
#ffb8b8 - Source : Center
- Size : 2
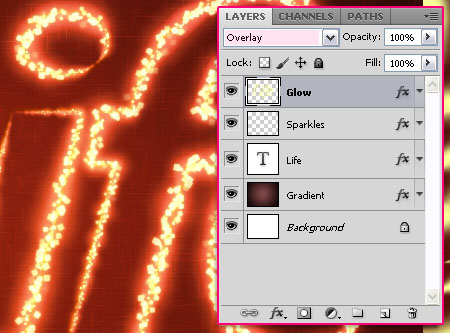
Change the Glow layer’s Blend Mode to Overlay. Notice how bright the text is now.
Step 5
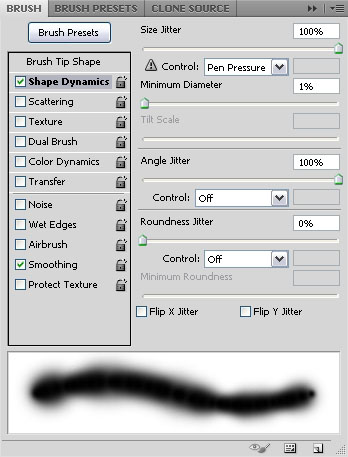
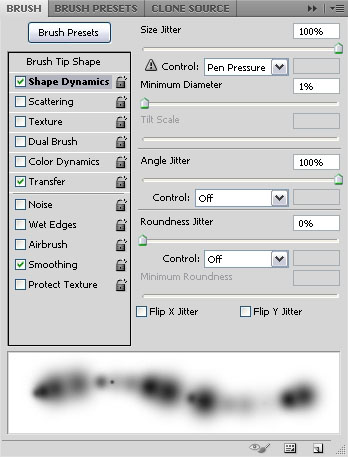
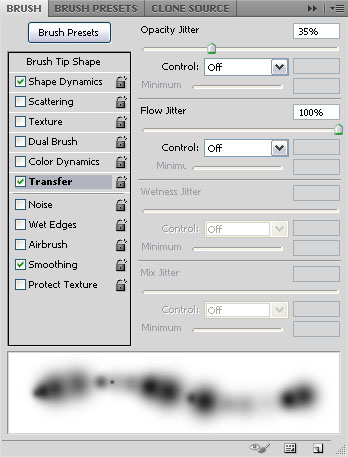
Once again, choose a soft round brush, and change its Setting as shown below.
Brush Tip Shape
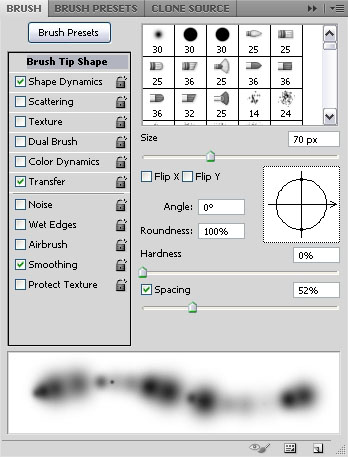
Shape Dynamics
Make sure to choose Pen Pressure from the Size Jitter Control drop down menu.
Transfer
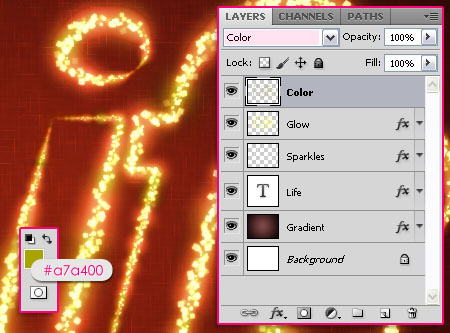
Create a work path, create a new layer on top of all layers, call it Color and change its Blend Mode to Color, set the Foreground color to #a7a400, and stroke the path with the brush, then hit Enter/Return.
This will add a nice green tone color to the glow.
* You can stop right here if you like the effect this way. The following two steps are optional, but they add a nice touch to both the Background and the text, making the final effect more winter/holiday-like. *
Step 6
Set the Foreground and Background colors back to #724242 and #3c1a1a, then select the Gradient layer.
Go to Filter -> Brush Strokes -> Sprayed Strokes, and change the values as shown below:
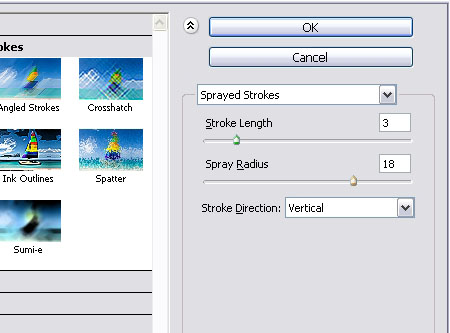
The big sparkles in the Background will disappear, leaving a smoother looking splattered-like texture.
Step 7
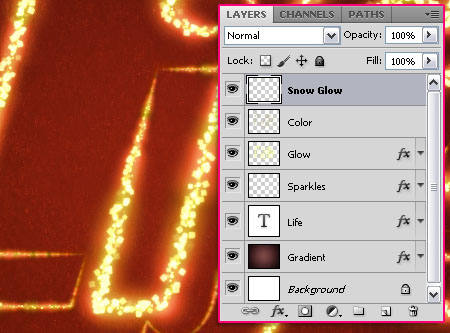
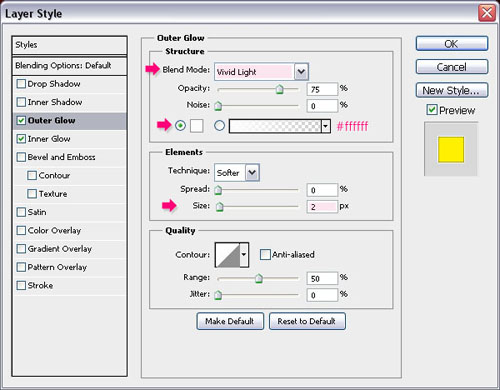
Create a new layer on top of all layers and call it Snow Glow, then double click it to apply the following Layer Style.
– Outer Glow
- Blend Mode : Vivid Light
- Color :
#ffffff - Size : 2
– Inner Glow
- Blend Mode : Linear Light
- Color :
#ffe400 - Source : Center
- Size : 2
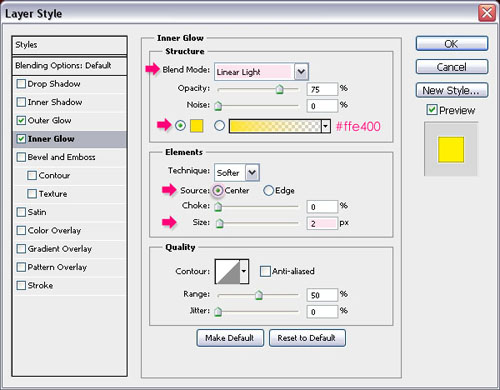
Set the Foreground color to White, and use the last brush you created (in Step 5) to draw some “glowing snow like” strokes along the text edges. You can use the Eraser Tool to remove any unwanted areas.
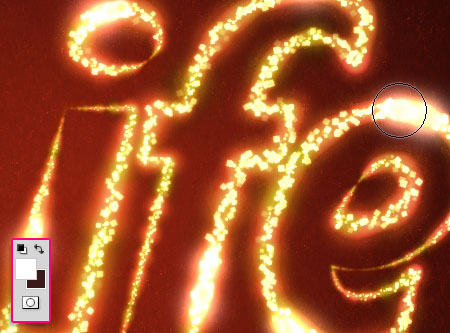
And we’re done!
Did you enjoy this post? Please consider donating to help us cover our server costs.


It looks nice! There are some complicated brushes in this tut, I will try and see what result I’ll obtain 🙂 thanks
They’re not that complicated actually, but there are a couple of values to change 😉
Hope you’ll get a nice result.
Thanks a lot for the comment 🙂
Thank You this help me very much 🙂
Glad it did 🙂
Thanks for the comment.
This is amazingly beautiful!!! Thank you very much!!
You’re welcome 🙂
Great to know that you like it, thanks a lot for the comment 😀
Hi, could you please provide brush settings for step 2?
You can download the brush and check all its settings (Window -> Brush). Here is a link on how to load the brushes into Photoshop.
If you still have any questions please feel free to add another comment.
Very nice 🙂
Thank you 🙂
I love the ending result! It wasn’t as complicated as I thought it be. Its like making an almost custom font. Thanks for this fine tutorial
You’re welcome!
Thanks for the comment 🙂
hi! nice and easy tut!
i used it here: http://lordbram.deviantart.com/#/d4j0jok
greets vibezallive
That’s really cool!
Thanks a lot for the comment and the link. 🙂
Hi!
Why I cannot choose Wet Edges? Please help me! Nice day to you
Is it grayed out? Were you able to modify all the other settings?
YOU ARE MIND BLOWING IN PHOTOSHOP TEXT EFFECTS TUTORIALS IS VERY COOL TUTS YOU ARE ONE ONLY WHOM I AM LIKING TO FOLLOWING TEXT TUTORIALS FOR INCREASE MY KNOWLEDGE … THANKS MAN KEEP IT UP ALWAYS GOOD WORK PL………………….
I appreciate your amazing words very much. Your support means a lot indeed!
So glad you are enjoying the tutorials and finding them helpful.
Once again, this just means a lot! Thank you very much.
Best regards.
hi guys how to add a gradient please tell me how 🙂
Do you mean in the first Step? You need to click the color stops below the gradient bar, then change the color value for each one.
If that’s not what you mean, please feel free to leave a reply with some more details.
Possible link load the brush
Is the link not working for you? I’ve just checked it and it works fine for me.
What do you get when you click it please?
Thank you !
You’re welcome 🙂
Thanks for the comment.
Thank you !