
Simple Ice Text Effect
This tutorial will explain how to create a frosting-ice text effect, using a couple of Layer Styles and a simple brush. It will also show you how to modify some settings to adjust the final outcome.
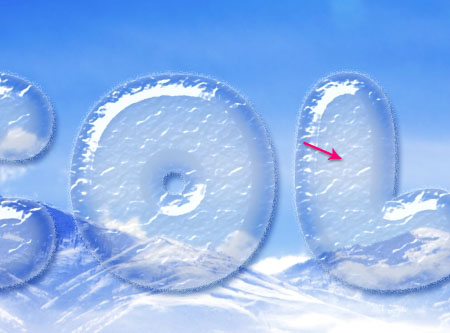
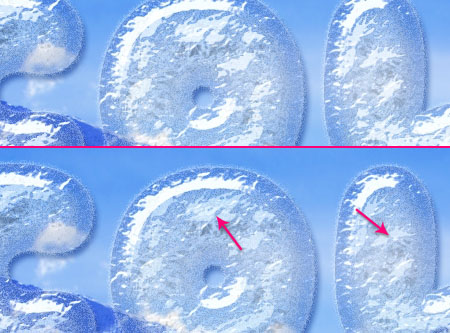
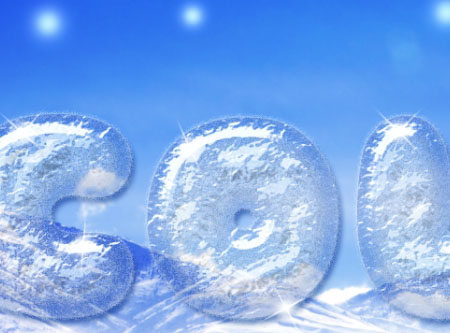
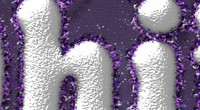
The Final Result

Tutorial Details
- Software Used : Photoshop
- Version : CS5 Extended
- Time : 0:30 – 0:45
Resources
- Sniglet font.
- landscape 86 by night-fate-stock.
- Sparklies Photoshop Brushes by redheadstock.
Intro
This effect was requested by one of our readers, Rafael Garcia, and it is inspired by this image.
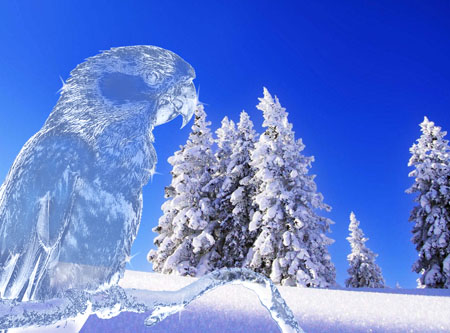
The text will use the main colors and some basic textures to create a simple ice effect similar to the one in the image. You can use your own textures as well, and you will get plenty of nice results.
Let’s get started.
Step 1
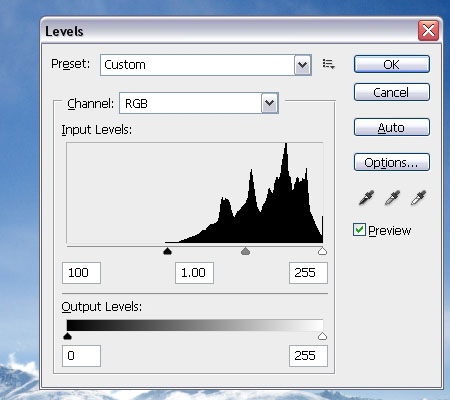
Open the landscape 86 image, then go to Image -> Adjustments -> Levels, and set the Highlights value to 100.
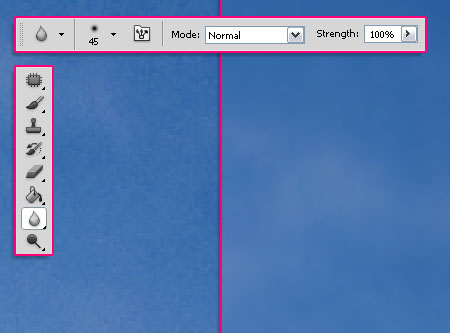
You might notice some noise in the image, so pick the Blur Tool and set the Strength to 100% in the Options bar. Then, using a soft round Brush, start softening the sky in the image. Do not blur the mountains, only the sky.
Set the Foreground color to #737cd4, and the Background color to #0f3ed4. Pick the Gradient Tool and choose the Foreground to Background Linear Gradient.
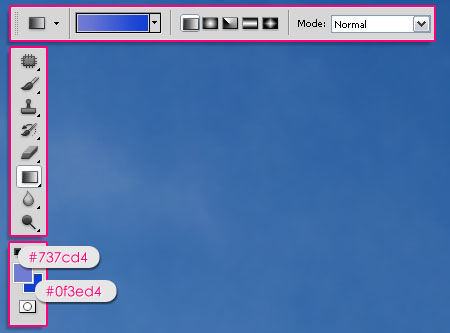
Create a new layer and call it Gradient, then fill the layer from bottom to top with the current gradient.
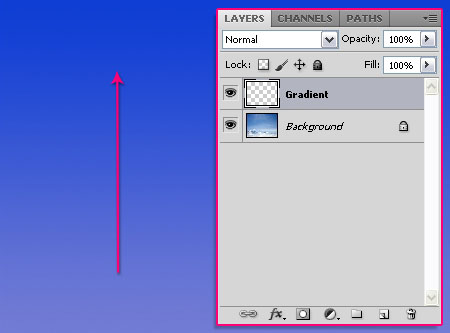
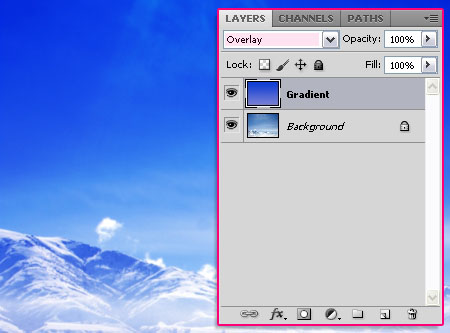
Change the Gradient layer’s Blend Mode to Overlay.
Step 2
Create the text using the color #d8d8d8. The font used is Sniglet and the Size is 300 pt.
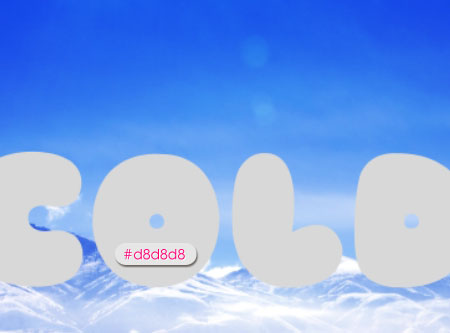
Change the text layer’s Fill value to 0. You can increase the value if you do not want the text to be totally transparent, but it’s better to do this after applying the Layer Style.
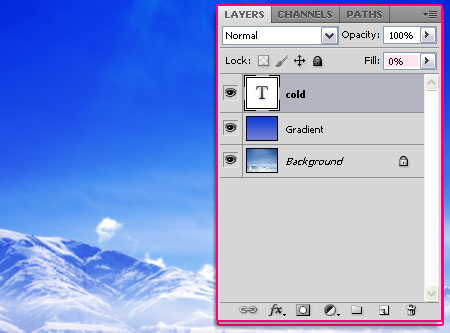
Double click the text layer to apply the following Layer Style:
– Drop Shadow
- Color :
#2457a2 - Distance : 7
- Size : 7
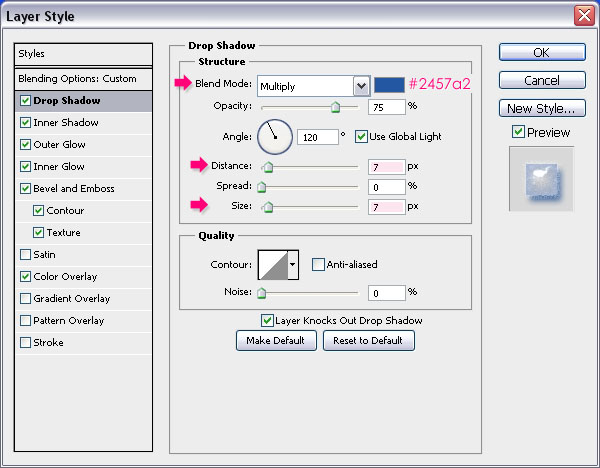
– Inner Shadow
- Color :
#a5bfec - Distance : 0
- Size : 40
- Contour : Half Round
– Outer Glow
- Opacity : 100%
- Noise : 20%
- Color :
#c6d9ff - Range : 100%
This will create a frost stroke for the text, and you can play around with the Noise value to increase or decrease the effect.

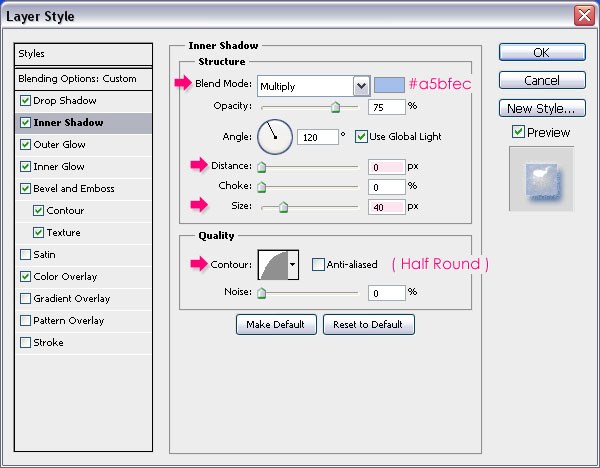
– Inner Glow
- Opacity : 35%
- Noise : 100%
- Color :
#ffffff - Source : Center
- Size : 23
- Contour : Cone – Inverted
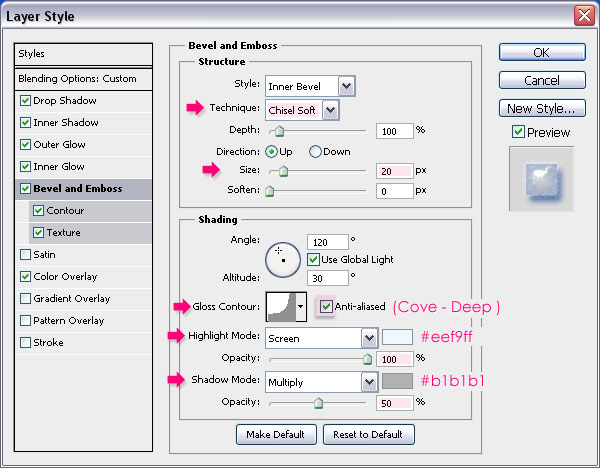
– Bevel and Emboss
- Technique : Chisel Soft
- Size : 20
- Gloss Contour : Cove – Deep
- Check the Anti-aliased box
- Highlight Mode :
- Color :
#eef9ff - Opacity : 100%
- Shadow Mode :
- Color :
#b1b1b1 - Opacity : 50%
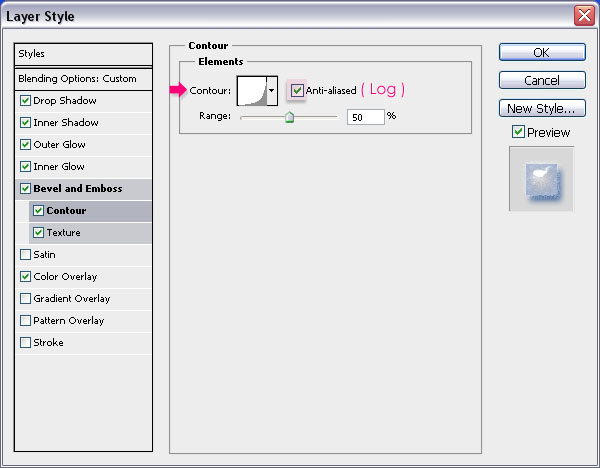
– Contour
- Contour : Log
- Check the Anti-aliased box.
– Texture
- Pattern : Ant Farm
- Depth : 7%

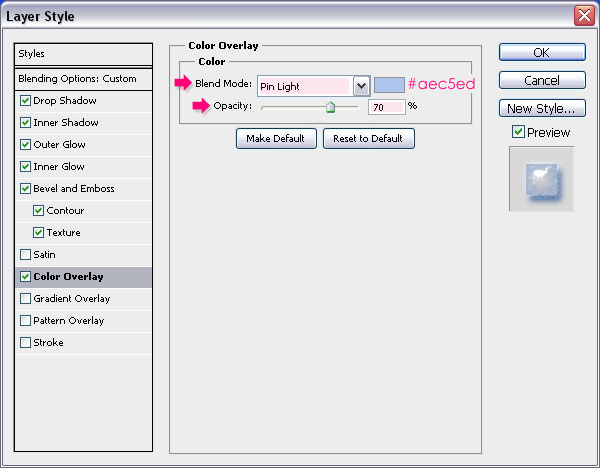
– Color Overlay
- Color :
#aec5ed - Blend Mode : Pin Light
- Opacity : 70%
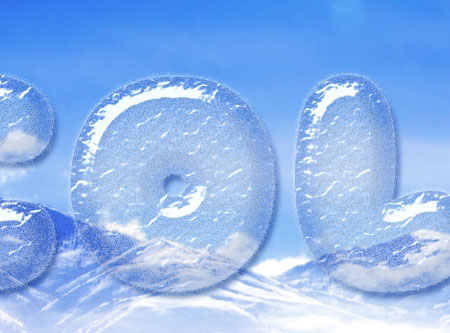
This is what you should get.
Tip: If you think there is so much noise inside the text, maybe because that’s how it looks against a different background, then you can reduce the Noise value of the Inner Glow effect.
Step 3
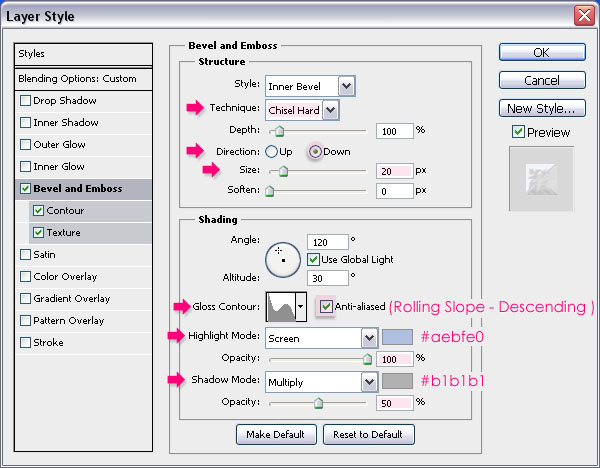
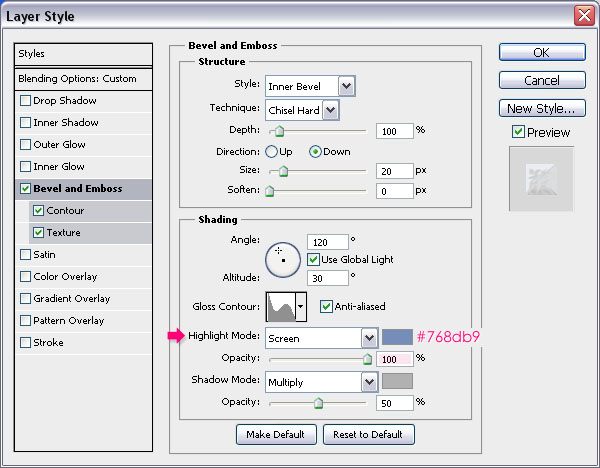
Create a new layer on top of all layers and change its Fill value to 0, then double click it to apply the following Layer Style.

– Bevel and Emboss
- Technique : Chisel Hard
- Direction : Down
- Size : 20
- Gloss Contour : Rolling Slope – Descending
- Check the Anti-aliased box
- Highlight Mode :
- Color :
#aebfe0 - Opacity : 100%
- Shadow Mode :
- Color :
#b1b1b1 - Opacity : 50%
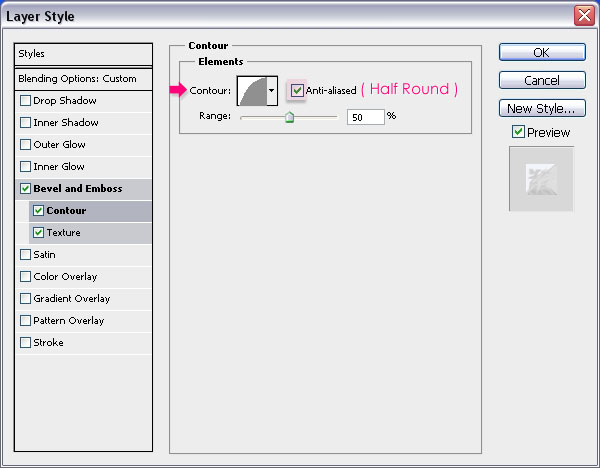
– Contour
- Contour : Half Round
- Check the Anti-aliased box.
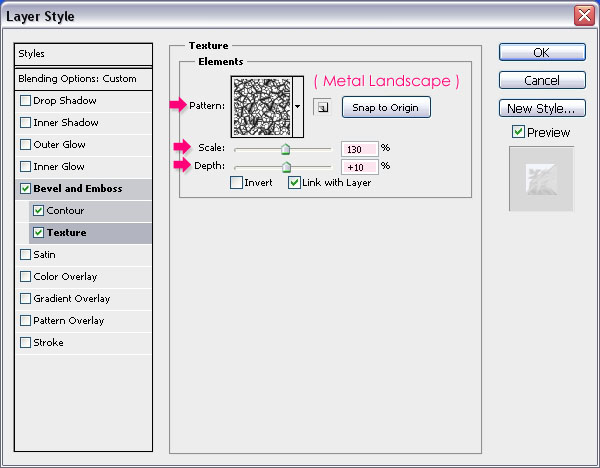
– Texture
- Pattern : Metal Landscape
- Scale : 130%
- Depth : 10%
Pick the Spatter 46 pixels brush, and adjust its Size if you have a different font size.
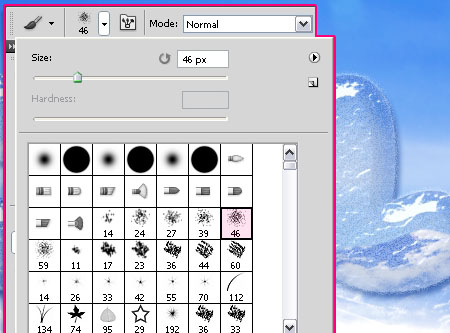
Set the Foreground color to #e9e3d8, and start adding separate short strokes over distant areas, and don’t cover all the text, leave some empty spaces.
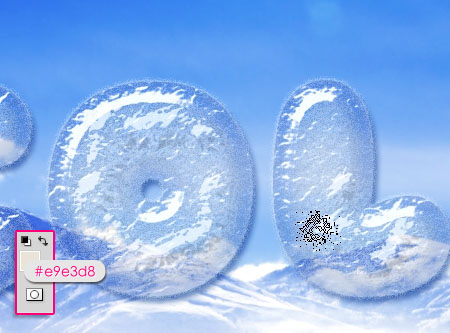
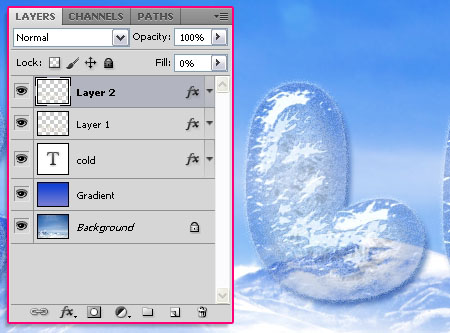
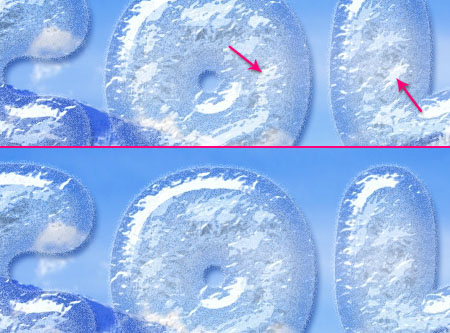
Create another new layer on top of all layers, right click Layer 1 and choose Copy Layer Style, then right click Layer 2 and choose Paste Layer Style. Now, add some strokes to fill the empty areas. This helps create a more 3D looking effect, to make it look similar to the original image where there are multiple ice layers covering the bird shape.
If the shiny areas seem too white or bright, you can change the Highlight Mode color to a darker shade, and the shininess will decrease.
Notice how the bright areas look less bright after using a darker color.
Also, you can apply different colors for each layer, which will create some really bright, and some not-so-bright areas. This effect is more similar to the original.
And that’s it for the main ice effect. Next, we are going to add some snow and sparkles.
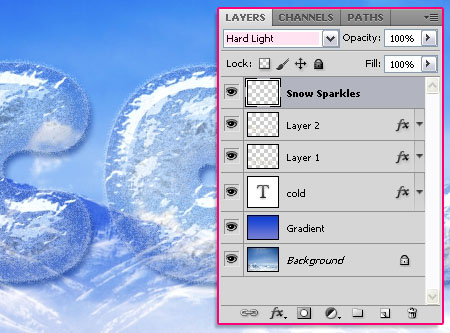
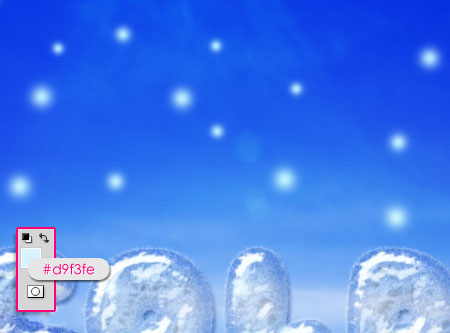
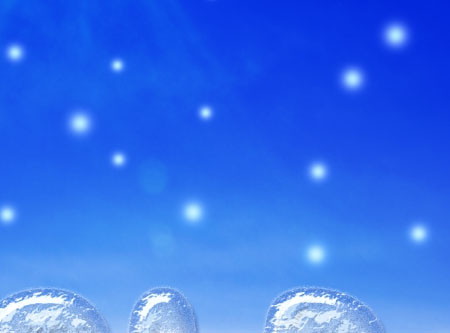
Step 4
Create a new layer on top of all layers and call it Snow Sparkles, then change its Blend Mode to Hard Light.
Choose a soft round Brush, and open the Brush panel (Window -> Brush) to modify its Settings as shown below:
Brush Tip Shape
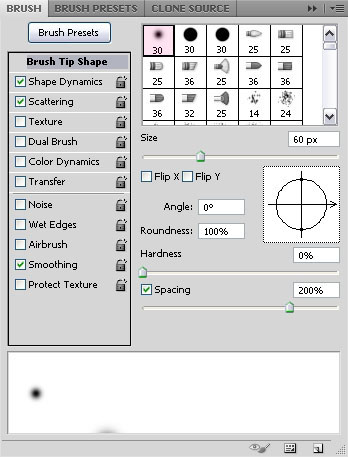
Shape Dynamics
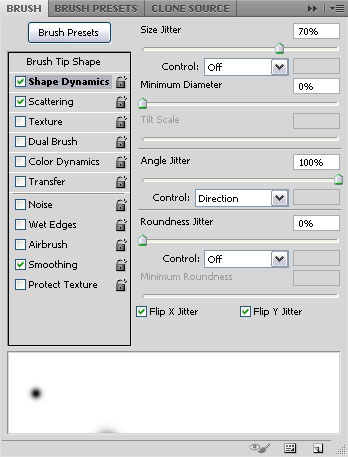
Scattering

Set the Foreground color to #d9f3fe, and scatter some snow sparkles. Try not to add any inside the text though.
Double click the Snow Sparkles layer to apply a simple Outer Glow. Change the Blend Mode to Overlay and the color to #0157ff.
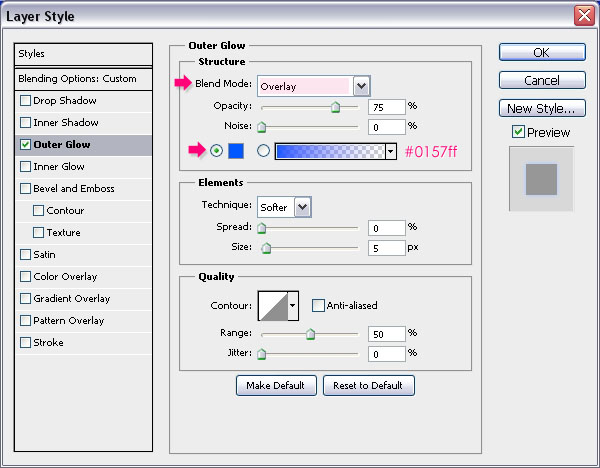
This will add a subtle nice glow.
Step 5
Create a new layer on top of all layers and call it Sparkles, then change its Blend Mode to Vivid Light. Set the Foreground color to #d8dfe4.
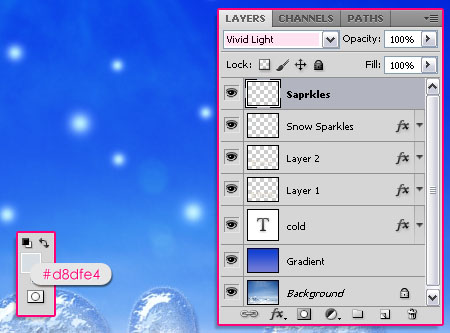
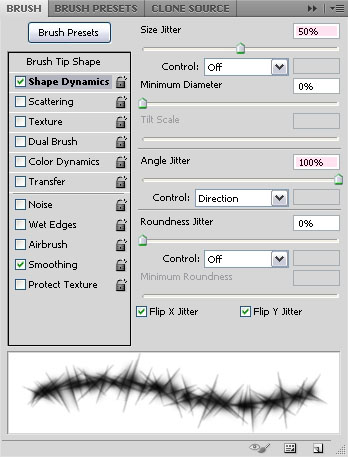
Choose one of the Sparklies Photoshop Brushes, decrease its Size, and under the Shape Dynamics in the Brush panel, set the Size Jitter to 50%, and the Angle Jitter to 100%. This will help you get sparkles with different sizes and rotation angles each time you click to add one.
Add the sparkles wherever you want to.
And that’s it. Hope you liked it, and thanks once again to Rafael Garcia for the suggestion.
* If you have any suggestions or ideas, please send them via the contact form. We love to hear from you.
Did you enjoy this post? Please consider donating to help us cover our server costs.


it looks great, so realistic!
That’s good to know.
Thanks a lot 🙂
teah so good
wonderful
Thank you for the comment 🙂
nice tutorial. very useful for both beginners and advanced designers…thx again
Glad you found it useful.
Thanks for the comment.
its realy cool!:)
Thank you 🙂
This is nice and effective tutorial. Easy to learn. I will pray to my Allah to give peach in your mind.
Thanks to give nice tuto.
shajahan
Thank you so much, this really means a lot.
Glad you found the tutorial helpful.
Regards.
beautiful
Thank you.
Thank you for your soooo useful tutorial. I did use it to complete some of my work . Thumbs up!
That’s awesome! Glad you found it useful.
Thanks a lot for the awesome comment 🙂
Dear Rose
the picture of landescape 86 is not found, could you help us to do this tutorial.
thanks
hello tuts.
the night fake stock deviantation has been deleted by his owner.. and this means the landscape 86 image has been removed.. do you has replacement link for this? i cant make my works..
Dear Rose
the picture of landescape 86 is not found, could you help us to do this tutorial.
thanks
sorry for repeated comment.
@John Mchackim @gasim,
I’ve been looking for alternative images, and I found a couple. So you can just crop the one you like and modify the colors a bit, then continue with the tutorial.
[1] – [2] – [3] – [4] – [5].
Hope this helps 🙂
unlimited thanks tuts ….
You’re very welcome 🙂
thank you alot very much tuts!
You’re very welcome 🙂
Thank you for the comment.