
Vintage Sparkly Sticker Inspired Text Effect
So if you’re an 80s or 90s kid, you must have been exposed to the whole sticker collecting trend at that time. You knew you were never ready to go back to school until you have your new collection of those!
Today’s tutorial is inspired by the colorful sparkling prismatic/holographic stickers, and it will take you down memory lane back to when those dreadfully bright gradients were such a cool thing!
A couple of noise filters will be used to achieve the effect, along with some other tips and tricks to create the peeled part.
The Final Result

Tutorial Details
- Software Used : Photoshop
- Version : CS6 Extended
- Time : 0:30 – 0:45
Resources
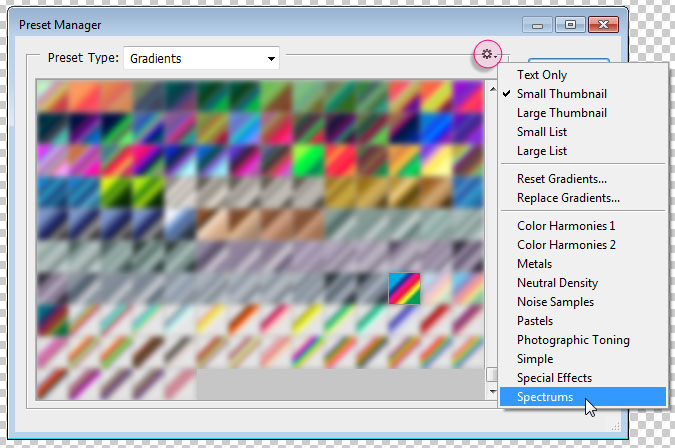
* You might need to load the Spectrum gradients set used in this tutorial.
To do so, go to Edit > Presets > Preset Manager, (or Edit > Preset Manager for versions < CS6), and choose Gradients from the Preset Type drop down menu.
Then, click the little arrow to the right of the Preset Type drop down menu, and click Spectrums down the pop-up menu. When the dialog box appears after that, just click Append, and you’ll get the gradient set.
Step 1
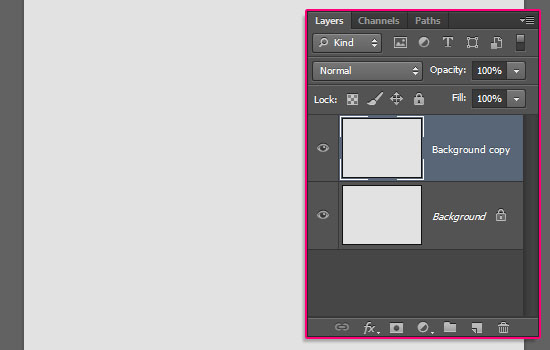
Create a new 750 x 550 px document, fill the Background with a light gray color #e2e2e2, then duplicate the Background layer.
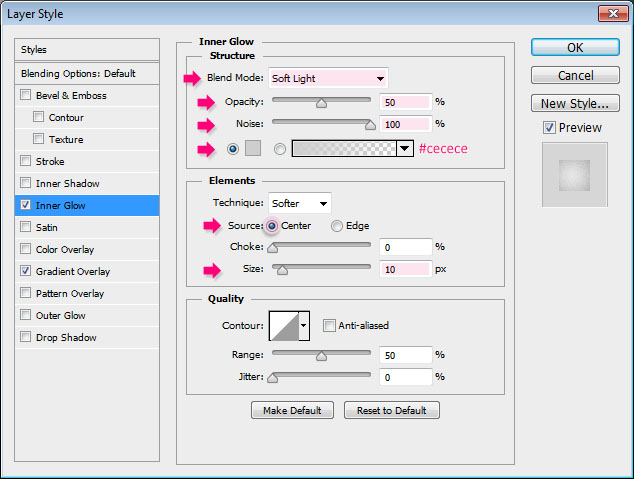
Double click the copy Background layer to apply the following Layer Style:
– Inner Glow
- Blend Mode : Soft Light
- Opacity : 50%
- Noise : 100%
- Color :
#cecece - Source : Center
- Size : 10
– Gradient Overlay
- Style : Radial
- Scale : 150%
- Click the Gradient box to create the gradient using the colors
#e4e4e4to the left and#868686to the right.
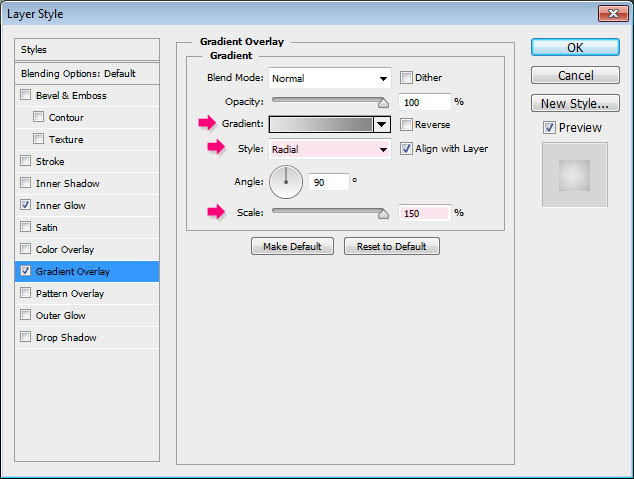
This will style the Background.

Step 2
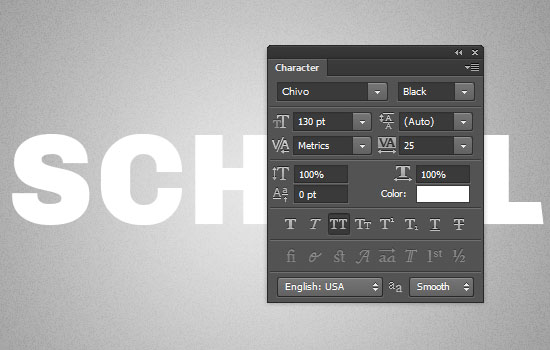
Create the text in All Caps using the font Chivo, and the color White. The font Size is 130 pt, the Tracking value is set to 25, and the Anti-aliasing method is set to Smooth.
Duplicate the text layer.
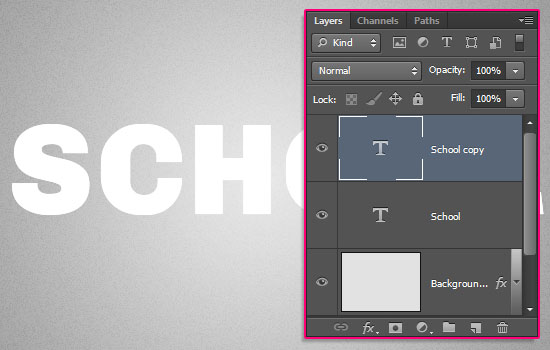
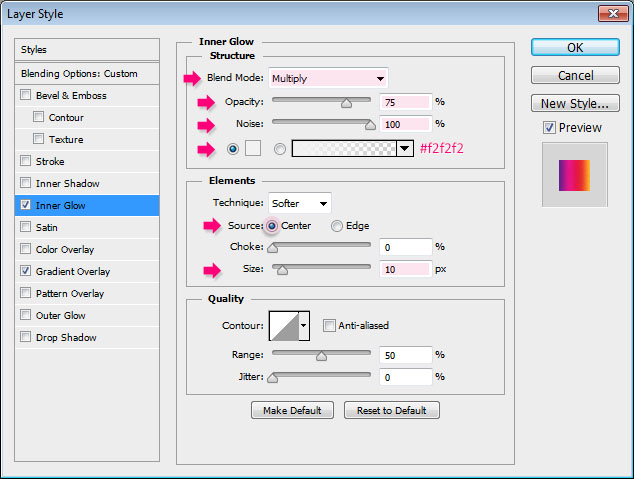
Double click the copy text layer to apply the following Layer Style:
– Inner Glow
- Blend Mode : Multiply
- Opacity : 75%
- Noise : 100%
- Color :
#f2f2f2 - Source : Center
- Size : 10
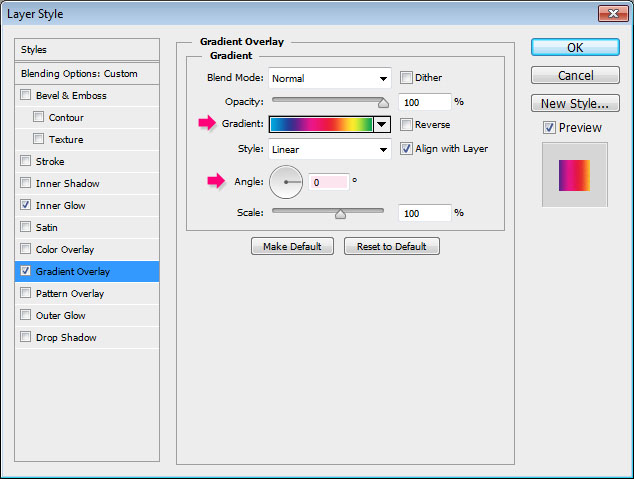
– Gradient Overlay
- Angle : 0
You can use any gradient you like to fill the text with. The one used here is the Spectrum gradient (the first one from the set loaded at the very beginning of the tutorial).
Feeling nostalgic already, aren’t you?
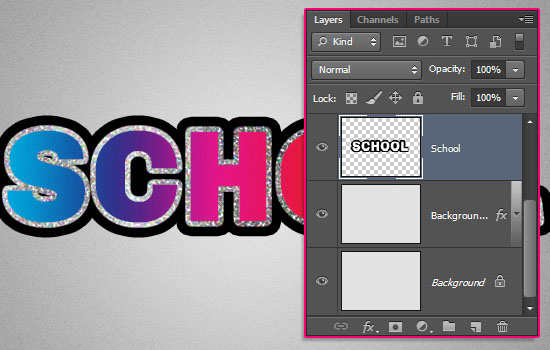
Duplicate this layer and keep the copy at the bottom of the Layers panel, because we’ll get back to it at the end of this tutorial.

Step 3
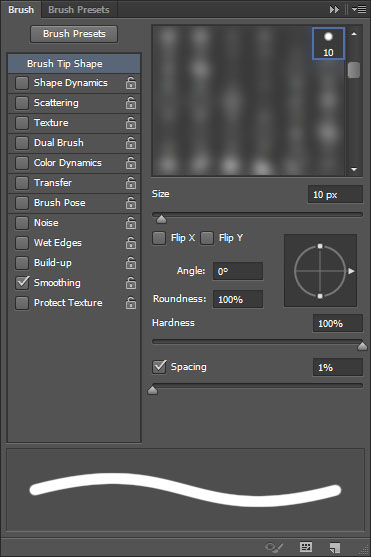
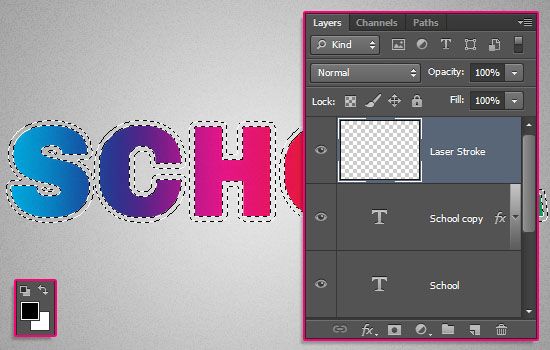
Right click the text layer and choose Create Work Path. Create a new layer on top of all layers and call it Laser Stroke, then pick the Brush Tool and choose a 10 px hard round brush.
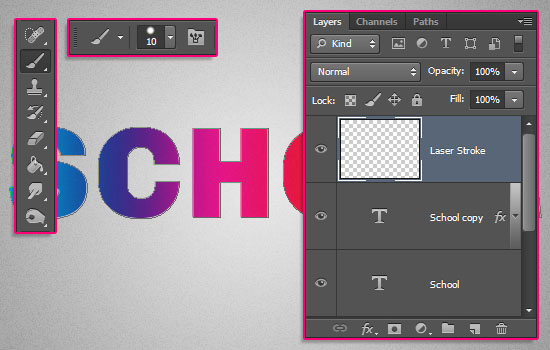
Open the Brush panel (Window > Brush), and make sure that the Spacing value is set to 1%.
Pick the Direct Selection Tool, right click the path, and choose Stroke Path. Then, choose Brush from the Tool drop down menu with the Simulate Pressure box un-checked.
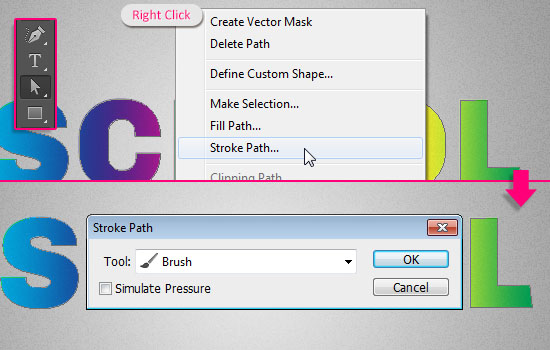
This will stroke the path. Hit the Enter/Return key to get rid of the work path.

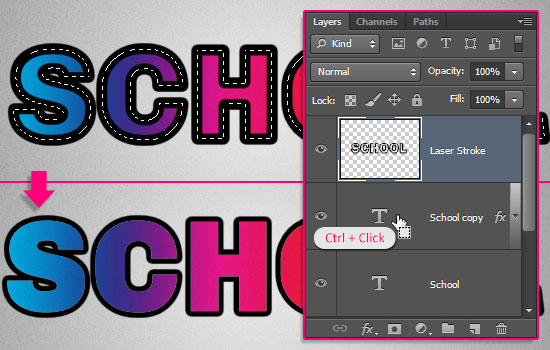
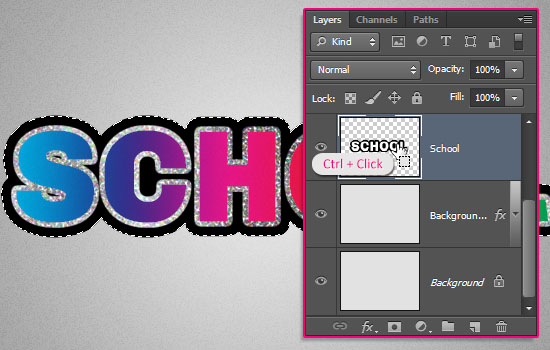
Ctrl/Cmd + click the text layer’s thumbnail to create a selection, then hit the Delete key to delete the inner part of the stroke.
Go to Select > Deselect to remove the selection.
Step 4
Ctrl/Cmd + click the Laser Stroke layer’s thumbnail to create a selection, then delete the Laser Stroke layer.

Create a new empty layer and call it Laser Stroke again. Set the Foreground and Background colors to Black and White.
Go to Filter > Render > Clouds, then to Select > Deselect.

Here’s the cool part! Go to Filter > Pixelate > Pointillize, and change the Cell Size to 3.
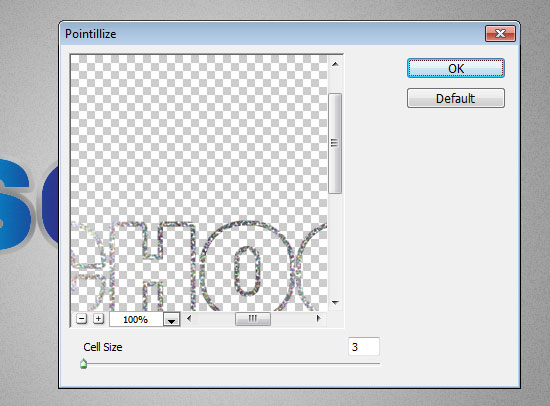
What this will do, is create an illusion of a sparkling stroke. The trick is to keep the stroke thin and the cell size as small as possible.

Step 5
Double click the original text layer to apply a Stroke effect by changing the Size to 15 px.

Right click the stroke layer and choose Rasterize Layer Style.
This is an option available in the CS6 version only.
For older versions, you’ll need to group the layer, then right click the group and choose Merge Group.
This will make the stroke a part of the original text, so we can create a selection based on the stroke.
Ctrl/Cmd + click the rasterized layer’s thumbnail to create a selection.
Right click the Background copy layer, and choose Rasterize Layer Style (group and merge for versions < CS6).
This time, the rasterizing will help us duplicate the gradient as it is, instead of applying it as a style to the duplicated part.
So press Ctrl/Cmd + J to duplicate the selection in a separate layer.
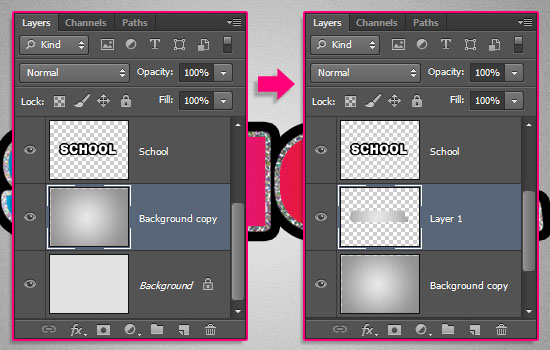
You can now delete the rasterized stroke layer. Then, make two more copies of the duplicated selection layer (Layer 1).
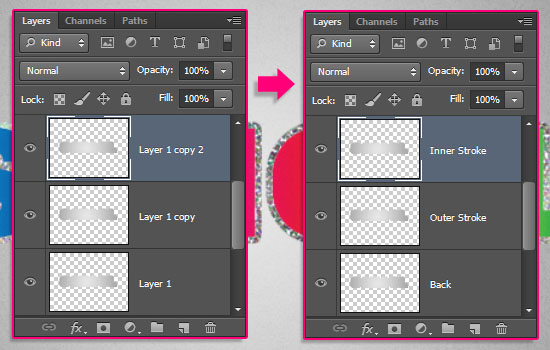
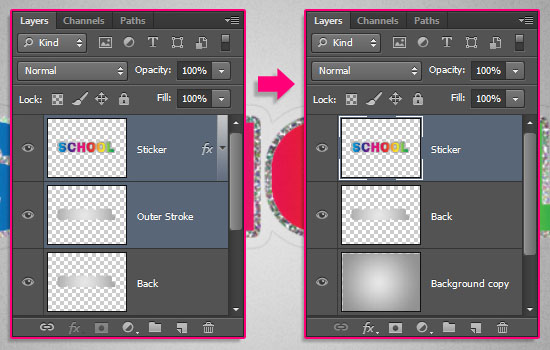
Rename the layers you have to Back, Outer Stroke, and Inner Stroke.
Step 6
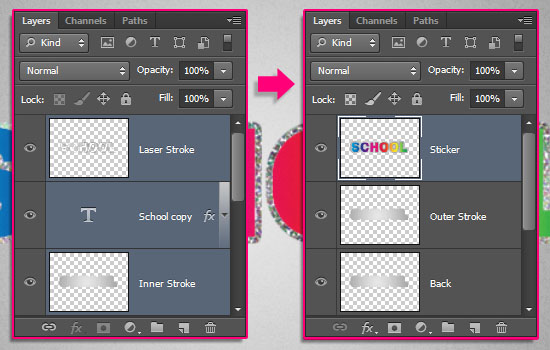
Select the Laser Stroke layer, the text layer, and the Inner Stroke, then go to Layer > Merge Layers.
Rename the merged layer to Sticker.
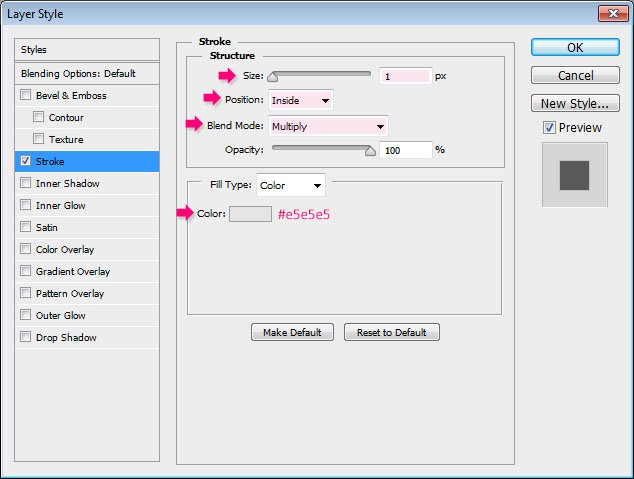
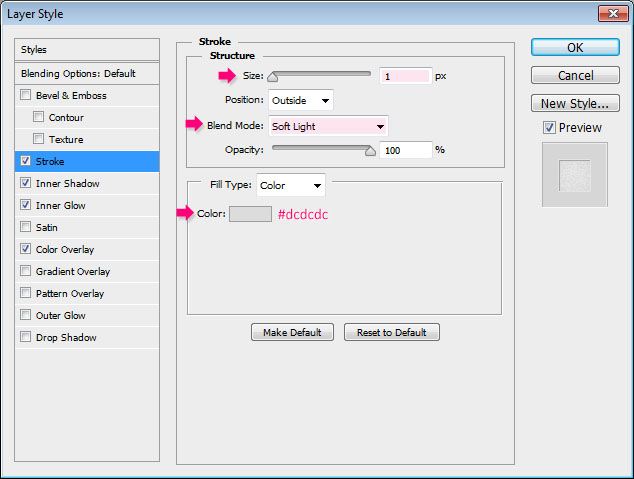
Double click the Sticker layer to apply a Stroke effect:
- Size : 1
- Position : Inside
- Blend Mode : Multiply
- Color :
#e5e5e5
Now select the Sticker and Outer Stroke layers and merge them.
Step 7
Double click the Back layer to apply the following Layer Style:
– Stroke
- Size : 1
- Blend Mode : Soft Light
- Color :
#dcdcdc
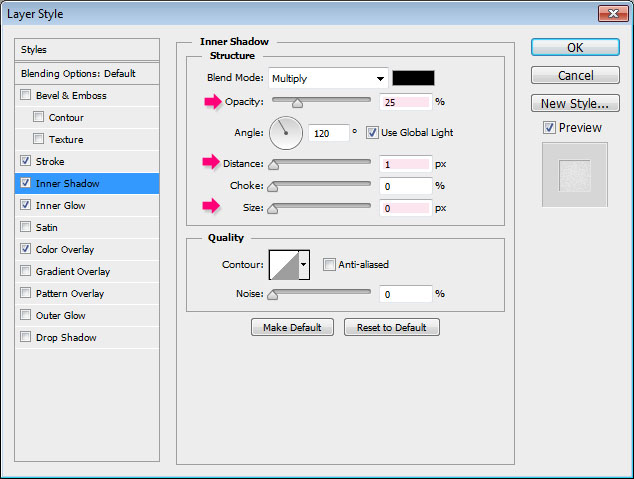
– Inner Shadow
- Opacity : 25%
- Distance : 1
- Size : 0
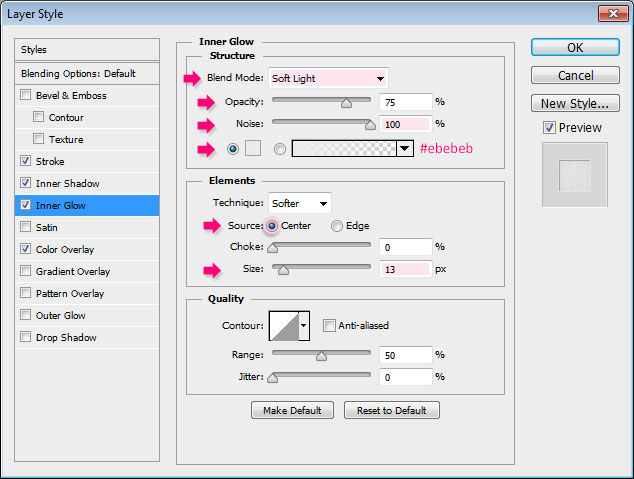
– Inner Glow
- Blend Mode : Soft Light
- Noise : 100%
- Color :
#ebebeb - Source : Center
- Size : 13
– Color Overlay
- Color :
#dcdcdc
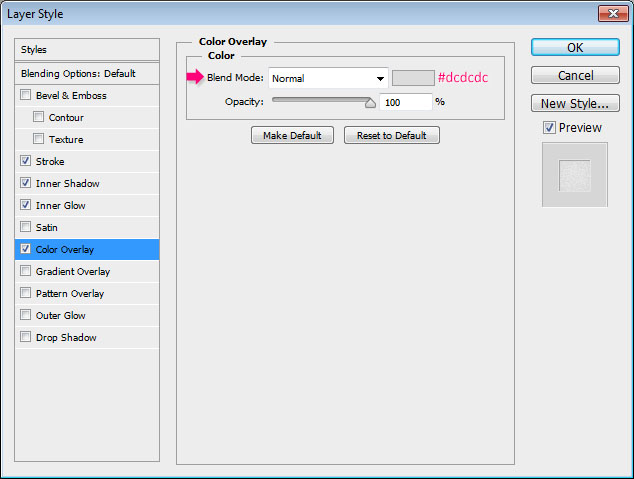
The slightly darker and lighter strokes will give an illusion of the cut edges around the sticker.

Step 8
Select the Sticker layer so that it is the active layer. Pick the Polygonal Lasso Tool, then create a selection around the area you want to peel.
You’ll need to click once to add each point, then release and drag to move and add another one.
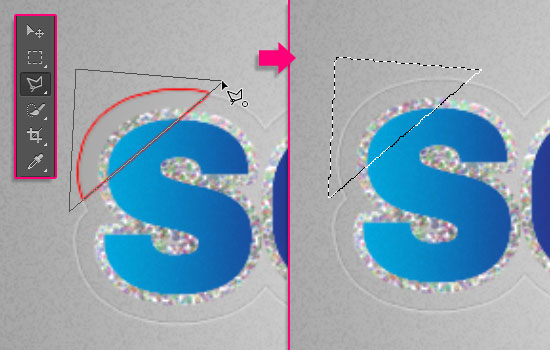
Go to Edit > Cut, then Edit > Paste Special > Paste in Place. This will paste the piece in a separate layer, while maintaining its original position.
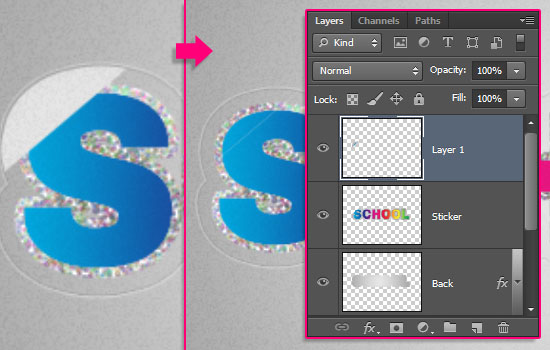
Go to Edit > Transform > Rotate 180°. Then use the Move Tool, and the Arrow Keys to move the piece until the edges match.
Double click the peeled piece layer to apply a Gradient Overlay effect, and change the Angle to -58.

The gradient uses the colors #000000, #fefefe, and #010101 from left to right. The Location value of the color in the middle is 70%.
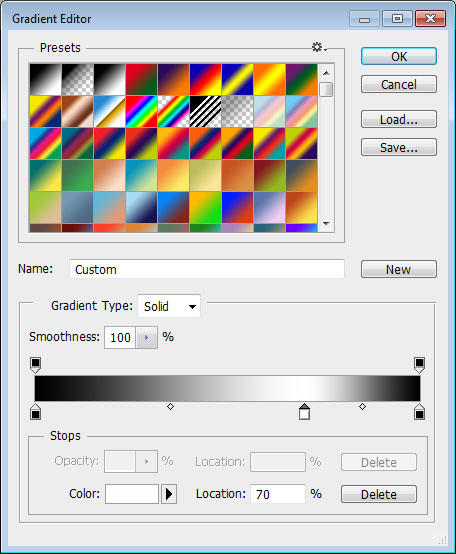
Click and drag the gradient until you like how it looks.
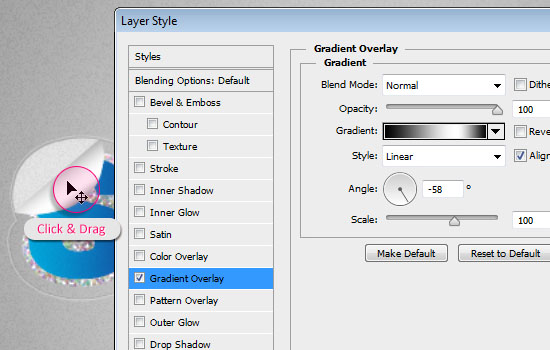
This will add the basic shadow and highlight areas.

Step 9
Ctrl/Cmd + click the piece layer’s thumbnail to create a selection.
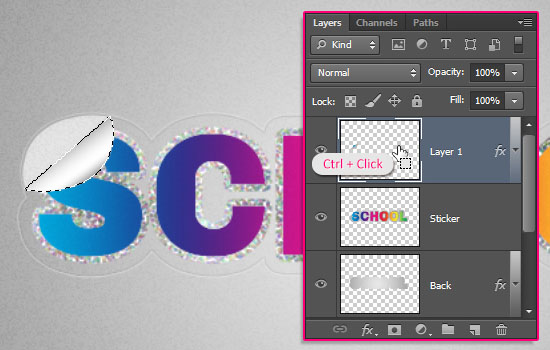
Create a new layer on top of all layers, call it Top Shadow, and change its Blend Mode to Multiply.
Pick the Brush Tool, choose a soft round brush, set the Foreground color to #898989. then click and drag near the edge of the selection to intensify the shadow a little bit.

Ctrl/Cmd + click the Sticker layer’s thumbnail, then Ctrl/Cmd + Alt/Option + click the peeled piece layer’s thumbnail to remove it from the selection.
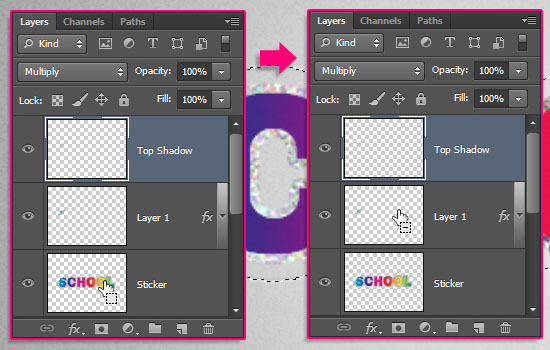
Create a new layer below the peeled piece’s layer, call it Bottom Shadow, and change its Blend Mode to Multiply.
Then use the brush to add some shadow below the peeled piece.
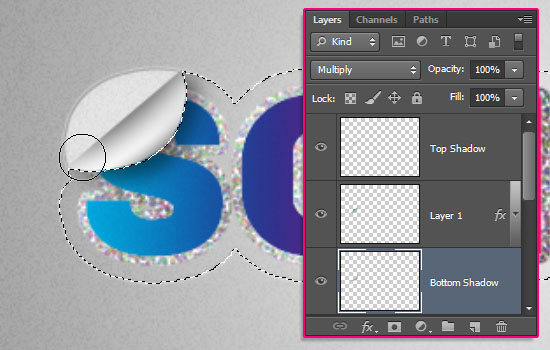
Ctrl/Cmd + click the Back layer’s thumbnail, then Ctrl/Cmd + Alt/Option + click the Sticker layer’s thumbnail to remove it from the selection.
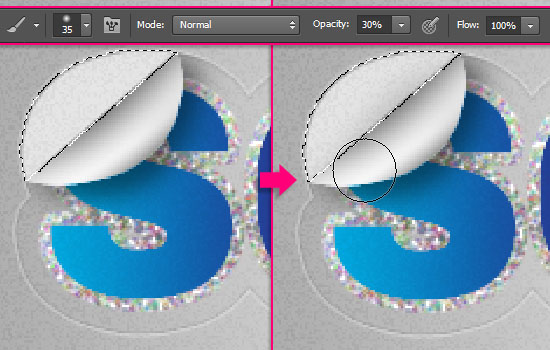
With the Brush Tool still active, change the Opacity value in the Options bar to 30%, and use a smaller brush size to add a subtle shadow in the peeled area.
The shadow should start in the center, then fade at the edges.
(Don’t forget to change the Opacity back to 100% when done.)
The shadows might seem a little dark or “off” right now, but we’ll fix that after we work on the gradient part next.

Step 10
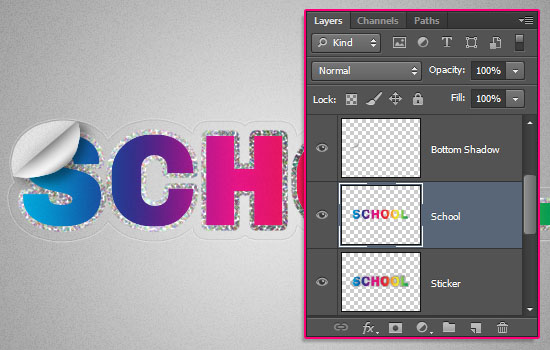
Drag the text layer you duplicated at the end of Step 2, and place it on top of the Sticker layer. Ctrl/Cmd + click the Sticker layer’s thumbnail to create a selection.
Then go to Select > Inverse to invert the selection.
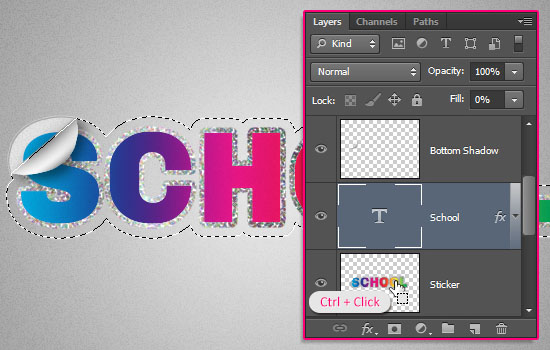
Right click the text layer and choose Rasterize Layer Style (or group and merge it), hit the Delete key to remove the extra part of the duplicated text, and go to Select > Deselect to get rid of the selection.
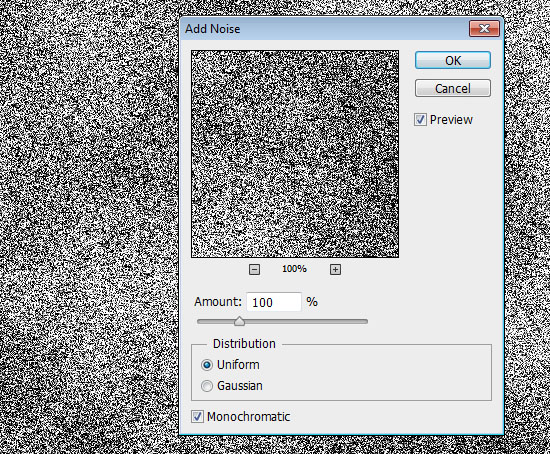
Go to Filter > Noise > Add Noise. Change the Amount to 35, and choose the Uniform option under Distribution.
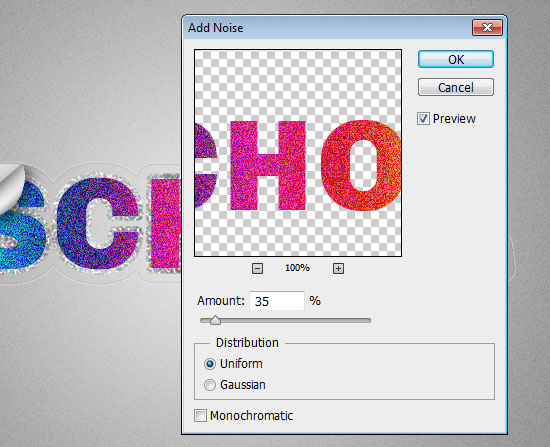
This is another trick that will make the inner part of the sticker look all sparkly!

Step 11
This is an optional part of the tutorial, but we’re going to add some more glittering text below the sticker.
Create the text using the Font akaDora and the font Size 50 pt.

Double click the text layer to apply a Gradient Overlay effect using the same gradient you used for the sticker text.

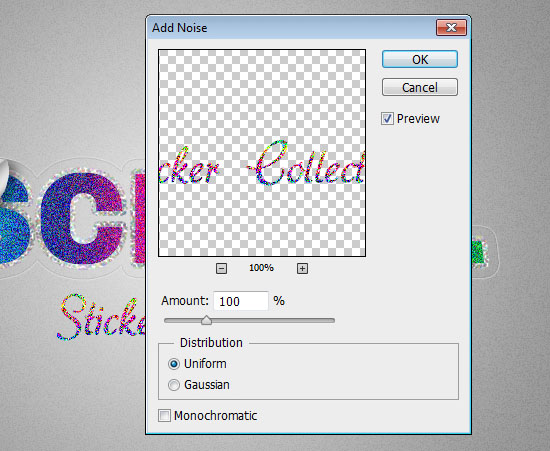
Go to Filter > Noise > Add Noise, increase the Amount to 100, while keeping the Uniform option.
And this is it for the main text parts of the design, all colorful and glittery!

Step 12
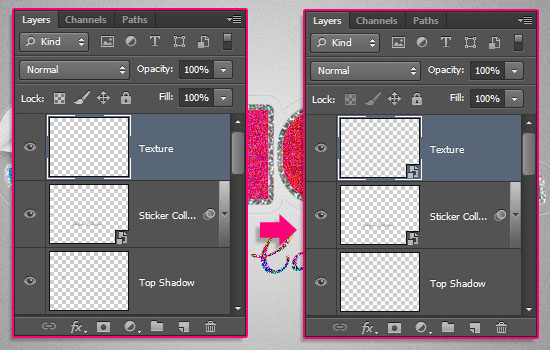
Create a new layer on top of all layers and call it Texture.
Go to Filter > Convert for Smart Filters. What this will do, is convert the layer to a Smart Object, which will make the filters editable even after they are applied.
Set the Foreground and Background colors back to Black and White, then go to Filter > Render > Clouds.
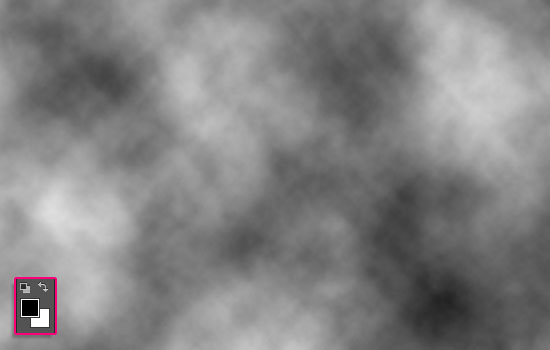
Go to Filter > Noise > Add Noise. The Amount should be set to 100, the Distribution to Uniform, and the Monochromatic box must be checked this time to get a black and white result.
Finally, go to Filter > (Filter Gallery) > Sketch > Torn Edges, and use the values shown below.
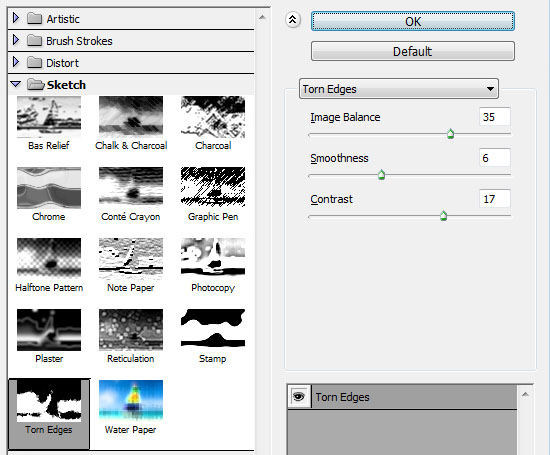
This is the result after applying all the filters.

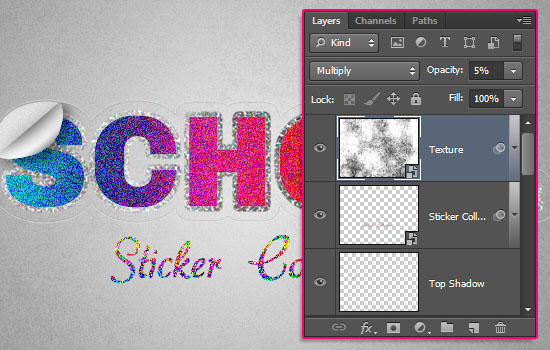
Change the Texture layer’s Blend Mode to Multiply, and its Opacity to a very small value (5%).
The noise should be so subtle, but it will add a nice vintage touch to the sticker.
If you need to change any of the values used, you can expand the Texture layer’s Filters list, then double click the filter name to open it, and change its values.
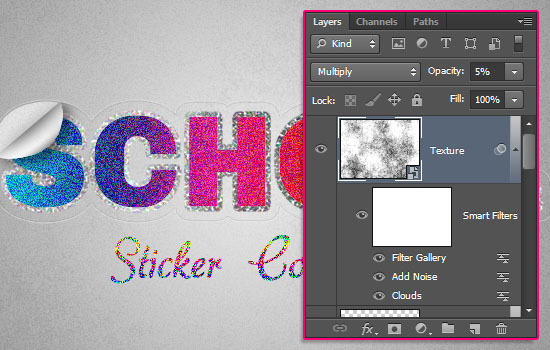
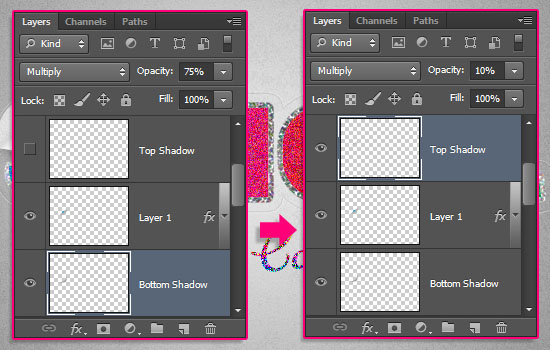
Now you can go back to the Shadow layers, and change their Opacity values.
The Bottom Shadow Opacity value is changed to 75%, and the Top Shadow Opacity value to 10%.
Your sticker is all ready now!
Make sure you add it to your collection (I know you’re hiding it somewhere there 😉 ).
Hope you enjoyed the tutorial and found the simple tricks helpful.
Did you enjoy this post? Please consider donating to help us cover our server costs.


Wooowwwww
Amazingggggg
SO Beautiful…. Love this tuts…
Thanks for sharing…
Super happy you like it!
Big thanks for the awesome comment 🙂
Help me, please …
I’m not be able to reproduce this tutorial, because I can’t understand the correct order of the layers in the Layer panel and also the layers styles leave me somewhat confused … Help, help, help … And thank you so mutch!! ;=)
The layers order can be a bit tricky. But if you make sure to read the description carefully and follow the screenshots, you’ll be able to follow along with no problems, as I tried to keep the order clear in the images.
Please feel free to add a reply with the step you start having issues with the order so that I can help you out 🙂
Regards.
I follow the tut SCRUPULOUSLY, but when I try to use Polygonal Lasso Tool, the only result obtained consists of a peeled piece without gray border or underlying gray zone … It’s very VERY frustrating … I got wrong, obviously … But where??!!
The tut reproduced OVER AND OVER … My best regards, OBVIOUSLY … ;=)
Let’s see. Here are a couple of things that might help:
Please check that you deleted the layer called “School” at the end of Step 5.
Did you make sure that the “Sticker” layer is the selected layer before you cut the peeled piece?
You won’t be able to see the gray part until you rotate the piece, so weren’t you able to see it even after you rotated the peeled part?
I’d also like to make sure that you did the steps as follows:
Used the Polygonal Lasso Tool to create the selection, cut the selection (can you see the gray part at this point?), pasted the selection (peeled part) in a new layer, and rotated the peeled part.
If you checked all the points above but the problem still exists, please feel free to leave a reply with a screenshot of the document and the Layers panel after rotating the piece. (You can upload it to tinypic.com).
Thank you and best regards 🙂
I,ve uploaded the screenshot you request, named: Luca – Vintage Sparkly Sticker Inspired Text Effect Problem … Thank you so much!! ;=)
I need the link to see the image please 🙂
(The link that appears after you upload the image under “Share This Image”, and it’s called the “Direct Link for Layouts”. Copy what’s in the yellow box below that sentence and add it in a reply.)
If you haven’t saved it the first time, you can re-upload the image and get a new one.
http://i39.tinypic.com/2s0fexy.jpg
Thank you!!
Think I found the problem! In Step 7, you’re supposed to double click and apply the Layer Style to the “Back” layer not the merged one.
Really sorry about that!
So now you’ll need to style the “Back” layer and leave the “Sticker” un-styled at all.
Sorry once again, and I hope this solves the problem 🙂
Thank you very much for pointing the issue out.
Best regards.
You are right … THANK YOU, THANK YOU, THANK YOU!!!!!!!!! :=)
That’s awesome!
You’re very welcome 😀
Thank you once again as well 🙂
when i create a work path it does not allow me to have the option ‘stroke path’ on the original text layer, why is this? 🙁
Is that in Step 8? Did you right click the text layer itself? Make sure not to right click the thumbnail, but the empty part of the layer tab.
Hope this helps.
If the problem still exists, please feel free to leave a reply with the Step that you have the problem with.
Sorry, I have a problem here.
I can’t add noise to the glittering text below the sticker, I mean I added noise, but it didn’t show . Please help.
Did you try different “Amount” values (drag the slider and see what happens)? What do you get when trying to apply the noise?
You might need to rasterize the text layer before you apply the Noise filter, by right clicking the text layer then choosing “Rasterize Type”.
Hope this helps. If you’re still unable to apply the filter, please feel free to add a reply.
I have available only Photoshop C3 and I have a problem in step 5:
“For older versions, you’ll need to group the layer, then right click the group and choose Merge Group.”
I don’t understand what levels to group.
Can you help me?
What a fool! I have understood where I was wrong 🙂
I have the same problem. Can you tell me what to do please?
You just need to select the layer, go to Layer > Group Layers, then right click the group and choose Merge Group 😉
Hope this helps.
That’s it! Thank you!!
http://car51.altervista.org/_altervista_ht/nuova/stickers.jpg
A very well done outcome 🙂
Enjoying all the work you’re sharing.
Thanks once again ^_^
great tutorial! thanks!
You’re very welcome.
Thanks for the comment 🙂
Hi please help me ..!!
I’m in step 3 and sroke path is not responding please help me …
You are right clicking the Type layer in the screenshot. So what you need to do when right clicking it is choosing Create Work Path, then select the Laser Stroke layer, right click the created work path, and then choose Stroke Path.
Hope this helps.
Please feel free to leave a comment if the problem still exists.
Help me i’m in step 3 and don’t know what happened i click enter then it happened .
hlep me
When you hit Enter, the text will be stroked. But it seems that you haven’t modified the brush as shown at the beginning of the Step.
So please undo stroking the path, select the Brush Tool, modify the brush tip, then hit Enter once again.
Hope this helps.
Please feel free to leave another reply if the issue isn’t solved.
Thanks again …
You’re welcome 🙂
Thanks this was awesome. I kept the flipped sticker underneath the flap to make it look like the type that show some of the front on the back – just for fun.
I absolutely love what you did with the peeled part, it looks amazing!
Thank you for the comment and for sharing your wonderful work 🙂