
Candy Corn – Inspired Text Effect
This is a simple fun tutorial that will show you how to use Layer Styles to create an awesome, delicious, candy corn – inspired text effect.
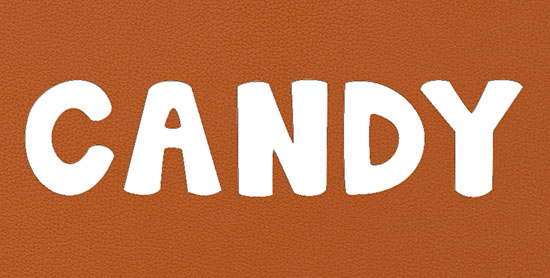
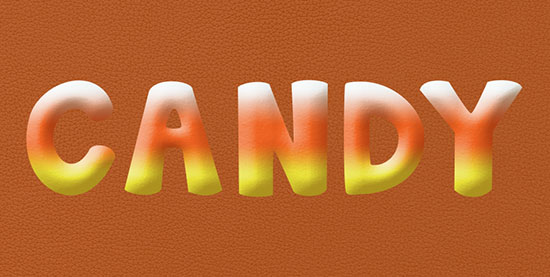
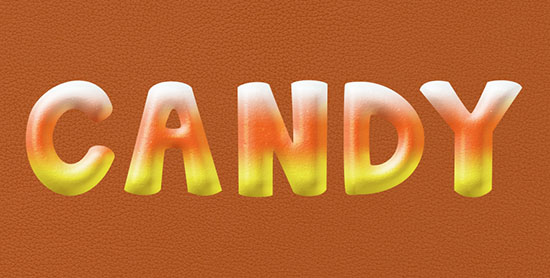
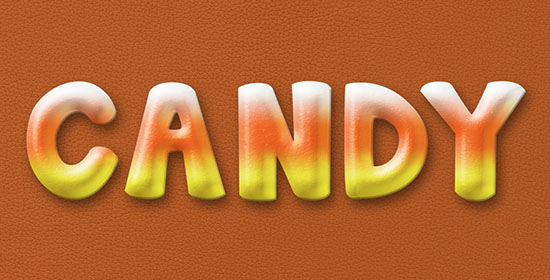
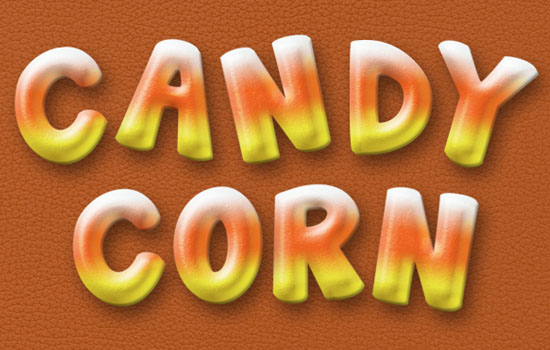
The Final Result

Tutorial Details
- Software Used : Photoshop
- Version : CC 2014
- Time : 0:45 – 1:15
Resources
- Janda Manatee font.
- Sorensen Leather – Tango-orange-41587 by SorensenLeather.
- Soft Wallpaper pattern by Atle Mo.
- Green Dust & Scratches pattern by Atle Mo.
- Stock – Confetti Blue png by Jassy2012.
Step 1
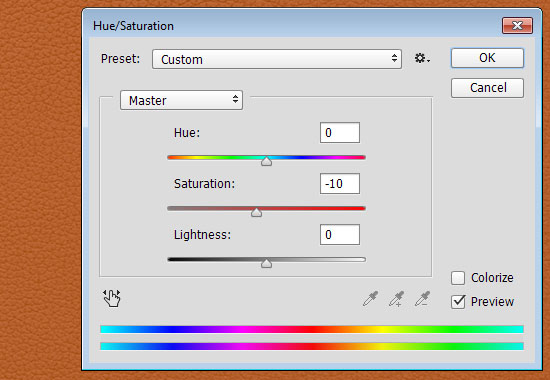
Create a new 900 x 460 px document, place the Sorensen Leather – Tango-orange-41587 texture on top of the Background layer, and resize it as you like. Then go to Image > Adjustments > Hue/Saturation, and change the Saturation value to -10.
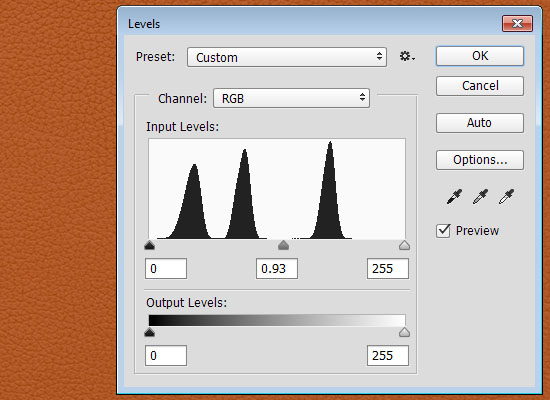
Go to Image > Adjustments > Levels, and change the Gamma value to 0.93. When done, go to Layer > Merge Down.
Step 2
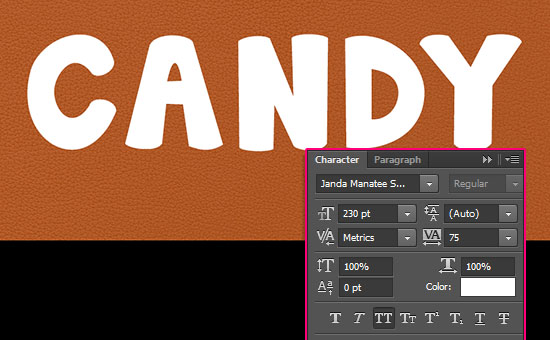
Create the text in All Caps using the font Janda Manatee, the Size 230 pt, and the Tracking value 75. If you want to add more than one line of text then create each line in a separate layer.
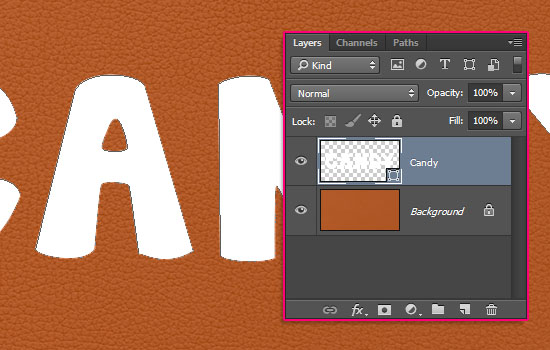
Right click the text layer and choose Convert to Shape.
This step is optional, but it will make the final effect look better. Pick the Convert Point Tool, and start clicking and slightly dragging the sharp corners to make them more rounded.

You can also use the Direct Selection Tool (A) to click and drag the anchor points and move them around if needed.
Duplicate the shape layer, change the copy’s Fill value to 0, then duplicate it as well.
Step 3
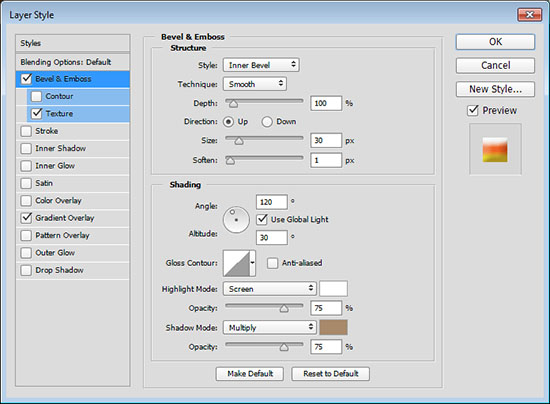
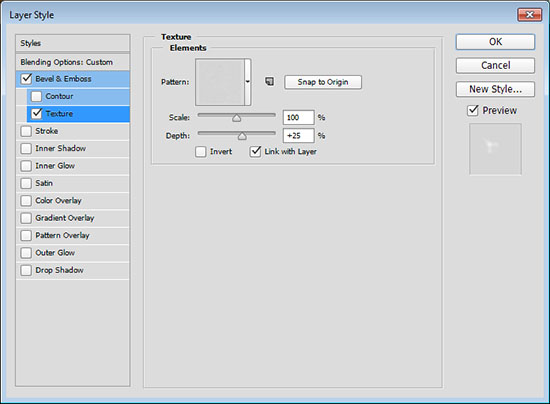
Double click the original shape layer to apply the following Layer Style:
– Bevel and Emboss
- Size : 30
- Soften : 1
- Shadow Mode – Color :
#a8896a
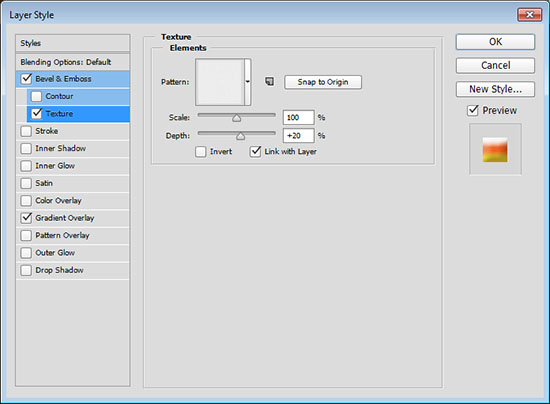
– Texture
- Pattern : Soft Wallpaper
- Depth : 20%
– Gradient Overlay
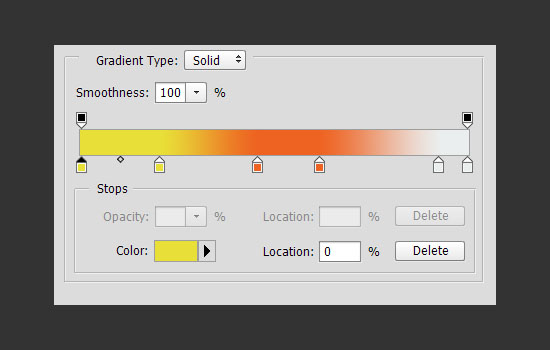
- Click the Gradient box to create the gradient
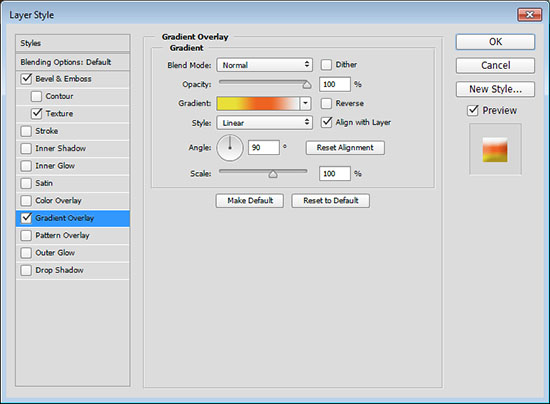
To create the Gradient, you’ll need to click below the gradient bar to add Color Stops, and when you click each Color Stop, you can change its Color and Location values. Here are the Color Stops values used from left to right:
Color – Location
#e8e038– 0%#e8e038– 20%#ee6322– 45%#ee6322– 61%#ebeeee– 93%#ebeeee– 100%
This will style the main text layer.
Step 4
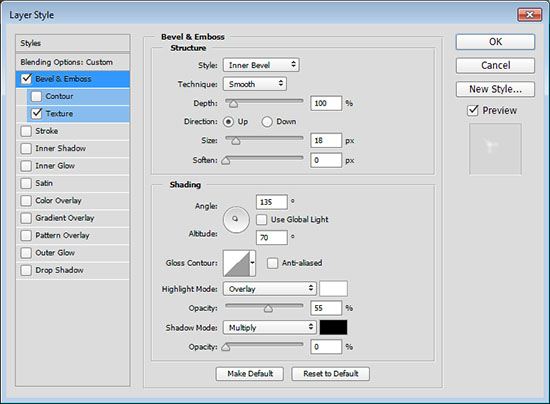
Double click the first copy shape layer to apply the following Layer Style:
– Bevel and Emboss
- Size : 18
- Uncheck the Use Global Light box
- Angle : 135
- Altitude : 70
- Highlight Mode : Overlay
- Opacity : 55%
- Shadow Mode – Opacity : 0%
– Texture
- Pattern : Green Dust & Scratches
- Depth : 25%
This will add a glossy textured layer to the main text.

Step 5
Double click the second copy shape layer to apply a Bevel and Emboss effect using the following values:
- Size : 18
- Uncheck the Use Global Light box
- Angle : -24
- Altitude : 37
- Highlight Mode : Overlay
- Shadow Mode – Opacity : 0%

This will give a subtle 3D appearance to the text.
Step 6
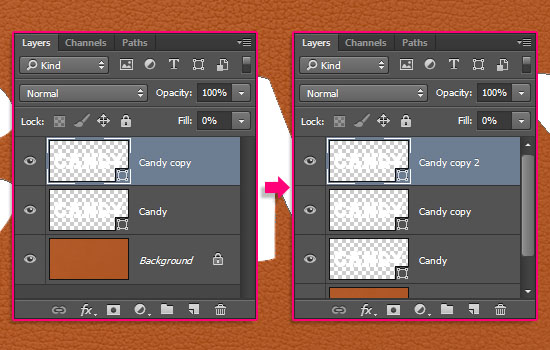
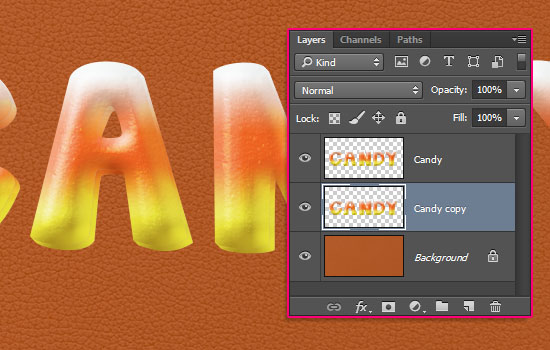
Select all the shape layers, right click any of them and choose Rasterize Layer. Then, go to Layer > Merge Layers, and rename the merged layer to Candy.
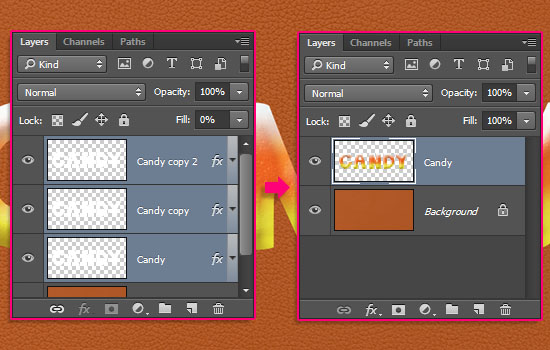
Duplicate the merged layer and drag the copy below the original. Then go to Edit > Free Transform (Cmd/Ctrl + T), and press the Right Arrow key once, then press the Down Arrow key also once to move the copy 1px to the right and 1px downwards.
Hit Return/Enter to accept the changes.

Press the Alt + Ctrl + Shift + T or Option + Cmd + Shift + T keys 4 times to duplicate the layer and the transformation. Then select all the copy layers and go to Layer > Merge Layers, and rename the merged layer to Candy copy.
This will add some more 3D feel to the text.
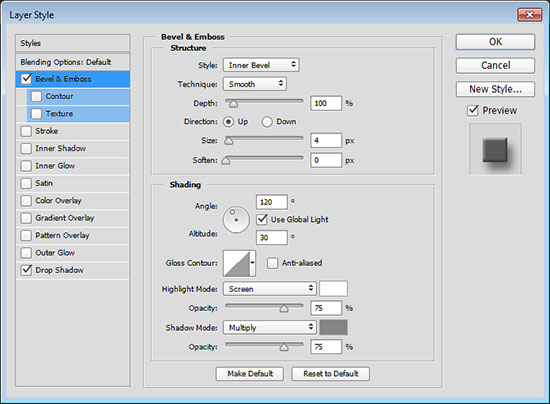
Step 7
Double click the Candy copy layer to apply the following Layer Style:
– Bevel and Emboss
- Size : 4
- Shadow Mode – Color :
#848484
– Drop Shadow
- Opacity : 50%
- Distance : 11
- Size : 21
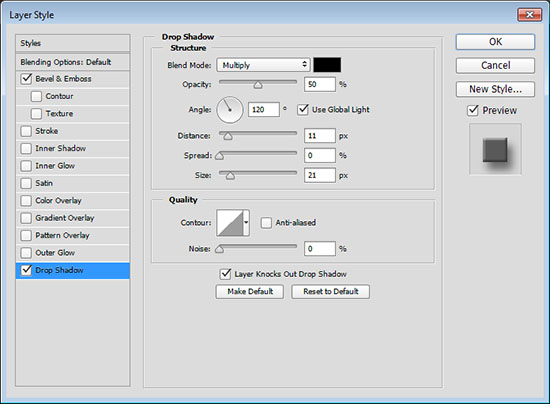
This will finish off the styling of the text.
Step 8
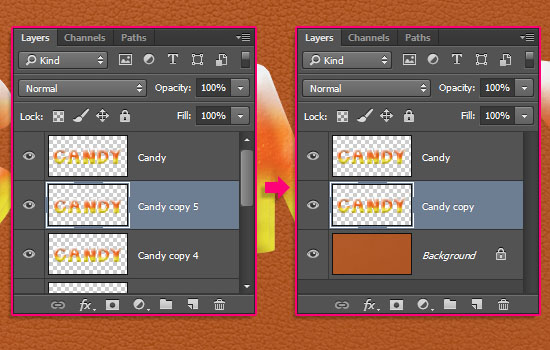
Pick the Lasso Tool, then select the first letter you have.

What you’ll need to do next for each letter after you select it is:
- Select the Candy Layer
- Press Cmd/Ctrl + J to duplicate the selected letter in a new layer
- Select the same letter again using the Lasso Tool
- Select the Candy copy layer
- Press Cmd/Ctrl + J
- Select the two letter’s layers, then go to Layer > Group Layers, and give the group the letter’s name
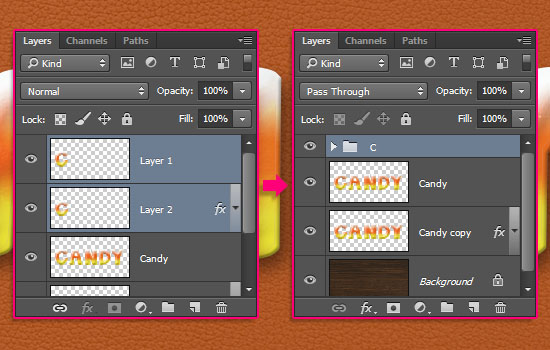
Repeat the previous steps for all the letters you have, and when done, make the original two layers invisible by clicking the eye icon next to each one of them.

You can add more text if you like, then resize, move, and rotate the letters as you like.
To do so, select each letter’s group, then go to Edit > Free Transform, and make any changes you like, then hit the Return/Enter key to accept those changes. You can also select more than one group at once if needed.
Step 9
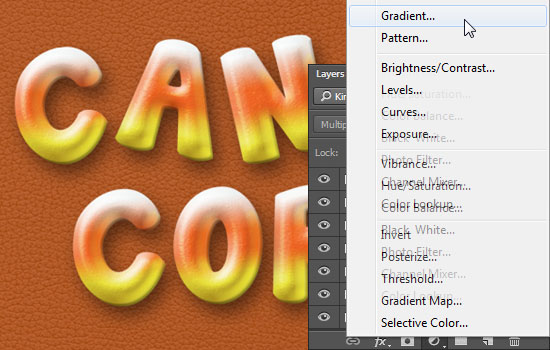
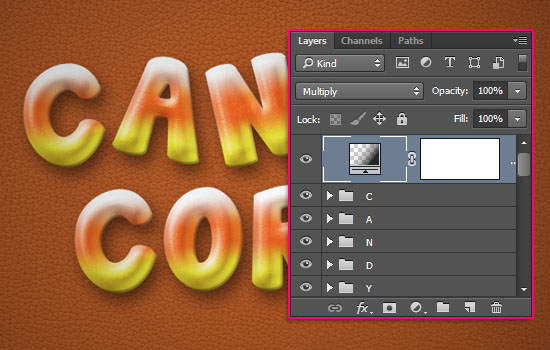
Click the Create new fill or adjustment layer icon down the Layers panel and choose Gradient.
Use a Transparent to Fill gradient, using the colors #949494 to the left and #262626 to the right. Change the Style to Radial, and the Scale to 350.
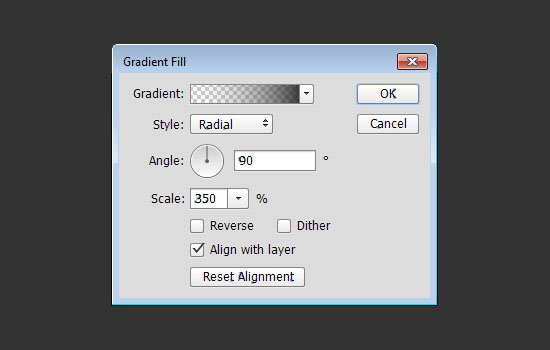
Place the adjustment layer on top of all layers, and change its Blend Mode to Multiply.
Place the Stock – Confetti Blue png image on top of the Background layer, rename its layer to Dots and change its Blend Mode to Screen.
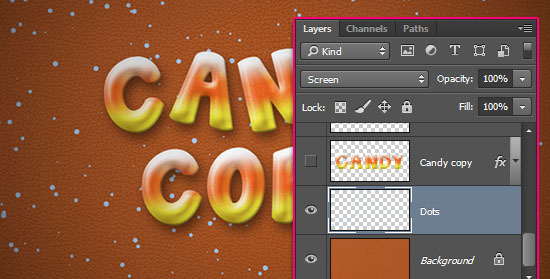
Go to Image > Adjustments > Hue/Saturation, check the Colorize box, and change the Hue value to 55 and the Saturation to 50.

And you’re done!
Enjoy your awesome candy corn letters 😉
Did you enjoy this post? Please consider donating to help us cover our server costs.


Nice Tutorial.. Here is my out come. Can you please sugar coated jelly text effect 😀
That’s awesome! Nicely done 😉
A sugar coated jelly text effect sounds like a great idea, will make sure to try and create a tutorial for that some time soon.
Thanks a lot for the comment, for sharing your work, and for the suggestion 🙂