
Colorful Textured Plastic Text Effect
This tutorial is a retro stationery inspired one. It will explain an easy way to create textured plastic semi-transparent letters, then move them around over the graph paper background.
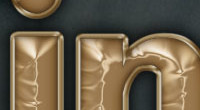
The Final Result

Tutorial Details
- Software Used : Photoshop
- Version : CS6 Extended
- Time : 0:30 – 0:45
Resources
- Anchor Jack font.
- Lined Paper Patterns by kittenbella.
- Little knobs pattern by Amos.
- Crumpled Paper Texture by capturedbykc.
Step 1
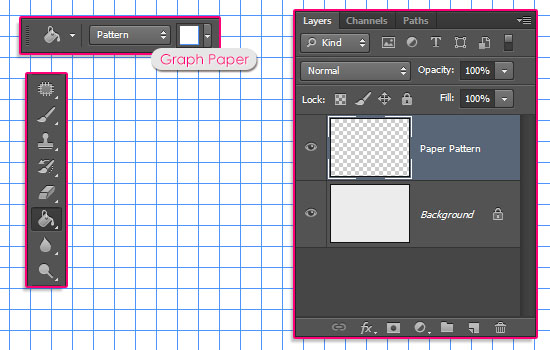
Create a new 1100 x 800 px document, set the Resolution to 300, and fill the Background with the color #ececec.

Pick the Paint Bucket Tool, then choose the Pattern option in the Options bar.
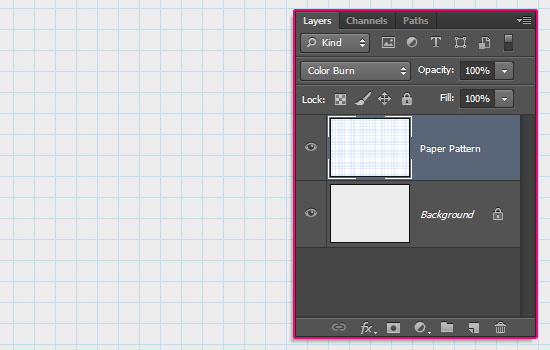
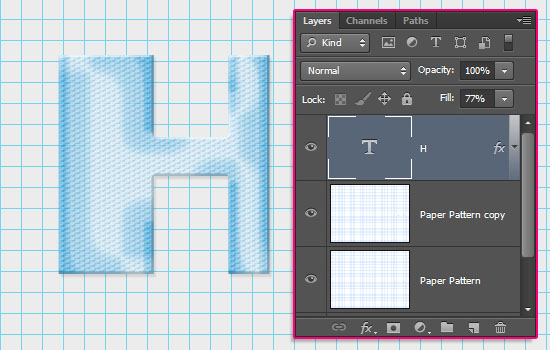
From the picker menu, choose Graph Paper (found in the Lined Paper Patterns pack). Create a new layer and call it Paper Pattern, then fill it with the selected Graph Paper pattern.
Change the Paper Pattern layer’s Blend Mode to Color Burn.
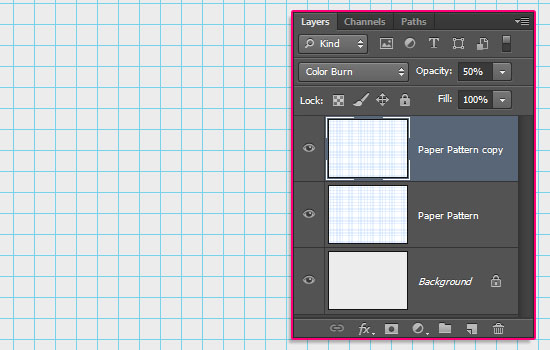
Duplicate the Paper Pattern layer, then change the copy’s Opacity to 50%.
Step 2
Type only the first letter of the text you want to create using the font Anchor Jack. Choose a bright color, here, the color #39ace1 is used.
The font Size is 70 pt, and the text is created in All Caps.

Double click the text layer to apply the following Layer Style:
– Bevel and Emboss
- Depth : 150
- Check the Anti-aliased box
- Shadow Mode – Color :
#b7b7b7
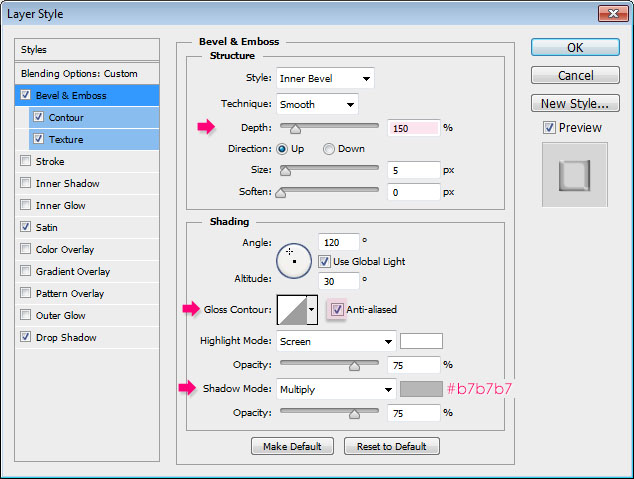
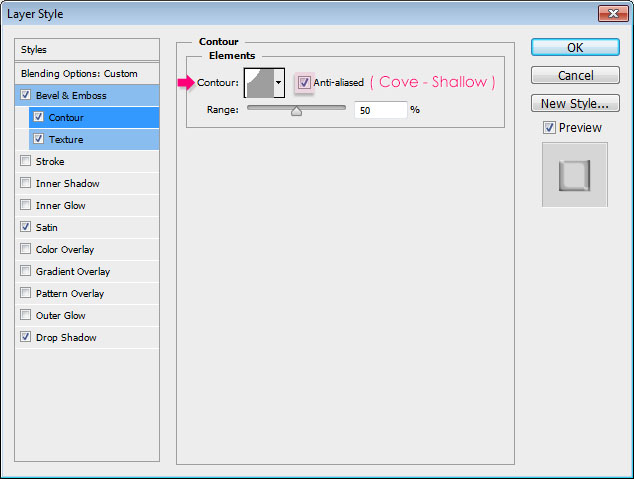
– Contour
- Contour : Cove – Shallow
- Check the Anti-aliased box.
– Texture
- Pattern : Little Knobs

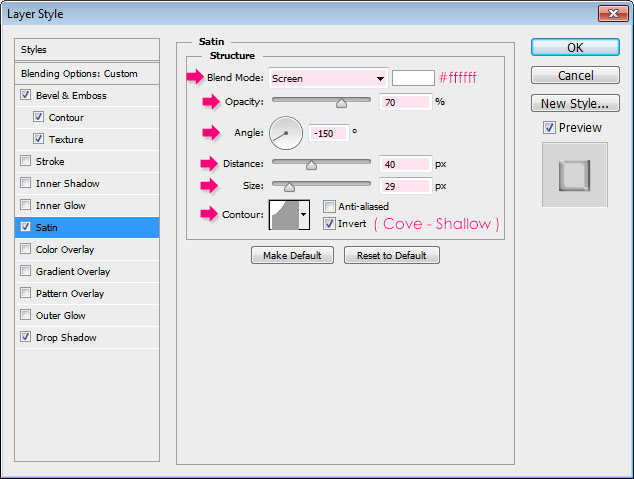
– Satin
- Blend Mode : Screen
- Color :
#ffffff - Opacity : 70%
- Angle : -150
- Distance : 40
- Size : 29
- Contour : Cove – Shallow
This will create simple reflections.
– Drop Shadow
- Color :
#dddddd - Distance : 3
- Size : 2
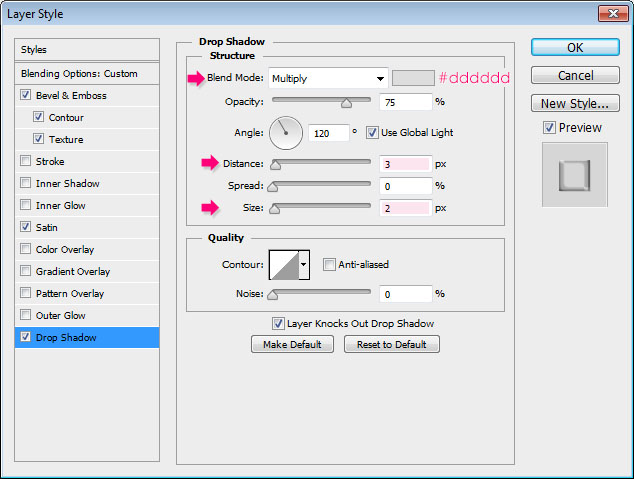
This will create the main plastic-like effect.
Step 3
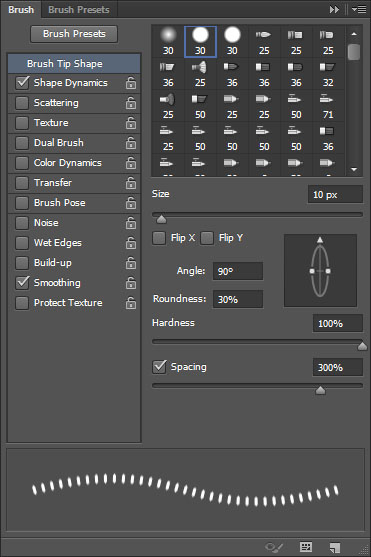
Pick the Brush Tool and open the Brush panel (Window > Brush).
Under Brush Tip Shape, choose a hard round brush, change the Size to 10 px, the Angle to 90°, the Roundness to 30, and the Spacing to 300.
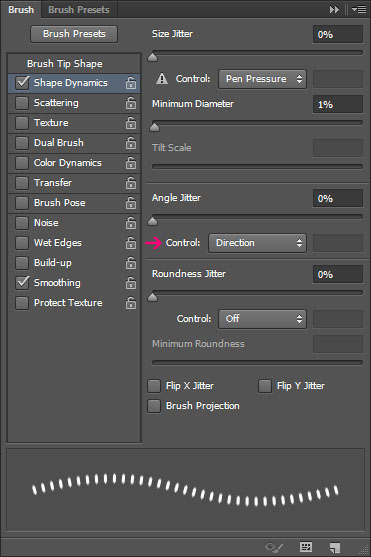
Under Shape Dynamics, set the Angle Jitter Control to Direction. This will change the brush tips’ angle values following their direction.
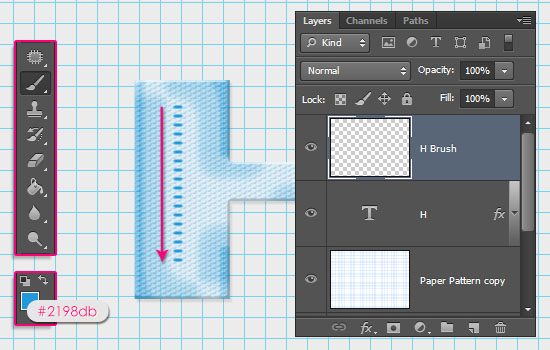
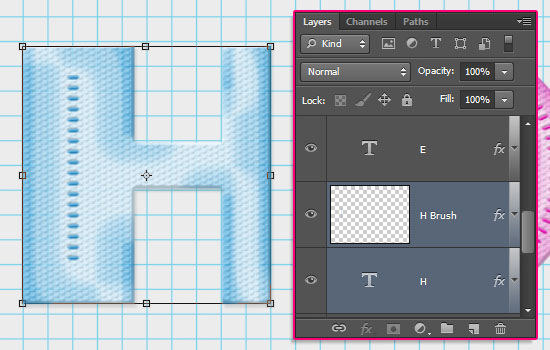
Create a new layer on top of the text layer, then call it (the letter) Brush, and set the Foreground color to a color that is a bit darker than the text color you used (here it is #2198db). Now, you’ll need to draw a line inside one of the letter’s sides.
So click where you want the line to start, and before you release the mouse button, press and hold the Shift key, and drag the line to where you want it to end, then release everything.
(Creating curves for letters like O and C will be explained in the next step).
Double click the brush layer, and apply a very simple Bevel and Emboss effect:
- Style : Pillow Emboss
- Size : 0
- Shadow Mode – Color :
#868686
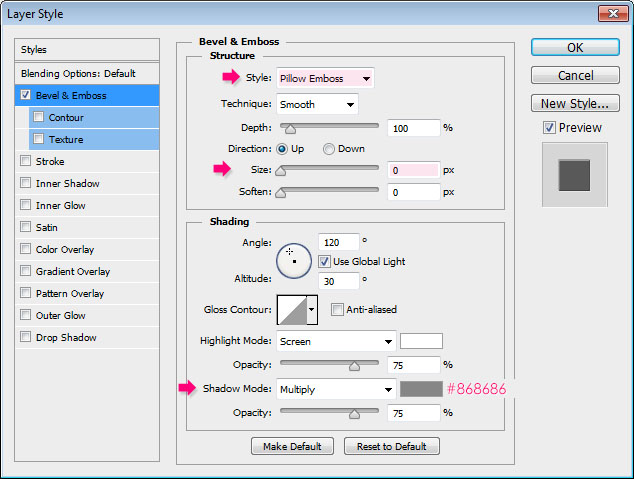
This will blend the brush with the plastic shape nicely.

Now, you’ll need to repeat the same steps for the rest of the letters.
So create each letter in a new bright color, create a new layer on top of it, add the brush, then apply the same Layer Styles to both layers.
To apply the Layer Styles quickly and easily, copy the original Layer Style (right click its layer, and choose Copy Layer Style), then paste it for each other layer (right click the new layer, and choose Paste Layer Style).

Step 4
To create the curves, you’ll need to use the Pen Tool. Make sure that the Path option is the active one in the Options bar.
Click to add a point, click and drag to create a curve.
You can then use the Direct Selection Tool to select the anchor points and move them around, or click and drag the direction points to control the curve.
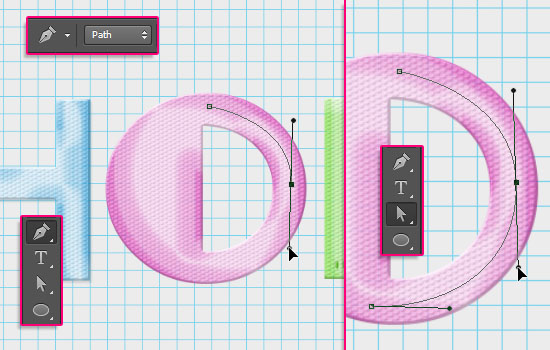
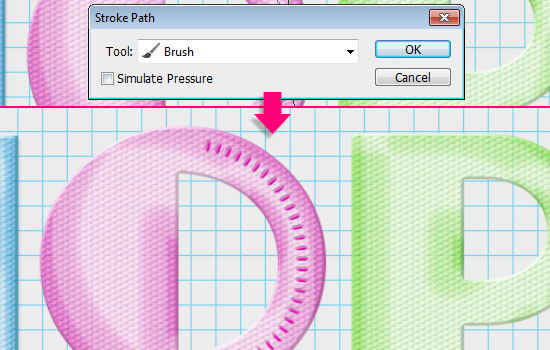
Make sure to create the Brush layer for the letter you’re working on and to change the Foreground color depending on the letter’s color, then right click the path (with the Direct Selection Tool or the Pen Tool active), and choose Stroke Path.
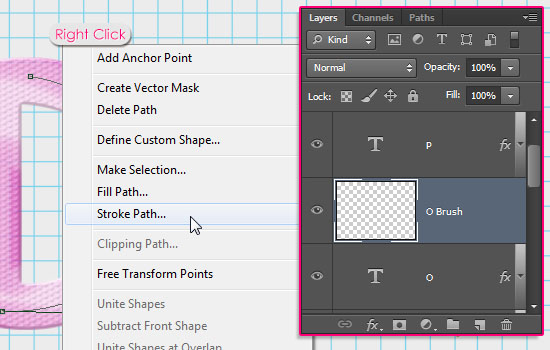
Choose Brush from the Tool drop down menu with the Simulate Pressure box un-checked, and click OK.
This will stroke the curve with the same brush. Hit the Enter/Return key when done to get rid of the work path.
Step 5
Next, select a letter’s text and brush layers (Ctrl/Cmd + click), then go to Edit > Free Transform.
Rotate and move the letter around, then hit Enter/Return to accept the changes.
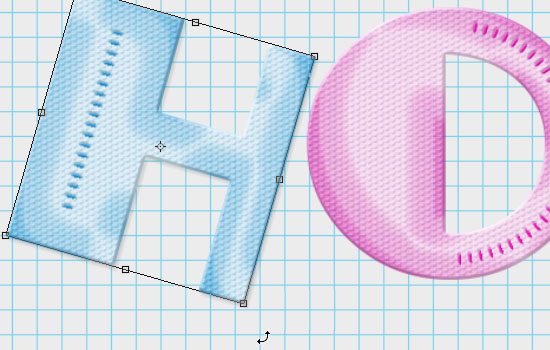
Repeat that for the other letters as well.

Step 6
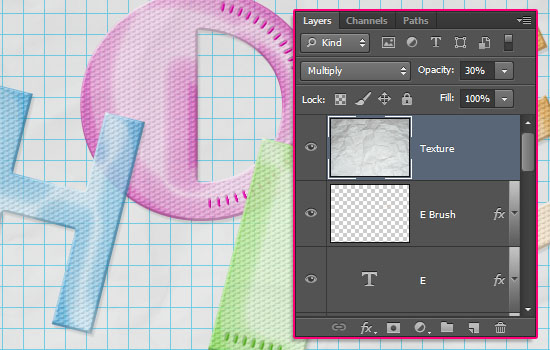
Place the Crumpled Paper Texture image on top of all layers, then change its layer’s Blend Mode to Multiply and its Opacity to 30%.
This will make the paper background look wrinkled, and will modify the coloring a little bit at the same time.
This is optional, but it will add some more coloring to the final result.
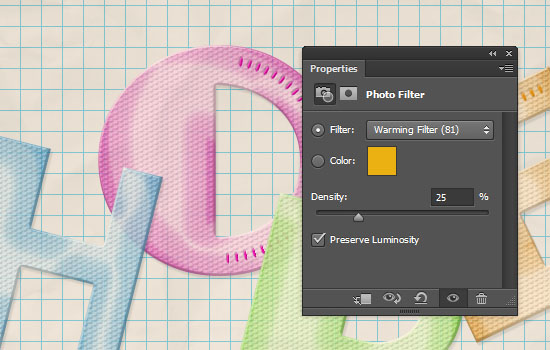
Click the Create new fill or adjustment layer icon down the Layers panel, and choose Photo Filter.
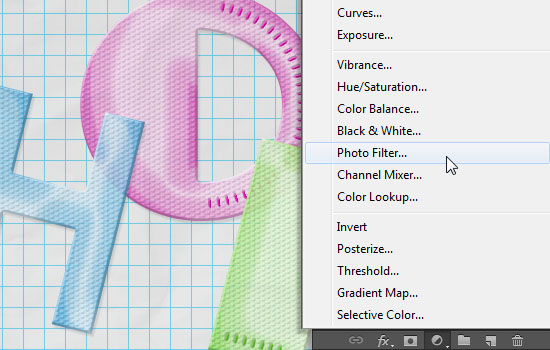
Choose any of the Filters you like. The one used here is the Warming Filter (81).
And you’re done!
The final result reminds me of the 90s school supplies for some reason!
Hope you enjoyed the tutorial 🙂
Did you enjoy this post? Please consider donating to help us cover our server costs.


thanks for nice tutorial… 🙂
here’s my result…
http://i1181.photobucket.com/albums/x427/pak-world/colorful-textured-plastic-text-effect_zps7878fedb.png
Amazing result!
Thank you very much for the comment and the link 🙂
this was so much fun, Thank you.
Glad you had fun with it 😀
Thanks a lot for the comment.
it’s a good tutrial
thank u
You’re welcome.
Thanks a lot for the comment.
This is a very nice tut. But, in my default patterns I can’t find the “Graph Paper”. Where can I find that?
It is found in the “Lined Paper Patterns” pack provided in the Resources section.
Hope this helps 🙂
Thanks a lot for the comment.
My effect: http://i368.photobucket.com/albums/oo123/sinfonia40/hola-texto-reglas.jpg
Very well done! Really nice outcome.
Thanks a lot for sharing your work 🙂
Please check how to define the pattern here.
Hope this helps 🙂
Very cool outcome!
Thank you very much for the comment and for sharing your lovely work 😀