
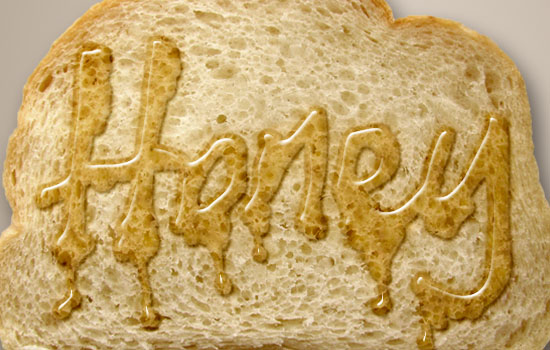
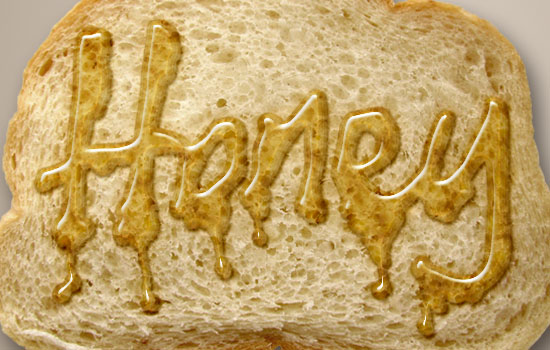
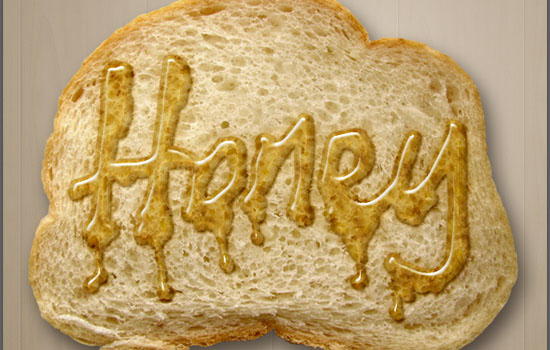
Dripping Honey on Toast Text Effect
What’s better than honey and toast? Well, honey on toast 😉 ! This tutorial will show you a simple way of modifying a toast stock photo, and using a couple of Layer Styles with some useful tricks, to create a golden syrupy honey-on-toast inspired text effect.
This text effect can also be modified to look like an oil text effect.
This was suggested by Luca. Thank you for the delicious suggestion, Luca 🙂
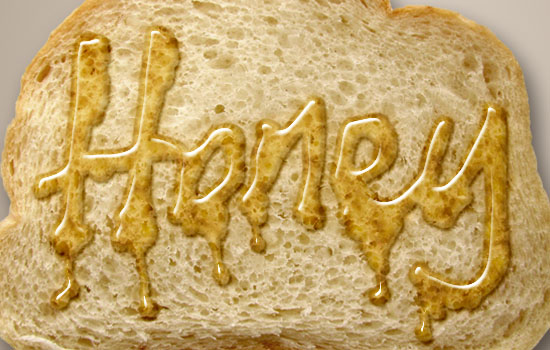
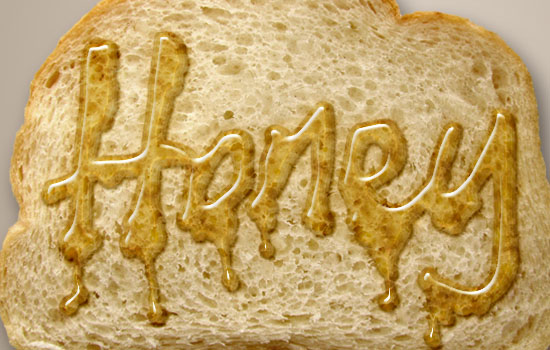
The Final Result

Tutorial Details
- Software Used : Photoshop
- Version : CS6 Extended
- Time : 0:30 – 0:45
Resources
- Hand of Sean font.
- Bread by stockmacedonia.
- Wood Patterns by Loungedy.
Step 1
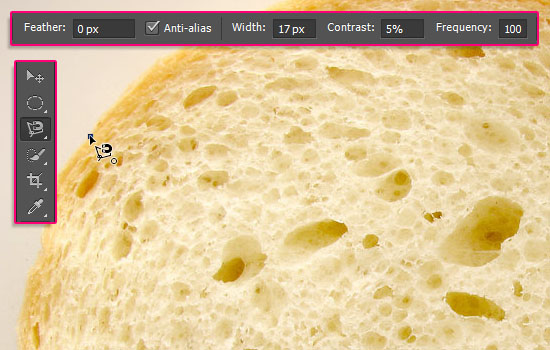
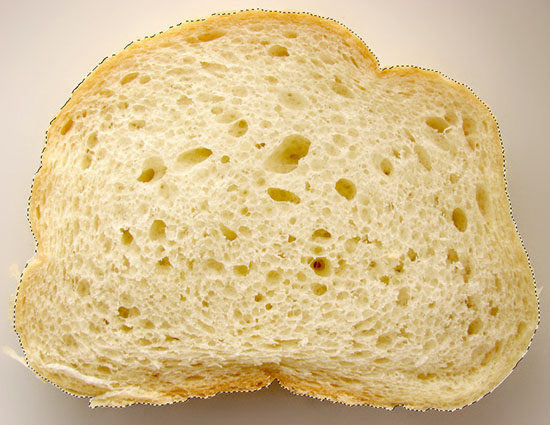
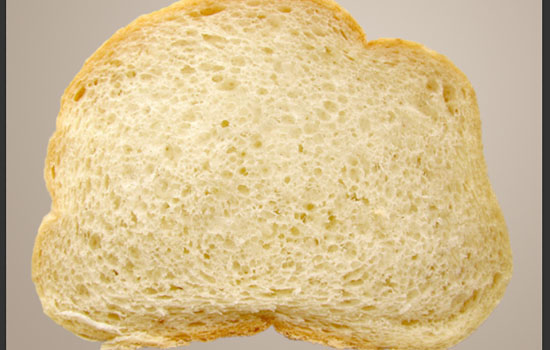
Open the Bread image, and pick the Magnetic Lasso Tool. In the Options bar, set the Width to 17, the Contrast to 5%, and the Frequency to 100.
Click once anywhere you want to start the selection, and drag a bit slowly to add some more points. You don’t need to click to add points unless you want to force adding them where the selection starts going off. The slower you drag, the more points are added, which means a more precise selection.
So click to add the points where needed, then continue dragging until you get back to the starting point to close the path. Don’t worry about some of the areas that don’t get selected along the way, as we’ll add them to the selection next.
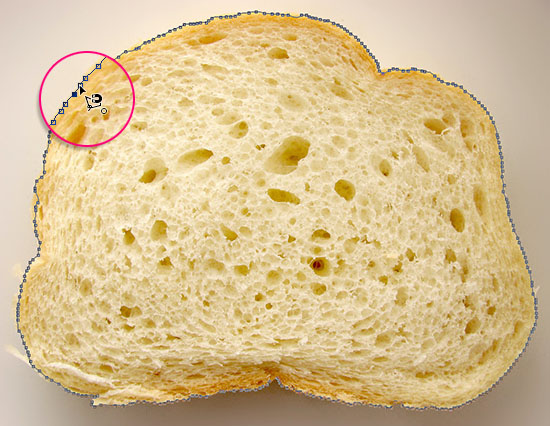
Once you reach the starting point and click it once more, the selection will be created.
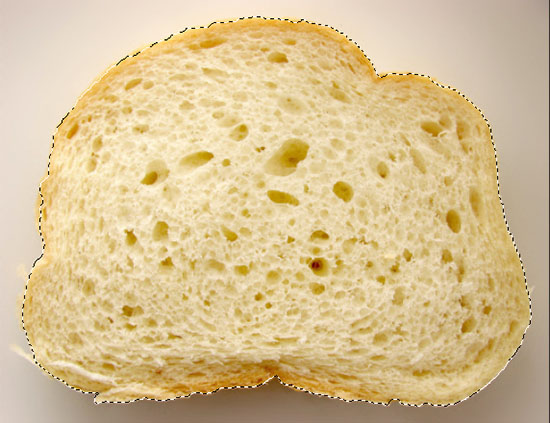
Pick the Quick Selection Tool and click the Add to selection icon in the Options bar. Choose a brush size that suits the size of the area you want to add to the selection, then click once (you might need to drag very slightly as well) to add it.
Add all the areas you want to add. There is no problem at all if you want to leave some extra bits unselected, or even click the Subtract from selection icon to remove any parts from the selection.
Once you like the result, just go to Edit > Copy.
Step 2
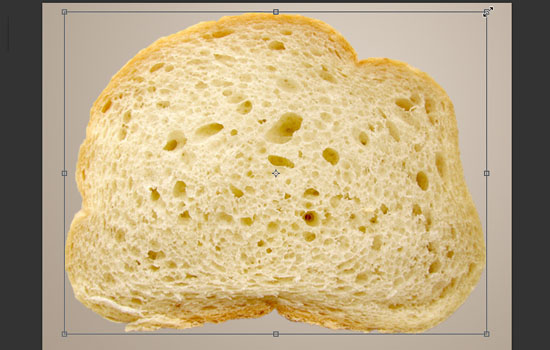
Create a new 648 x 486 px document (you can use any other dimensions depending on the length of the text you’re going to create). Set the Foreground color to #d9cfc5 and the Background color to #ad9d8d. Pick the Gradient Tool, choose the Foreground to Background gradient fill, and click the Radial Gradient icon.
Then, click and drag from a point near the top right corner of the document to the bottom left corner to create the background gradient.
Go to Edit > Paste to place the selected bread into the document. Then, go to Edit > Transform > Scale to scale it down until it fits within the document, and hit Enter/Return to accept the changes.
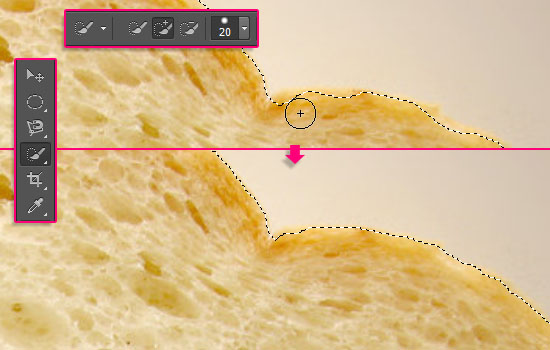
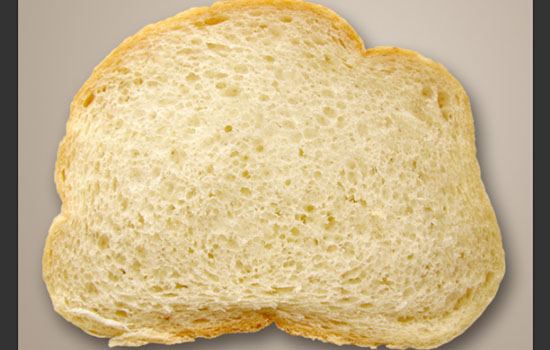
Next, we want to get rid of the big holes in the bread image. So pick the Spot Healing Brush Tool, choose a brush size that is around the size of the hole you want to remove, and paint the hole to get rid of it.
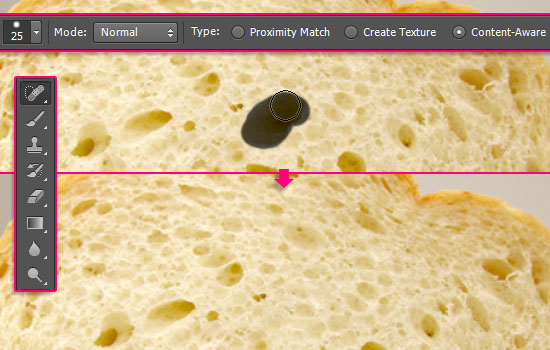
You can leave the ones near the edges, but the ones in the middle should look neat and clean.
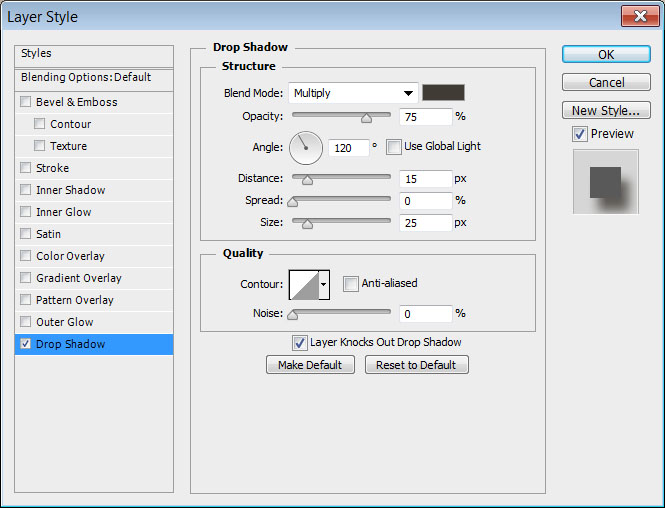
Double click the bread image to apply a Drop Shadow effect:
- Color :
#413b36 - Distance : 15
- Size : 25
We will get back to this to add some Inner Shadow after we add the text.
Step 3
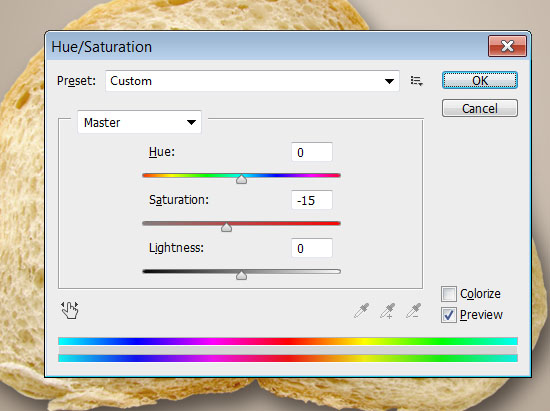
Go to Image > Adjustments > Hue/Saturation, and change the Saturation value to -15.
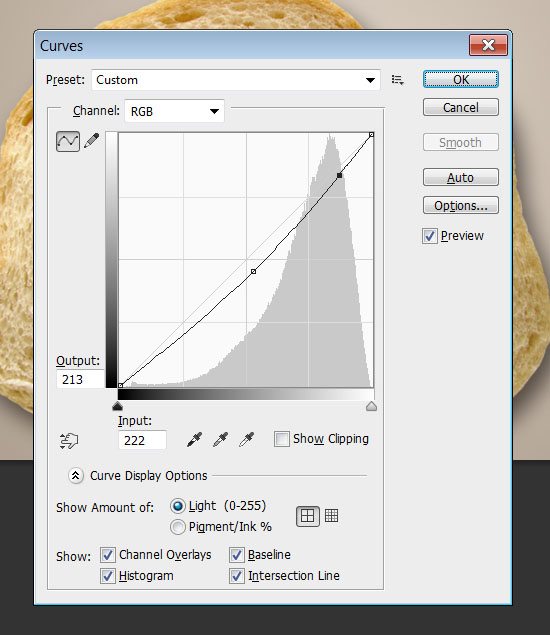
Go to Image > Adjustments > Curves, and add two points with the following Input and Output values: (135,116) and (222,213).
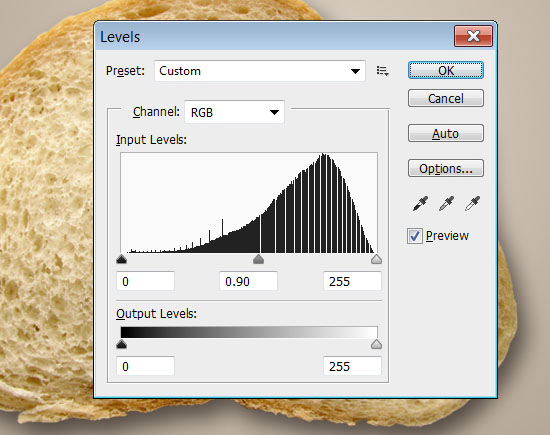
Go to Image > Adjustments > Levels, and change the Gamma value to 0.90.
Step 4
Create the text using the color #d19e31, the font Size of 170 pt, and the font Hand of Sean. You can use any similar one if needed (this one’s for personal use only), or even try different fonts as well.
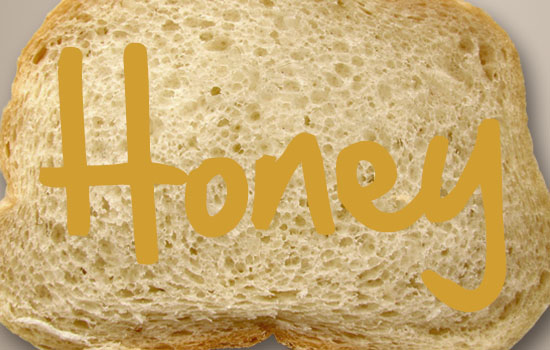
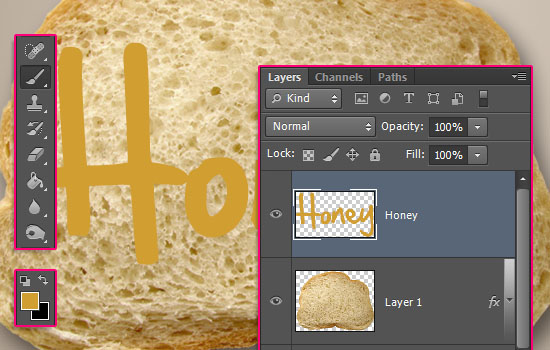
Right click the text layer and choose Rasterize Type. This will enable us to warp and paint over the text, but it won’t be editable anymore. Pick the Brush Tool and set the Foreground color to #d19e31.
This is optional, but you can go to Edit > Transform > Warp, and warp the text a little bit to make it look more interesting. Hit Enter/Return when done.
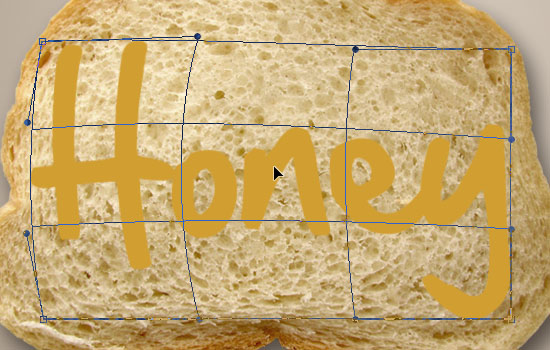
With the Brush Tool, start adding the leaking parts all over the text. For this step, you’ll need to use different brush tip sizes depending on the result you want to get. A quick way to change the brush size while painting is to use the left bracket key [ to decrease it and the right bracket key ] to increase it.
The parts leaking at the bottom should end with a drop that’s bigger in size than the line leaking. Take your time with this step to make sure you create a great final result.
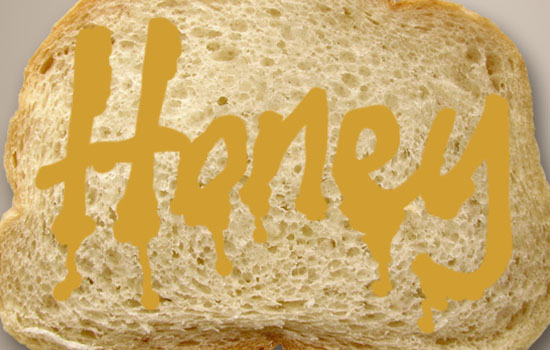
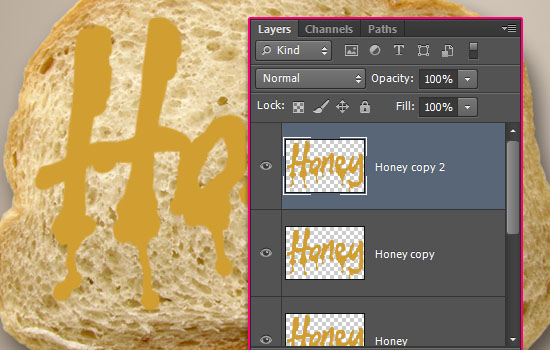
Duplicate the text layer two times.
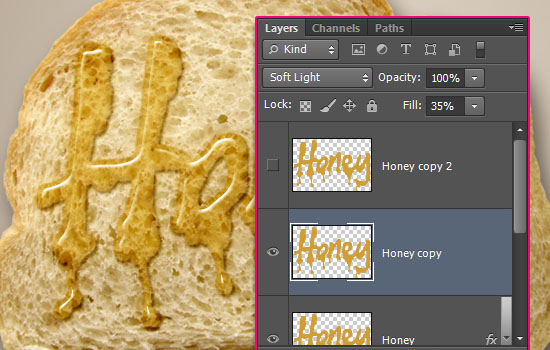
Step 5
You can make the two copy layers invisible by clicking the eye icon next to each of them. Then, change the original text layer’s Blend Mode to Linear Burn and its Fill value to 45%.

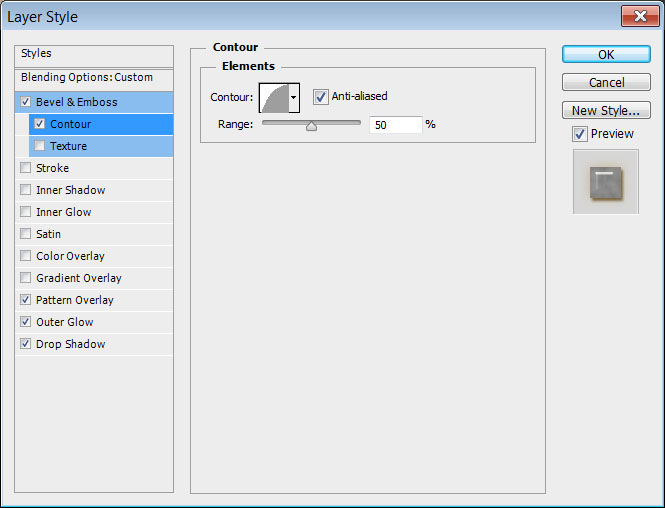
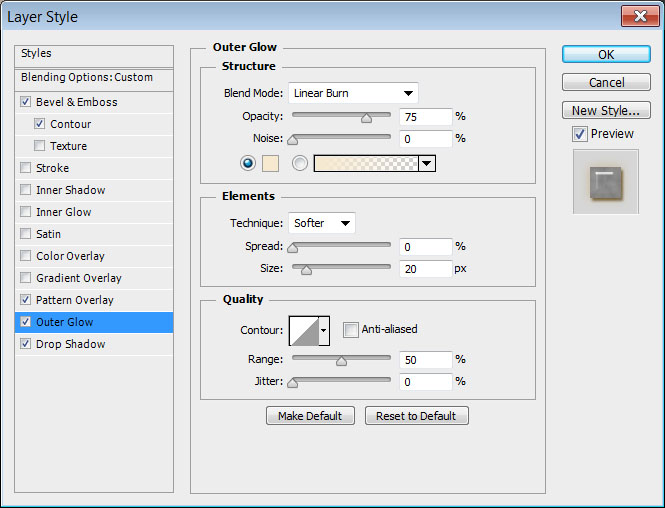
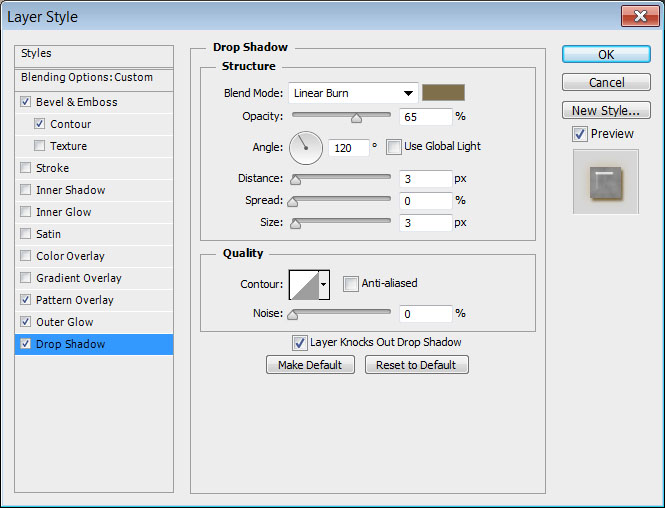
Double click the original text layer to apply the following Layer Style:
– Bevel and Emboss
- Depth : 358
- Size : 8
- Uncheck the Use Global Light box
- Angle : 117
- Altitude : 69
- Check the Anti-aliased box
- Highlight Mode – Opacity : 100%
- Shadow Mode :
- Color :
#b0a697 - Opacity : 28%
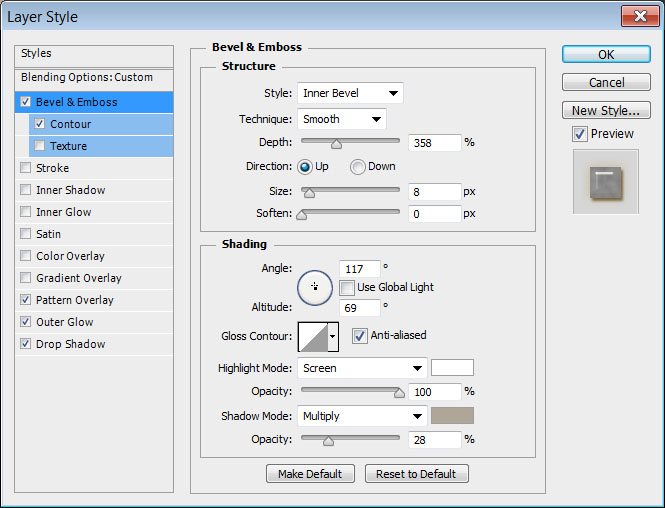
– Contour
- Contour : Half Round
- Check the Anti-aliased box.
– Pattern Overlay
- Blend Mode : Soft Light
- Opacity : 50%
- Pattern : Cells

– Outer Glow
- Blend Mode : Linear Burn
- Color :
#f6e9cf - Size : 20
– Drop Shadow
- Blend Mode : Linear Brun
- Color :
#806f4b - Opacity : 65%
- Distance : 3
- Size : 3
This will create the first layer of the honey effect. It already looks like honey, so if you like it you can just stop here. But we’re going to layer it some more in order to add intensity and depth. So we’re going to get back to this layer to change some values after adding the other layers.
Step 6
Make the first copy layer visible by clicking the empty box next to it where the eye icon was. Then, change its Blend Mode to Soft Light and its Fill value to 35%. Double click it to apply the following Layer Style:
– Bevel and Emboss
- Depth : 358
- Size : 8
- Uncheck the Use Global Light box
- Angle : 117
- Altitude : 69
- Check the Anti-aliased box
- Highlight Mode – Opacity : 100%
- Shadow Mode :
- Color :
#b0a697 - Opacity : 28%
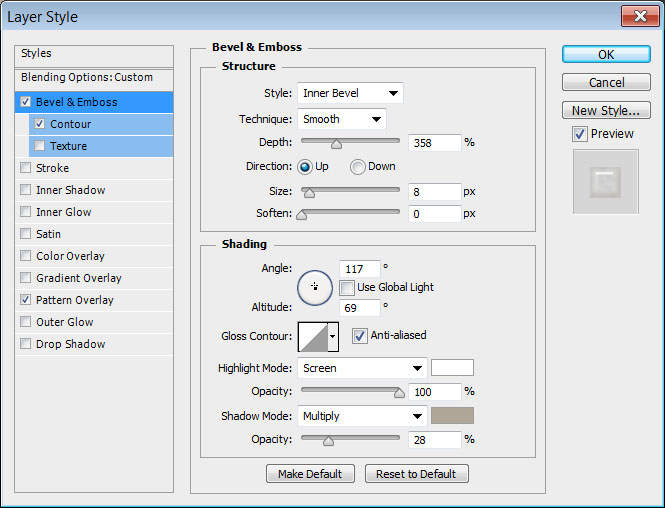
– Contour
- Contour : Half Round
- Check the Anti-aliased box.

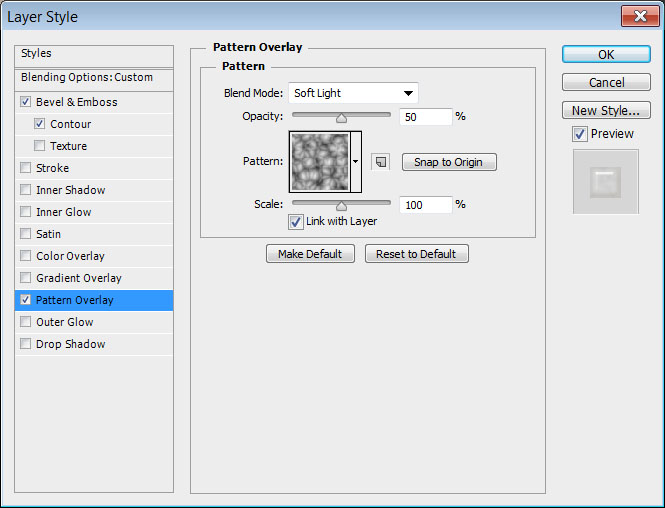
– Pattern Overlay
- Blend Mode : Soft Light
- Opacity : 50%
- Pattern : Cells
You can already see how the effect is building up now.
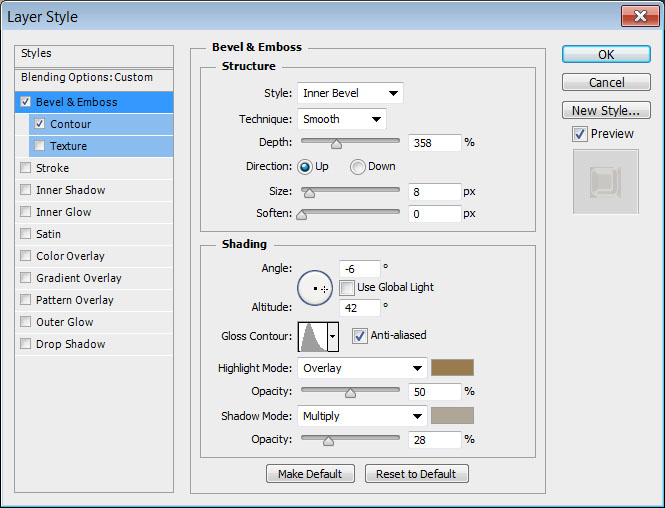
Step 7
Make the second copy layer visible, change its Blend Mode to Soft Light and its Fill value to 10%, then double click it to apply the following Layer Style:
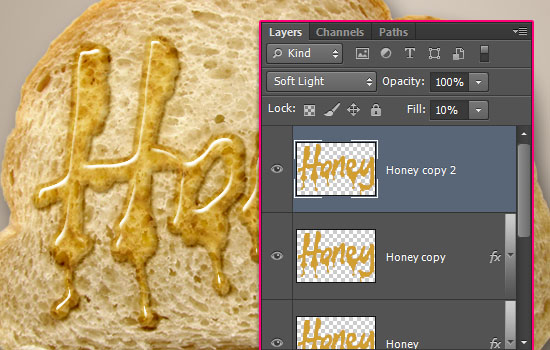
– Bevel and Emboss
- Depth : 358
- Size : 8
- Uncheck the Use Global Light box
- Angle : -6
- Altitude : 42
- Contour : Cone – Asymmetrical
- Check the Anti-aliased box
- Highlight Mode : Overlay
- Color :
#997b4d - Opacity : 50%
- Shadow Mode :
- Color :
#b0a697 - Opacity : 28%
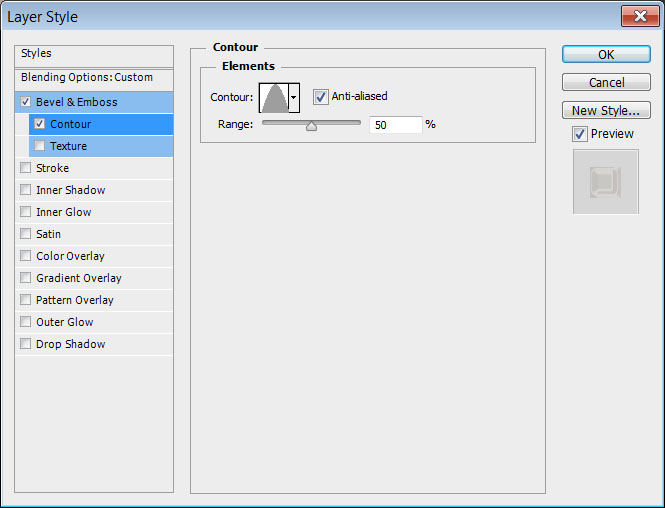
– Contour
- Contour : Cone
- Check the Anti-aliased box.
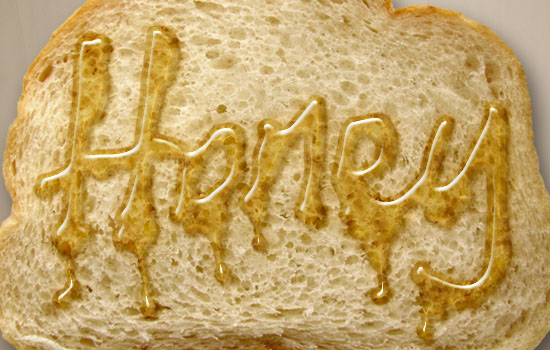
This will add the final layer. It’s a more strong and well defined effect than the first one created, and that’s the power of layering Layer Styles!
Step 8
You can now pick the Burn Tool, and in the Options bar, choose a soft round 90 px brush tip, set the Range to Midtones, and the Exposure to 50%. Then, select the Bread layer, and click and drag slightly to darken up any very bright areas behind the text.
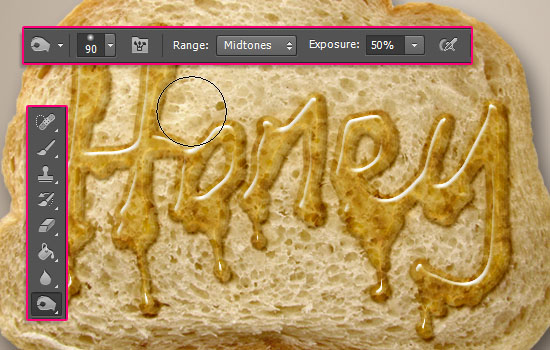
Double click the Bread layer and apply an Inner Shadow effect:
- Blend Mode : Color Burn
- Opacity : 35%
- Distance : 0
- Size : 13
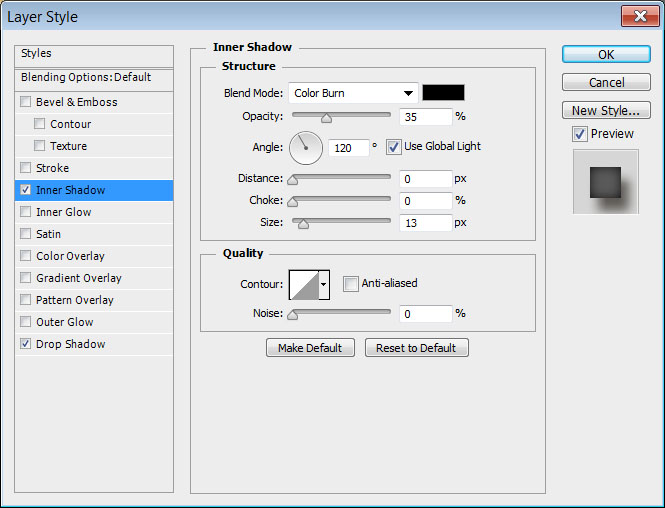
This will darken the edges a little bit.
Duplicate the Background layer then double click it.
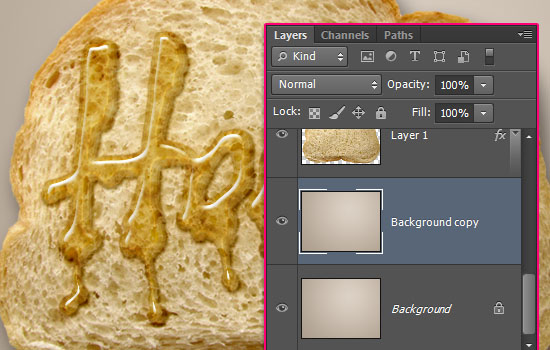
Apply a Pattern Overlay effect:
- Blend Mode : Color Burn
- Pattern : 29 (from the Wood Patterns pack)
- Scale : 50%

This will add a subtle background pattern.
Double click the original text layer and change the Drop Shadow‘s Opacity to 25%.
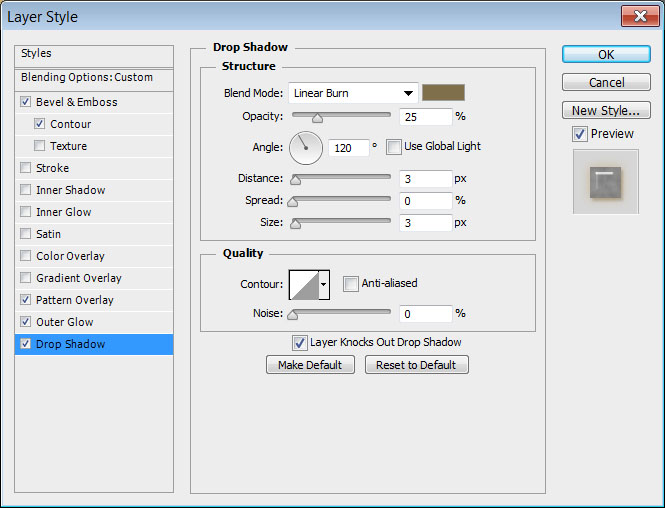
This will tone down the intensity of the shadow, so you can use whichever value you like best.
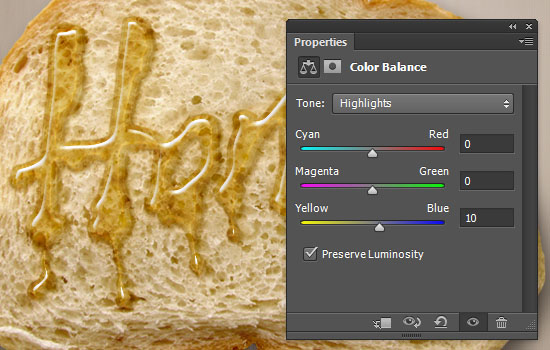
And finally, to adjust the overall yellow undertone of the final result, you can click the Create new fill or adjustment layer icon down the Layers panel and choose Color Balance.
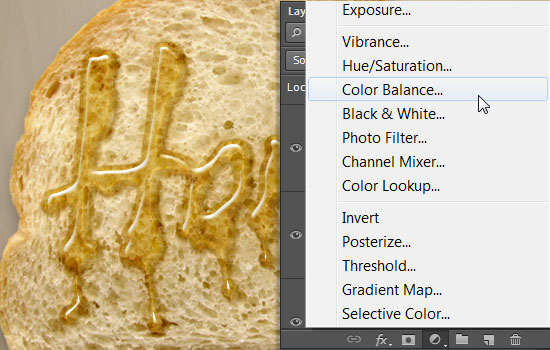
Choose the Highlights option from the Tone drop down menu, and change the Yellow/Blue value to 10.
And you’re done!
You can now enjoy your honey toast 😉 Hope you found the tutorial helpful.
Feel free to attach your lovely toasts in the comments below 😀
Did you enjoy this post? Please consider donating to help us cover our server costs.


Amazing
Thank you!
Really glad you do 😀
Thanks a lot for the comment 🙂
Incredible
Thank you 🙂
Linear Light–>Linear Burn
Fixed!
Thanks for pointing that out 😉
That’s so cool 🙂
Thanks a lot 🙂
awesome! many thanks i learn something new
That’s great to know!
Thank you very much for the kind comment 🙂
Ha this is great, did a quick version myself. Thanks
Amazing! Really like how it looks on the pancake 🙂
Many thanks for the comment and for sharing you work.
loved this ^-^ thank you so much!! im gonna make lots for friends hahah
Oh cool! That’s really nicely done 🙂
Hope your friends enjoy it 😉
Thanks a bunch for sharing your work and for the comment.
really great effect!
Thank you very much 🙂
good job, very good effect
Glad you like it.
Thanks a lot for the comment 🙂
thanks for the cool tutorial , I’m from Africa so i just wrote my surname on the bread 😀
here is mine 🙂
Great outcome 🙂
Thanks a lot for the kinds comment and for sharing your work.
its really cool, i don’t no one thing, where is Pattern : Cells?
You need to Load its set. To do so, go to Edit > Preset Manager, and choose “Patterns” from the “Preset Type” drop down menu. Then, click the little arrow to the right of the Preset Type drop down menu, and click “Patterns” near the bottom of the pop-up menu. When the dialog box appears after that, just click Append, and you’ll get the pattern 🙂
Hope this helps.
Thanks for the comment.
Thats mine… A bit late… but still… 😛
Very well done outcome indeed!
Thanks a lot for the comment and for sharing your work 🙂
rose this didn’t help now im going to fail and its all your fault you meany