
Fantasy Spring Text Effect
This tutorial will show you how to create a simple brush, then modify its settings, in order to create a nice fresh fantasy spring text effect.
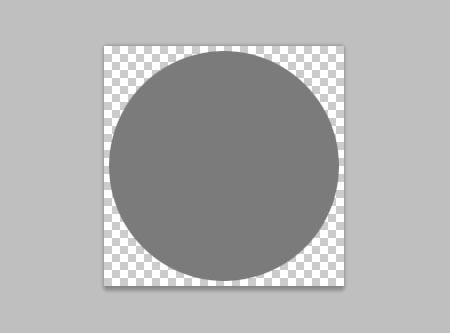
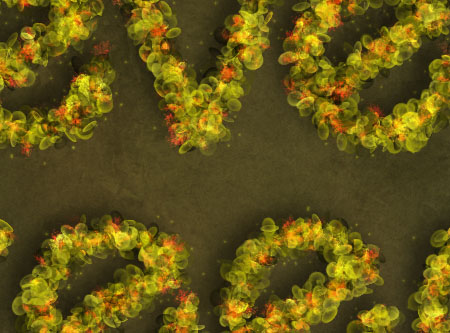
The Final Result

Tutorial Details
- Software Used : Photoshop
- Version : CS5 Extended
- Time : 0:45 – 1:15
Resources
- Brie Light font.
- Pip Paper by struckdumb.
- Monster texture by redwolf518stock.
- Sparkles Brush.
Step 1
We will start by creating the brush. So create a new 230 x 230 document, and use the Ellipse Tool to create a circle that fits within the document.
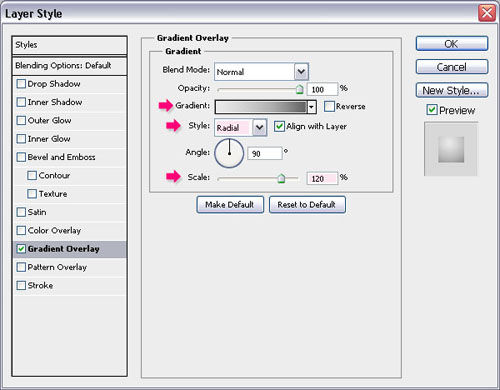
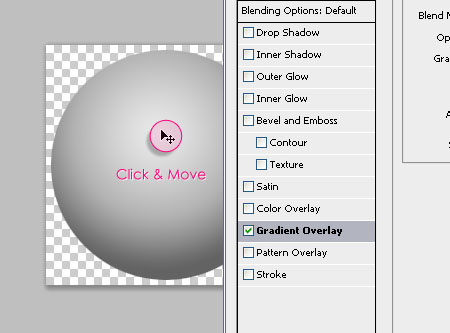
Double click the circle’s layer to apply a Gradient Overlay effect:
– Gradient Overlay
- Style : Radial
- Scale : 120%
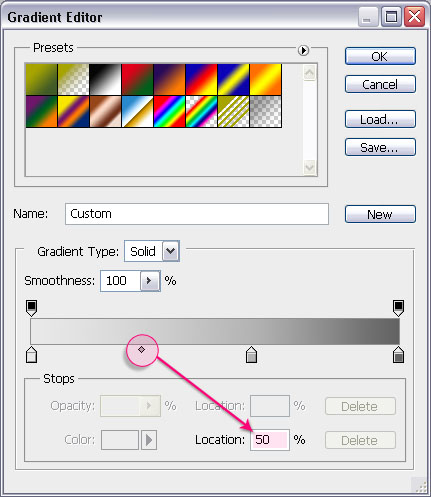
- Click the Gradient box to create the gradient
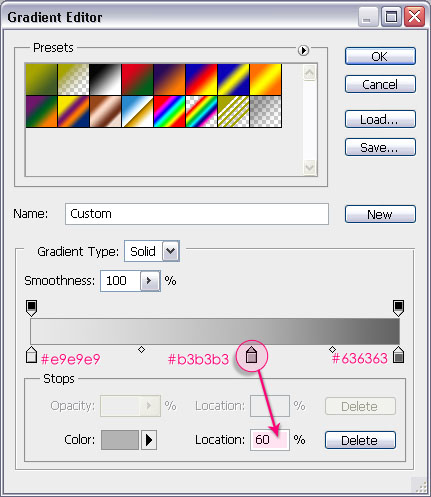
You will need 3 colors to create the Gradient (you can add the colors by clicking under the gradient bar to create Color Stops): #e9e9e9 to the very left, #636363 to the very right, and #b3b3b3 in between. Set middle color’s Location to 60%.
(You can assign the value after you click the Color Stop).
When you click the #b3b3b3 color stop, two Midpoints will appear, one to its left, and another one to its right. click the Midpoint to the right, and change its Location to 55%.
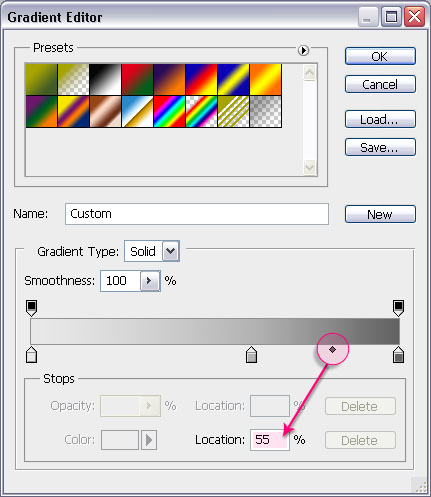
Then, change the Location of the Midpoint to the left to 50%.
Now that the gradient is finished, click OK to get out of the Gradient Editor, and while the Layer Layer Style box is still open, click the circle to move the Gradient around, until you get a result similar to the one below:
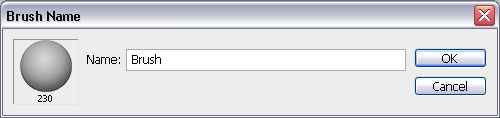
When you’re happy with the result, hit OK. Then go to Edit > Define Brush Preset, and type in a name for the brush.
Step 2
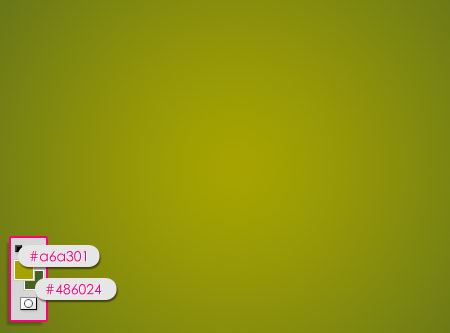
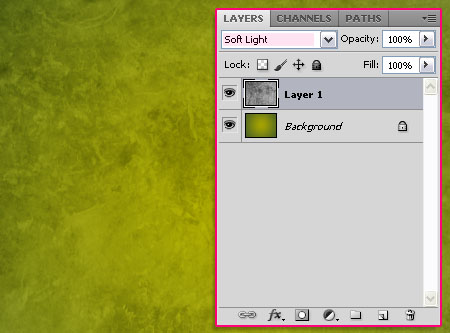
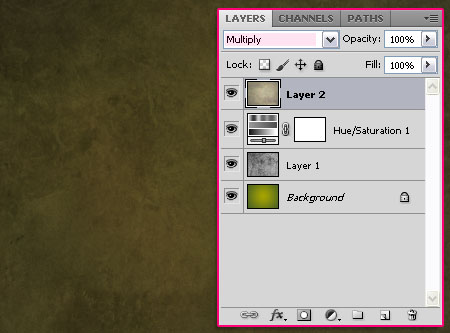
Create a new 1024 x 768 px document. Set the Foreground color to #a6a301, and the Background color to #486024, then, create a Radial Gradient from the center of the document to one of the corners.
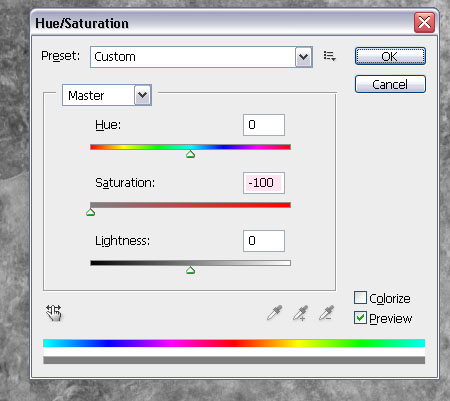
Place the Pip Paper texture on top of the Background, then go to Image > Adjustments > Hue/Saturation, and change the Saturation to -100.
Change the layer’s Blend Mode to Sof Light.
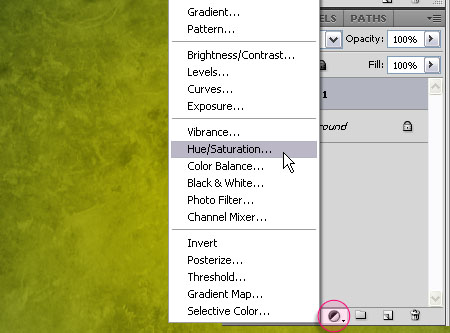
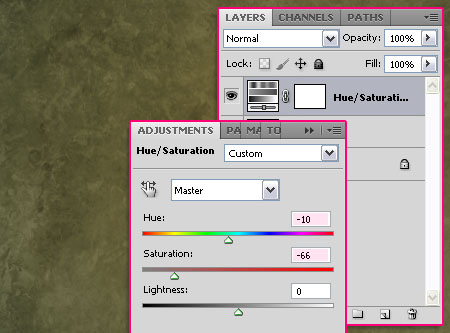
Click the New Adjustment Layer icon at the bottom of the Layers panel, and choose Hue/Saturation.
Change the Hue value to -10, and the Saturation value to -66.
Open the Monster texture and place it on top of all layers, then change its Blend Mode to Multiply. And we’re done with the Background!
Step 3
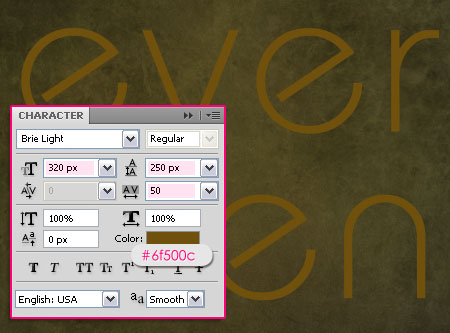
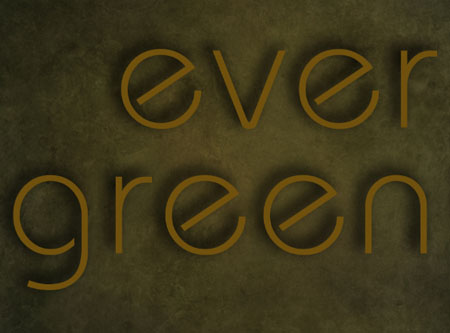
Create the text using the color #6f500c. The font used is Brie Light and the Size is 250 px. You might need to change the Leading value if there are multiple lines, and the Tracking value to avoid overlapping. (Found in the Character Panel ‘Window > Character’).
Double click the text layer to apply a Drop Shadow effect:
– Drop Shadow
- Uncheck the Use Global Light box
- Angle : -36
- Distance : 18
- Spread : 15
- Size : 35
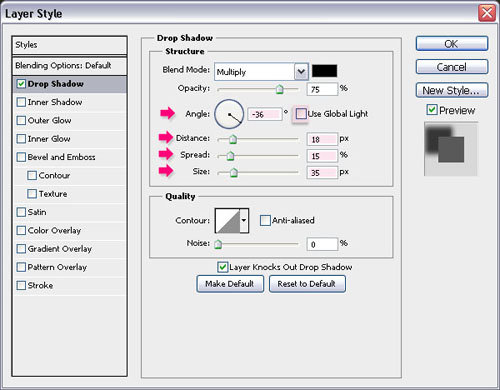
The text should have more depth.
Step 4
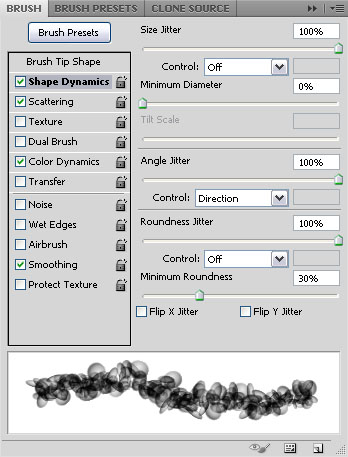
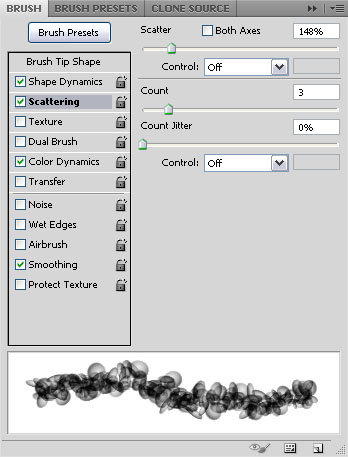
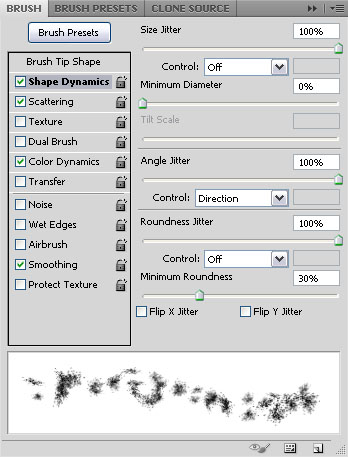
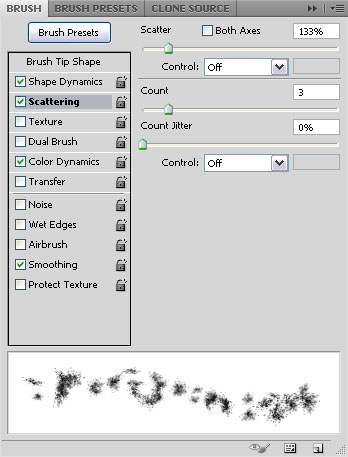
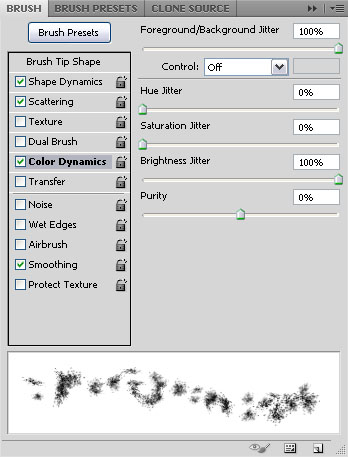
Open the Brush panel (Window > Brush),to modify the Settings of the Brush tip created in the first step as below:
Brush Tip Shape
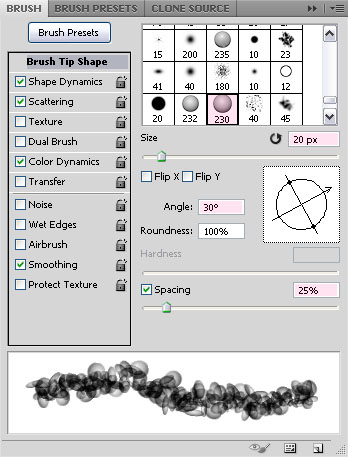
Shape Dynamics
Scattering
Color Dynamics
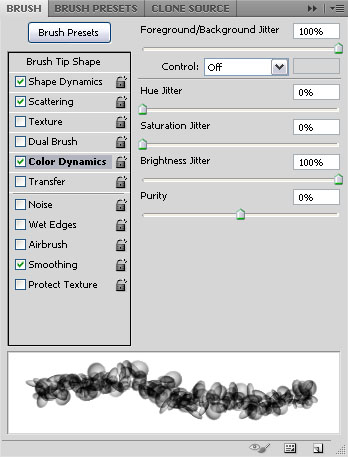
* You can play around with the values if you like, especially if you are using a different font or font size.
Step 5
Back to the original document, right click the text layer, and choose Create Work Path.
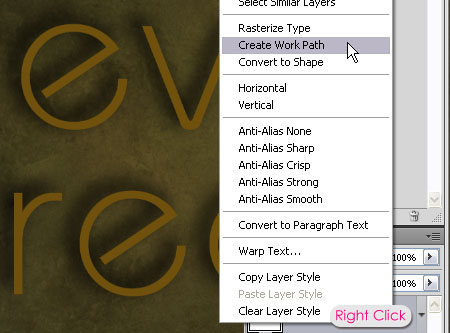
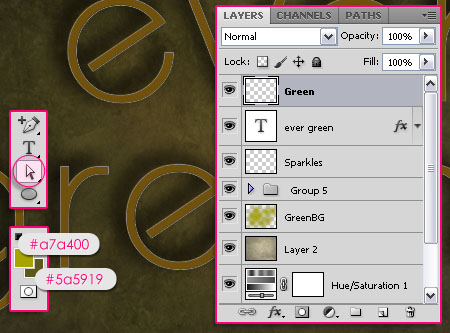
Set the Foreground color to #a7a400 and the Background color to #5a5919, and pick the Direct Selection Tool. Create a new layer on top of all layers and call it Green.
Right click the work path, and choose Stroke Path.

Choose Brush from the Tool drop down menu, and make sure that the Simulate Pressure box is un-checked.

This will stroke the path with a nice leaves-like stroke.
Step 6
Pick the Spatter 27 pixels brush, and modify its Settings as below:
Brush tip Shape
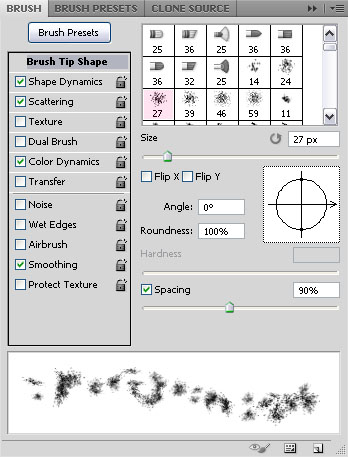
Shape Dynamics
Scatter
Color Dynamics
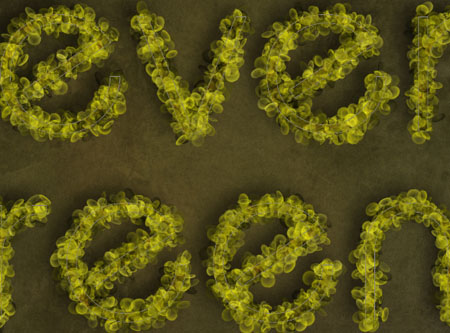
Create a new layer on top of all layers and call it Roses. Set the Foreground color to #f49e9c and the Background color to #df0024. Repeat the Stroke Path process to stroke the path with the new brush.
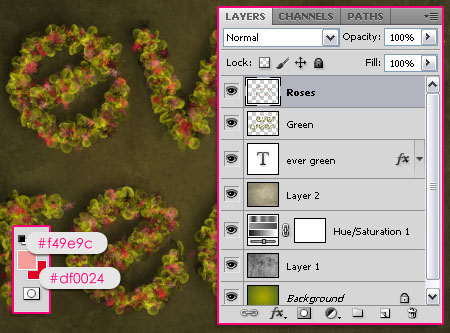
Change the Roses layer’s Blend Mode to Color Dodge, this will give an illusion of roses spread all over the green leaves.

Step 7
Load the Sparkles brush tip. Create a new layer right below the text layer and call it Sparkles, and set the Foreground color to #fef99d.
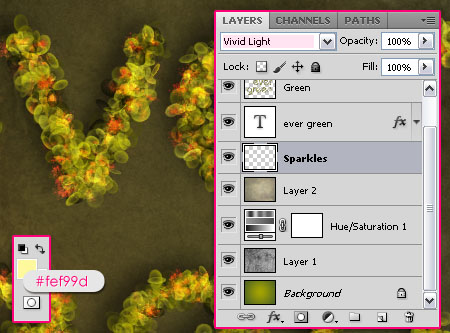
Again, stroke the path with this Sparkles brush. this will add a more fantasy-like feel to the effect.
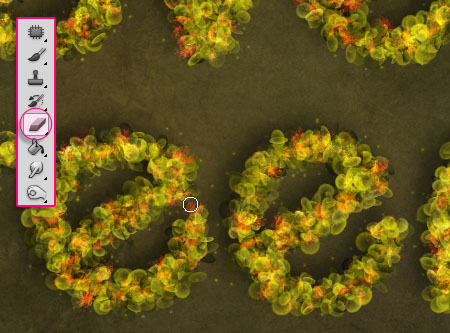
Use the Eraser Tool to get rid of any extra stuff. Just use a soft round brush with whatever size is suitable, and clear any scattered spots from any layer.
Step 8
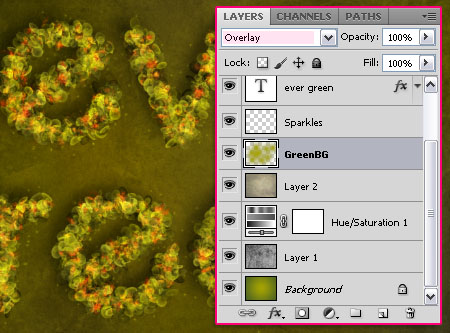
The last thing we’re going to do is add a simple green illumination behind the text. So set the Foreground color to #a7a400 once again, then create a new layer under the Sparkles layer and call it GreenBG. Use a big soft round brush to paint randomly around the text. Do not cover much of the background though.

Change the GreenBG layer’s Blend Mode to Overlay. And we’re done!
This is the Final Result once again.
Did you enjoy this post? Please consider donating to help us cover our server costs.


wow,.
thanks… 😀
You’re welcome, thanks for the comment 🙂
Hi, how did you create the text saying “I’m every colour I’m” Such as font colour etc, thanks
The font used is “Fmiring Campotype One”, you can download it here. Create the text using a slightly light green color and change its Blend Mode to Color Dodge.
Hope this helps.
good tutorial
Thank you 🙂
very nice !!!!!!!!!!!
Thanks a lot!
This looks really beautiful!
Nice work.
Thank you very much!
Glad you liked it 🙂
zajebiste..
nice
Thanks 🙂
Awesome tutorial but I have a little question:
what is font name which final image? (I’m every color. I’m)
Thank you so much 🙂
The font used is “Fmiring Campotype One”, you can download it here.
Thanks once again.
Will apply well. Thanks.
Great!
Thanks for the comment.
Great tutorial, you are very good at explaining aswell!
Thank you so much!
I’m really glad you liked it 🙂
Awesome design site and original idea for only text tutorials. I would like to invite you to submit some of your tutorials on my tutorials directory: http://www.onlytutorials.com/
Thanks a lot Andrei.
I actually submit all my tutorials there, but thanks for the invite.
Best regards.
amazing tutorial, very incredible effect. Thanks for share
Glad you liked it.
Thank you so much for the comment 🙂
gracias por compartir tus conocimientos, es un efecto hermoso
Your welcome, glad you liked it.
Muchas gracias for the comment 🙂
Thank you. May I want to share your tutorial in my language?
Sure, but please link back to the original (this) tutorial.
Cheers.
Can you tell me please, what is the font of this text when you wrote “I’m every color I’m” ?
Sure, it’s “Fmiring Campotype One”, you can download it here.
Cheers.
good
Thanks!
This tutorial very nice….. Thank you
You’re welcome.
Thanks for the comment 🙂
this is awesome! thank you! 🙂
you’re welcome.
Thank you for the comment 🙂
Amazing Tut, thank you again, I will try it for sure !!!
So glad you liked it.
Thanks a bunch for the comment 🙂
Here is my result 🙂
http://afmrp.deviantart.com/art/Spring-is-Coming-285719811
excellent work and i learn more techniques.
That’s great to know!
Thanks a lot for the comment.
Sparkles brush file loads as ‘floral spatters’ and looks just like the one we create for roses. It doesn’t look like the dots that show on your image. Is it the wrong file or am I doing something wrong?
Uploaded the right file. Please check it and leave a reply if the problem still exists.
Thanks for reporting the link.
Thanks! The file looks good.
I’m having an unrelated issue though, and I’m hoping you can help. I was done with this project (except for sparkles), and my computer crashed. It didn’t save, so I started over. Now when I try to apply the leaves to my lettering, it looks messed up. You can barely see them, like they’re blending with the bg. It kind of looks like they’re applying to the drop shadow, even though the work path is on the lettering. I can’t figure out what I’m doing wrong.
It’s like it applies behind the lettering.
Make sure that you are applying the stroke on the new layer, and make sure that the Foreground and Background colors are as the ones in the tutorial. Also, when you pick the Brush Tool, check that the Mode is set to Normal and that the Opacity and Flow values in the Options bar (at the top) are set to 100%, and so must be the Layer’s Blend Mode and the Opacity and Fill values.
If the layer that you are applying the stroke to has any other layer styles clear them.
Hope this helps.
Please feel free to add a reply if the problem still exists.
What a fun tutorial–thanks so much!
Glad you enjoyed it.
Thanks a lot for the comment.
Thank you so much! Such clear and helpful instructions.
Glad you found it so.
Thanks a lot for the comment.
Great help! Thanks! 🙂
Glad to know that 🙂
Thanks a lot for the comment.
I found this tutorial just today. This is a very interesting and really spring text effect. I have mad it and I will make an easter wallpaper from it. Thanx a lot.:)And of course I’ll send the my own easter version image. OK?
That’s awesome!
Would definitely like to see your outcome. Please feel free to leave a reply with the link once you’re done.
Thanks a lot for the kind words 🙂
As I promised last week, now I’m sending my easter wallpaper version. Again, thanx a lot for shaering.
Please look at my work here:
http://kepfeltoltes.hu/130315/easter_2013_fantasy_spring_www.kepfeltoltes.hu_.jpg
Amazing result! Nice color variations as well.
Thanks a lot for the comment and the link 🙂
Wowwwwwwwwwww….
Great one… Nice One… Cant have any word to appreciating…
In a one of Singer Tune…
B.O.M.B.A.A.S.T.I.K…. <3 <3
Oh wow! This means so very much, really!
Very glad you like it.
Thanks a lot for the amazing comment 🙂
I can’t adjust the Settings of the “Sparkles” brush. Can you help me? Thanks a lot!
Why can’t you do so? Are there any missing options? What Photoshop version are you using?
hi very nice tut i use your effects for my facebook timeline and i learnt much key point so keep doing always good work. my english is not good. i from india…Late Thanks for you time..lovly work
That’s really great to know! super glad you’re enjoying the tutorials and finding them helpful 🙂
?ukriy? very much for the comment 😉
hi this is fantastic and explaining is very good keep going thnkq
Glad you found it so 😀
Thanks a lot for the kind comment 🙂
I love this tutorial, thank you so much for your great work ! I love the result.