
Gingerbread Cookies Text Effect
This tutorial will explain how to bake make a delicious gingerbread cookies inspired text effect, using layer styles, some filters, and a couple of other simple elements. Ready?
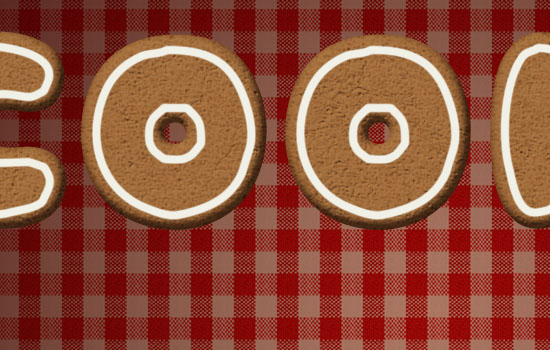
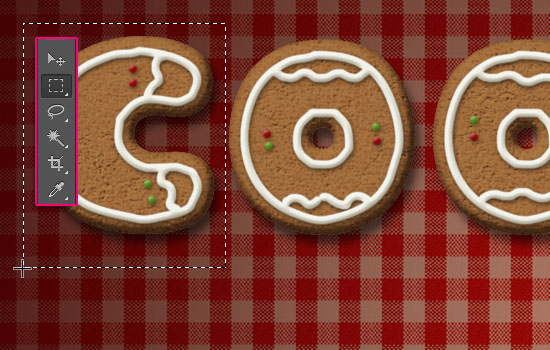
The Final Result

Tutorial Details
- Software Used : Photoshop
- Version : CS6 Extended
- Time : 0:45 – 1:15
Resources
- Sniglet font.
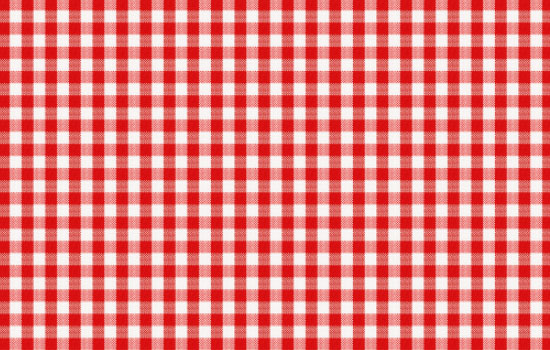
- Seamless tablecloth texture by PSD Graphics.
- Rocky Wall pattern.
Vintage Patterns by ~acupofmilk.
edit: The pack above is no longer available, as the associated account has been deleted. Below is an alternative pack that you can use.
- Colour Checkered Patterns pack by powerpuffjazz.
Step 1
Create a new 1152 x 864 px document. Place the Seamless tablecloth texture image on top of the Background layer, then resize it so that it fits within the document.
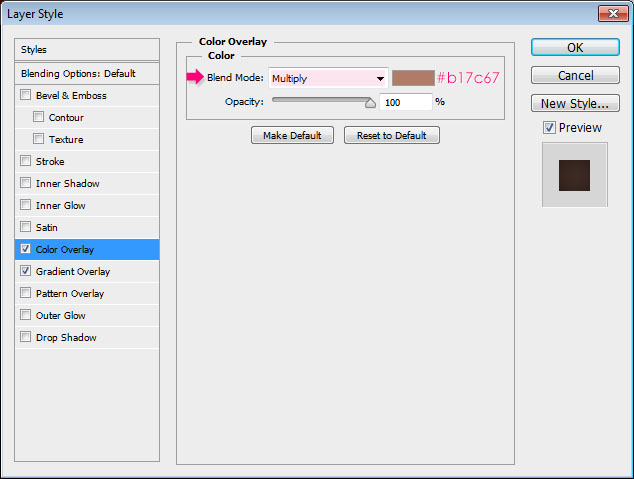
Double click the texture layer to apply the following Layer Style:
– Color Overlay
- Color :
#b17c67 - Blend Mode : Multiply
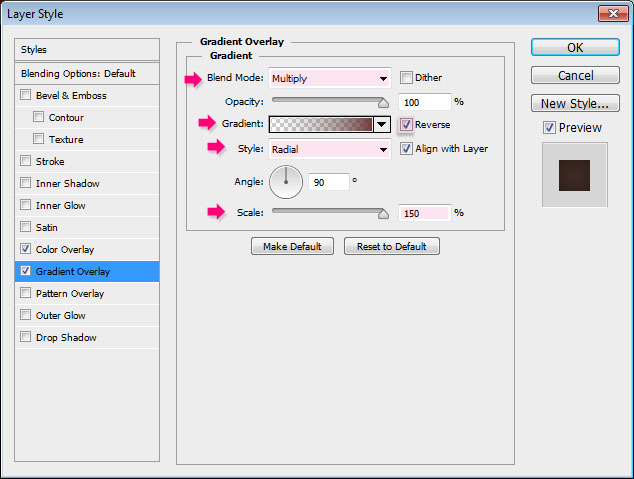
– Gradient Overlay
- Blend Mode : Multiply
- Style : Radial
- Scale : 150%
- Check the Reverse box
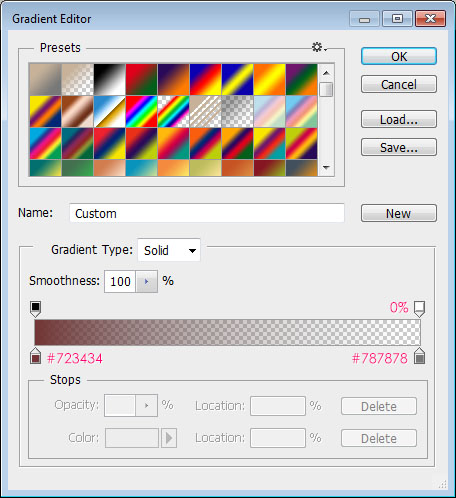
- Click the Gradient box to create the gradient
The gradient uses two colors: #723434 to the left and #787878 to the right. The Opacity value of the stop to the right is 0%.
This will darken the image.

Step 2
Create the text in the color #9a6c40 using the font Sniglet. The font Size is 273 pt and the text is better written in All Caps.
If the text doesn’t fit within the document, hit Enter/Return to add the remaining letters in a new line. We’ll be moving the letters closer later.

Double click the text layer to apply the following Layer Style:
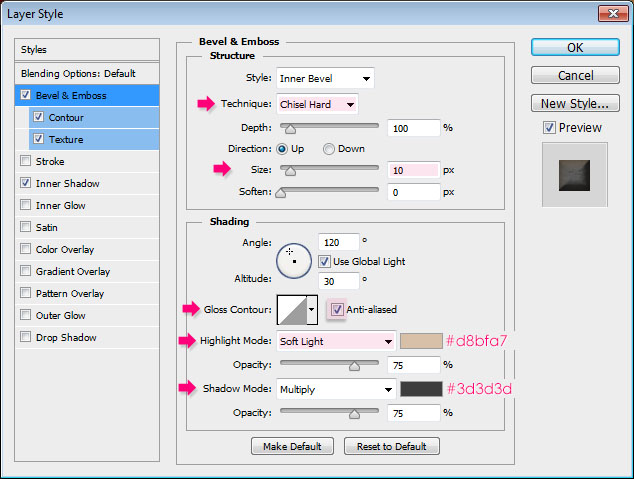
– Bevel and Emboss
- Technique : Chisel Hard
- Size : 10
- Check the Anti-aliased box
- Highlight Mode : Soft Light
- Color :
#d8bfa7 - Shadow Mode – Color :
#3d3d3d
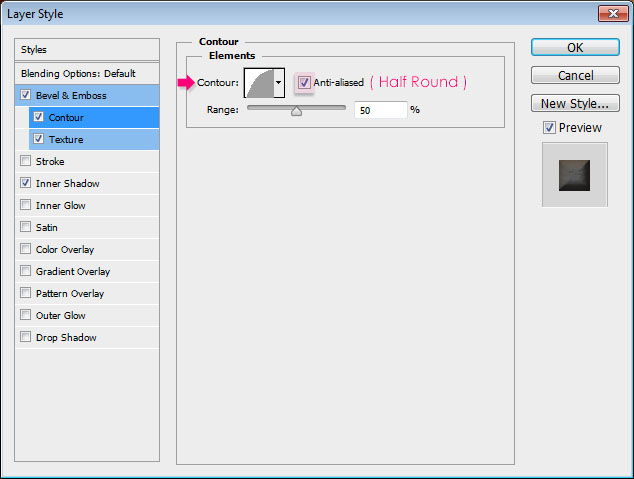
– Contour
- Contour : Half Round
- Check the Anti-aliased box.
– Texture
- Pattern : Rocky Wall
- Depth : 150%
- Check the Invert box
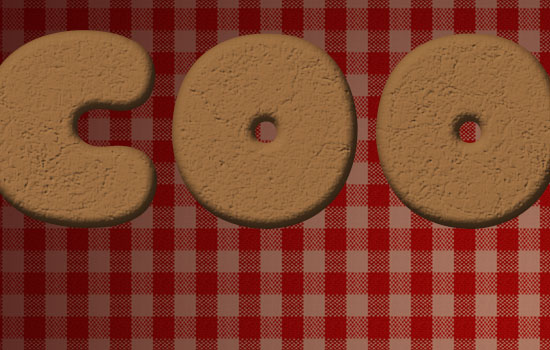
This will create the first part of the cookies’ texture, with an illusion of subtle 3D bumps and cracks.

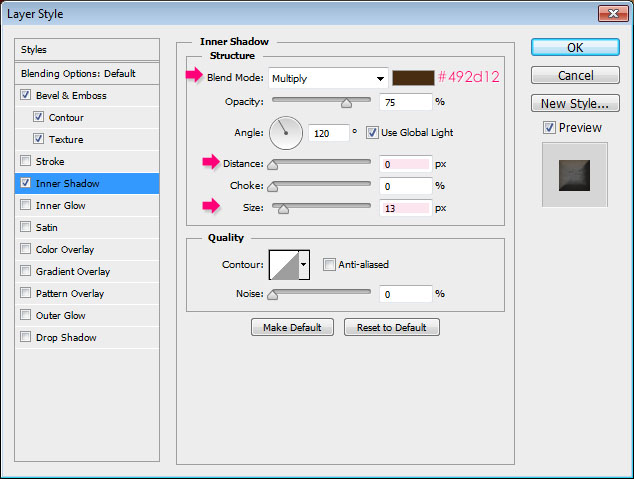
– Inner Shadow
- Color :
#492d12 - Distance : 0
- Size : 13
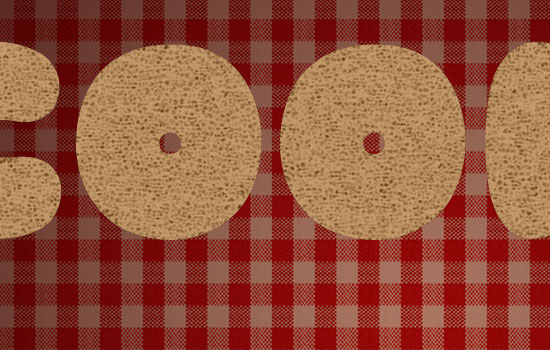
The Drop Shadow effect will be added near the end as some layers will be merged first. For now, this is what you should get:
Step 3
Ctrl/Cmd + click the text layer’s thumbnail to create a selection.
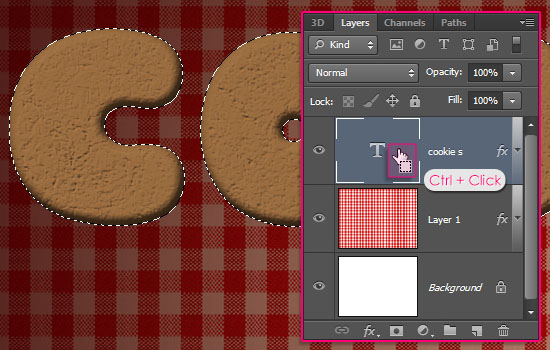
Create a new layer on top of all layers and call it Texture. Then, set the Foreground color to #c69c6d and the Background color to #603913.
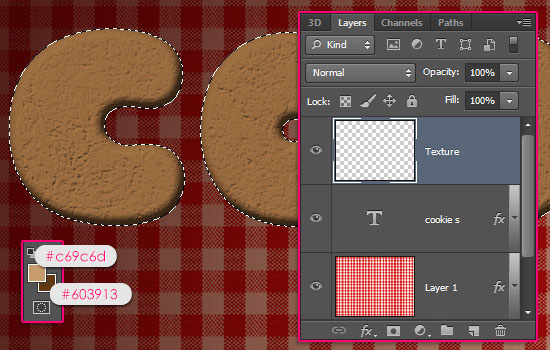
Go to Filter > Render > Clouds. Then go to Select > Deselect to get rid of the selection.
Step 4
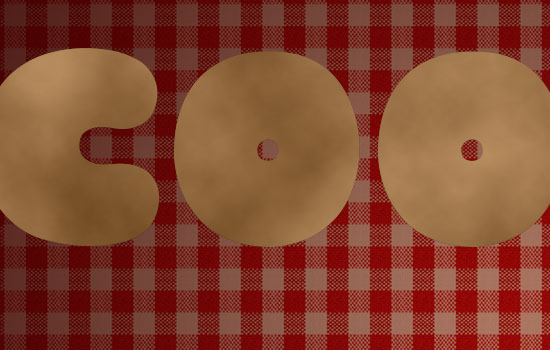
Go to Filter > (Filter Gallery) > Sketch > Note Paper. Change the Image Balance to 50, the Graininess to 10, and the Relief to 12.

Go to Filter > (Filter Gallery) > Sketch > Reticulation. Change the Density to 4, the Foreground Level to 40, and the Background Level to 0.
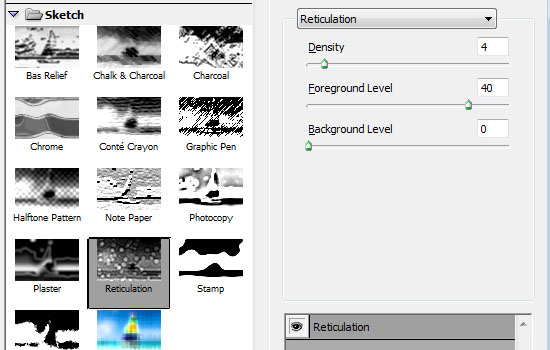
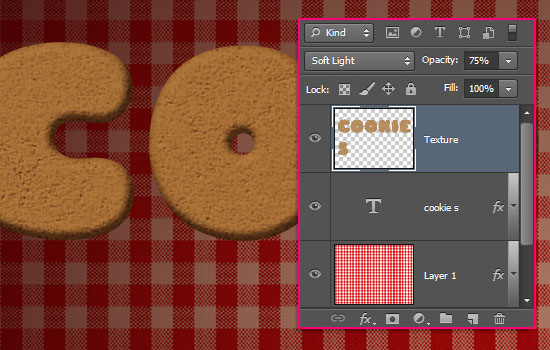
Change the Texture layer’s Blend Mode to Soft Light and its Opacity to 75%. This will create the second part of the texture adding more details to the cookies.
Go to Image > Adjustments > Hue/Saturation. Change the Hue to -7 and the Saturation to -45.

Step 5
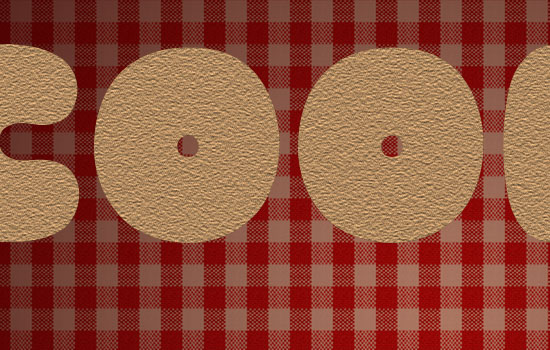
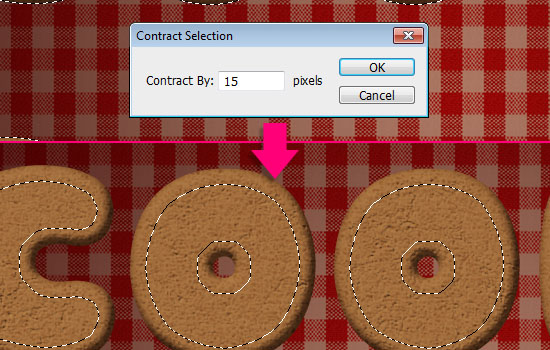
Ctrl/Cmd + click the text layer’s thumbnail again to create a selection.
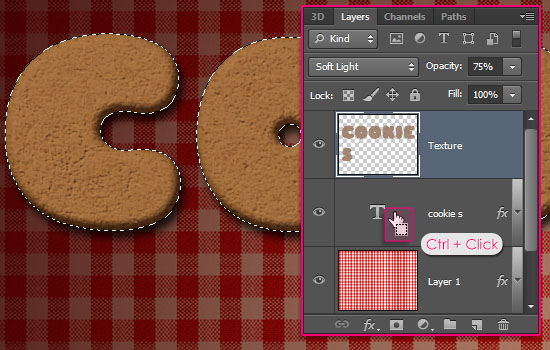
Go to Select > Modify > Contract, and type in 15. This will remove 15 px of the selection adding more space on the edges.
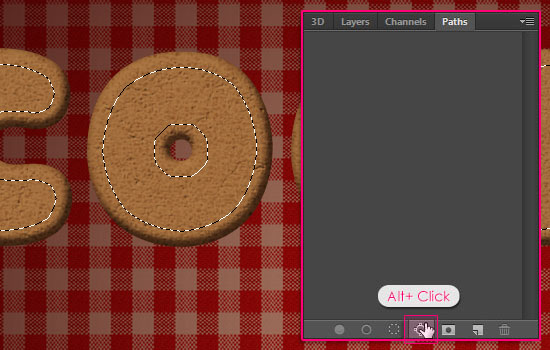
Open the Paths panel (Window > Paths). Press and hold the Alt/Option key and click the Make work path from selection icon down the Paths panel.
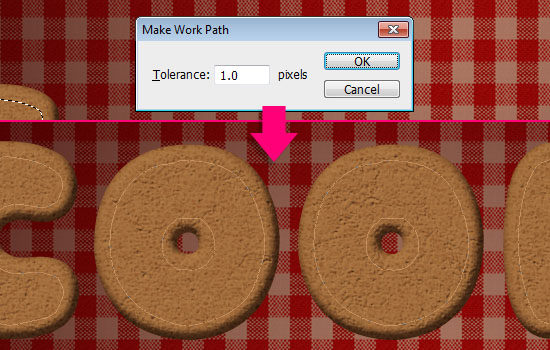
Set the Tolerance value to 1.0, which will result in a more precise path.
Step 6
Pick the Brush Tool and choose an 8 px hard round brush, then set the Foreground color to #f0f0e7.
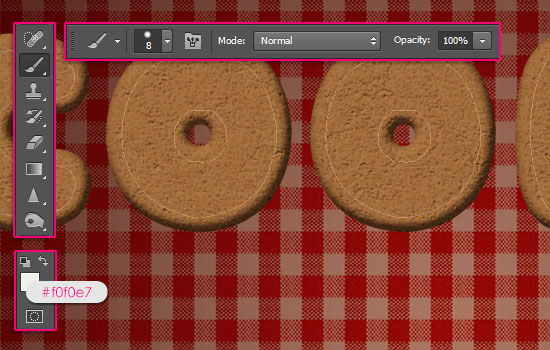
Pick the Direct Selection Tool. If there are any parts of the path that you want to modify, you can click the path, then click the anchor points to move them around.
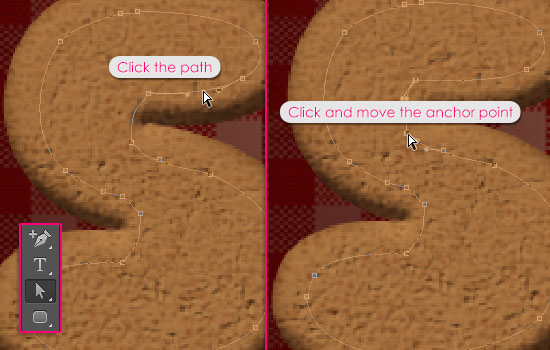
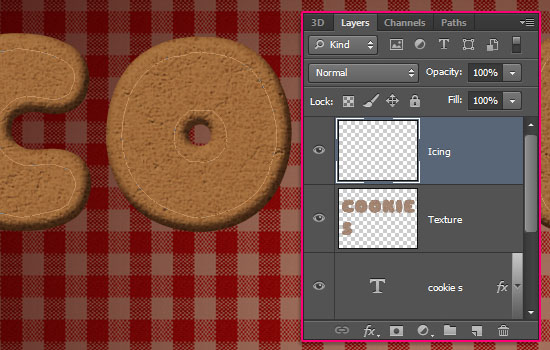
Create a new layer on top of all layers and call it Icing.
Right click the path and choose Stroke Path.
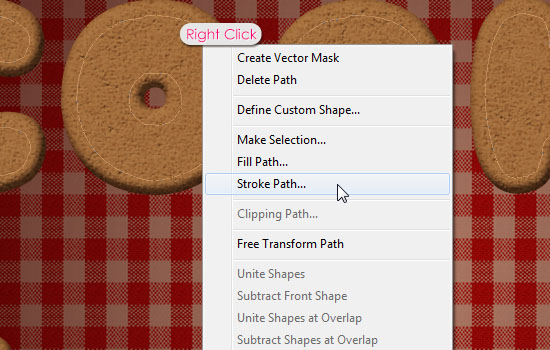
Choose Brush from the Tool drop down menu, and make sure that the Simulate Pressure box is un-checked.
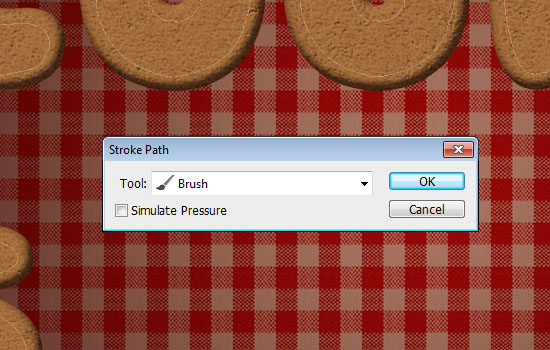
This will stroke the path. Hit Enter/Return to get rid of the work path.
Step 7
Double click the Icing layer to apply the following Layer Style:
– Bevel and Emboss
- Soften : 5
- Check the Anti-aliased box
- Shadow Mode – Color :
#8b816c

– Drop Shadow
- Color :
#494949 - Distance : 2
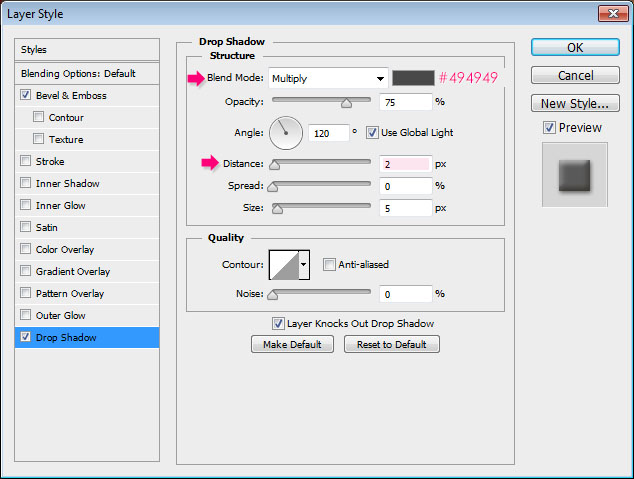
You’ll get some nice icing!
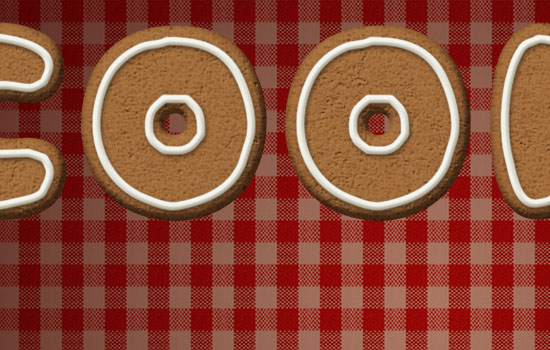
You can go ahead and add some more lines and decorations on the same layer.
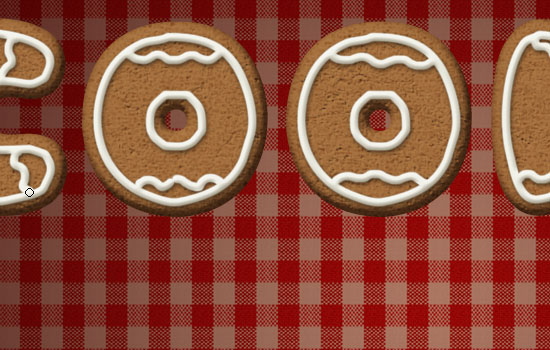
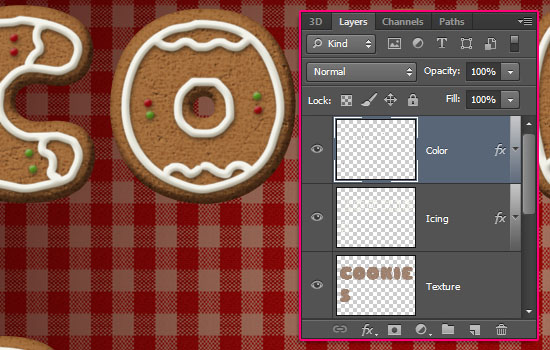
If you’re in the mood, create a new layer, call it Color, right click the Icing layer, choose Copy Layer Style, then right click the Color layer and choose Paste Layer Style.
Pick red and green colors, and add some more colored dots or lines to the cookies.
Step 8
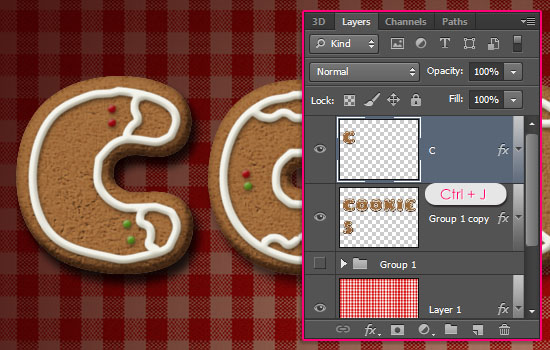
Now, group all the layers except for the Background layers (Shift + click the layers, then go to Layer > Group Layers or press Ctrl/Cmd + G).
Duplicate the group then make the original invisible by clicking the eye icon next to it.
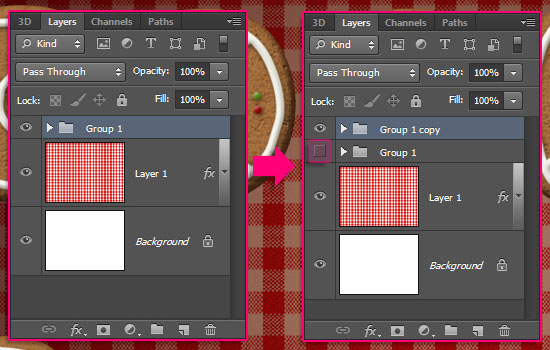
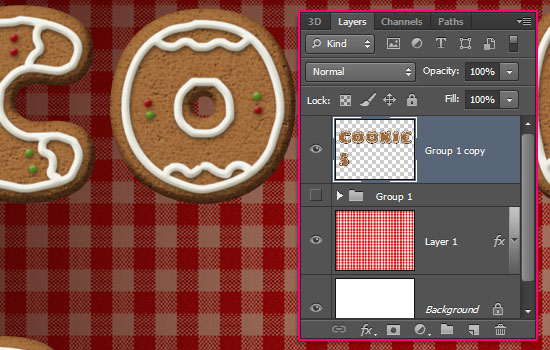
Make sure that the copy group is selected then go to Layer > Merge Group to rasterize all of the group’s layers in one layer.
(That’s why we kept a copy of the original group, as the merged layers are not editable).
Double click the merged layer to apply a Drop Shadow effect:
- Opacity : 55%
- Distance : 10
- Size : 10
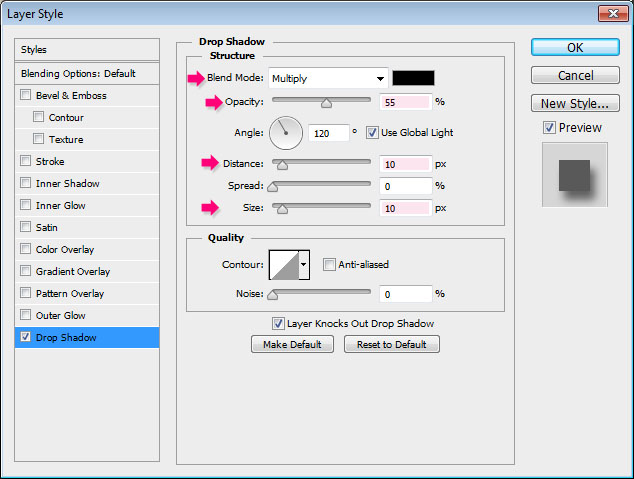
This will make the cookies even more 3D looking.

Step 9
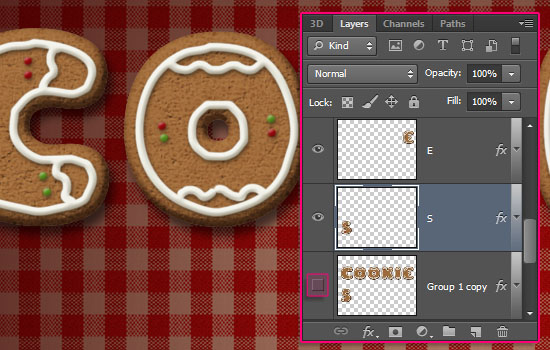
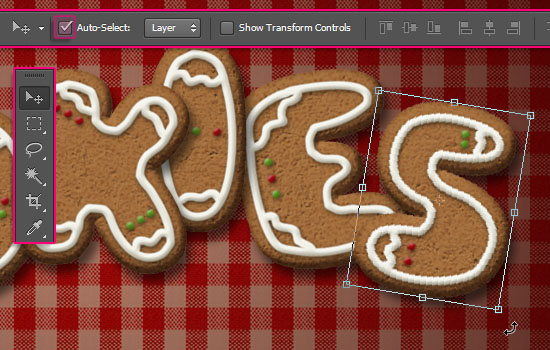
Pick the Rectangular Marquee Tool, Then create a selection around the first letter.
Press Ctrl/Cmd + J to duplicate the letter in a separate layer. You can rename each layer to the letter it has.
Do the same for the rest of the letters. Don’t forget to select the original merged layer each time before duplicating a new letter.
Once you’re done, make the original layer invisible.
Pick the Move Tool, and check the Auto-Select box in the Options bar, make sure Layer is the option next to that box.
Basically, what this does is it enables you to select the letter by clicking it directly without the need to select its layer. This makes things much easier and faster.
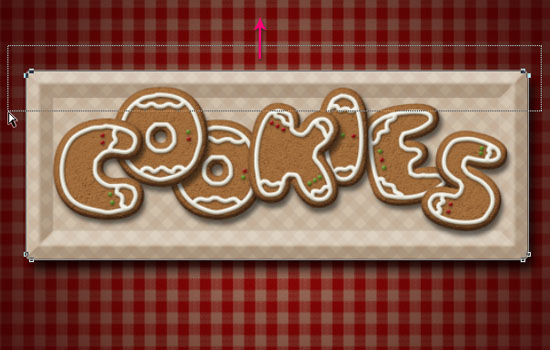
Now click the letters and move them so that they are next to each other and slightly overlapping. You can as well change the order of the layers to bring letters to the front or send them back.
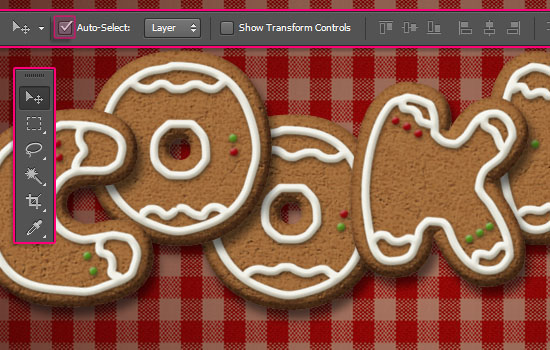
You can also rotate some of the letters (select the letter, go to Edit > Transform > Rotate, rotate the letter, then hit Enter/Return to confirm).
Step 10
This is optional, but if you want to place your yummy cookies in a nice plate, then set the Foreground color to a light color like #a9977d, and create a new layer on top of all layers called Plate.
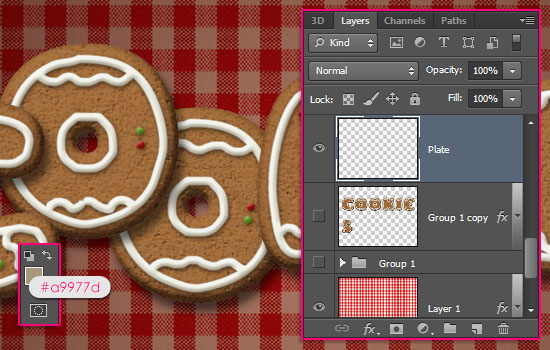
Pick the Rounded Rectangle Tool and set the Radius in the Options bar to 10 px. Higher values will create more rounded corners.

Click and drag to create the basic shape.

We’ll adjust the height and width after applying the layer style.

Step 11
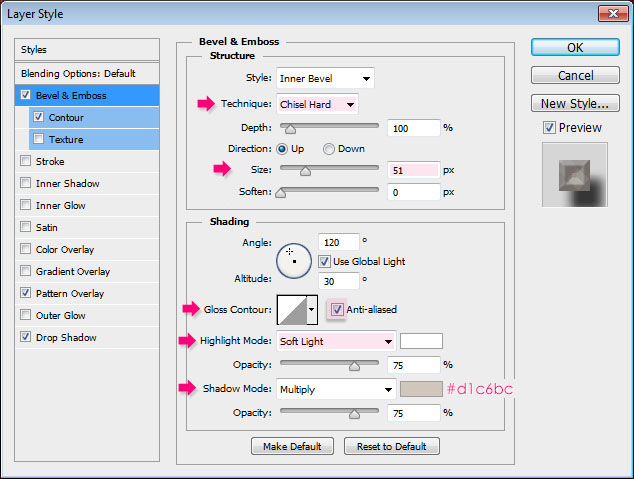
Double click the Plate shape layer to apply the following Layer Style:
– Bevel and Emboss
- Technique : Chisel Hard
- Size : 51
- Check the Anti-aliased box
- Highlight Mode : Soft Light
- Shadow Mode – Color :
#d1c6bc
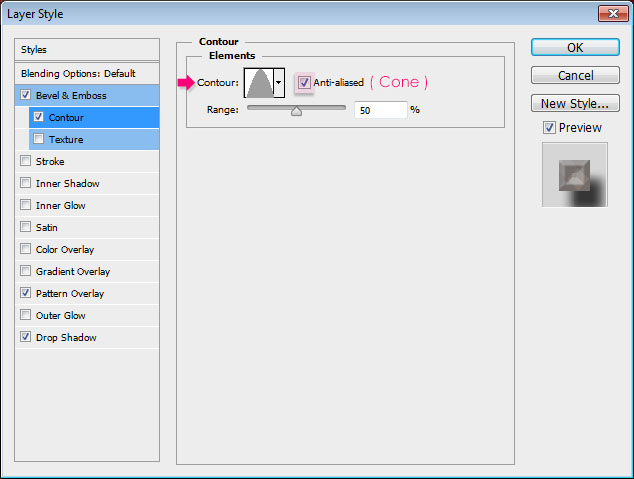
– Contour
- Contour : Cone
- Check the Anti-aliased box.
– Pattern Overlay
- Blend Mode : Soft Light
- Pattern : Choose any of the patterns from the patterns pack provided in the Resources section.
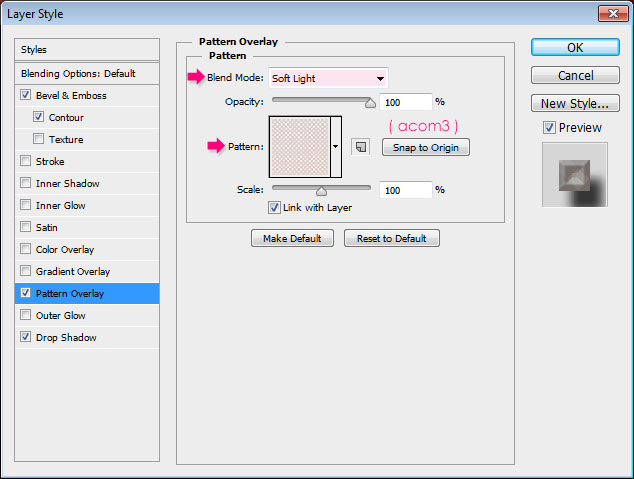
– Drop Shadow
- Distance : 23
- Size : 21

Your plate should look all cool and nice now.

You might get some letters over the edges of the plate. So pick the Direct Selection Tool, click the plate shape once, then click and drag to select the anchor points of the edges you want to move, then, use the keyboard arrow keys to move the edges as needed.
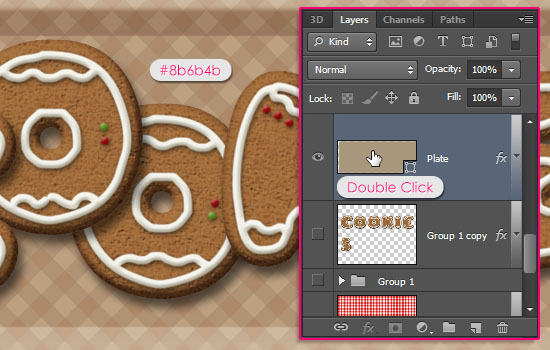
If you want to change the color of the plate then double click its shape layer’s icon and choose a new color. Here, a slightly darker color is chosen #8b6b4b. You can try different patterns as well. Have fun with it.
Your cookies now are ready to eat … Or be a nice background wallpaper 😉
Hope you enjoyed the tutorial and found it useful.
Feel free to share your cookies with us ^_^
Did you enjoy this post? Please consider donating to help us cover our server costs.


Happy holidays Rose & Textuts! :o) Thanks so much more another terrific tutorial, I love them. (and thanks for the Winter Holidays Layer Styles Pack, –I’m having lots of fun with the snow & peppermint styles.
http://www.flickr.com/photos/wp-crickett/8263200954/in/photostream/
Checking your work always makes me happy for some reason 🙂 I just like your take on each concept, and the little things you add to make it your own. Brilliant indeed!
Thank you very much for sharing your work with us and for the awesome comment =)
Very happy holidays to you too 😀
Awesome….Gr8 tutorial…I like your tutorials….Gr8 Work..Thx for sharing
Really glad you do.
Thank you very much for the support.
Thank you for a fantastic tutorial.
Perfect for Christmas.
I have a problem when I got to step 5.
I click the ‘Make work path from selection’ and then comes – Set the Tolerance value to 1.0, which will result in a more precise path.
Here comes the problem for me. I can not find where to set the tolerance value.
I fogot to say. I have PS CS 5
When you Alt+click the ‘Make work path from selection’ icon, you’ll get a small dialog box in which you can set the value. It is the box shown in the fourth image of Step 5.
Do you get that box when you Alt+click the icon?
Thanks fro the kind comment 🙂
Oh oh when I read your answer it is quite clear to me. I misunderstood the tutorial even though I read the text several times .. I clicked Shift / Alt.
Thank you so much for your help.
No worries 🙂 Glad the problem was solved.
Thanks for the comment.
This is a marvelous idea. Thanks for all the instruction. Can’t wait to try it out.
Awesome! Have fun with it 🙂
Thanks a lot for the comment.
THANK YOU!!!!!
You’re very welcome 🙂
Thanks for the comment.
I had a lot of fun with it. Sharing with us is fantastic.
I wish you all the best for the hollidays.
So glad you did 🙂
Thank you very much for the lovely comment and the kind wishes.
All the great wishes for the holidays to you too 🙂
Great tutorial! Thank you!
Can you please help me? I got stuck at step 3.5 when I should apply filter “Clouds” – they are just grey. Step 4 is impossible to do: for some reason half of the filters are unavaiable (I can’t click on them to select). Any ideas of what I am doing wrong?
Here is a printscreen of what it looks like:
http://farm9.staticflickr.com/8337/8283079683_322e6100b4_b.jpg
Seems you are working with the 16-bit format. To be able to apply Filters you need to be working with the 8-bit format.
To do so, go to Image -> Mode -> 8 Bits/Channel. Filters should work fine after that.
Hope this helps.
Please feel free to add any other queries you have.
Thanks for the comment 🙂
YES! It was the problem! Thank you so SOOOOO much! 🙂
Glad the issue was solved 🙂
Thanks once again for the comment.
Thank you for the tutorial 🙂
http://picturepush.com/public/11755627
Cool brightly decorated cookies!
Thank you very much for the comment and the link 🙂
Wow! Brilliant way to achieve the cookie texture.
Just discovered your awesome site. You explain the style tweaks and options better than any other site I’ve seen, and your results look more realistic!
Thanks for sharing your knowledge 🙂
That’s very nice of you to say, and it just means so much 🙂
So glad you found the tutorials informative.
Thank you so much for the kind comment 🙂
What a wonderful tut! Thanks a zillion!!! I enjoyed doing it greatly. And I like the result. Better go have some tea… with cookies!
Your comment just made my day 😀
So glad you enjoyed it.
Thank you very much for the kind words.
Soemthing went awwefully wrong when I tried this tutorial.
What was that? In which step?
Always a pleasure to follow your text tutorials. Also learned something new: clicking on a selection to create a path!
Very glad to know you find the tutorials useful 🙂
Thank you very much for the kind comment.
Thanks a lot for this great tutorial 😀
Why my path is green color and when i try to stroke path, not only the path was being painted, but the whole word was painted?
Did you make sure that the “Icing” layer is the active (selected) layer before stroking the path? Also, did you make sure that you have the same brush size, and that you chose the Brush option from the Tool drop down menu?
Please check those things out, and feel free to add a reply if the problem still exists.
Thanks a lot for the comment.
Problem solved. Thank you very much. I like your tutorial 🙂
Great 🙂
Thanks a lot for the comment.
Is that I can use the patterns in my design?
What patterns do you mean?
I mean the Vintage Patterns.
acupofmilk, the author of Vintage Patterns already deactivated his/her account. Don’t know whether can use the pattern in my game(non-profit).
I’m afraid the link doesn’t work anymore!
I posted a link to a new pack in the Resources section, and it is free for personal and commercial use.
Hope this helps.
I was very impressed with all the designs of your text ..
so I’m always waiting for something new from you ..
I think the design of a natural text like this is good ..
Other examples may be like wood styles ..
you are great, thank you
This absolutely means so much.
Glad you’re enjoying the tutorials.
Thank you very much for the kind comment and for the support, appreciate it.
Best regards.
How can I use the “Rocky wall” pattern?
You need to download it then add it inside Photoshop to the Patterns Preset.
To do so, go to Edit -> Preset Manager, and choose “Patterns” from the “Preset Type” drop down menu. Then, click the “Load” button to the right, and open the saved pattern (.pat) file.
Hope this helps.
Please feel free to add any other queries you have.
Whenever I select a letter the background gets selected aswell?
Did you merge the Background with the text? If not, make sure that the “New Selection” icon is the selected icon in the Options bar, and not the “Add to selection” icon.
Hope this helps.
Please feel free to leave a comment with any other queries, and if you can add a screenshot that’d be great as well.
Regards.
Thank you.
Tutorial was perfect!
You’re really fantastic!
:*
Well, that certainly means a lot!
Super glad you liked the tutorial 🙂
Thanks a lot for the very kind words.
a complete guide to hone the ability to produce a good picture
This can be seen from the results
Thank you very much for the comment.
I really appreciate it.
Regards.
The rocky wall pattern I downloaded is not a .pat file its a .png file and will not be loaded, how do I use it as a pattern?
You’ll need to open the .png image with Photoshop, then go to Edit -> Define Pattern, and click OK. This will add the image as a pattern to the Pattern Picker, and you’ll be able to use it.
Hope this helps.
Please feel free to add any other queries you have.
Another great tutorial and superb effects. This website has been a godsend to me 🙂 …I don’t know if I have followed the tutorials from the same person, or if the site has a set of equally great artists, but as usual, the tutorial was very very well explained.
I must say that I was most skeptic going into this tutorial as it had one of my Achilles’s heel, the “Pen Tool” (I am left handed, but held the mouse in right hand from the start. So I can’t draw a lot of straight lines with my right hand, and I can’t control the mouse from my left 🙁 )..But thanks to this tutorial, I followed through.
Here is my effort:
http://s24.postimg.org/o512q3k6d/gingerbread_cookie_2.jpg
Hope to see much more of such amazing tutorials. 🙂
Actually the image I created was a bit bigger.
Here is the link:
http://postimg.org/image/jx2m6cyxz/
No words can describe how much your comment means.
Glad you found the tutorial easy to follow, and your final result is definitely awesome. It’s always fun to see the effect created in different ways with different additions.
Many big thanks for the amazing comment, all the support, and for sharing your results with us… Much appreciated.
Regards.
Perfect and very nice tutorial
My version:
http://car51.altervista.org/_altervista_ht/nuova/biscotti_natale.jpg
Thanks!!
Cool outcome! Nicely done.
Many thanks for the comment and for the link 🙂
Really awesome tutorial!! I’ve been doing almost all of your tutorials and I am really enjoying them! Here’s my version! I used it for a Christmas Card for a friend ^^
http://www.mediafire.com/convkey/9af5/2yeawamrddt3s2m6g.jpg
Very happy to know that you’re enjoying the tutorials 😀
Awesome job on the card 🙂
Thank you very much for the kind words and for sharing your work, really appreciate it.
Great tutorial!! I liked it so much.
I used it in my project of flash game.
This is my work. Thank you!!
Cool bright colorful cookies!
Great to know you did.
Thank you very much for the comment and for sharing your amazing work 🙂
Me gustó mucho el tutorial. Y para hacer algo diferente use mi nombre y le puse cosas personales..xD
That’s a fun cool outcome!
Nice additions to the concept indeed 😉
Muchas gracias for the comment and for sharing your work.
Un hermoso y util tutorial!! increible luego subo mi resultado!!!!
Really glad you enjoyed it 😀
Muchas gracias for the kind words 🙂
Thanks, great tutorial for my christmas mailing this year 🙂
That’s a nice version of it indeed!
Thanks a lot for sharing your work and for the comment 🙂
why i cannot open all the texture files ? do you guys hava any solution ? thanks
Which ones don’t open for you, please?
Very good outcome 🙂
the rocky wall and colourful checkered pattern . i download it but cant open
Please check this link to see how to use them.
Hope this helps 🙂
Bonjour,
Je suis bloqué à l’étape 5 , je ne comprends rien fenêtre > chemins ??
“Ouvrez le Paths panneau (Fenêtre> Chemins). Appuyez et maintenez la / Option Alt enfoncée et cliquez sur le chemin de travail de Marque de la sélection icône sur le panneau Tracés.” Ca veut rien dire !
Pouvez-vous m’aider et me de donner un déroulé plus clair et plus précis merci.
D’avance merci pour votre aide.
Alexandre
It’s difficult to find educated people about this topic, however,
you seem like you know what you’re talking about!
Thanks
Your tutorial was featured in the Amazing Christmas Inspired Photoshop Text Tutorials collection:
http://www.psd-dude.com/tutorials/resources/amazing-christmas-inspired-photoshop-text-tutorials.aspx