Glam Gold Text Effect + Free PSD Download
Classic, simple and elegant text effects don’t go out of style. This tutorial will show you a very easy way to create a fully editable, glam gold text effect using layer styles, and create a nice shadow using a couple of blur filters.
The effect is fully editable, so you can change the text it’s applied to any time without the need to recreate the effect itself.
You can download the PSD source file for this tutorial for FREE. Download link at the end of the tutorial. 😉
The Final Result
Tutorial Details
- Software Used : Photoshop
- Version : CC
- Time : 0:30 – 0:45
Resources
- Bevan Regular font.
- Black Fabric Texture Soft Cloth Suede Fuzzy Stock by TextureX-com.
- Metal Mesh Patterns – Pack 1 by Axertion.
- Go to Edit > Presets > Preset Manager, and choose Patterns from the Preset Type drop down menu. Then, click the little arrow to the right of the Preset Type drop down menu, and click Patterns near the bottom of the pop-up menu, then click Append to get a set of patterns that will be used in the tutorial.
- Free Pack 6000 photoshop gradients by Supertuts007 (Load the Goldmedal.grd file).
Step 1
Create a new 1024 x 741 px document and duplicate the Background layer.
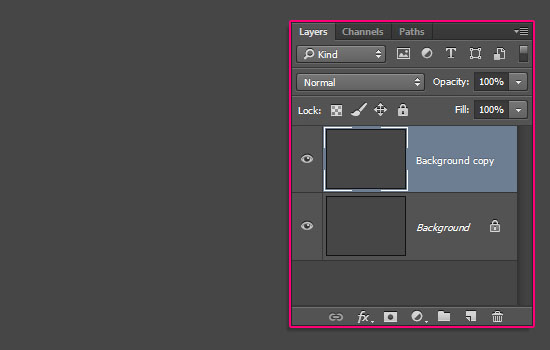

Double click the Background copy layer to apply a Gradient Overlay effect with the following settings:
- Check the Dither box
- Style : Radial
- Scale : 150%
- Click the Gradient box to create the gradient using the colors
#606060to the left and#232323to the right.
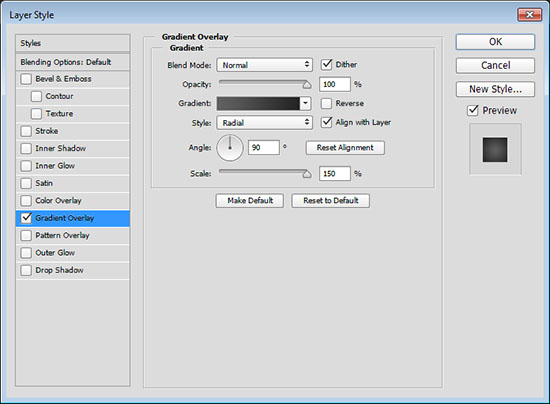

This will apply a simple radial gradient to the Background copy layer.


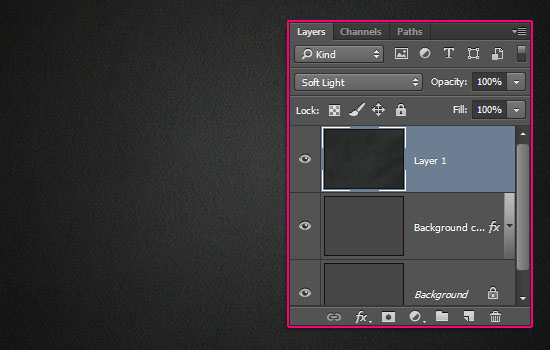
Place the Black Fabric Texture Soft Cloth Suede Fuzzy Stock image on top of both Background layers, and change its layer’s Blend Mode to Soft Light.

Step 2
Create the text in All Caps using the font Bevan Regular, the Size 250 pt, the color #ac813d, and change the Kerning value in the Character panel (Window > Character) to Optical. Duplicate the text layer.
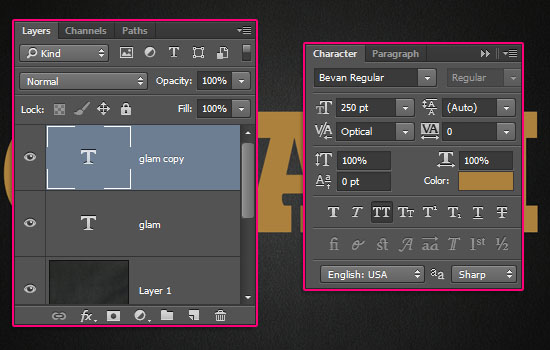

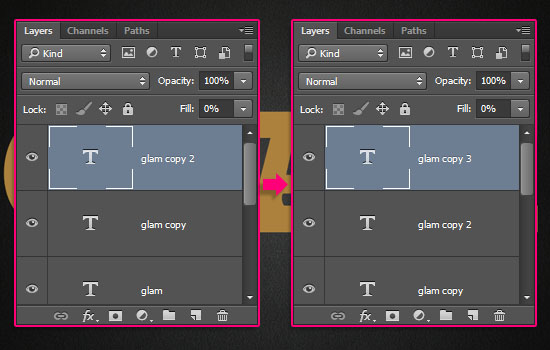
Duplicate the copy text layer, change the copy’s Fill value to 0, and duplicate it.

Step 3
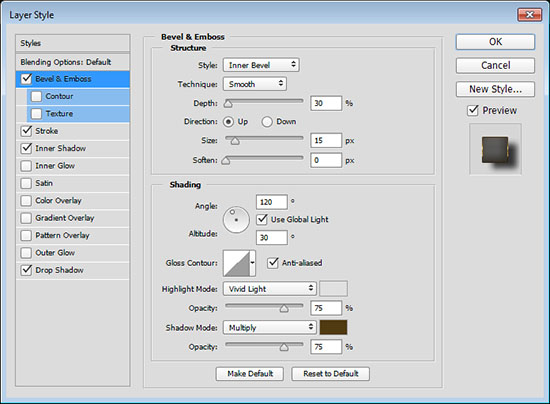
Double click the first copy text layer (not the original one) to apply the following Layer Style:
– Bevel and Emboss
- Depth : 30
- Size : 15
- Check the Anti-aliased box
- Highlight Mode : Vivid Light
- Color :
#e0e0e0 - Shadow Mode – Color :
#4f3a11

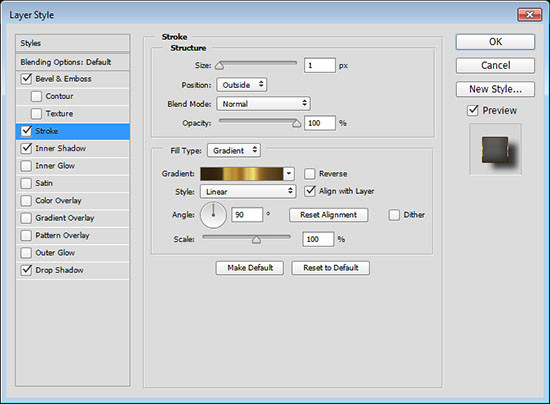
– Stroke
- Size : 1
- Fill Type : Gradient
- Angle : 90
- Use the Gold label 120xs gradient fill.

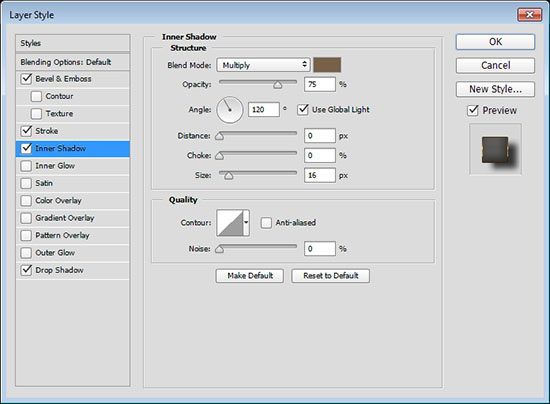
– Inner Shadow
- Color :
#78614b - Distance : 0
- Size : 16

– Drop Shadow
- Uncheck the Use Global Light box
- Angle : 146
- Distance : 15
- Size : 9
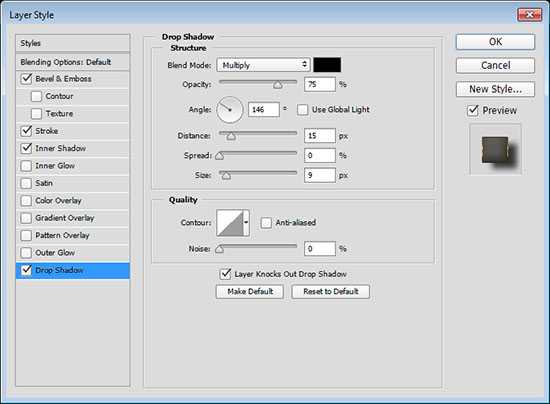

This will add the shadow and the subtle shiny stroke.


Step 4
Double click the second copy text layer to apply the following Layer Style:
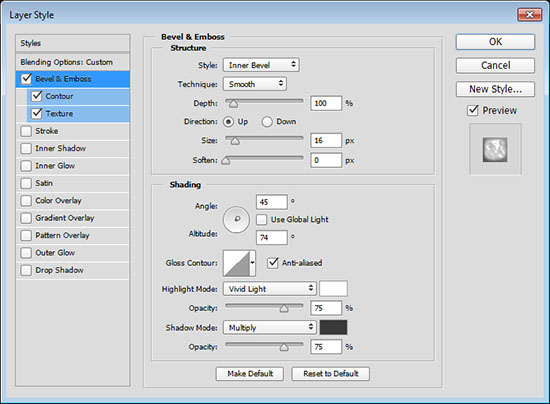
– Bevel and Emboss
- Size : 16
- Uncheck the Use Global Light box
- Angle : 45
- Altitude : 74
- Check the Anti-aliased box
- Highlight Mode : Vivid Light

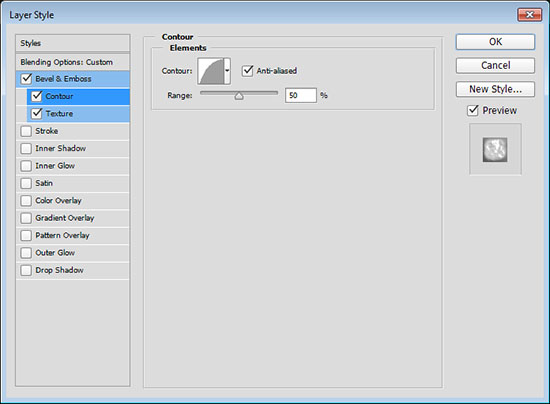
– Contour
- Contour : Half Round
- Check the Anti-aliased box.

– Texture
- Pattern : Clouds
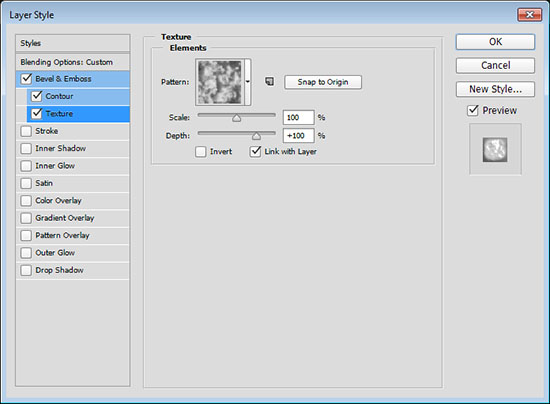

This will style the first layer of the textured text.


Step 5
Double click the third copy text layer to apply the following Layer Style:
– Bevel and Emboss
- Technique : Chisel Hard
- Size : 30
- Uncheck the Use Global Light box
- Angle : 15
- Altitude : 50
- Check the Anti-aliased box
- Highlight Mode : Vivid Light
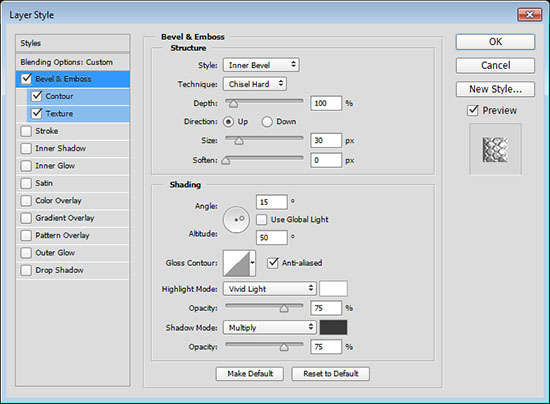

– Contour
- Contour : Half Round
- Check the Anti-aliased box.


– Texture
- Pattern : Hex Metal Mesh
- Depth : 75%
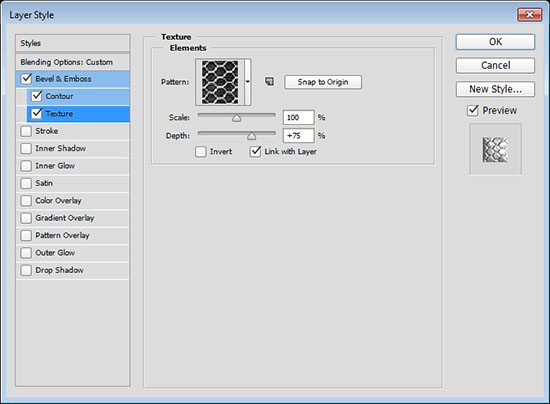

This will add the second layer of textured text. Using two textured layers creates a more dynamic effect.


Step 6
Select the original text layer, and change the text color to #252525.
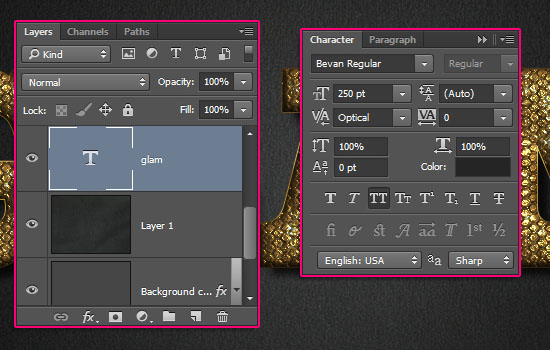

Go to Filter > Convert for Smart Filters. This will convert the text layer into a Smart Object, which will help keep the text editable, and apply non-destructive filters.
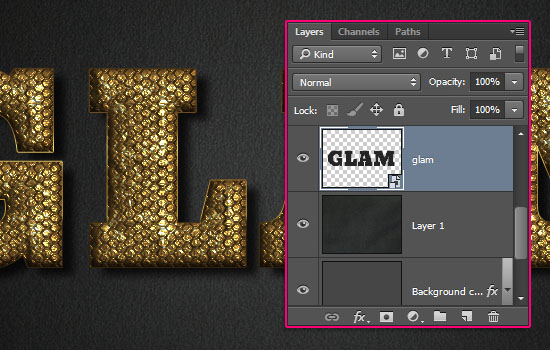

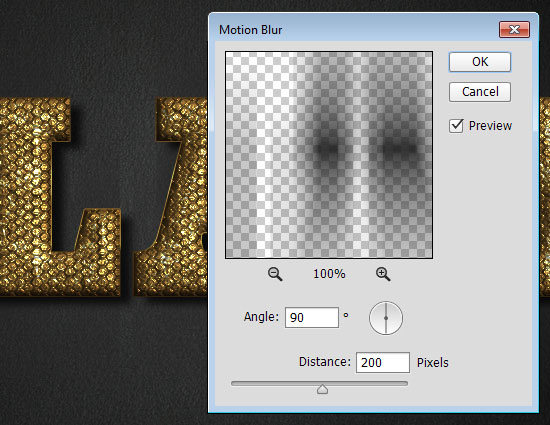
Go to Filter > Blur > Motion Blur. Change the Angle to 90 and the Distance to 200.

Change the smart object layer’s Blend Mode to Color Burn and its Opacity to 50%.
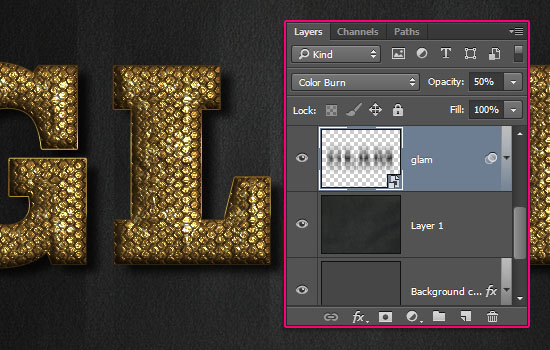

Select the Move Tool, then use the Down Arrow Key (or Shift + Down Arrow Key for larger increments) to move the shadow downwards until its top aligns with the text’s top.


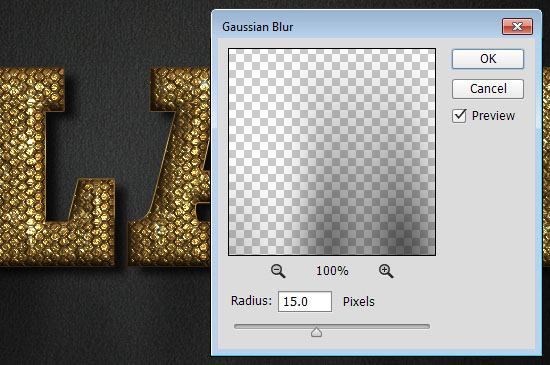
Go to Filter > Blur > Gaussian Blur, and change the Radius to 15. This will smooth the shadow’s harsh edges.

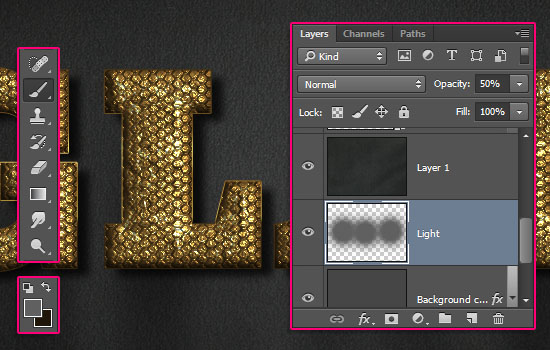
Create a new layer right on top of the Background copy layer, call it Light, and change its Opacity to 50%.
Pick the Brush Tool, set the Foreground color to #606060, and use a large soft round tip to add a couple of big dots behind the text, in order to lighten that area up a little bit.

You can change the text any time you like. To do so, you’ll need to double click each text layer’s thumbnail to change its content, and double click the smart object’s thumbnail to open the shadow’s text layer, edit it, save it (File > Save), and close it to view the updates in the original file.
You can also download the PSD source file for this tutorial, and use the effect for personal and commercial purposes 😀
Download – 3.92 MB
Hope you enjoyed the tutorial and found it helpful 🙂
Did you enjoy this post? Please consider donating to help us cover our server costs.




i am share this to site:pstuts.ir
thank you
Thank you too 🙂
Amazing tutorial, we have featured it here : http://theneodesign.com/best-photoshop-tutorials-december-2014/
Thanks a lot!
Hi Rose,
thank you for this amazing tutorial.
Here is my outcome.
That looks awesome!
Thanks a lot for the comment and for sharing your work 🙂
Thank you for sharing these tutorials and downloadable templates!. I’m such a newbie and your tutorials are an immense help!
Really glad to know that!
Thank you very much for the kind words 🙂
after doing Filter > Convert for Smart Filters, then it do not let me use the motion blur filter it gives error “Could not complete the Motion Blur command because the selected area is empty”please reply me at [email protected] ishall be very thankful
Are you sure that the smart object contains the original text layer? Do you have a selection? If you do, you need to deslect whatever is selected (Select > Deselect).
If the problem still exists, please feel free to attach a screenshot of the issue.
i could not solve the problem but finally my outcome is here
Really sorry it wasn’t solved, but a cool version of the effect nonetheless 😉
Thanks a lot for sharing your work 🙂
can i ask for how to download Free Pack 6000 photoshop gradients by Supertuts007 this?
After you download the file, extract it, then double click each of the mentioned .grd files to add them to Photoshop’s preset.
Hope this helps.
Please feel free to leave any other questions you have in a reply.
lol i yhink its bad at me anyway thank u :*
Are you using a different font size? If so, you’ll need to change the layer style values accordingly.