
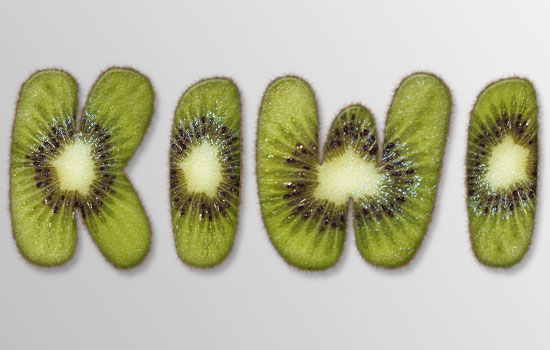
Kiwi-Inspired Text Effect
Kiwi is a delicious, exotic, and good lookin’ fruit! Its textures and colors are just so vibrant and fresh. This tutorial will show you how to use some kiwi stock images to create an awesome kiwi-inspired text effect. Let’s get started!
This was suggested by Anj. Thank you for the awesome suggestion, Anj : )
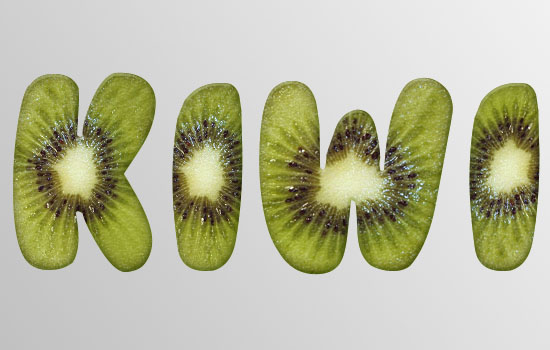
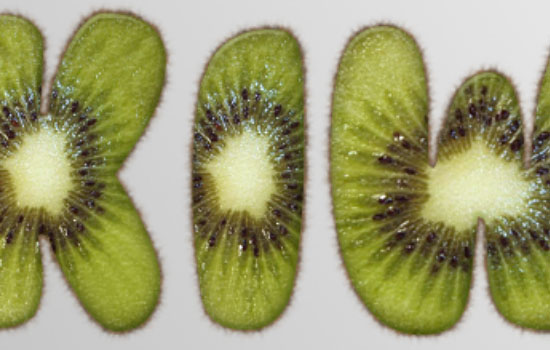
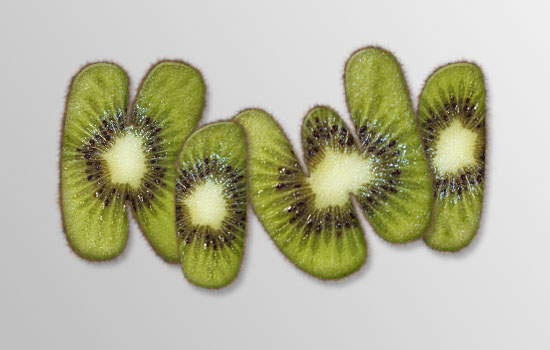
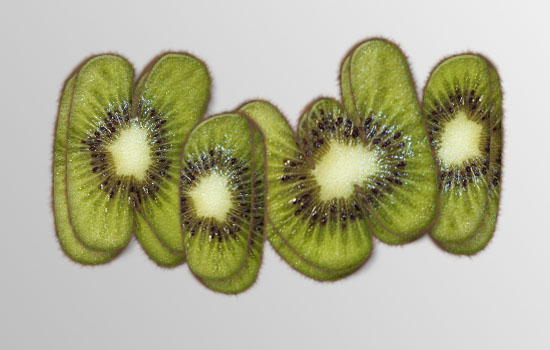
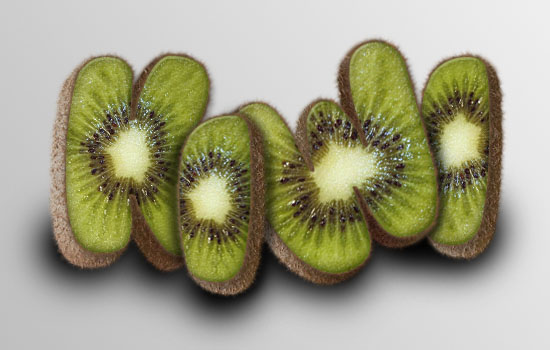
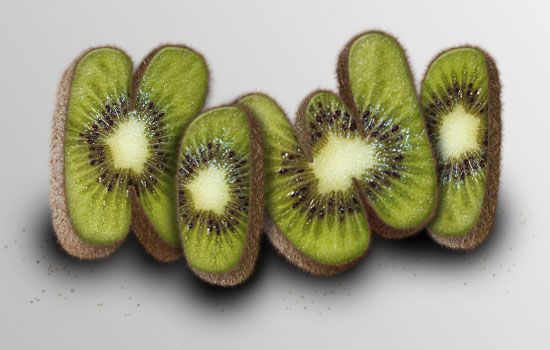
The Final Result

Tutorial Details
- Software Used : Photoshop
- Version : CS6 Extended
- Time : 1:00 – 1:45
Resources
- BubbleGum font.
- Wine Cork pattern by Atle Mo.
- Kiwi Stock. by keaps.
- Kiwi Stock 1 by hatestock.
- Texture – Sky and drops by Retsnimel.
- ETH font (ETH Sans/EthRomainEthon.ttf).
Step 1
Create a new 1152 x 864 px document. Set the Foreground color to #f9f9f9 and the Background color to #b5b5b5. pick the Gradient Tool, choose the Foreground to Background gradient fill, and click the Linear Gradient icon.
Then, click and drag diagonally from the top right corner to the bottom left corner to create the background gradient.
Create the text using the font Bubblegum. The font color is #cee3a5, and the Size is 250 pt.
Duplicate the text layer then change the copy’s Fill value to 0.
Step 2
Double click the copy text layer to apply the following Layer Style:
– Bevel and Emboss
- Technique : Chisel Hard
- Uncheck the Use Global Light box
- Angle : 111
- Altitude : 45
- Check the Anti-aliased box
- Highlight Mode : Hard Light
- Color :
#f9ffe6 - Opacity : 35%
- Shadow Mode – Color :
#cee3a5
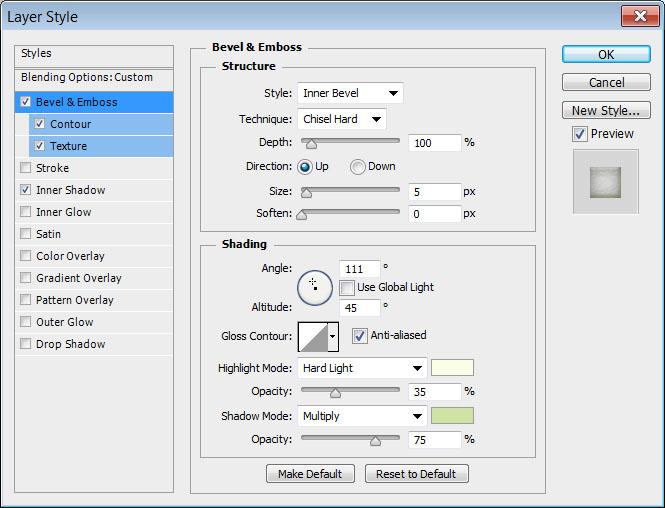
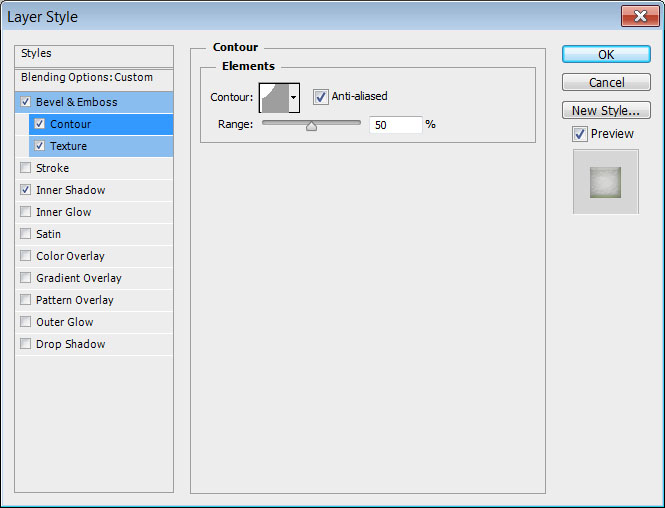
– Contour
- Contour : Cove – Shallow
- Check the Anti-aliased box
– Texture
- Pattern : Wine Cork
- Depth : 200%

– Inner Shadow
- Opacity : 50%
- Distance : 0
- Size : 15
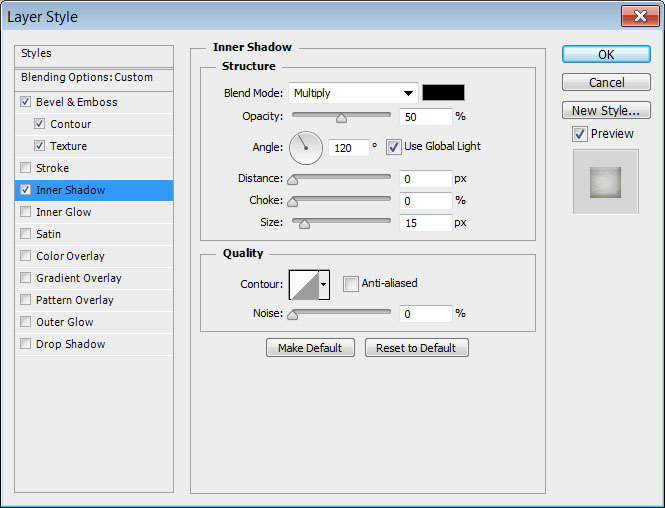
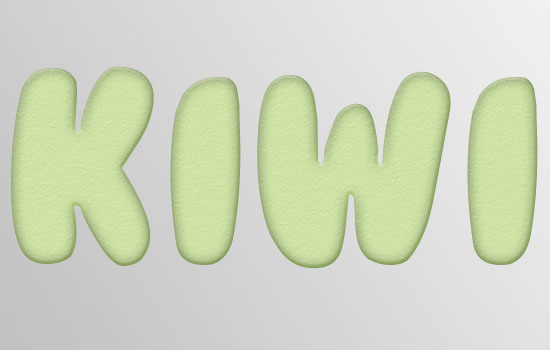
This will texture the top text layer.
Step 3
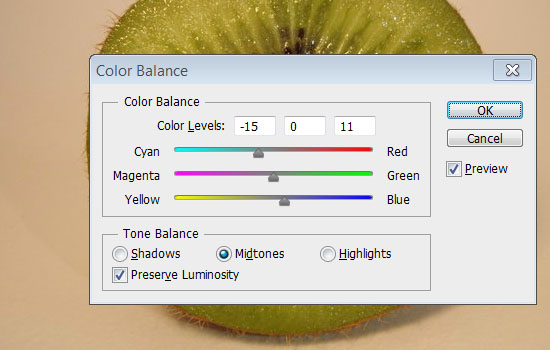
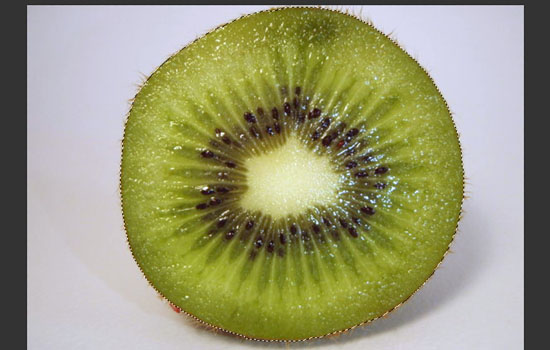
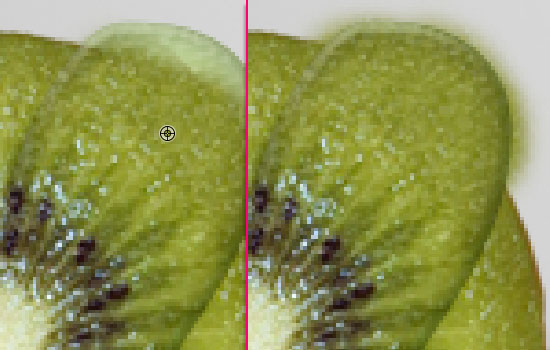
Open the Kiwi Stock. image, then go to Image > Adjustments > Color Balance. With the Tone Balance set to Midtones, change the Color Levels to -15, 0, 11.
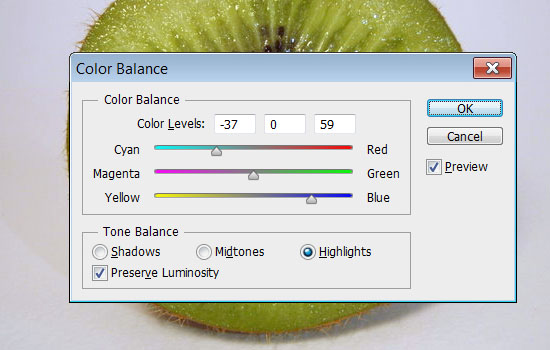
Under Tone Balance, choose Highlights, then change the Color Levels to -37, 0, 59. This will get rid of the red tint of the image.
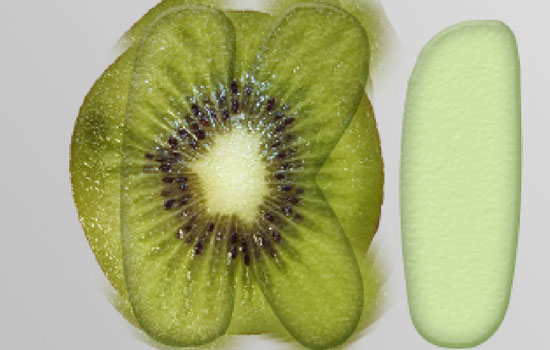
Pick the Magnetic Lasso Tool, and in the Options bar, set the Width to 10, the Contrast to 10%, and the Frequency to 57.
Then click once at the edge of the kiwi, and drag a bit slowly around it to add some more points. You don’t need to click to add points unless you want to force adding them where the selection starts going off. This might happen at the bottom of the kiwi where there is not much contrast going on. So click to add the points where needed, then continue dragging until you get back to the starting point to close the path.

Once you close the path, a selection will be created. Go to Edit > Copy to copy the selected part, then go back to the original text document.
Step 4
In the original document go to Edit > Paste, and place the pasted layer between the two text layers.
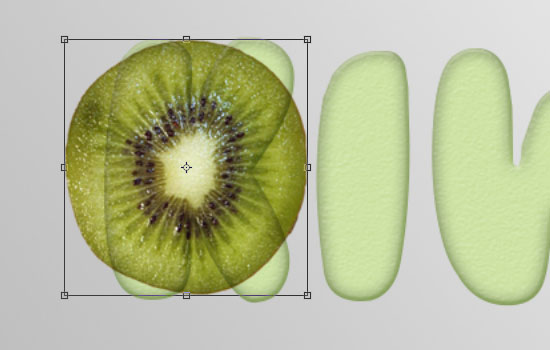
Then, duplicate the kiwi layer and make the original invisible by clicking the eye icon next to it.
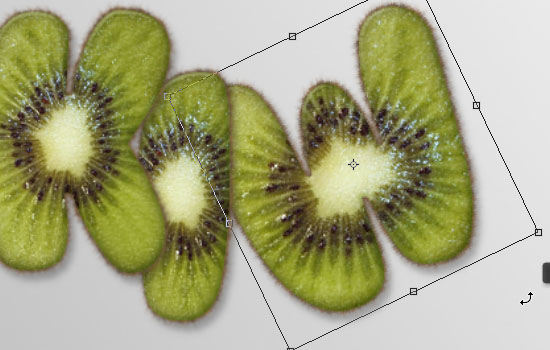
Select the copy kiwi layer, then go to Edit > Free Transform to enter the Free Transform Mode. Place the kiwi image below the first letter, then resize it and rotate it as you like.
It doesn’t matter if you have empty areas, because we’re going to fill them next. But when you’re done modifying the image, make sure to hit the Enter/Return key to accept the changes.
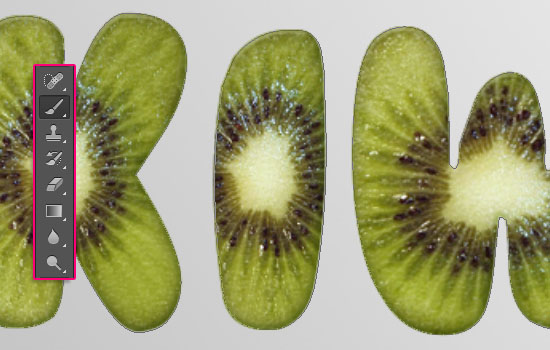
Pick the Clone Stamp Tool, and pick a soft round 20 px brush tip.
Press and hold the Alt/Option key, and click the source area you want to use, which should be near the edge. Release all, then click and drag to start filling the empty area.
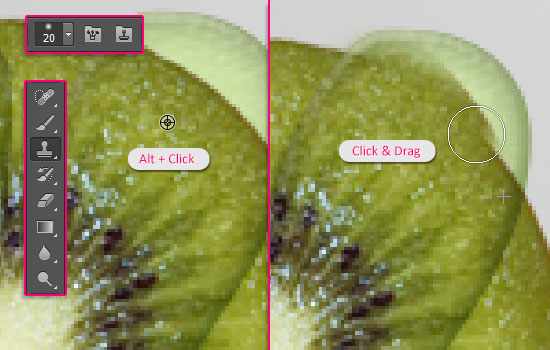
You might need to repeat the previous step a couple of times to be able to fill all of the area you have.
Do the same for the remaining empty parts. You can change the brush size if needed to fill some of the smaller or larger areas.
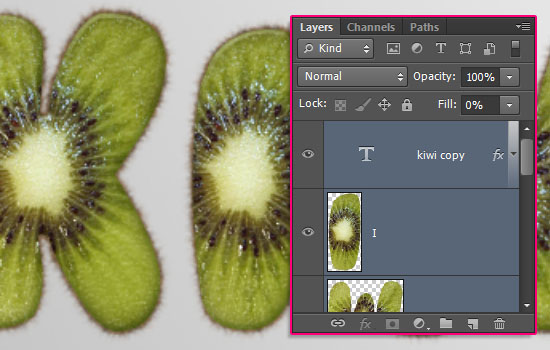
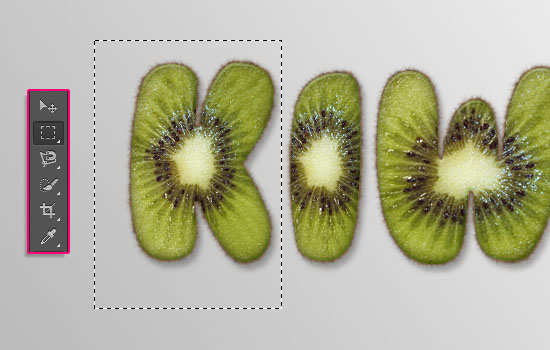
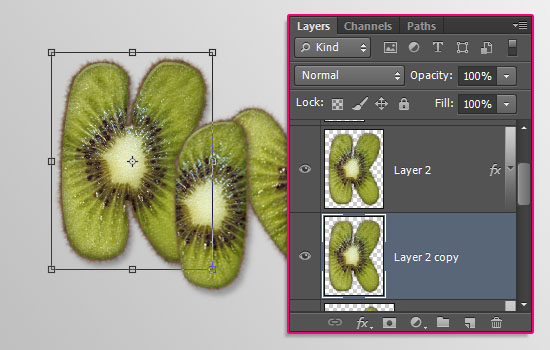
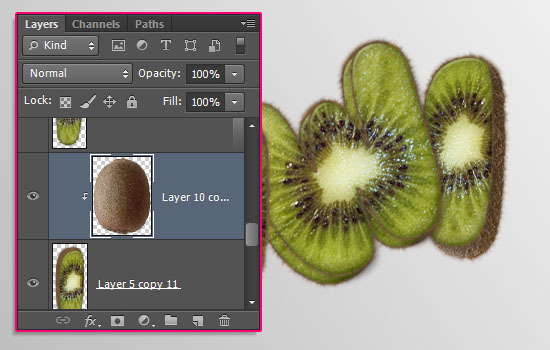
Ctrl/Cmd + click a text layer’s thumbnail to create a selection.
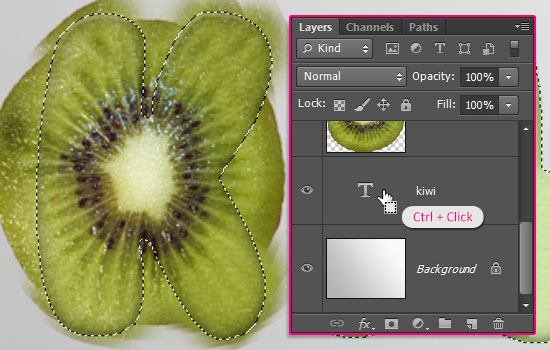
Pick the Rectangular Marquee Tool, and click the Intersect with selection icon in the Options bar. Then click and drag to create a rectangle around the first letter. When you release the mouse button, only that letter will be selected.
With the letter’s kiwi texture layer selected, press Ctrl/Cmd + J to duplicate the selection in a new layer. Then, delete the letter’s kiwi texture layer.
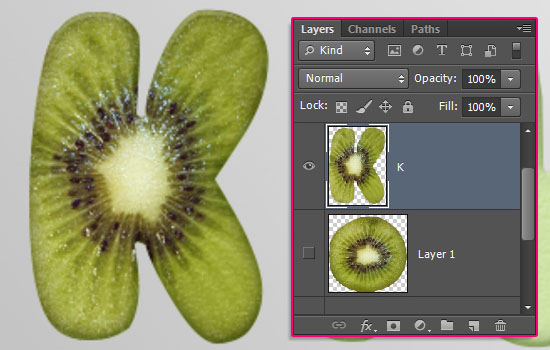
Duplicate the invisible (original) kiwi image layer and make the copy visible by clicking the empty box next to it where the eye was.

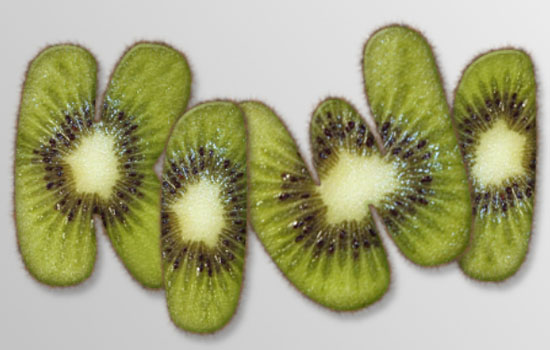
Repeat the same previous steps to texture each of the other letters. Don’t forget that you can rotate the image to create some variations.
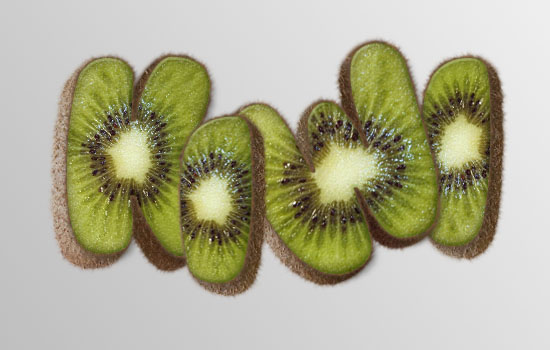
Step 5
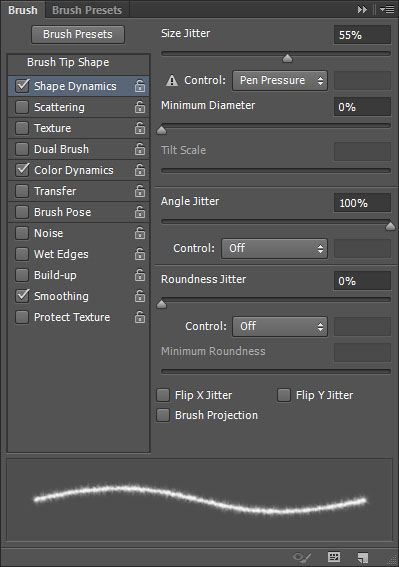
Right click a text layer and choose Create Work Path. Pick the Brush Tool and open the Brush panel (Window > Brush).
Under Brush Tip Shape, pick the Star 42 pixels tip, then change its Size to 25 and the Spacing to 1%.
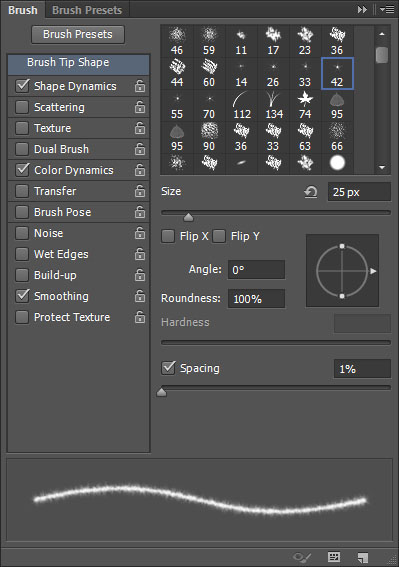
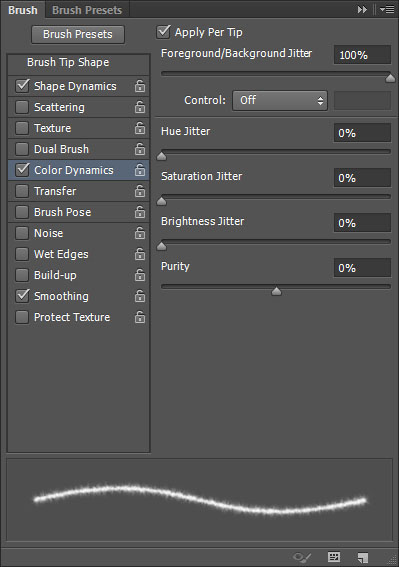
Change the rest of the Settings as below:
Shape Dynamics
Color Dynamics
Create a new layer right on top of the bottom text layer and call it Stroke, set the Foreground color to #8c6239 and the Background color to #504333, and pick the Direct Selection Tool.
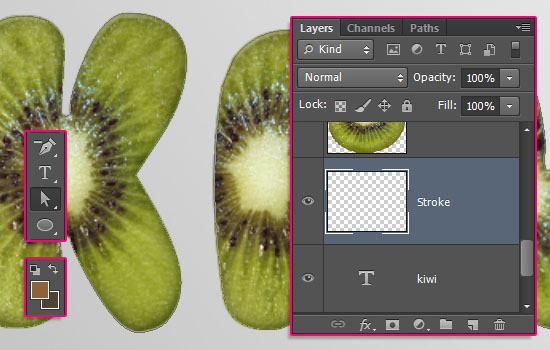
Right click the work path and choose Stroke Path. Then choose Brush from the Tool drop down menu, and un-check the Simulate Pressure box.
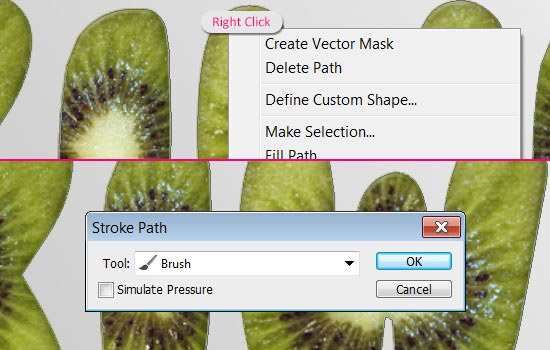
This will create a fuzzy stroke that will help make the peel part of the kiwi more realistic later on. Hit the Enter/Return key to get rid of the work path.
Step 6
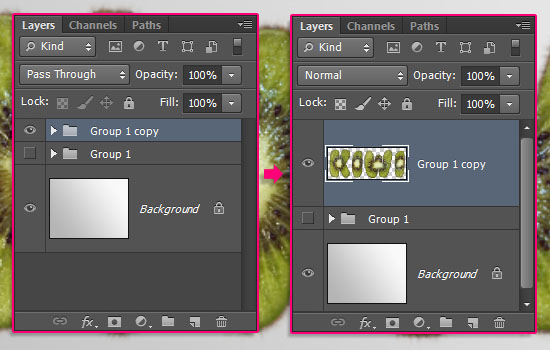
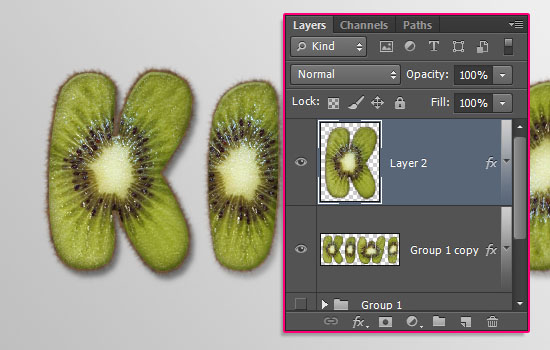
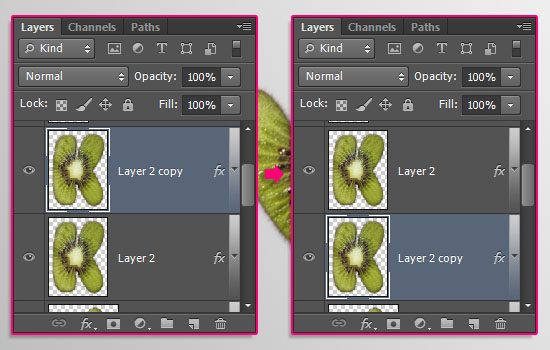
Select all the layers except for the Background layer (select the text layer at the top, press and hold the Shift key, then click the bottom text layer).
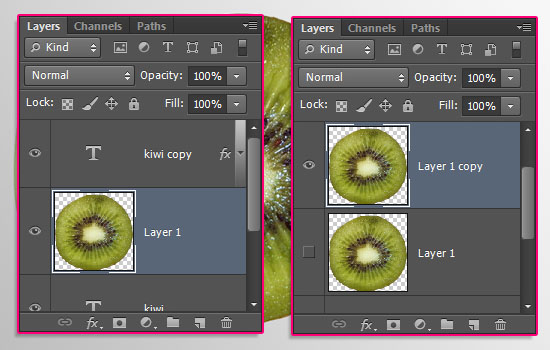
Group the selected layers, duplicate the group and make the original invisible, then select the duplicated group and go to Layer > Merge Group.
We’ll be working with the merged group layer, but the invisible group will keep all the original layers in case you need them anytime later.
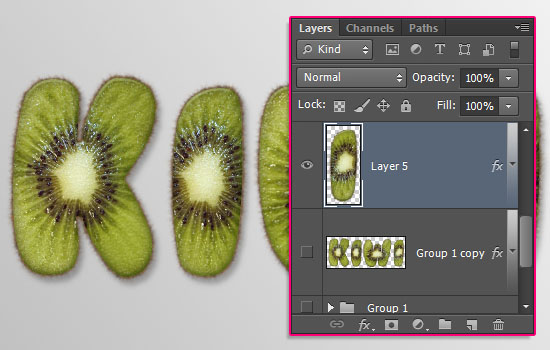
Double click the merged layer to apply a Drop Shadow effect:
– Drop Shadow
- Opacity : 25%
- Distance : 7
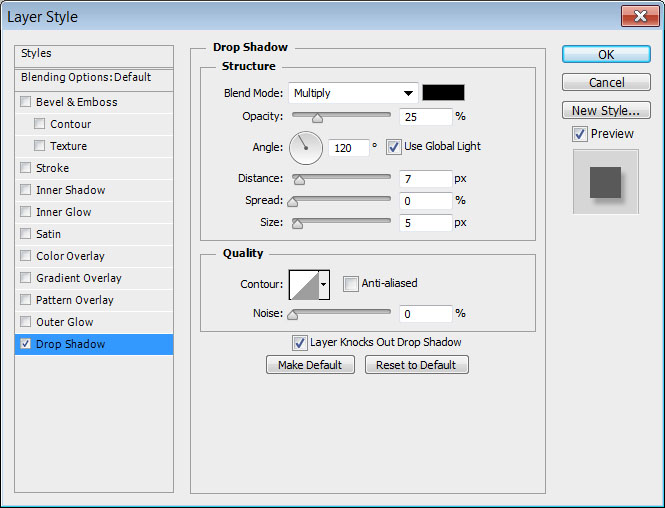
This will apply a subtle shadow.
Step 7
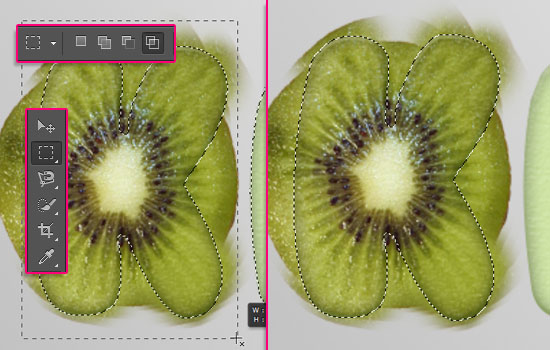
Use the Rectangular Marquee Tool to select the first letter.
Press Ctrl/Cmd + J to duplicate the letter with the Drop Shadow effect in a new layer.
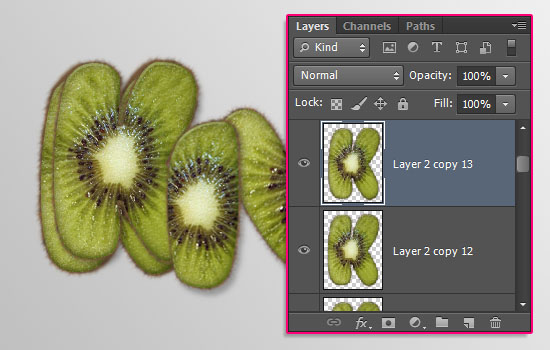
Select the merged layer again, then repeat the same steps for each of the remaining letters to extract it in its own layer, then make the merged layer invisible.
Step 8
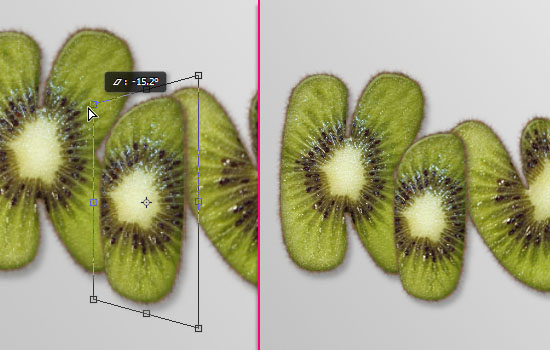
For each letter, enter the Free Transform Mode to rotate it and place it around in the document. Don’t forget to hit Enter/Return to accept the changes.
You can also change the order of the layers to place the letters on top of or behind each other.
Another cool thing you can do, is select a letter’s layer, then go to Edit > Transform > Perspective. Then click and drag the letter’s bounding box corners to tilt it in perspective. Hit Enter/Return when done.
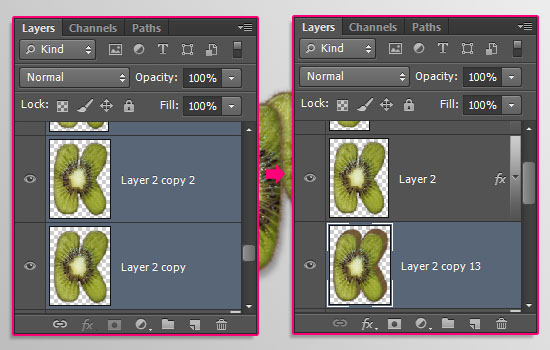
Duplicate the first letter’s layer, then drag the copy below the original.
Right click the copy and choose Clear Layer Style. Then enter the Free Transform Mode.
Press the Left Arrow key once to move the copy 1 px to the left, then press the Down Arrow key once to move it 1 px downwards. Hit the Enter/Return key.
Press the Alt + Ctrl + Shift + T or Option + Cmd + Shift + T keys a couple of times to duplicate the layer and the transformation until you like the depth of the extended part.
Select all the copy layers, then go to Layer > Merge Layers (Ctrl/Cmd + E) to merge them in one layer.
Repeat the previous steps for the rest of the letters. Just make sure to use the Arrow Keys that will move the duplicated layer in the direction you want. So you’re not going to use the Left and Down arrow keys for all of the letters (unless you want them all to be extended in the same direction), instead, you might use the Right and Down arrow keys, or maybe the Left or Right and Up arrow keys.
Step 9
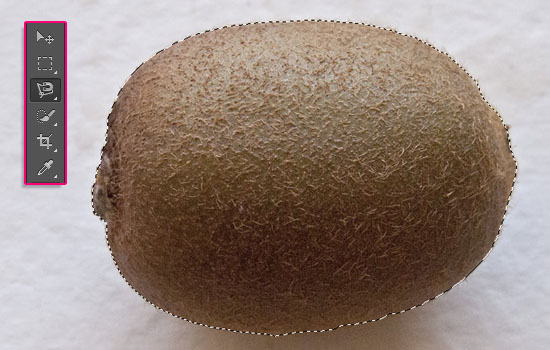
Open the Kiwi Stock 1 image and select the kiwi using the Magnetic Lasso Tool. Then go to Edit > Copy.
In the original document, go to Edit > Paste. Duplicate the pasted layer and make the original invisible.
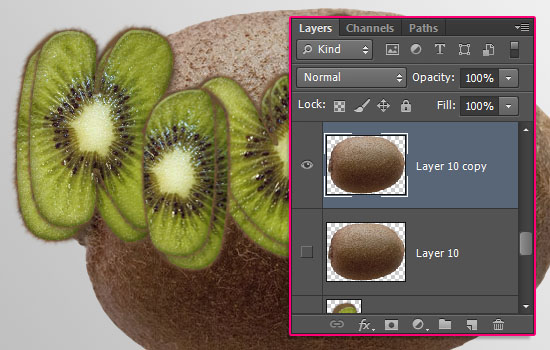
Enter the Free Transform Mode to resize and rotate the kiwi peel image, then place it between the last letter’s layers.
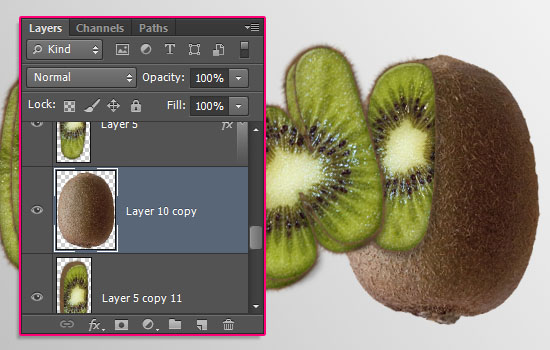
Right click the kiwi peel layer and choose Create Clipping Mask. This will clip the image to the letter’s extension.
You can use the Move Tool to move the image around while clipped to see how you like it best.
Duplicate the clipped kiwi peel layer, move the copy between another letter’s layers, clip it again, and move it around as you like.
Repeat that for all the remaining letters.
Create a new layer below all the letters’ layers and call it Shadow. Set the Foreground color to Black. Pick the Brush Tool, and choose a soft round 115 px brush tip.
Start dotting a simple shadow below the letters. Don’t click and drag, just place a couple of dots next to each other.
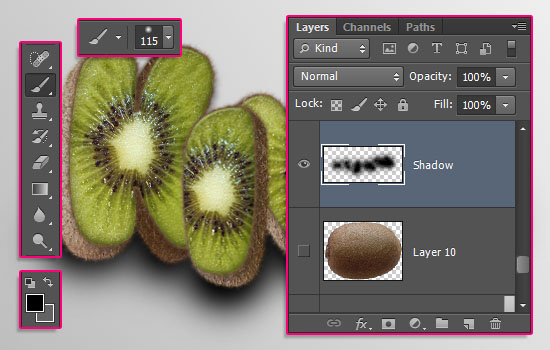
You can play with the layer’s Opacity if you want a more subtle result.
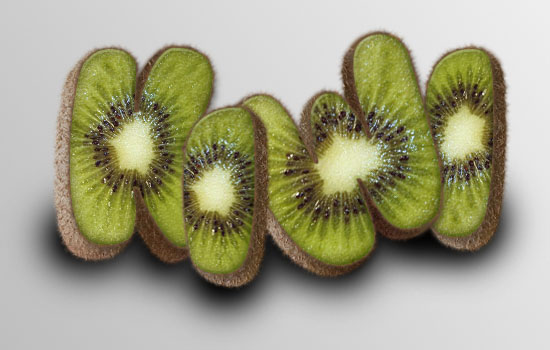
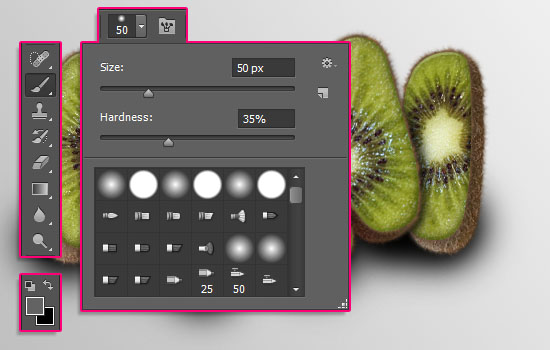
Change the Foreground color to #636363, the brush Size to 50, and its Hardness to 35%.
Create a new layer between two letters’ layers, change its Blend Mode to Multiply, then click and drag to create a simple shadow between the two letters.

Repeat that between each two letters.
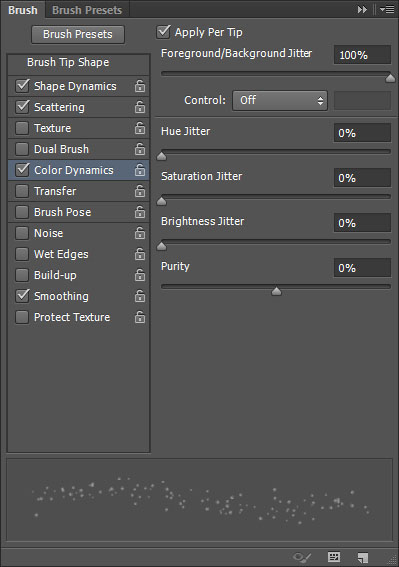
Step 10
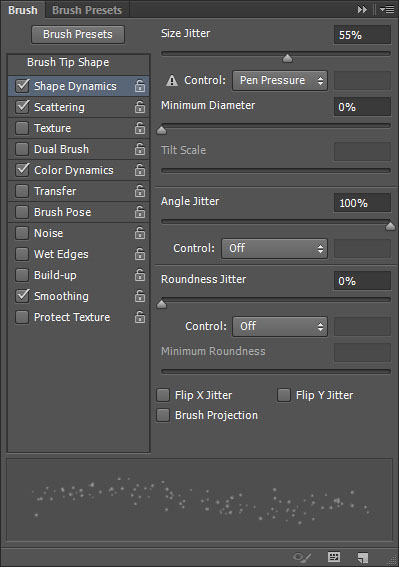
Open the Brush panel and choose the Star 14 pixels tip, then change its Settings as below:
Brush Tip Shape
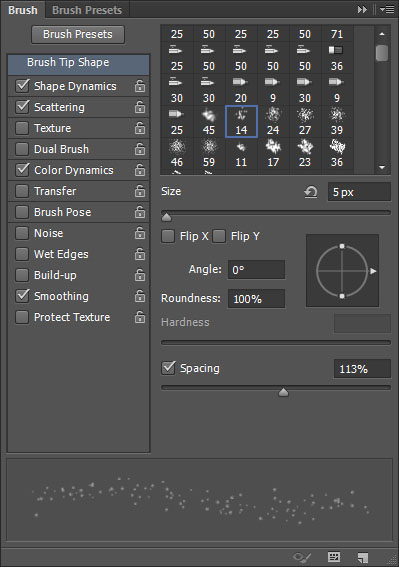
Shape Dynamics
Scattering
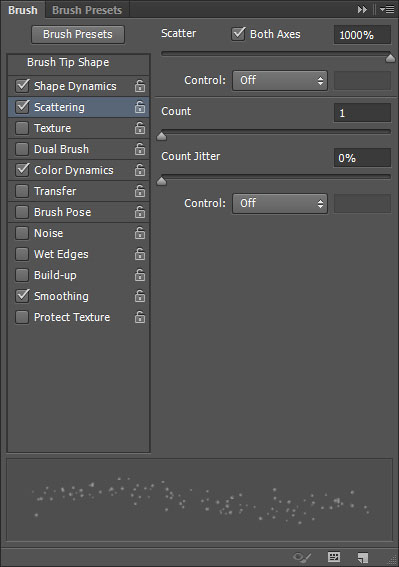
Color Dynamics
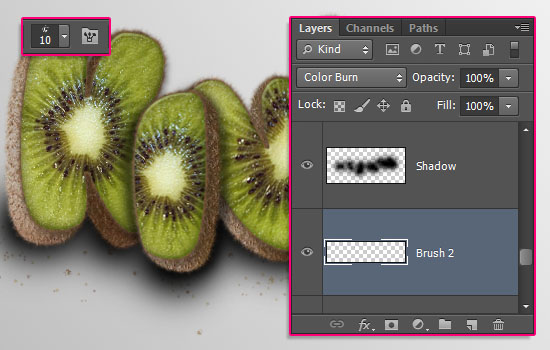
Set the the Foreground color to #8c6239 and the Background color to #504333. Create a new layer below the Shadow layer and call it Brush, then change its Blend Mode to Color Burn.
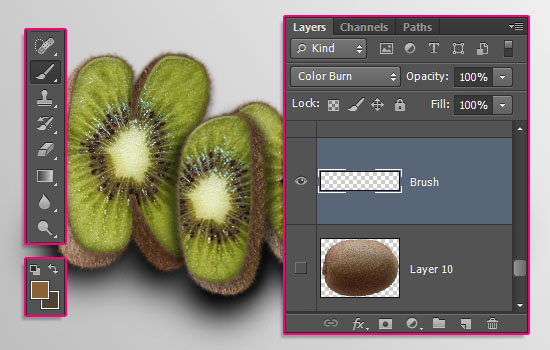
Start clicking and slightly dragging to scatter some of the peel around the text.
Increase the brush Size to 10, create a new layer on top of the Brush layer and call it Brush 2, then change its Blend Mode to Color Burn as well.
Add some more bigger, but less, scattered peels.
Step 11
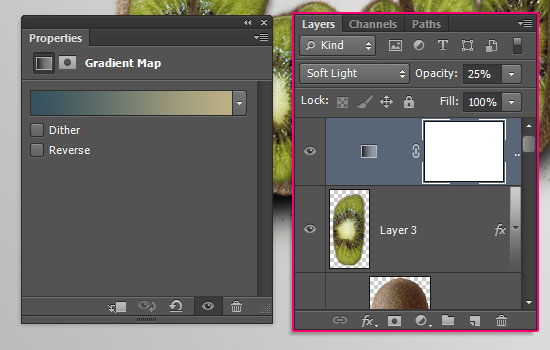
Click the Create new fill or adjustment layer icon down the Layers panel and choose Gradient Map.
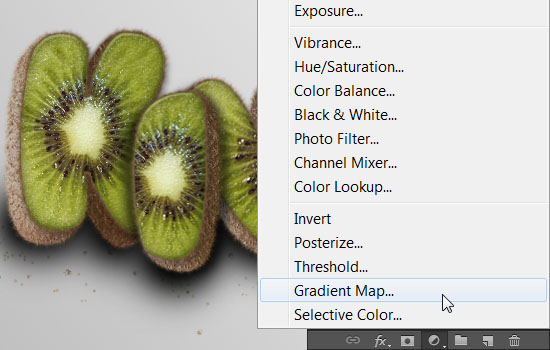
Place the adjustment layer on top of all layers, then change its Blend Mode to Soft Light and its Opacity to 25%.
Use the colors #35515c to the left and #bcb086 to the right to create the gradient.
This will help intensify the contrast of the colors a little bit.
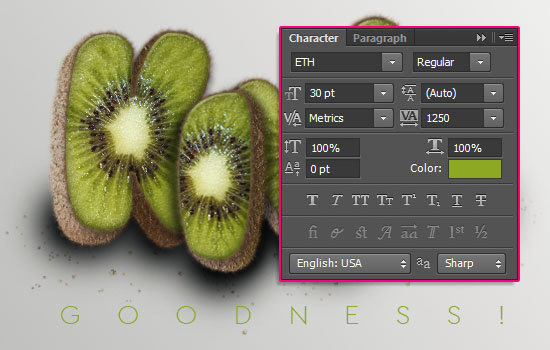
To create the text at the bottom, use the font ETH, the font Size 30 pt, and the color #8da924.
Then, change the Tracking value to one that spreads the letters along the kiwi text. Here, it is set to 1250.
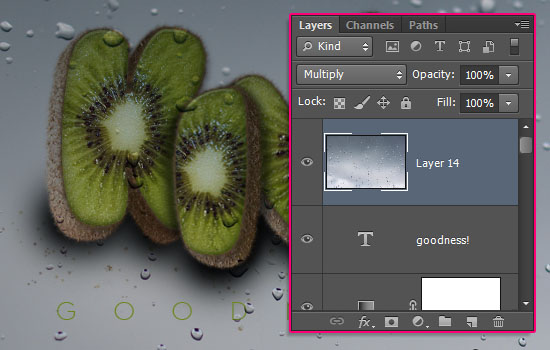
Place the Texture – Sky and drops image on top of all layers, resize it to fit within the document, then change its layer’s Blend Mode to Multiply.
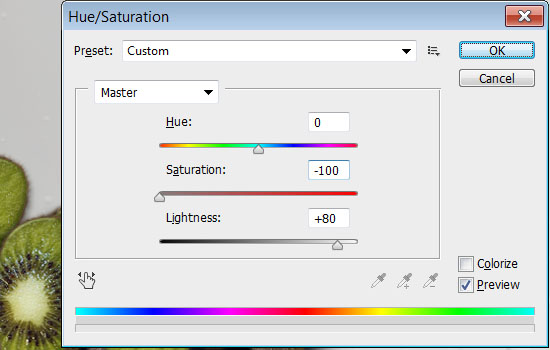
Go to Image > Adjustments > Hue/Saturation. Change the Saturation to -100, and the Lightness to 80%. This will decolorize the texture and brighten it.
Pick the Eraser Tool, and choose a big soft round tip. The start clicking to erase parts of the corners and any other areas you don’t want to be covered by the texture.
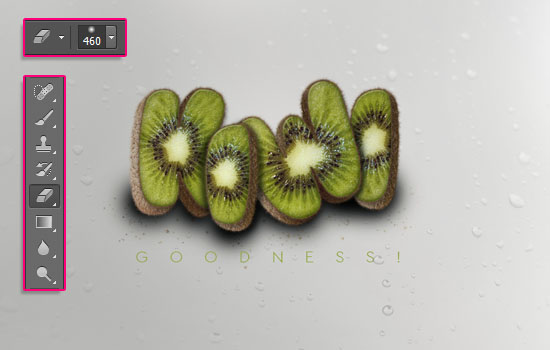
You can actually play around with the elements you use to achieve different results as well.
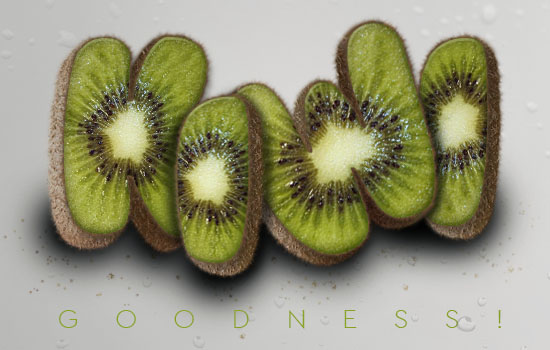
And there you have your fresh kiwi text.
Hope you like it 🙂
Did you enjoy this post? Please consider donating to help us cover our server costs.


Woowwwwwwwwww….
I search tutorials like this… for many time
Can’t have any words to appreciate you…
I Love this…
Thanks alot…
<3 <3 <3
Your kind words absolutely mean a lot.
Many sincere thanks for the splendid comment 🙂
Wonderful tut.Thanks
Glad you like it 🙂
Thanks a lot for the comment.
Hey tuts, i really love ur tutorials.. Can u make for me something fishy?some Like fish, starfish, or anything,? I want to make it to my brother because he’s really like fishing.. Please!
That’d be a nice idea for sure!
Thanks a lot for the comment and the suggestion 🙂
Very good tutorial
Thanks a lot!
Thank you !
You’re welcome 🙂
Thanks for the comment.
wow yummy text . amazing tut
Glad you like it.
Thanks a lot for the comment 🙂
Hello tuts.. I really like ur tuts.. Can u make some flowering text for me? I want to give to my wife for her birthday..
That’s so sweet 🙂
We already have a couple of floral tutorials, like the Velvet Roses Text Effect, the Fantasy Spring Text Effect, and the Vintage Tiles Text Effect.
Hope you like those 🙂
Thank you for the kind comment.
hello and welcome,
A problem has been create during “Step no 1″ applying texture.
my question is that what is the complete procedure to apply ” wine
cork” texture ?
thanks a lot
You mean Step 2 – the Bevel and Emboss Texture?
You’ll need to download the file (from the Resources section at the very beginning of the tutorial), extract it, then look for the “cork_1.png” image. Open that image in Photoshop, then go to Edit -> Define Pattern.
Then you’ll be able to find it down the picker when applying the layer style (as shown in the screenshot).
Hope this helps.
Please feel free to add any other queries you have.
Deliciously insane… as usual.
Thank you very much 😀
So fantastic
Thanks a lot 🙂
I really love this,thank you so much.
Super glad you do!
Thanks a lot for the comment 🙂
HI Rose, where do I find the star 42 pixels brush? I loaded every section and I can’t seem to find it.
It is among the default brushes. What PS version are you using please?
You can use any of the similar brushes in your Brush panel, there are a couple of them. Do you have those?
CS6. Thanks, I found it. 🙂
No problem 🙂
Nice Tutorial, Well Explained.. Thank you…
Glad you like it 🙂
Thanks a lot for the comment.
Absoutley loved it! Had no issue at all with following the steps which is something that usually happens! End results beloowww
Very glad to know that!
Really great outcome indeed 🙂
Many thanks for the kind comment and for sharing your work 😀
That is pretty awesome actually!
Great outcome indeed!
Many thanks for the comment and for sharing you work 🙂
Impressive..! Thanks.
shoptutorials.blogspot.in
Glad you like it.
Thanks for the comment 🙂
hey Rose… had fun doing this , here’s my outcome 😀
Nice outcome indeed!
Glad you had fun with it.
Thank you very much for the comment and for sharing your work 🙂
Oh I like this skill.>?<
Amazing outcome!
Thanks a lot for the comment and for sharing your work 🙂
Really love this tutorial… So nice and creative
Nice variation! Well done 😉
Thanks a lot for the comment and for sharing your work 🙂
but I think mine not really good. what’s wrong with that?
I think the images used can make a big difference. So you might need to try different ones until you get a result that looks more realistic and well put together.
Also, for some reason, the 3D part is kind of separated from the original text at some parts. This might be because of a problem in the duplicate with transformation step.
Another note is that the background color might look better if it was more neutral instead of as bright as the text itself.
Those are some quick observations, but you still did a great job of course, and it’s always nice to see different versions of the original tutorial.
Hope this helps, and thanks once again 😀