Nice 3D Text Effect In Photoshop CS5
This tutorial will explain some basic 3D concepts in the Photoshop CS5 Extended environment, in order to create a nice 3D text. It aims to provide a step-by-step guide to creating a 3D scene, and presents some tips and techniques for using Repoussé, applying materials, combining 3D layers, dealing with the object, mesh and camera tools, shadows and reflections, and some rendering basics as well.
Then, it will explain how to adjust the output to get the final result.
The Final Result
Tutorial Details
- Software Used : Photoshop
- Version : CS5 Extended
- Time : 2:00 – 3:30
Resources
- Bash — Space Brush Set_3 by ~B-a-s-h.
Enabling OpenGL
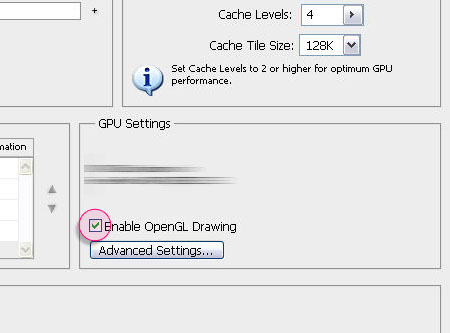
The Repoussé will not work unless OpenGL is enabled. So go to Edit > Preferences > Performance, and make sure Enable OpenGL Drawing (under GPU Settings) is checked.

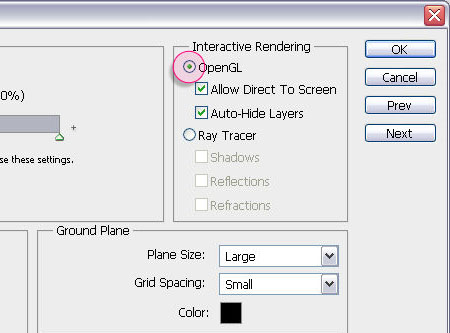
Also, go to Edit > Preferences > 3D, and make sure OpenGL (under Interactive Rendering) is enabled.

Step 1
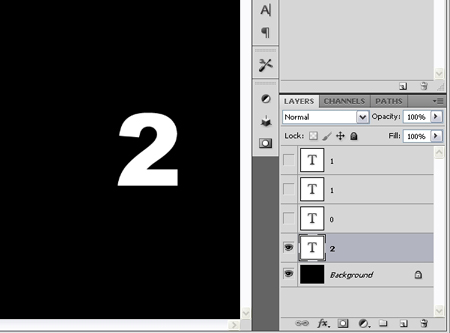
Create a new 1024 x 768 px document. On a Black background, create your text, each letter in a separate layer. The text color should be White. The font used here is Arial Black. The size doesn’t matter now as you’ll be able to scale the text up and down when you create the 3D objects.
Once you’ve created the first letter, duplicate it and make the original layer invisible (remove the eye next to it), then change the duplicated letter. Do NOT move it or change its size. This will save time and effort when merging the 3D objects later on.

Step 2
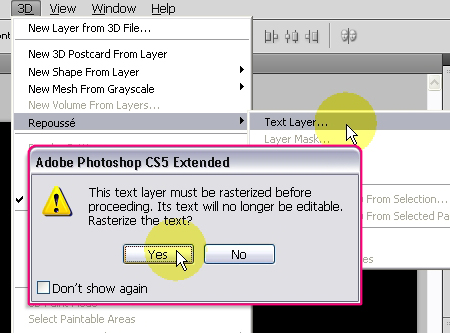
Now, turn the visibility of the first layer (at the bottom of the layers palette) on, and make the other layers invisible. Make sure the visible layer is active (selected), and go to 3D > Repoussé > Text Layer.
A dialog box will appear telling you that this will rasterize the type layer, and you will no longer be able to modify your text. So if you are sure you don’t need to modify your text, click yes and continue.

Step 3
– There are a couple of Repoussé Shape Presets available, we’ll be using Bend Center.
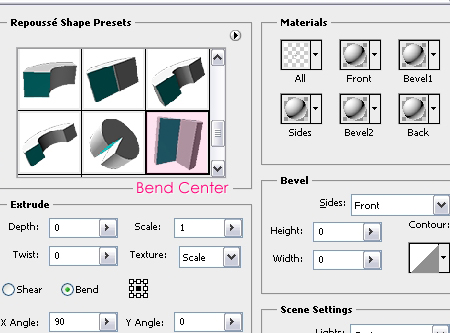

– You can move or rotate your mesh to see it from different sides, but make sure to click on Return to initial mesh position icon before clicking OK.
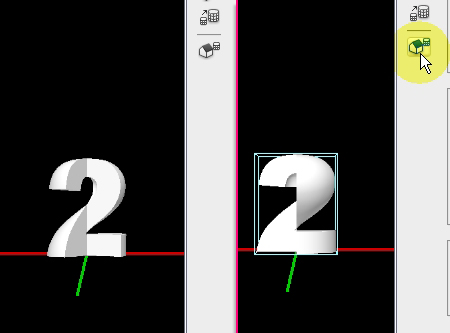

– Repeat Steps 2 and 3 for all of the letters.
Step 4
Once you’re done, it’s time to apply the materials. Keep in mind that you’ll be able to change any material attribute at any time, and I’m going to change the color later on. But for now, let’s just open the 3D panel (Window > 3D).
In this tutorial, we’ll be doing all the work in the 3D {SCENE} tab. So make sure that tab is active.
Under that tab you can find all the elements of the 3D scene you’re working with.
And under the name of each Object, you can find its Materials.
– First, as we have no Bevel added, we want to make sure no texture is applied to the Front Bevel Material and Back Bevel Material. So select each one of them, click on the icon next to Diffuse, then click Remove Texture.
Repeat this step for all of the other Materials as well, because if there is a texture, you will not be able to see the Diffuse color.
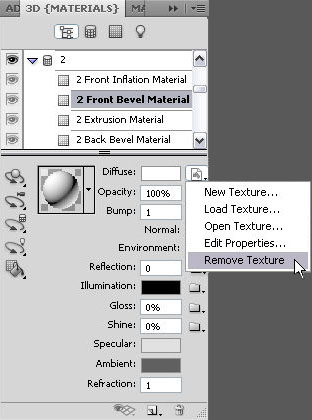

– Now, we will modify some of the Front Inflation Material values. Notice that we removed the texture next to Diffuse (the icon next to it is the folder icon now). Click on the Diffuse color to choose a new one.
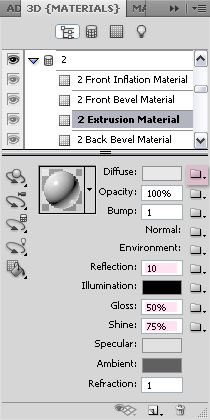
We want a reflective glossy Material, so we’ll change the Reflection value to 10, the Gloss value to 50%, and the Shine value to 75%.
Because we’re working with the Interactive (Painting) render preset, we won’t be able to see the final effect with all the details now (no reflections or shadows, and the quality isn’t very good), but that’s fine.
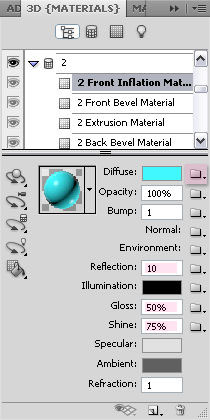

– You can save the Material so that you won’t need to re-enter the values each time. Select your material, then from the pop-up menu icon, choose New Material, type in the name of your material and click OK. Now, when you scroll down the material presets you’ll find your material, which when clicked will be applied to the selected object.
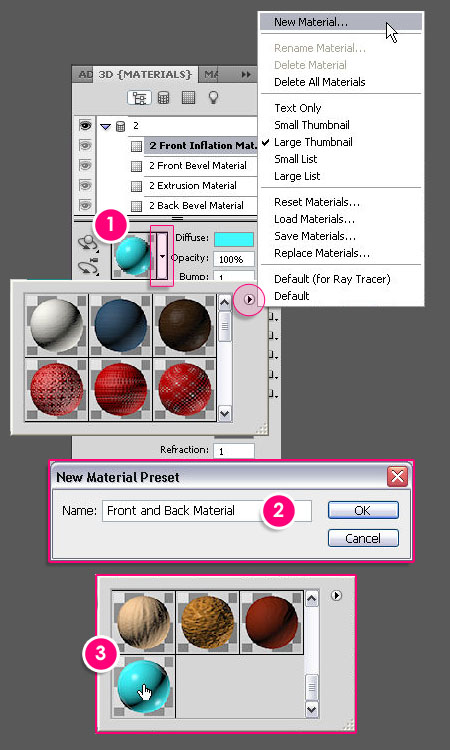

– Apply the same material to the Back Inflation Material, then to the Extrusion Material, but for this one, change the Diffuse color.

Step 5
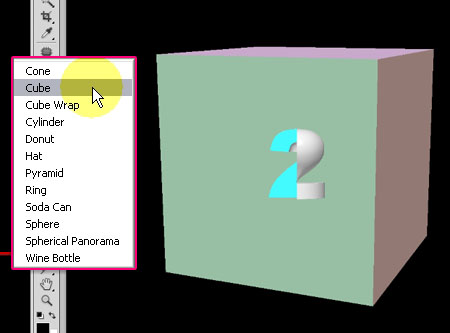
Create a new layer over the Background layer and under all of the text layers, then go to 3D > New Shape From Layer > Cube.
We will use the cube to create the planes surrounding the text.

Step 6
Up to this point, we have separate 3D objects in separate scenes, which means none of them affects or interacts with the others. We need to combine all of the objects in one scene to be able to position them and let them cast and catch shadows, reflections,etc.
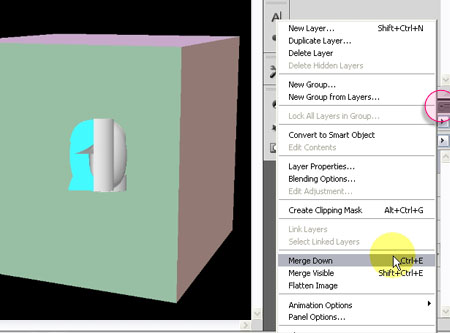
To do this, make sure all the layers are visible, select the layer at the very top (the first layer in the Layers palette), and from the layers panel options menu, choose Merge Down.
Another way to do this, is to select the first layer, and Ctrl + Click on the layer below it so that both of them are selected together, then go to 3D > Merge 3D Layers.
Repeat the merging process until all the objects are inside one layer -the Object are now called Meshes-.
* Do NOT merge the 3D layer with the Black Background layer.

Step 7
If you take a look at the 3D {SCENE} tab, you’ll notice that all the meshes are available with their materials. You’ll also notice that the cube is created as 6 separate planes (sides), not as one mesh. This will help us remove the sides (faces) we don’t want and keep those we need.
Remove the eye icon next to each side (face) of the cube you don’t need. (Note: The names of the sides might or might not match their real position, for example, in this tutorial, the Right side is actually the Front of the cube.)
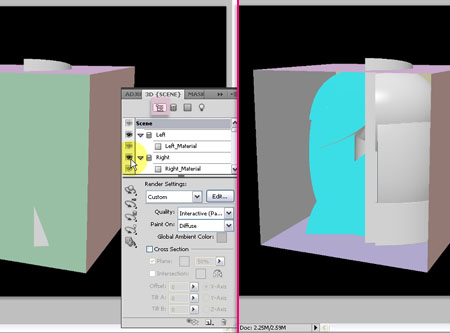

Step 8
Once you’re done, use the Camera Tools to move it around so that you can see the whole scene. Here are some useful tips for using the camera tool.
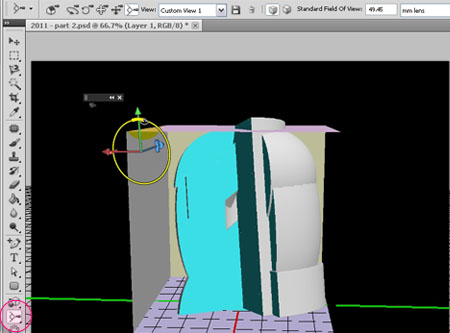

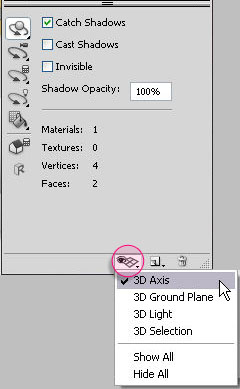
(* If you can’t see the Axis or if you want to display the grid, select any Object Tool, and at the bottom of the 3D Panel, click on the “eye with the grid” icon to toggle overlays.)

Step 9
It’s time to reposition the meshes. When we combine the objects in one scene, they become meshes that together act as one Object, so moving, rotating or scaling them using any of the Object Tools will affect the scene as a whole.
So to move each mesh separately, select that mesh name in the 3D {SCENE} tab, then select the appropriate Mesh Tool, to reposition, rotate or scale the mesh.
(Read more about the 3D Axis, and the 3D object and camera tools)
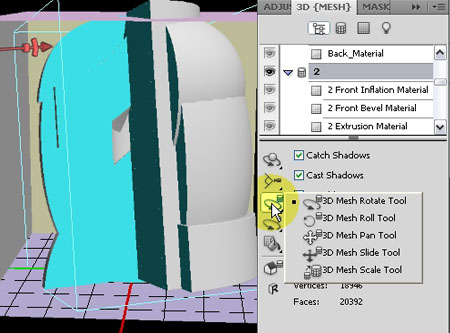

Step 10
Position your meshes as you like. This might require frequent switching between the Camera Tools and the Mesh Tools to get the final result.
It might be a little bit hard to use those tools at first, but with some practice, you’ll be able to master them more easily.
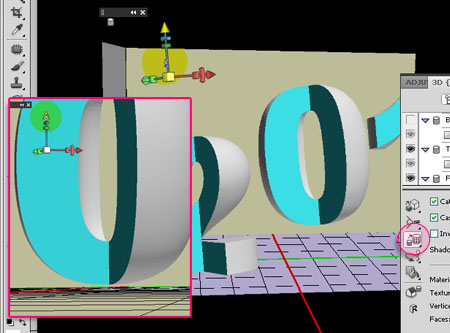

Step 11
– Scale the planes of the cube and move them so that the other meshes are entirely inside them. Do not rotate the planes, this might ruin the perspective of the scene, instead, modify the camera values until you get the best view.
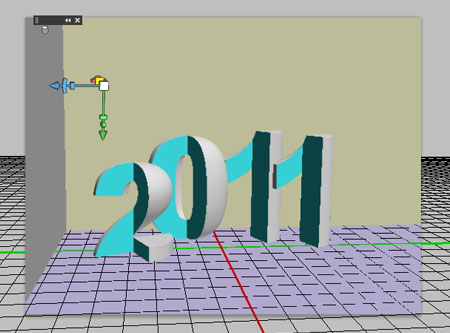

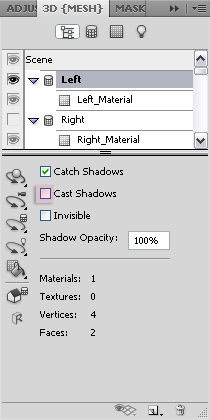
– In your 3D {SCENE} tab, select the name of each plane used in your final scene, and remove the check next to Cast Shadows. We do not want the floor and walls to cast shadows on the meshes.

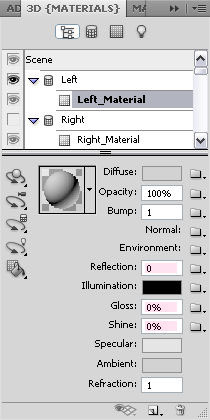
– Then, select the material of the “walls” of your scene. In this tutorial, the walls are not glossy or reflective. They just catch shadows casted form other scene elements. Choose a Diffuse color as well, and remove any textures.

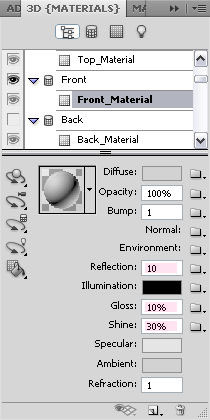
– As for the “floor” material, we want want some glossiness and reflectivity, so these are the values used:

Step 12
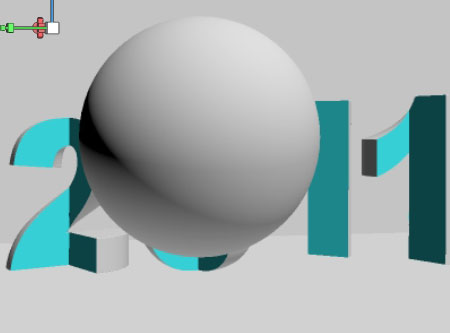
It’s time to start adding the spheres. So create a new layer, and go to 3D > New Shape From Layer > Sphere.

Step 13
Because we changed the position of the meshes and the camera view, we can’t merge the sphere layer with our scene layer directly, as this might mess up the seen. So before merging, we should match the two layers’ cameras and position.
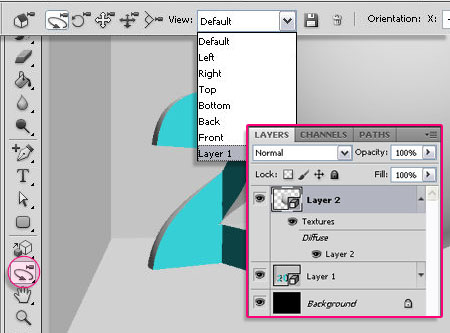
– Make sure the Sphere layer is selected, and select one of the Camera Tools. In the options bar, from the View menu, choose the name of your scene layer. This will make the camera of the sphere scene have the same settings of the original scene camera.

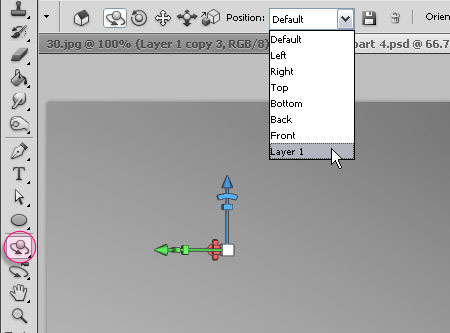
– Next, select any Object Tool, and in the options bar, from the Position menu, choose the name of your scene layer again.
This might fill your screen with the sphere, but that’s fine. We’ll fix this after merging the layers.

– Now, we can merge the two layers. So go ahead and merge them.
Select the Mesh Scale Tool, and select the name of your mesh to scale it down.
Remember, the sphere is no longer an independent object, so using the Object Tools to scale it will scale the whole scene. Use the Mesh Tools instead. (A turquoise border will appear around the selected mesh, be careful which mesh you’re scaling).
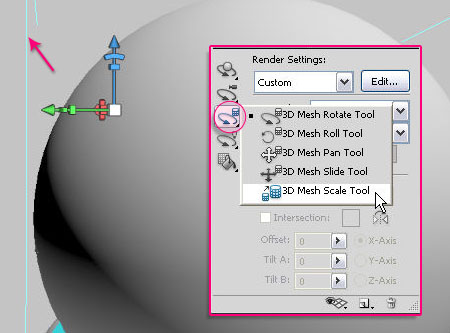

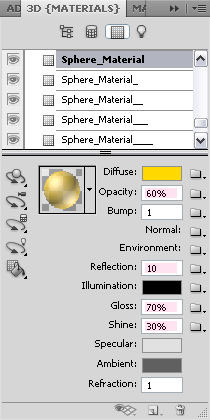
– Change the Material values of the sphere, and save it if you want to add more spheres.
Notice that the Opacity value is reduced, which will make the sphere a little bit transparent.

– Repeat the same steps to add as many spheres as you like.
Create a Camera View
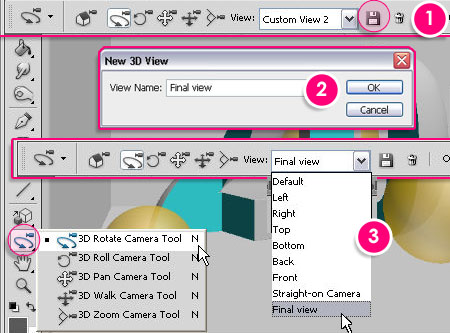
You might like a certain camera view and you want it to be the final view, but you still need to rotate and move the camera to position the meshes, or there might be some camera views you frequently use for different purposes, you can save them as presets, and go back to them any time.
To do that, select any Camera Tool, in the options bar click the save icon, type in the name of the camera preset or the view, and hit OK. Now, you can find it in the View drop down menu.

Lights and Shadows
When 3D layers are merged, the lights of the top layer disappear, so the only lights available in the scene are those of the bottom layer.
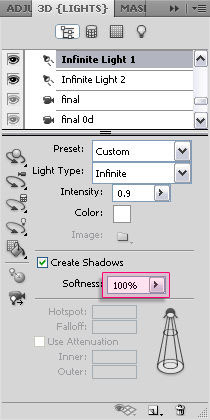
The default lights are fine, so we won’t change any settings here. But we’ll change the shadows Softness to 100%, as the default (0%) creates really hard dark edges.
You can find the lights under the 3D {LIGHTS} tab (click on the bulb icon), or just scroll down the 3D {SCENE} tab and you’ll find them there. Change the Softness value for both of the lights.

Rendering
– Before rendering the whole scene, you might want to check what the final result would look like on a small area first. You can use any Selection tool to draw your selection, then go to 3D > Progressive Render Selection. It might take a few minutes to render the selection.
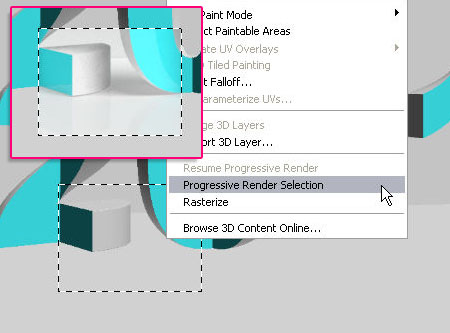

– You can stop the rendering process at any time by clicking anywhere inside you document. You can also change any settings, materials, colors, positions, cameras, etc. So go ahead and finalize your scene for final rendering.
Once you’re done, select the Scene at the top of the 3D {SCENE} tab, and from the Quality drop down menu choose Ray Traced Final.
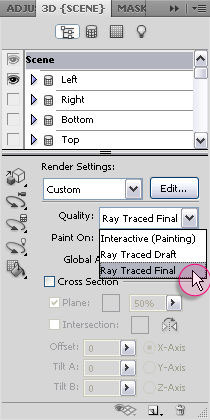

It might take a REALLY long time to get the final image, so be patient!
The rendering will stop when it reaches its High Quality Threshold, which you can find in Edit > Preferences > 3D under the Ray Tracer box. (This defines the quality of ray traced rendering.)
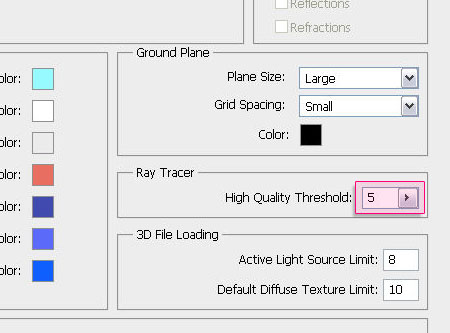

Once the rendering is finished, save the result as an image (JPEG).


Step 14
– Open the image you’ve just saved, and add a Curves adjustment layer. From the drop down menu, choose each channel to adjust its values. We’re trying to make the colors more bright and vivid.
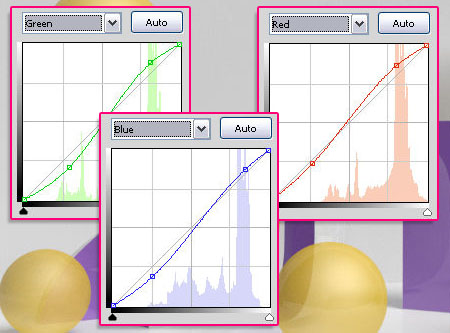

– Once you’re satisfied with the result, grab the Elliptical Marquee Tool, and start drawing circles around the spheres (press the Shift key while drawing to add to the selection).
Create a new layer at the top, and call it “Sparkles”. Change its Blend Mode to Overlay.
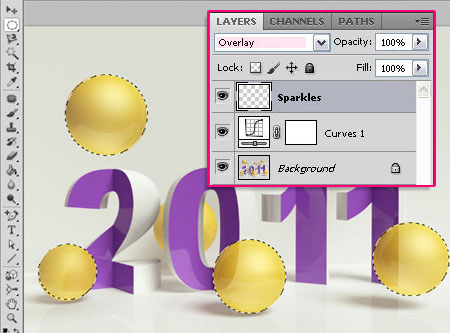

– Set the Foreground color to white, and using the sparkly brushes of this set Bash — Space Brush Set_3 by ~B-a-s-h, start adding some sparkles inside the spheres. Once you’re done, press Ctrl + D to deselect.


Step 15
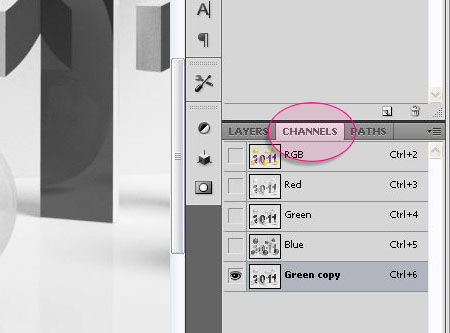
– Now go to the Channels palette (Window > Channels).
You can see the three channels of the image (Red, Green, Blue). click on each one of them to see which one has the most contrast between the White and Black colors. In this tutorial, it’s the Green Channel.
Duplicate the channel layer, and make sure it is the active one. (Any modification on the original channel layers will affect the original image).

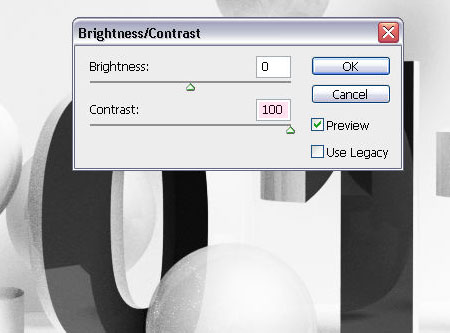
– From Image > Adjustments > Brightness/Contrast, modify the Contrast value to increase the White/Black contrast of the image.

– Go to Image > Adjustments > Levels, and start darkening the shadows (moving the black arrow), and brightening the highlights (moving the white arrow). We want the “2011” front faces to be Black, and everything else to be white.
(You can hit OK, then repeat this step again as many times as needed).
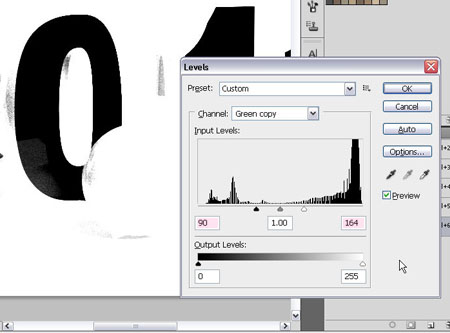

– Do not lose the edges of the “2011”, and if needed, you can use the Eraser to remove any noise left.
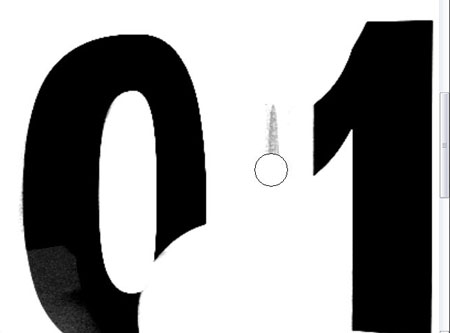

– You should end up with something like this.
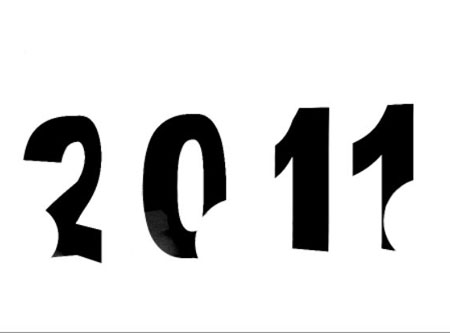

Step 16
– Click on the RGB on top of the channels to go back to the original image, and click the Layers palette again.
Go to Select > Load Selection, and from the Channel drop down menu, choose the name of the channel you’ve been working on. This will create a selection based on the white space on that channel, but we actually want the black area to be selected, so check the Invert box.
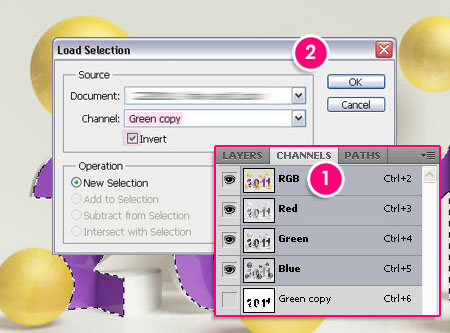

– Create a new layer, call it “Sparkles – 2011”, change its Blend Mode to Overlay, and start adding sparkles inside your selection. Press Ctrl + D to remove the selection.
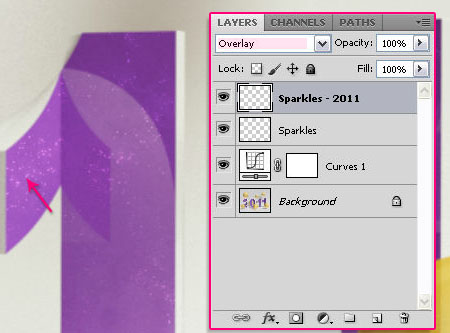

And that’s pretty much it!!
Hope you enjoyed the tutorial. If you have any questions or suggestions please feel free to add them in your comments below.
/strong
Did you enjoy this post? Please consider donating to help us cover our server costs.





Flawless, dude! 😀
Thanks for the comment!
Awesome tutorial
Thank you!
very good,thanku sir.
Thanks!
“Dude”, “sir”? I thought her name was Rose.
I’m just glad that people are enjoying the tutorials and learning something new, so … I hope you enjoyed the tutorial as well 🙂
Thanks for pointing this out anyway!
Hey i am lost at number 8.. it wont let me merge the 3d layers. they just show up like unclickable..
number 6 i mean! :/
Hello tmold16,
So the problem is that you can’t select the layers? Did you make sure ALL of them are visible (there is an eye icon next to each one of them)? Also, which method are you using when you merge the layers?
OMG. U GOT SKILL DUDE.. PHOTOSHOP TO THE WORLD I LOVE THIS..
Oh, thanks you so much for the comment! I really appreciate it.
Though I’m a girl ^_^
But thanks anyway!
I would like to learn about the 3D effects in French. Is there a French translation of the tutorial above ?
Thank you and congratulations for this excercise.
Hello Mathieu,
Thanks for the comment. I would really like to help, but unfortunately I don’t know French. You can try using google translate, it might give a good translation.
Thank you once again.
I cant press on overlay, its grey’ed out. Any reason for that?
At what step does the problem exist?
Nice tutorial…. I’ll try this… 🙂
Thanks for the comment 🙂
dude how to enable my 3D? i try OpenGL but it doesn’t work man.,. i need your feedback.,.thanks
Hello Vince,
Well.. I’m a girl 🙂
As for the 3D, did you check the system requirements for PS CS5?
The steps at the very beginning of the tutorial explain what is needed for the 3D to work, so the problem might be something Hardware or system related.
Do you get any specific message when you try to use the 3D?
Please add any other details, and I will try my best to help!
Best regards.
Maybe my video graphic card is too low for that 3d or Open GL.,. i have to upgrade it.,.
That might be it, especially if the scene is big or contains many 3D objects.
Very nice tut, unfortunately I lost in step 5 🙁
What exactly got you lost?
Were you able to create the cube?
I can removed the textures, but I lost when change the color to purple,
I can create the cube but I don’t know how to use it
All you need to change the color is to click the color box, then choose whatever color you like.
As for the cube, once you create it and merge it with the other objects, you first need to keep only the needed faces (as shown in Step 7), then move and scale those faces to create the Background for the scene.
Did you try to do anything with the cube? Did it work?
First off, Great tutorial 🙂
Sadly though I can’t seem to even start 🙁 As soon as I go Repoussé -> Text Layer and say yes to rasterize the layer I get the following message:
“Could not complete the Text Layer command because the type layer uses faux bold style”
Shows this message no matter what font I use, and have checked my settings…Any ideas?
Thanks for the comment.
As for the error message, go to Window -> Character to open the Character panel, and un-click the Faux Bold icon if it’s clicked. Check this image please.
Hope this helps.
Awsome once………
Thanks!
I don’t have Edit -> Preferences -> 3D, how is that possible? Am I doing something wrong? (My Photoshop is not English, but 3D is an universal symbolic..)
Are you using a version that supports 3D? (An extended version of PS CS4 or CS5).
I have an extended version, so it means my version doesn’t support 3D? ( I didn’t bought it my Photoshop )
The Extended version is the one that supports 3D. But are you using a trial (is this what you mean by not buying it)?
I used CS5 extended, but I couldn’t use 3D for some reason. So now I use CS5.1, which supports 3D. Will follow your 3D tuts very soon!
I don’t have an idea what went wrong, but it’s great that you found another version that works!
Good luck 🙂
nice tutorial .but will you please send me this tutorial video?
Hello maddii,
Thanks for the comment, but I don’t have this tutorial as a video tutorial. Sorry for that!
Cheers 🙂
homegirl! That looks 3ds max rendered, hope they pay you proper money for your skills! Keep it up.
<3
Thank you so much for your kind words, they mean a lot 🙂
Cheers 😀
thnks for the tuts.. I learned a lot from this site . 🙂 bless!
So glad to know that!
Thank you so much for the comment 🙂
Hey I really lyk ur design. salute u….
🙂
Thank you very much 🙂
who created you man?
are you a machine?
God u r a flawless master
oh am sorry you r a girl! God! thanks 4 blessing the world with this tut
Wow! Thank you so much! This really means a lot.
So glad you liked it and found it useful.
Thank you once again for the awesome comment 😀
First of all the art work is just great !
The second thing I looked for a long time for a bit more detailed explanation on how to use the Photoshop 3D, Until by A chance I came here ty very much.
Thank you so much. It’s great to know you found it useful.
You can take a look at the other 3D tutorials for more tips and tricks if you like as well.
Thanks a lot for the nice comment once again.
thanks..this is really helpful..
Glad you found it so.
Thanks for the comment.
I CREATED THE CUBE BUT CANT SEEM TO MERGE IT TO THE OTHER MESHES.
Do you get an error message? This might be caused by the lack of RAM.
Please explain what goes wrong when you try to merge the layers, and how many layers do you already have.
just 2, the merge 3d layer option is greyed out i was able to get my leters merged but once i try to merge the cube it wont let me.
i think the issue is the camera matching, somehow i cant get my letters and cube to coexist on one plane when i set it to the cube camera the letters disappear.
Try merging without changing the camera position, does it work? If so, you can reposition the cube planes after merging.
If that doesn’t work please feel free to add another reply.
Now that’s what is a complete tutorial…
Thank you very much.
How can I do this with cs6?
You’ll need to search for the settings in the new panels 🙂
You’ll find them in the 3D and Properties panels (both found under the Window menu).
Hope this helps a bit.
Thank you for this tutorial. I did all of your steps. But after rendering I had very bad quality of image, although I tried also with high quality of 10, and figures were not lila like your ones. I work with photoshop CS5 Extended like you. What could be wrong ?
How long did you wait for the scene to be rendered? Did you let it finish or did you stop it yourself?
As for the color, I did change it to light purple before rendering.
The sentence “You can also change any settings, materials, colors, positions, cameras, etc. So go ahead and finalize your scene for final rendering” was also added to clarify that you can change the settings even right before rendering, like changing the color of the text for example.
If possible, please share a screenshot of the problem you’re having. That might make figuring out the problem much easier.
Hope this helps. Please feel free to add a reply with any further details or questions.
Thank you for the comment.
I would have never come with an idea of having 3D text look like this. Outstanding.
Thank you very much for the kind words, appreciate it.
hi
my name is jamal.i live in iran. you are number one.i like your tutorials.
i am very happy that i find here.
thank you very much.
good luck.
That is very kind of you to say, really appreciate it!
Thanks a lot for the kind words and for the support.