
Old Decorated Metal Text Effect
This tutorial explains how to use Layer Layer Style to create a metal text effect, and then add a very nice decoration texture using only a couple of filters, without the need for brushes or texture images. After that, some adjustment layers will be added to give the final effect an aged look.
The Final Result

Tutorial Details
- Software Used : Photoshop
- Version : CS5 Extended
- Time : 0:45 – 1:15
Resources
- Titania font.
- Untitled texture 66 by untitled-stock.
Step 1
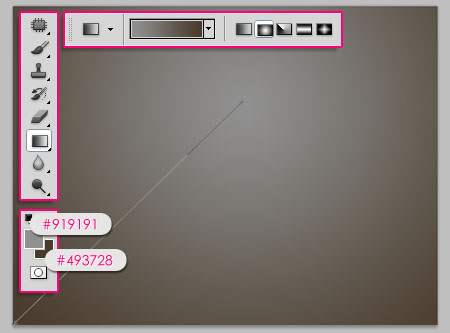
Create a new 1024 x 768 px document. Set the Foreground color to #919191, and the Background color to #493728, then, create a Radial Gradient from the top center of the document to one of the corners at the bottom.
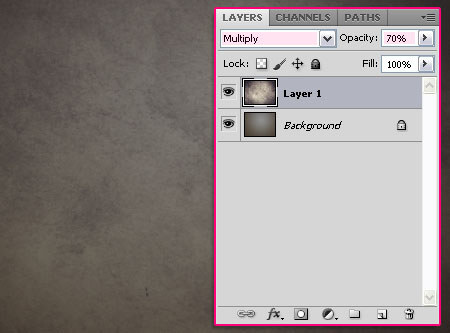
Place the Untitled texture 66 image on top of the Background layer, then change its Blend Mode to Multiply and its Opacity to 70%.
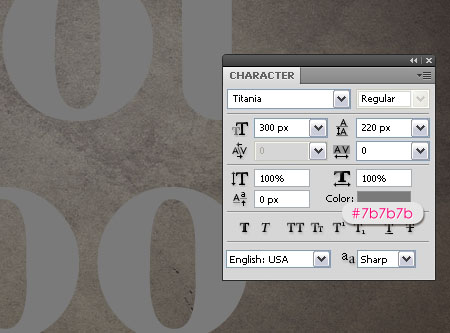
Create the text using the color #7b7b7b. The font used is Titania, and the Size is 300 px.
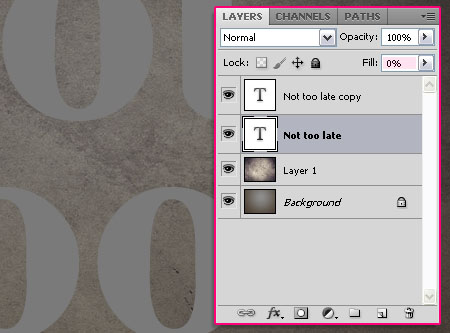
Duplicate the text layer, and change the original layer’s Fill value to 0.
Step 2
Double click the copy text layer to apply the following Layer Style:
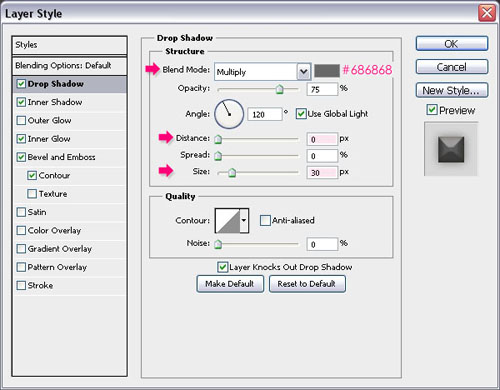
– Drop Shadow
- Color :
#686868 - Distance : 0
- Size : 30
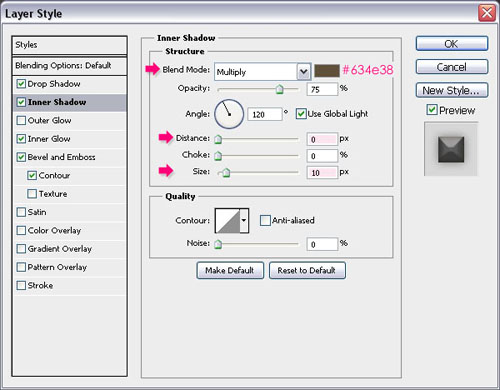
– Inner Shadow
- Color :
#634e38 - Distance : 0
- Size : 10
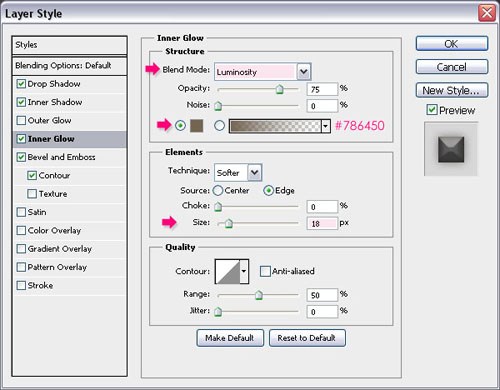
– Inner Glow
- Blend Mode : Luminosity
- Color :
#786450 - Size : 18
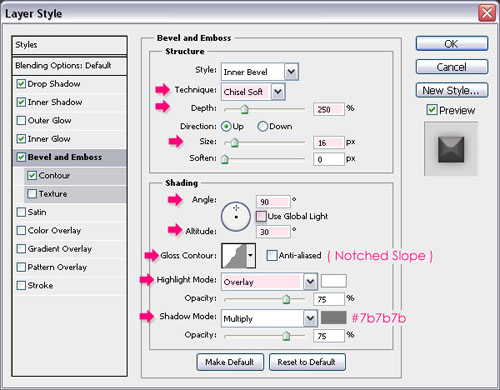
– Bevel and Emboss
- Technique : Chisel Soft
- Depth : 250
- Size : 16
- Uncheck the Use Global Light box
- Angle : 90
- Altitude : 30
- Gloss Contour : Notched Slope
- Highlight Mode : Overlay
- Shadow Mode – Color :
#7b7b7b
– Contour
- Contour : Half Round
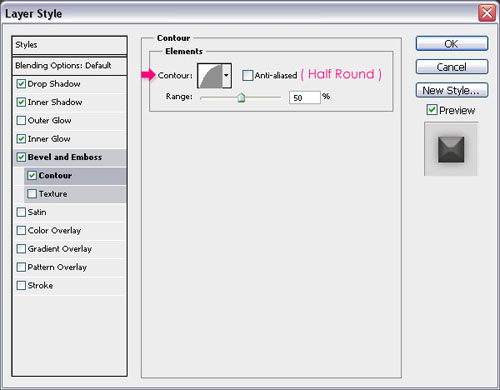
This should give the text a nice metallic look.

Now, double click the original text layer to apply a Drop Shadow effect:
– Drop Shadow
- Color :
#6d5b4a - Uncheck the Use Global Light box
- Angle : -170
- Distance : 10
- Size : 25
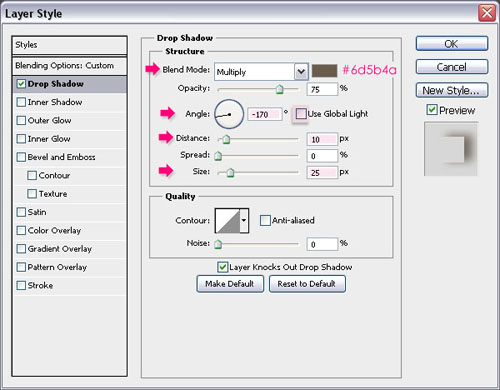
This should intensify the shadow around the text, giving it even more depth.

Step 3
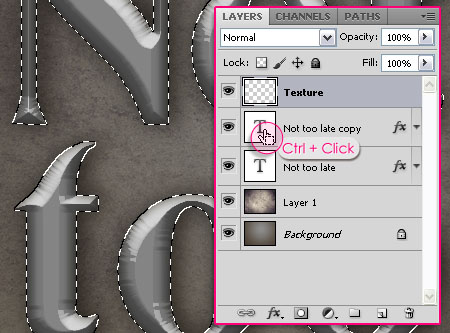
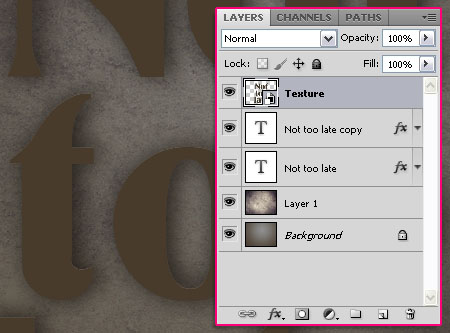
Create a new layer on top of all layers and call it Texture. Ctrl/Cmd + click a text layer’s thumbnail to create a selection.
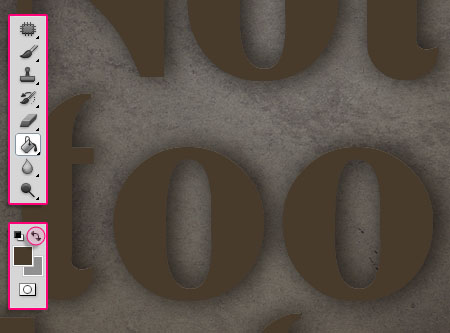
Switch between the Foreground and Background colors, then fill the selection with the new Foreground color. Press Ctrl/Cmd + D to get rid of the selection.
Right click the Texture layer, and choose Convert to Smart Object. Smart Objects preserve an image’s source content with all its original characteristics, enabling you to perform nondestructive editing to the layer. This simply means that we will be applying a couple of Filters to this layer, and we will still be able to edit the Filter’s values after applying them. This will come in handy later on.
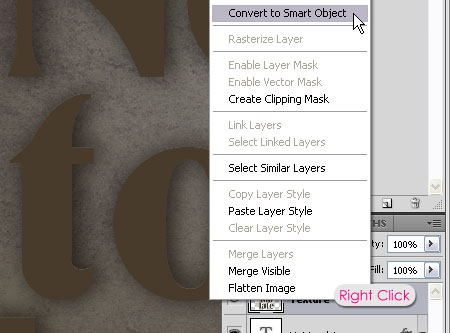
Notice the small icon that appears at the bottom right corner of the layer.
Step 4
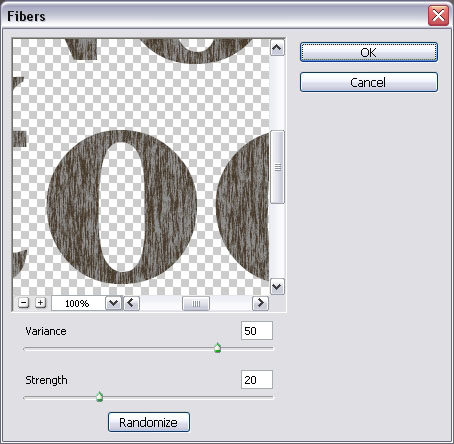
Change the values for each Filter as shown in the images below:
Start by going to Filter > Render > Fibers

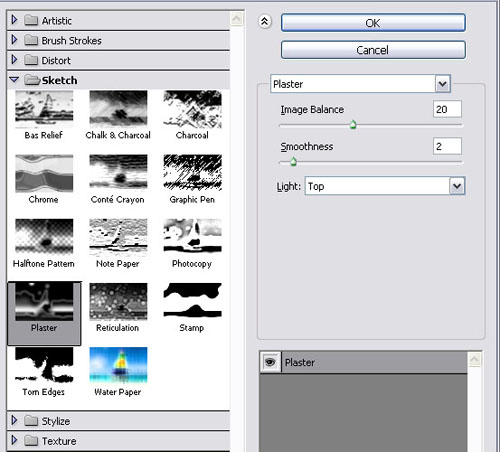
Filter > Sketch > Plaster

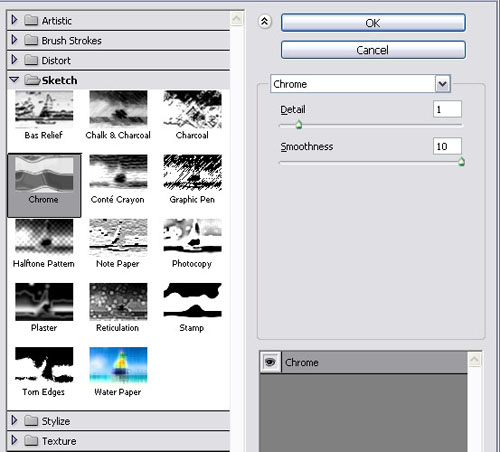
Filter > Sketch > Chrome

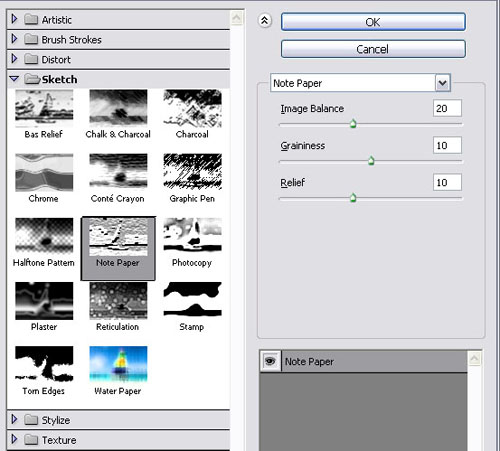
Filter > Sketch > Notepaper

* You can click the small arrow on the right of the Texture layer to expand the list of filters used, and then double click the name of any filter to change its values. You might need to change the values for both the Chrome and Notepaper filters if you are using a different font or size for your text, or if you would like to see how the different values affect the final result.
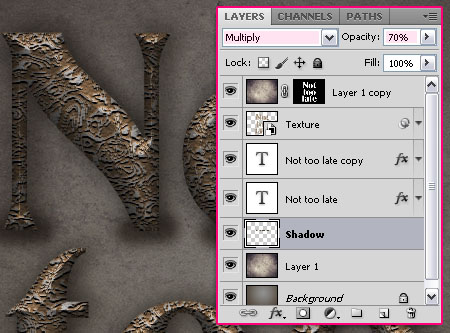
After applying the Filters, change the Texture layer’s Blend Mode to Multiply.
Step 5
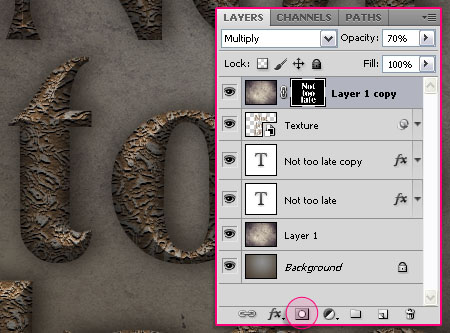
Duplicate Layer 1 and drag the copy to the top. Create a selection once again.

Click the Add layer mask icon in the Layers panel to create a mask using the selection.
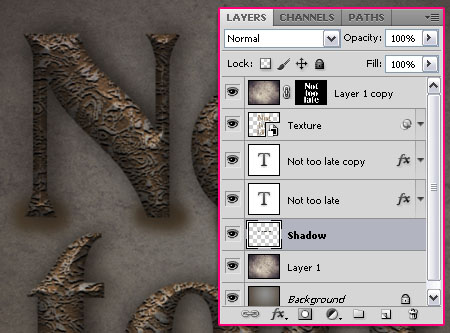
Create a new layer right below both text layers and call it Shadow. Use a 40 px soft round brush to create some shadow spots. The color is still the Foreground color (#493728).
Change the Shadow layer’s Blend Mode to Multiply and its Opacity to 70%.
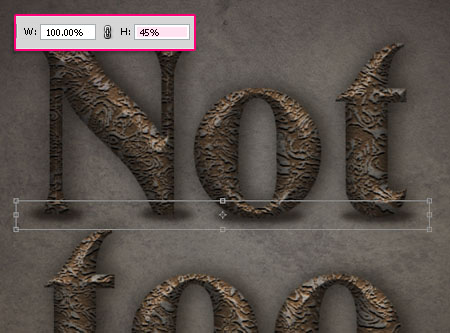
Press Ctrl/Cmd + T to free transform the spots, type in 45% in the Height box in the Options bar at the top, or any other value you like. Move the shadow if necessary, then hit Enter/Return to accept the changes.
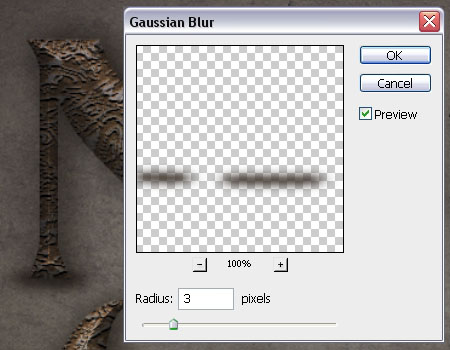
Go to Filter > Blur > Gaussian Blur and apply a simple blur to the shadow you created.
Note that you might need to do the previous steps on a separate layer for each horizontal line of text you have, then you can merge all layers in one layer.
You can as well go ahead and erase any unwanted parts.

Step 6
Click the Create new fill or adjustment layer icon down the Layers panel, then choose Color Balance.
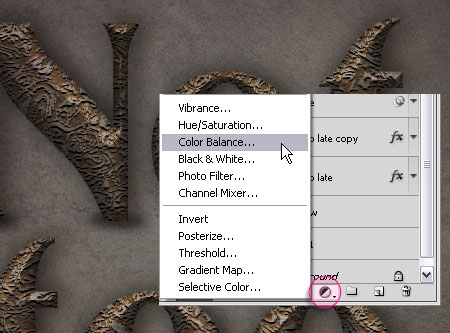
We are going to adjust the Highlights and Midtones values as shown below:
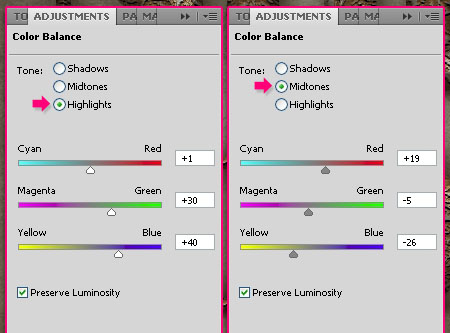
This will add a vintage feel to the effect.

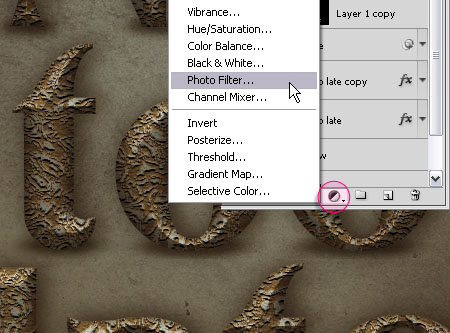
Once again, click the Create new fill or adjustment layer icon, but this time choose Photo Filter.
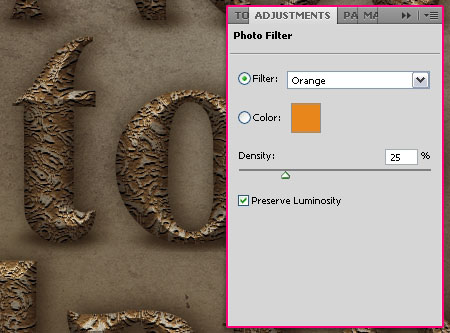
You can see how the different filters affect the image, but right here the filter used is the Orange Filter. It gives warmth to the final effect.
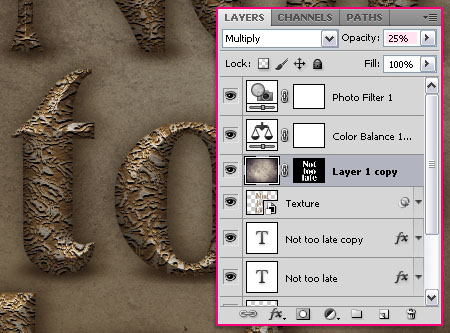
If the text seems too dark, you can go ahead and reduce the Layer 1 copy layer’s Opacity value. Here, it is reduced to 25%.
That’s it!
Did you enjoy this post? Please consider donating to help us cover our server costs.


I’m using CS4 and Step 5 does not create the effect shown – it simply creates a darker version of the previous effect. Is there a step missing, or is it because I’m using an earlier version?
I don’t think the version has anything to do with it. Do you mean that when you click the mask icon no mask is created? Because this step aims to darken the effect, so if the text looks darker it’s Ok, you can go ahead and lower the Opacity value if you like. But if this is not the problem, then please add more details so that I can know what the problem exactly is.
Cheers!
I like it!!! So good so nice!!!
But difficult After the “Filter -> Sketch -> Notepaper”
How to do that?
Do what exactly? 🙂
Not a single step worked. You missed something somewhere
Ooops! That’s awkward!
Please tell me what exactly did not work so that I can help.
Nice work!
Thanks…^^
Thanks for the comment 🙂
I finished step 4 but I could’t see like picture of step5.
I have last picture on step4. How can I make like step5 picture
You need to change the “Texture” layer’s Blend Mode to Multiply. Added that to the tutorial.
Sorry for the inconvenience 🙂
Thanks…^^
You’re welcome 🙂
think it is very useful for personal development like Web thanks
Glad you do.
Thanks for the comment.
Thank you for a fantastic tutorial. Is there any way of all of the saving the steps to use again.
You’re welcome!
I think you might mean something like saving the steps as an “action”? In this case, it’d be a bit hard to explain that right here, but this might help you.
If I misunderstood your point, please feel free to add a reply.
Thanks a lot for the comment 🙂
Superb effect, thanks, I’ve been looking exactly for this effect for an Iron Working web site.
That’s great to know!
Thank you for the comment 🙂
By using this we can learn photo shop very easily. thanks
It’s awesome that you find it useful 😀
Thank you so much for the comment 🙂
i just discovered your site; love the way you do your tutorials – they’re very clear and the screenshots are excellent. thank you for sharing your knowledge – you rock! 🙂
That’s so nice of you, glad you found the tutorials easy to follow.
Thank you so much for the kind words, I really appreciate them 🙂
thx a lot! it worked perfectly!
Great!
Thanks a lot for the comment.
Fantástico, no me ha quedado exacto pero creo que es falta de práctica.
Gracias por compartir
Practice makes perfect indeed 🙂
Muchas gracias for the comment.
The notepad filter image balance should be reduced to get the effect you have shown .. tired it got it.. thanx for the tutorial
It depends on the text you are using, and the font and fonts size. So just like mentioned at the end of Step 4, you might need to adjust the values a bit. And that’s where the Smart Object comes in handy.
Glad you were able to modify your design.
Thanks a lot for the comment.
I’m using the CS6 version and the filters doesn’t have the sketch option 🙁 but the end effect is still cite 🙂
You might not find it if you followed the exact path. The filter categories have been taken out from Photoshop CS6 Filter menu. But you can still find all the filters if you go to Filter -> Filter Gallery.
You can show the categories back in the Filter menu by going to Edit -> Preferences -> Plug-Ins, and checking the “Show all Filter Gallery groups and names” box.
Hope this helps.
Thank you for the comment 🙂
This website and its tips are very nice and helpfull to understand the tools and their fuctions…………
Awesome tuts…………
Very glad to know you found it so!
Really appreciate your kind words.
Thanks for the comment.