Scrabble Tiles Text Effect
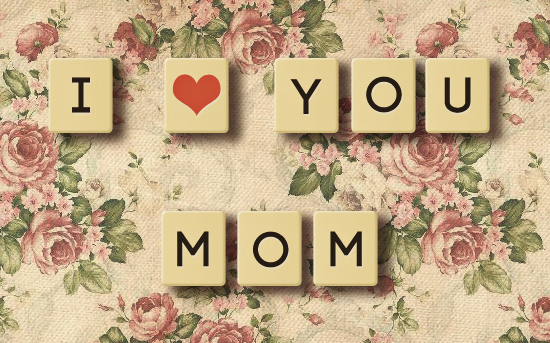
You’ve probably seen a couple of quotes written using the scrabble tiles somewhere on the Internet, like those on Tumblr and Pinterest. They’re really nice and different, but it’s not always easy to create them.
This tutorial will show you how to create your own scrabble tiles set from scratch, so that you can use them anytime with any background you like. It’s really simple and fun, so let’s get started.
The Final Result
Tutorial Details
- Software Used : Photoshop
- Version : CS5 Extended
- Time : 0:35 – 1:00
Resources
- Code Bold Code Free Font font.
- Floral Fabric Patterns by sofi01.
- texture D by Knald.
Step 1
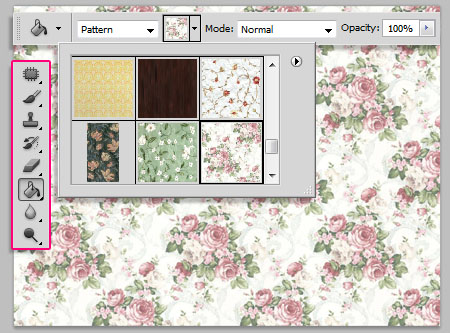
Create a new document with the dimensions you need (depending on the text you want to create), here, the dimentions are 1152 x 864 px. Then, Fill the Background with one of the patterns in the Floral Fabric Patterns set, the one used in the tutorial is called Textures-WhiteFlorals-01_inspyretash-stock.jpg.

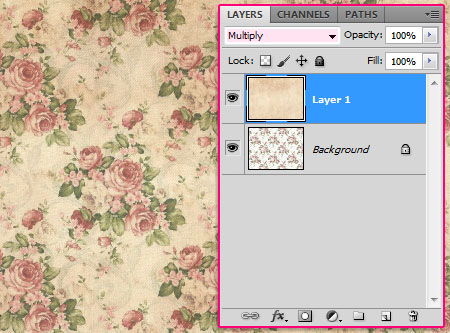
Place the texture D image on top of the Background layer, then change its layer’s Blend Mode to Multiply.

Step 2
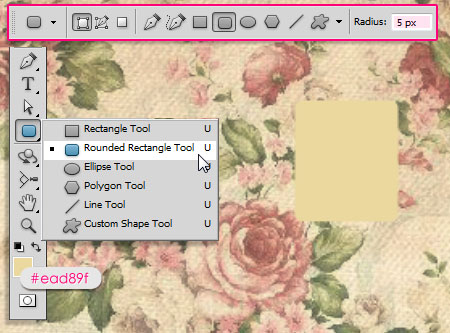
Set the Foreground color to #ead89f, pick the Rounded Rectangle Tool, and make sure that the Radius value in the Options bar is set to 5. Then, create the tile in whatever size you like. Here it is 65 x 75 px.

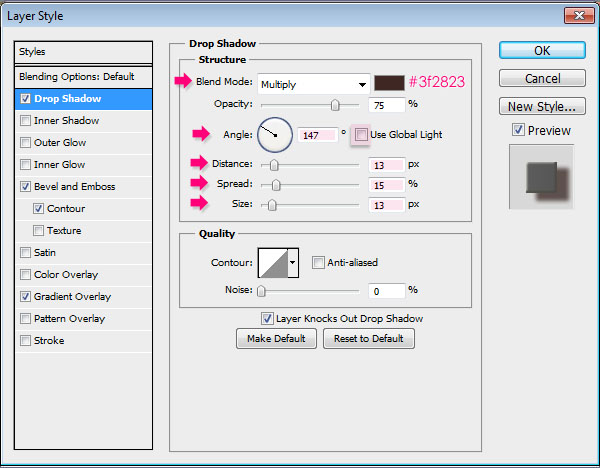
Double click the Shape Layer to apply the following Layer Style:
– Drop Shadow
- Color :
#3f2823 - Uncheck the Use Global Light box
- Angle : 147
- Distance : 13
- Spread : 15
- Size : 13

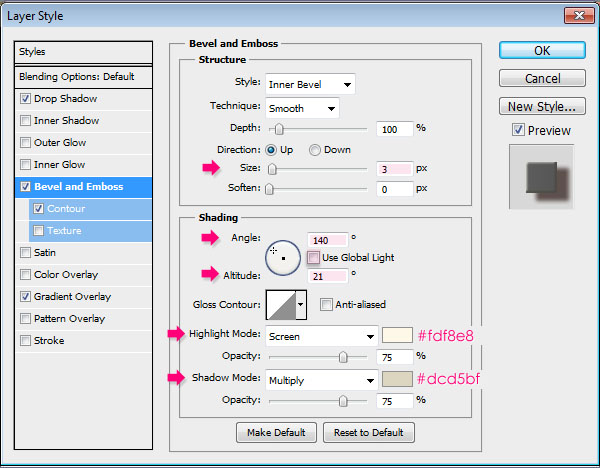
– Bevel and Emboss
- Size : 3
- Uncheck the Use Global Light box
- Angle : 140
- Altitude : 21
- Highlight Mode – Color :
#fdf8e8 - Shadow Mode – Color :
#dcd5bf

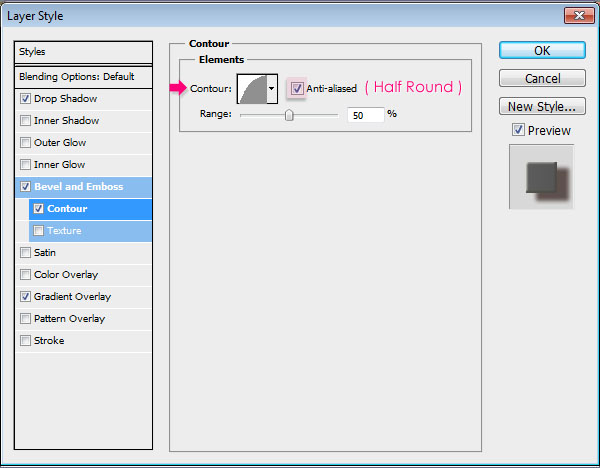
– Contour
- Contour : Half Round
- Check the Anti-aliased box.

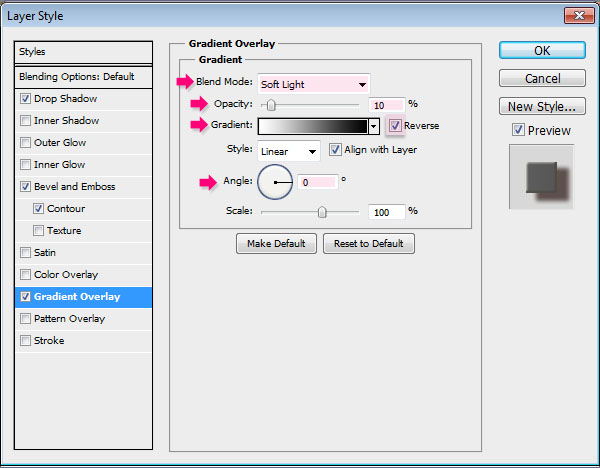
– Gradient Overlay
- Blend Mode : Soft Light
- Opacity : 10%
- Angle : 0
- Check the Reverse box
Use the default Black to White Gradient.

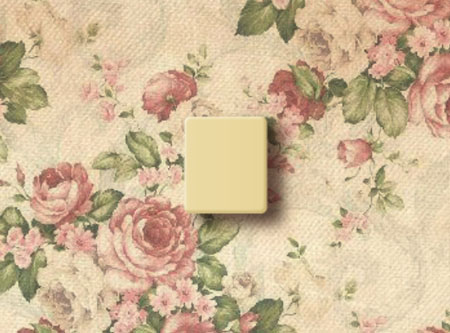
This is how the tile should look like.

Step 3
Now, add the letter you want inside the tile. Use the color Black and any font you like. The font used here is Code Bold Code Free Font, and the Size is 50 pt.
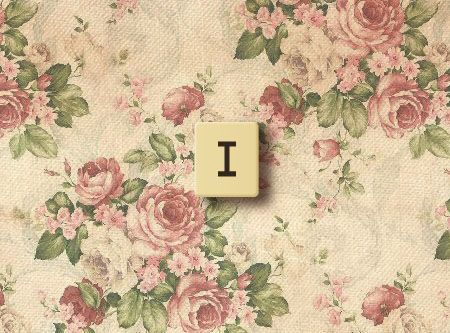

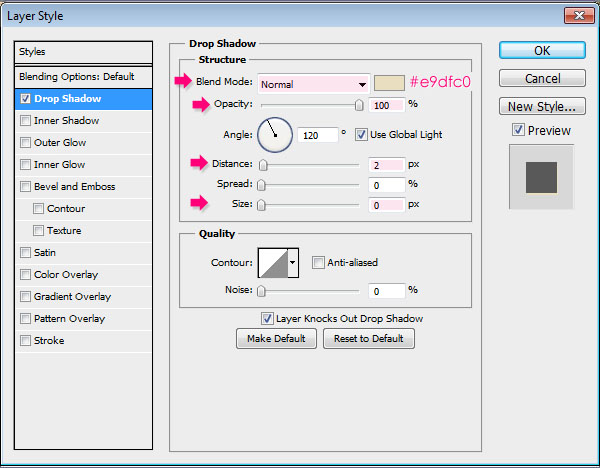
Double click the text layer to apply a simple Drop Shadow effect:
– Drop Shadow
- Blend Mode : Normal
- Color :
#e9dfc0 - Opacity : 100%
- Distance : 2
- Size : 0

This will make the text look like it’s engraved in the tile, which will make it look more realistic. Once you’re done, group the tile and the letter, and rename the group to whichever letter it contains.
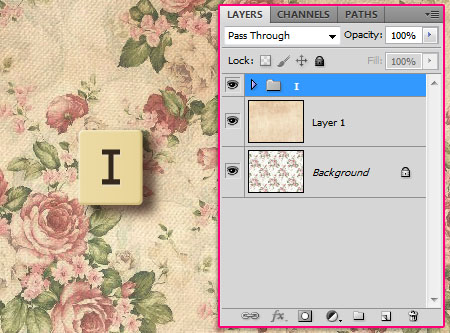

Duplicate the group and type in a new letter, then rename the group to the new letter. After that, select the group and press the Move Tool (V) then move the tile around and place it in the document as needed.
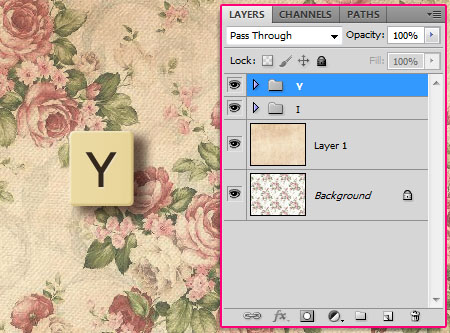

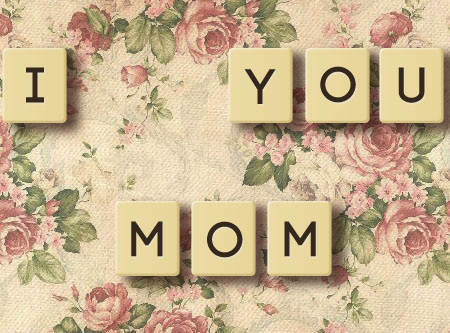
Continue duplicating and placing the tiles until you write the whole word. You can also create a full set of tiles (with all the alphabet letters and numbers as well) and save them in a separate PSD file so that you can use them anytime you want.

Step 4
Duplicate the tile group one more time, and delete the text layer. Pick the Custom Shape Tool and set the Foreground color to #d5593d.
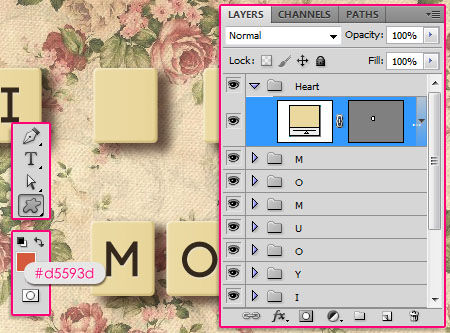

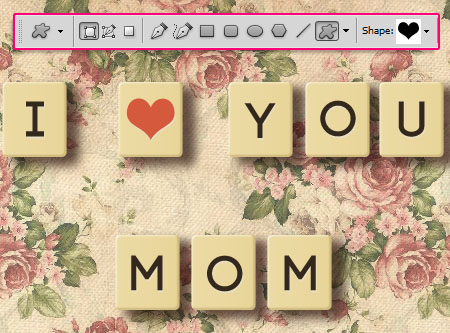
Choose the Heart shape, and draw the heart on top of the empty tile, inside the same group. Then apply the same text Layer Style to the shape layer (Right click any text layer, choose Copy Layer Style, then right click the shape layer, and choose Paste Layer Style).

Step 5
Click the Create new fill or adjustment layer icon down the Layers panel and choose Gradient Map.
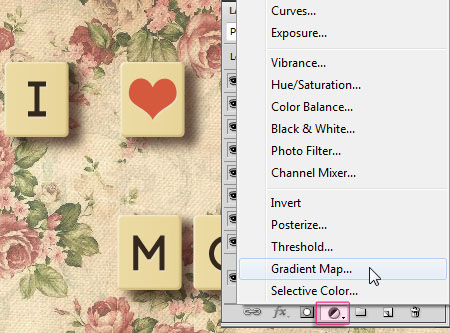

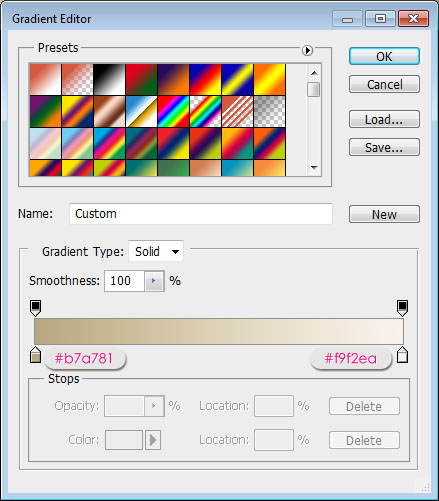
Change the Adjustment Layer’s Blend Mode to Multiply, and its Opacity to 40%. Then click the Gradient box to open the Gradient Editor.
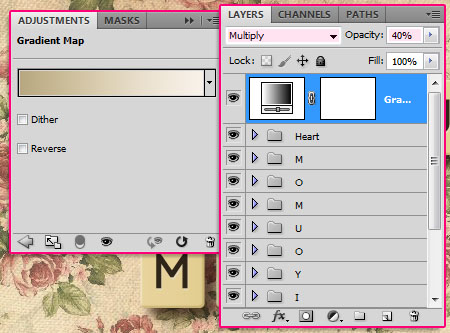

Create the Gradient using the colors #b7a781 and #f9f2ea.

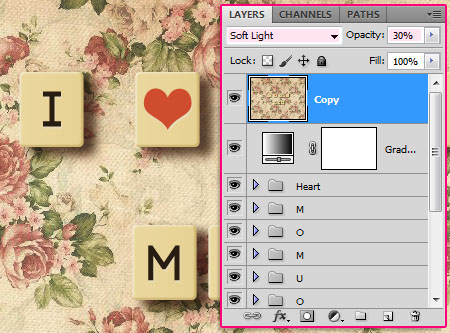
Select all the layers you have, including the Background layer, and duplicate them. Then go to Layer -> Merge Layers to merge the duplicated (copy) layers. Change the merged layer’s Blend Mode to Soft Light, and its Opacity to 30%.

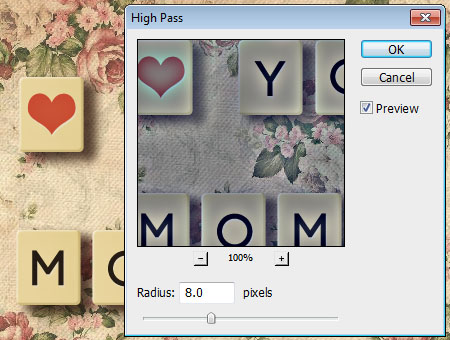
Go to Filter -> Other -> High Pass and set the Radius to 8.0, then click OK. This will intensify the edges a little bit to make them look more defined.

And that’s it! Now you have your own “Photoshop Scrabble Tiles” that you can use easily to create any text you want in a couple of minutes. Hope you liked it.
Did you enjoy this post? Please consider donating to help us cover our server costs.


Aww, what a sweet tut. Just in time for mother’s day! Thanks for sharing. 🙂
Glad you liked it.
Thank you for your kind words 🙂
Hi,
I am unable to create this type of text effect , as i am new to it , can you please provide some information like how to ” Then, Fill the Background with one of the patterns in the Floral Fabric Patterns set, the one used in the tutorial is called Textures-WhiteFlorals-01_inspyretash-stock.jpg.
Scrabble Tiles Text Effect step 1
Place the texture D image on top of the Background layer, then change its layer’s Blend Mode to Multiply. ” Thanks for the help !
Fantasctic. I love this tut.
Thank you so much.
You’re welcome.
Thanks a lot for the comment.
Great idea and the effect looks very realistic!
Thanks a bunch for the comment.
Awesome design in photoshop. Nice looking and Helpful, user friendly tutorial. Thanks for it.
Glad you like it.
Thanks a lot for the comment.
This tut so great 🙂 Thanks for your sharing 😀
You’re very welcome 🙂
Thank you for the comment.
totally awesome my friend. looks so real!
Thanks a bunch for the nice comment 🙂
Outstanding effect, and the way you structured the tute with all the helpful PS windows was a thing of beauty. Great work, many thanks! : )
Wow! Thank you so much for the kind words.
Glad you liked the tutorial and the effect.
Regards.
WOW! I think my Mom will love it =D
Thank for your tut
Hope she will 😉
Thanks for the comment.
how can i center the font inside the tile? thanks
You can either do it manually by moving the letters around, or you can select the “Vector mask thumbnail” (to the right of the shape layer), enter the text inside the tile, then use the Paragraph panel (Window -> Paragraph) to align it.
Hope this helps.
Thank you so much..it’s wonderful
Happy you liked it.
Thanks a lot for the comment.
My version I made for a friend.
http://s19.postimage.org/9j9ty96eb/jellybean.jpg
That’s so sweet 😀
Thanks for the comment and the link.
This is an user friendly tutorial and the product is sweet. 🙂
Thank you so much, appreciate it 🙂
Oh. I love this tut. It’s Sweet and beautiful. I will make for Women’s day or Valentine’s day. Thank you so much!
That’s great! Glad you will 🙂
Thanks a lot for the comment.
Wow! this tutorial seems awesome! Will definately try it as soon as possible!
That’s great to know!
Thanks a lot for the comment 🙂
Thanks it was simple and lovely
Glad you enjoyed it.
Thanks for the comment.
fantastic effect.. tutorial was easy to follow even for a non-professional like me and i was able to reproduced the results very quickly.
You put in a lot of effort in making these tutorials. Thanks a ton man.
That’s great to know! glad you were able to get the same effect easily.
Thanks a lot for the comment.
(I’m a girl though ^_^)
Oh! I am sorry.. i should have guessed. 🙂
I really liked your website btw.. came back for more today. i try something a bit more complicated today. 😀
No problem 🙂
So glad you did, and hopefully you’ll enjoy the other tutorials as well 😀
Thank you so much for your kind words.
Hi, I have done exactly what you taught, however, my rounded rectangle looks very sharp and the shadow is very small, unless I use Distance at step 2 to 130% :(. Help please? No matter what I have changed, the Review is not looked as same as ur
Do you mean the Drop Shadow “Distance” value? The problem might be caused by a very large rectangle size, or a very high resolution document (should be 72 not 300).
If the problem is none of the above please feel free to add a reply.
WOW……….. THANKS
You’re welcome 😀
Thanks for the comment.
I like the photoshop – scrabble-tiles-text- effect
Glad you do 🙂
Thanks for the comment.
Love the tutorial thanks… How Do you get that nice round shape on the tiles?
Do you mean the heart shape? It is one of the custom shapes that come with Photoshop. You can get it by selecting the Custom Shape Tool (one of the Shape Tools), then pick it from the “Shape:” drop down menu in the Options bar at the top.
If you mean the tiles’ rounded corners, those are controlled by the Radius value shown in Step 2. Higher values create more rounded corners.
Hope this helps 🙂 Please feel free to add any other queries you have.
Thanks a lot for the comment.
i’m a newbie in photoshop.
pls help. i have downloaded the texture (jpg format) but i couldn’t load it. it asked in psd format.
i’m using cs3. it that really matter?
thank you
The version doesn’t matter, you just need to load the .pat file, and not the images. You can check the Working with Palettes page to see how (just choose Patterns instead of Swatches).
Hope this helps.
Please feel free to leave any other queries you have.
What an excellent teacher you are! Thanks for being so generous with your artistry.
Thank you very much for your kind words, they truly mean a lot. You just made my day 🙂
Regards.
Almost with every tutorial I ever followed, I got stuck half way because the tutor skipped a crucial step or didn’t add proper screenshots.
Even a simple tutorial sometimes takes quite some time to follow.
With your tutorial here, It was really easy to follow step by step. The screenshot were very helpfull as well.
Thanks a lot for your hard work!
That really, truly, means a lot.
Very glad you found it helpful and clear.
Thank you very much for the kind comment and for the support, appreciate it.
Regards.
Thank you very much! I have tried it and went well thanks to you! I appreciate your helps ^^
That’s awesome!
Thanks a lot for the comment.
Hi, I’ve made this and such a great effect! 🙂
But I just have one question if you don’t mind.
How do I save full set of these tiles in a separate PSD file like you’re saying? And be able to use them separately?
Thanks a mil! 🙂
You’ll need to create a tile for each letter, put it in a group, then save the PSD file that has all the tiles. Then, you can just duplicate and rearrange the tiles to create whatever text you like.
Hope this clarified the idea. You can also buy the complete set for $3 here.
Please feel free to add any other queries you have.
Thanks a lot for the comment 🙂
Wow absolutely perfectly said tut, and with a change of backgrounds, could be used for Fathers day or even any other celebration
Thank you for sharing this, please keep making great tuts like this. God Bless!! <3
It sure can! There is no limit to what you can do with a neat set of tiles 😉
Many thanks for the very kind words, I really appreciate all the support 🙂
Very very nice, thanks!!
My version here 🙂
http://car51.altervista.org/_altervista_ht/nuova/bdomenica.jpg
Lovely outcome! Very glad you liked the effect.
Thanks a lot for the comment and for the link 🙂
this was fun doing , thanks for the tutorial. My outcome????
Nicely done indeed!
Glad you had fun working on it 🙂
Many thanks for the comment and for sharing your work.
This is what I came up with. Thank you!
Very lovely! Nice background and final result 🙂
Thanks a lot for sharing your work.
Its very simple effect
Good job!
Thanks a lot for sharing your work 🙂
thanks Rose. very nice tutorial.
Nice take on the effect 🙂
Really glad you enjoyed it.
Thank you very much for the comment.