
Type Tool in Photoshop CS6+ – Character and Paragraph Panels
Some basic Type Tool options were discussed previously in the Options Bar part of this Type Tool series. But there are even more formatting options available in Photoshop CS6.
The Character and Paragraph panels have a bunch of advanced text options to help you format and modify the text to your needs. Getting to know how those options work is super easy, but it makes such a difference in the way you handle text inside Photoshop, and makes the whole process more effective and professional.
This part of the series will explain the options/settings available in those panels, with examples to help you better understand and use them.
Opening the Panels and Changing the Values
– To get the Character and Paragraph panels, you can click the Toggle the Character and Paragraph panels icons in the Type Tool Options bar, check their names under the Window menu (Window -> Character / Window -> Paragraph), or find them under Type -> Panels.
Those panels are usually grouped together, but you can easily choose each one by clicking its name’s tab.
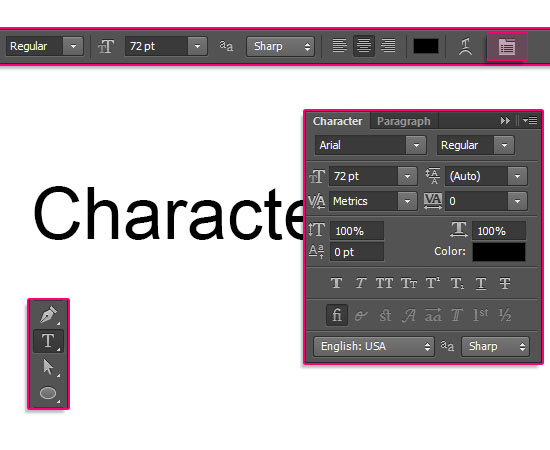
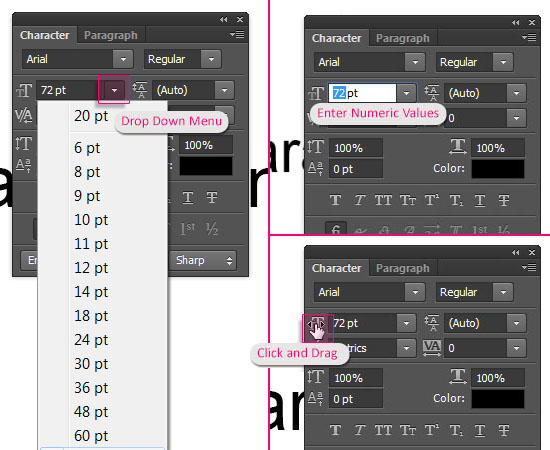
– To change the values, you can either choose a value from the drop down menus, click inside the fields and type in numerical values, or click and drag the option’s icon using the “scrubby slider”.
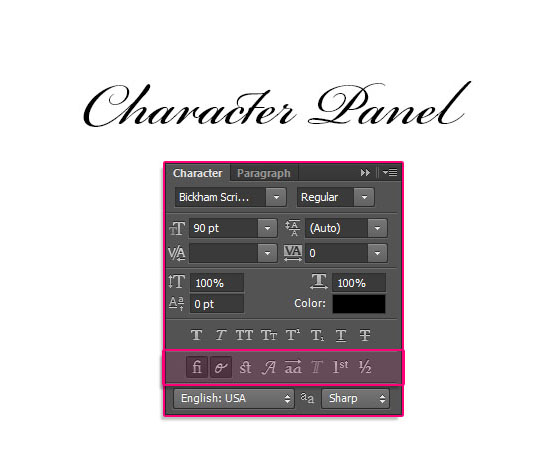
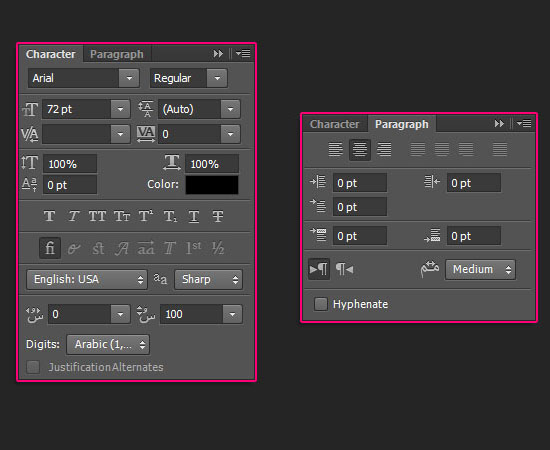
Character Panel Options
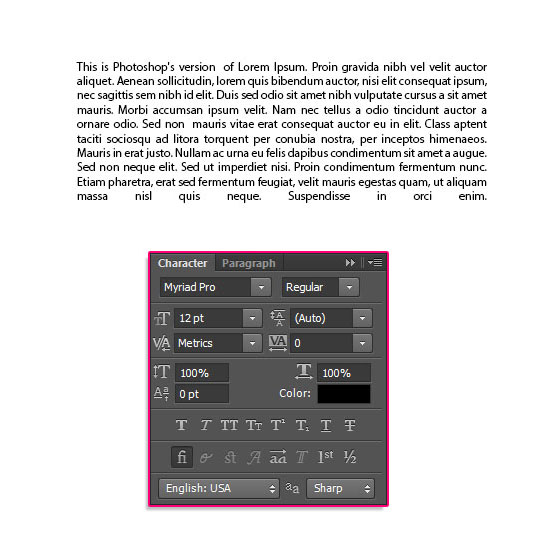
The Basic Options
– As you can tell, the Character panel already has the Options bar settings:
1- Set the font family.
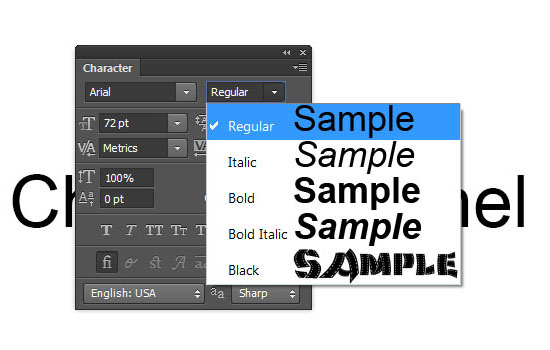
2- Set the font style.
3- Set the font size.
4- Set the anti-aliasing method.
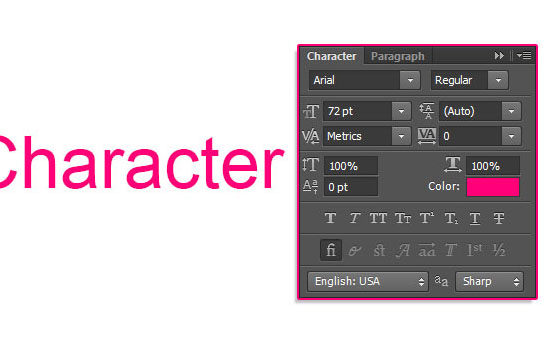
5- Set the text color.
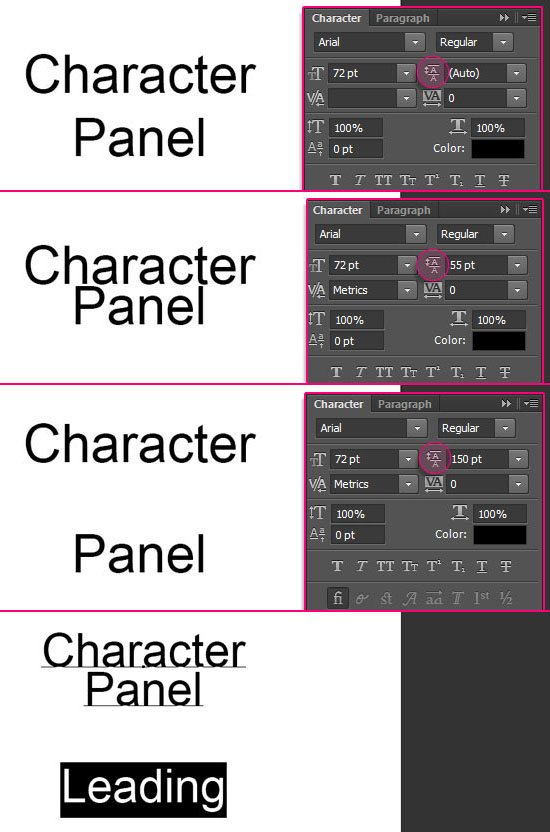
Leading
– The Leading option controls the distance (space) between lines of text. Its default value is Auto, and it usually gives good results.
But depending on the font used and the distance you want, you can change that value to decrease or increase that space.
You can apply the same value to the whole text, or you can select lines of text and assign different Leading values for each one of them. Each line’s value determines its distance from the line above it.
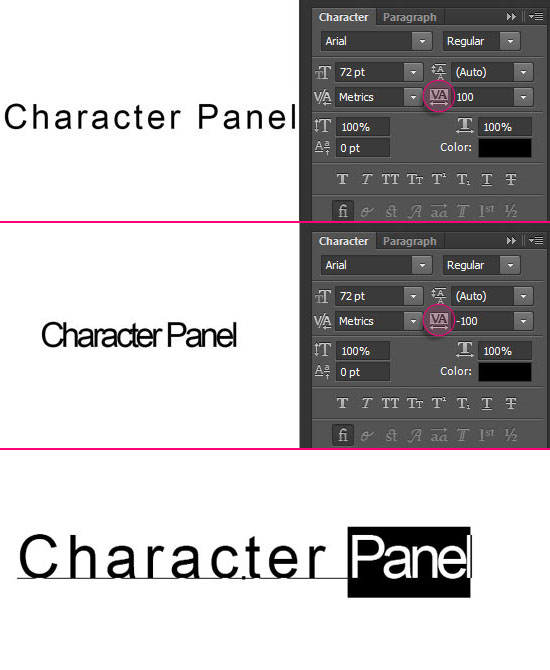
Tracking
– The Tracking option controls the distance (space) between a range of characters. Its default value is 0.
Again, this can be applied to the text as a whole, or to a range of selected characters.
Kerning
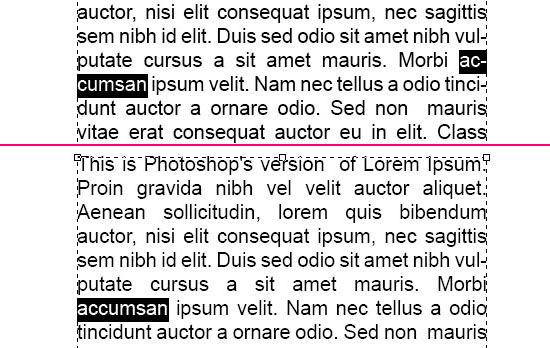
– The Kerning option controls the distance (space) between two specific characters. Its default value is Metrics.
The Metrics value uses the letter spacing information included with the font by the font’s designer, so the result you get depends on the font’s quality.
The Optical value, however, adjusts the spacing based on the shapes of the characters.
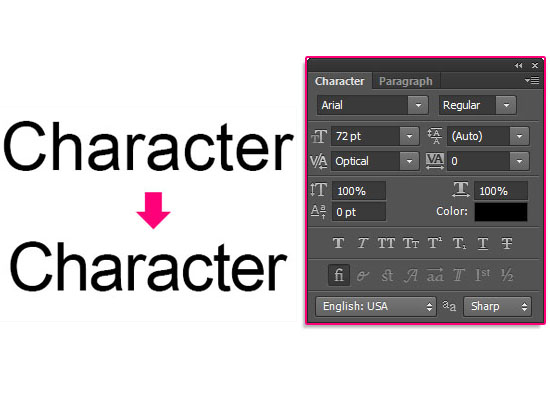
– You can apply the Metrics and Optical options for the whole text, but the numerical values can be assigned for the space between two letters only.
To do so, place the cursor between the two letters you think need adjusting, then change the Kerning value.
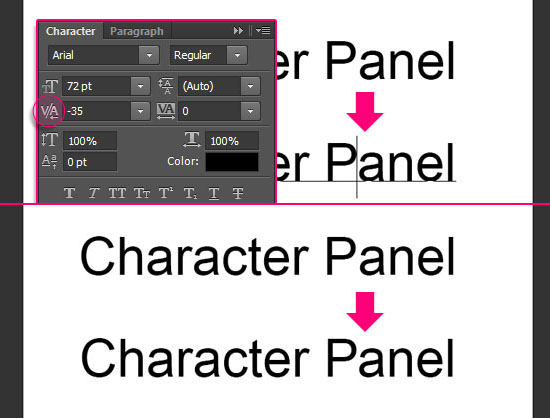
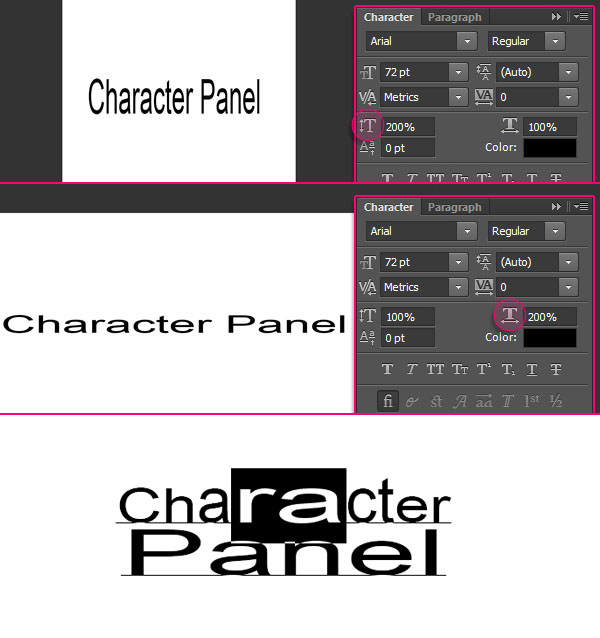
Vertical And Horizontal Scale
– Vertical Scale (to the left) and Horizontal Scale (to the right) are simply used to scale type vertically or horizontally. These options can be applied to the whole text or to any selected parts as well.
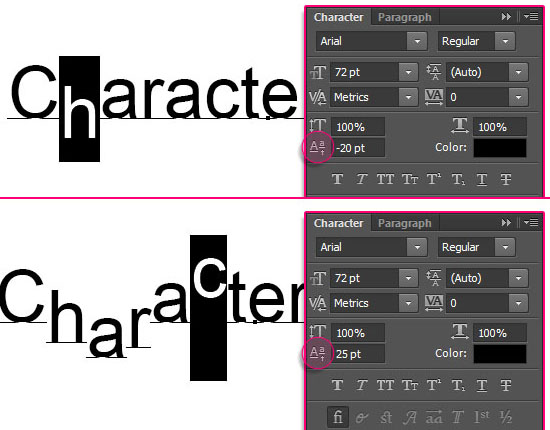
Baseline Shift
– This option allows us to move selected character(s) or word(s) above or below the font’s baseline. Its default value is 0.
Positive values shift the selected text above the baseline, and negative values shift it below the baseline.
This option has no preset values to choose from, so values need to be assigned manually.
Additional Type Options
The next line is a row of additional options’ icons.
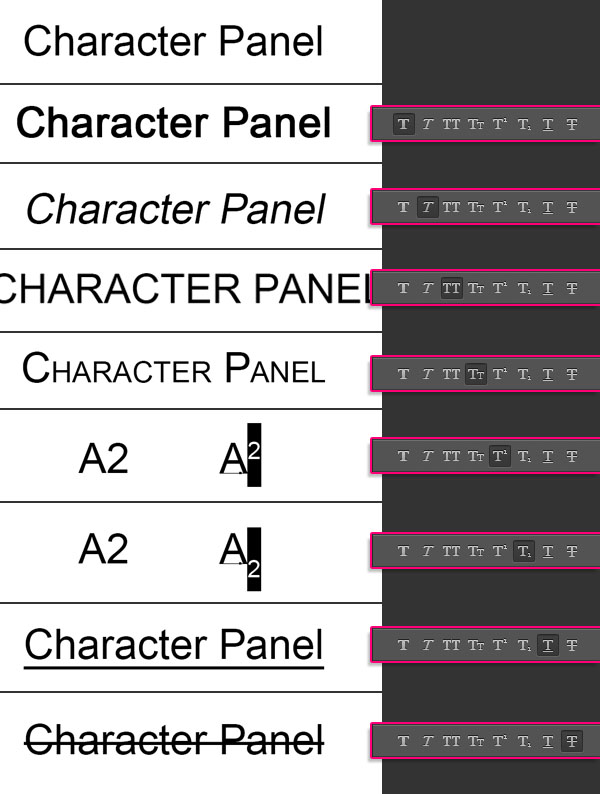
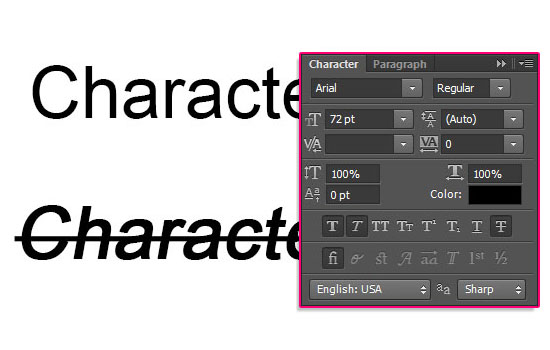
– Faux Bold and Faux Italic: Create fake bold or italic styles when the font doesn’t include them (in the “Set the font style” option).
– All Caps and Small Caps: Convert lowercase letters into either full size or smaller size uppercase letters.
In the Small Caps case, Photoshop automatically uses the small cap characters included with the font if available. If not, Photoshop generates faux small caps.
– Superscript and Subscript: Convert selected text to reduced? size text that is raised or lowered in relation to a font’s baseline.
– Underline and Strikethrough.
– You can use those options individually, or you can use a couple of them together as well.
– OpenType fonts can include more glyphs (characters) than the TrueType or Type 1 fonts. So they may also include a number of special features, including (from left) Standard Ligatures, Contextual Alternates, Discretionary Ligatures, Swashes, Stylistic Alternates, Titling Alternates, Ordinals, and Fractions.
– By clicking those icons, the characters will be substituted accordingly. Not all OpenType fonts include all options.
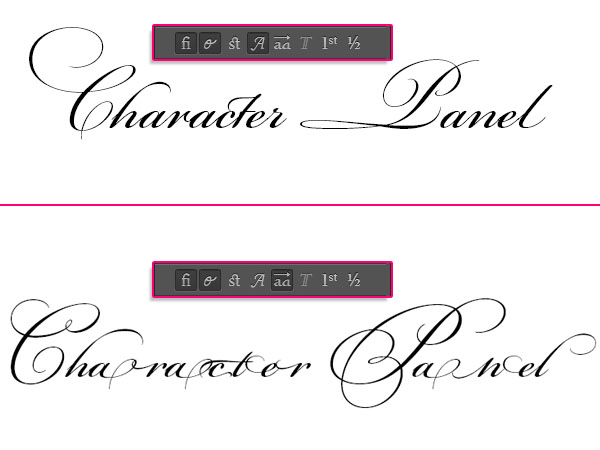
Contextual Alternates: Substitutes certain letterforms for others that join together more fluidly.
Discretionary Ligatures: Replacements for letter pairs like ct, st, and ft. They tend to have a bit more flourish than their standard ligature counterparts.
– Swash: Substitutes a standard character for one with an exaggerated stroke.
– Stylistic Alternates: Characters that have extra bits of decoration.
– Titling Alternates: Displays a special set of all-caps characters designed to be used at large sizes.
– Ordinals: Decreases the size of letters appearing next to numbers and increases their baseline shift.
– Fractions: Converts a number-slash-number combination into a real fraction.
Paragraph Panel Options
The Alignment and Justification Options
– The row at the top of the Paragraph panel has the aligning and justifying text icons.
The first three to the left are the Alignment options, which are the ones found in the Options bar: Left Align Text, Center Text, and Right Align Text.
The other four to the right are the Justification options: Justify Last Left, Justify Last Centered, Justify Last Right, and Justify All.
The Justification options let Photoshop re-adjust the spacing between the words making every line of the paragraph’s text fill the entire width of the text box from left to right.
The only difference between the four justification options is in handling the last line in the paragraph.
The left column illustrates the Alignment options, and the right column illustrates the first three Justification options.
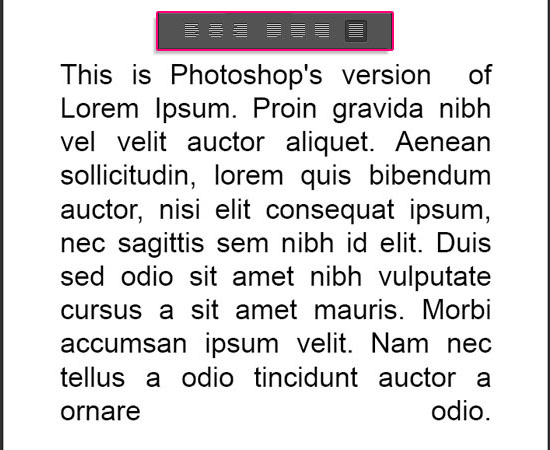
The Justify All option.
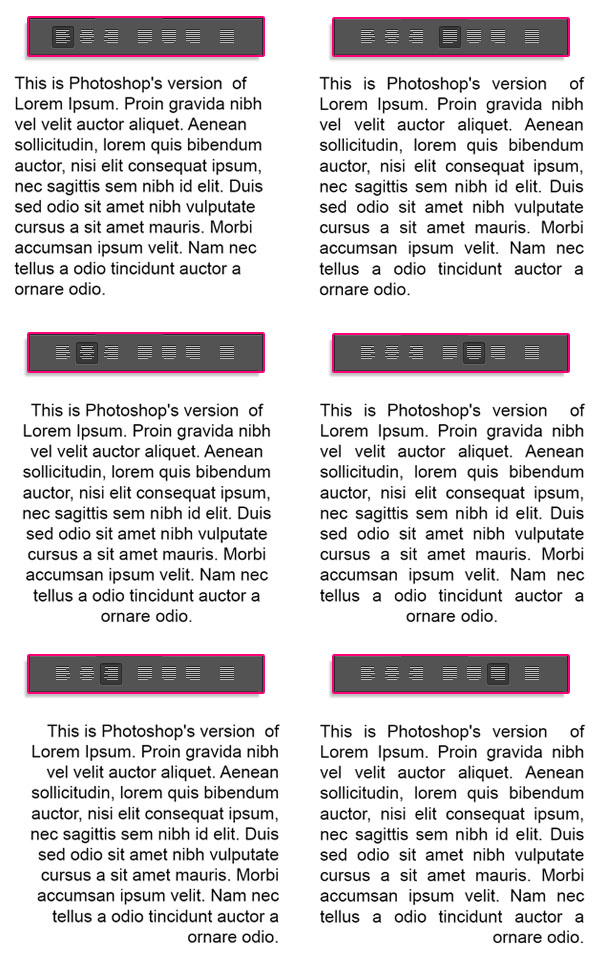
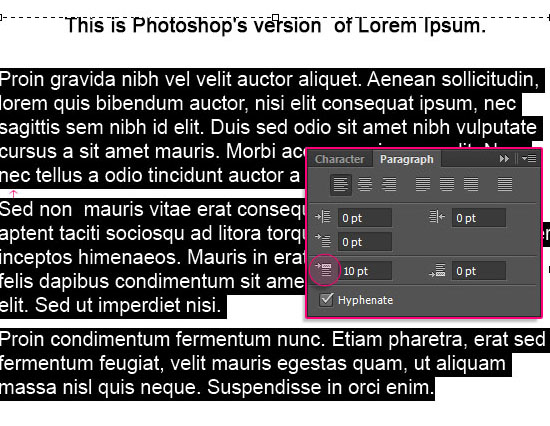
The Indent Options
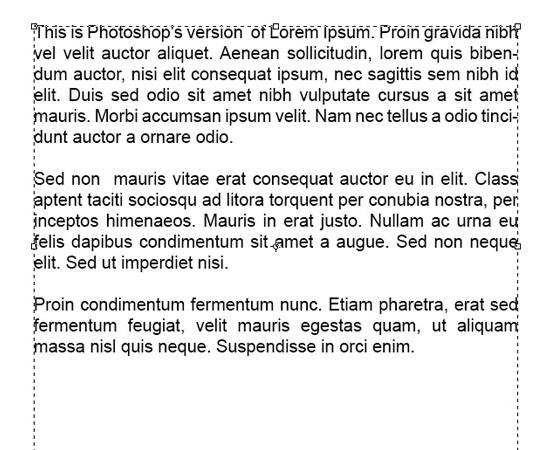
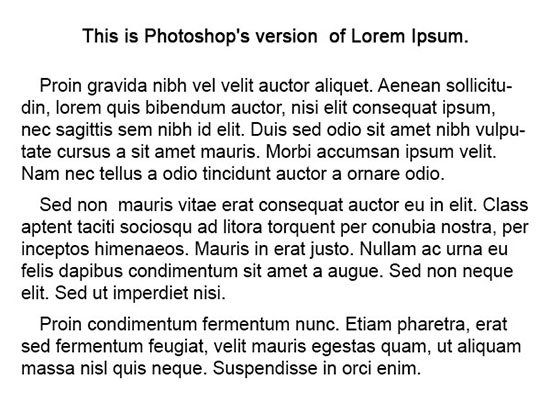
– The The Indent Options help refine the text appearance when there are more than one paragraph. The text below consists of 3 paragraphs, separated by hitting the Enter/Return key after each one of them. Later, however, you’ll get to know how to separate them without the need to do that.
The text is added using the Paste Lorem Ipsum option that will be discussed in the next part of the series.
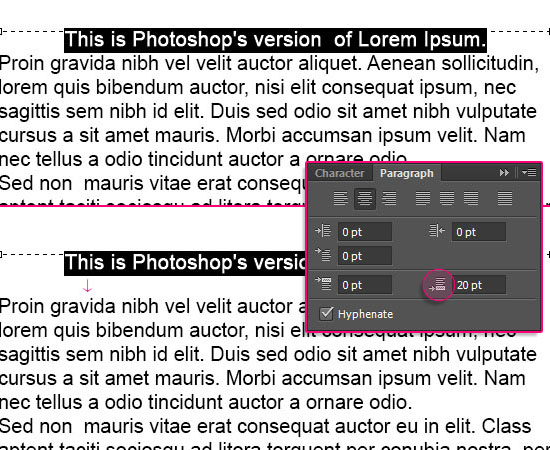
– The first row of the Indent Options has two icons: Indent Left Margin and Indent Right Margin. Those options add space between the whole paragraph and the left or right sides of the text box.
They can be applied to all the paragraphs of the text, or you can apply them to selected paragraphs.
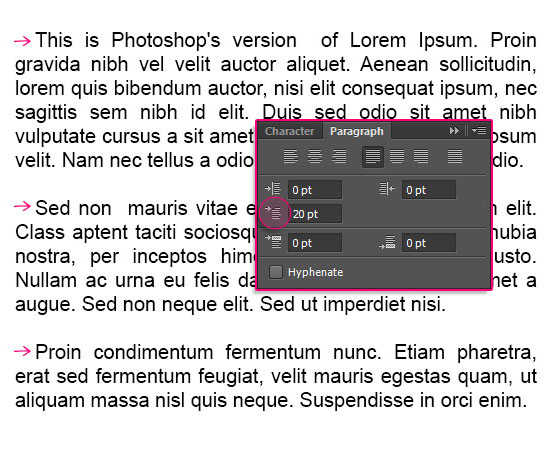
– The icon below them is for the Indent First Line option, which basically adds space just to the first line of the paragraph (or the selected paragraph(s)).
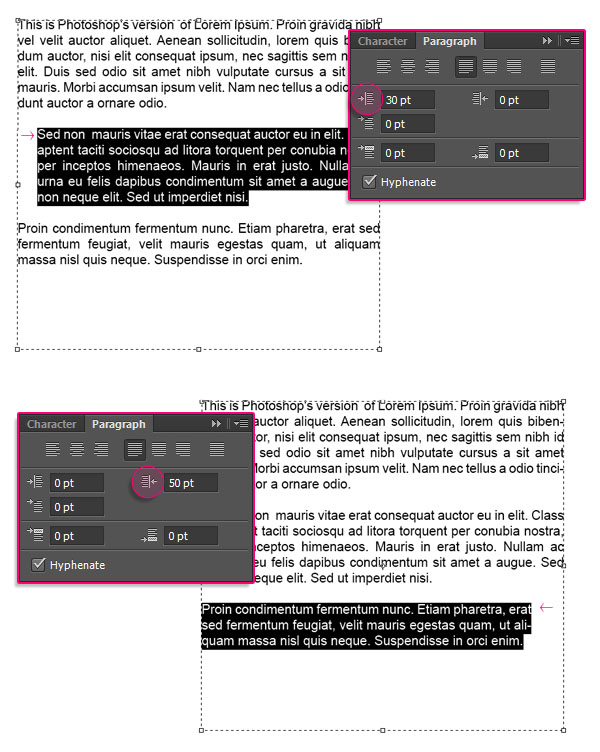
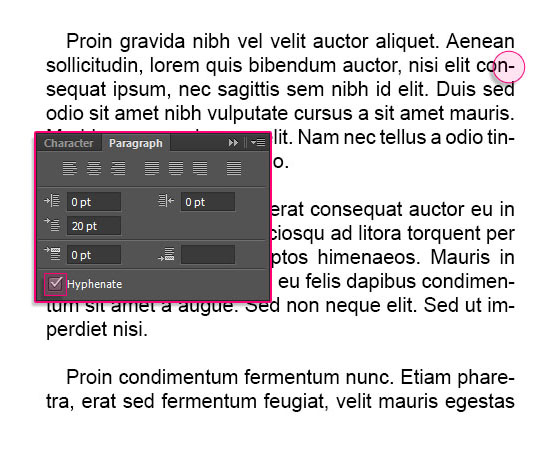
The Paragraph Spacing Options
– These are the Add Space Before Paragraph (to the left) and Add Space After Paragraph (to the right) options. By using these options, you will not need to keep hitting the Enter/Return keys to add space between the paragraphs.
So let’s make the first line a title for the paragraph, and remove all the spaces created between the paragraphs.
The Add Space After Paragraph option is used to add space between the title and the text below it.
– Then, the Add Space After Paragraph option is used to add space between the other paragraphs.
Typically, only one of those options is used, not both at the same time. And the one usually used is the Add Space Before Paragraph option.
Hyphenate
– Hyphenation lets Photoshop break longer words up onto separate lines.
It makes it spacing out the words easier when using the justification options, but you can disable it by un-checking its box.
Text Engine and Language Options
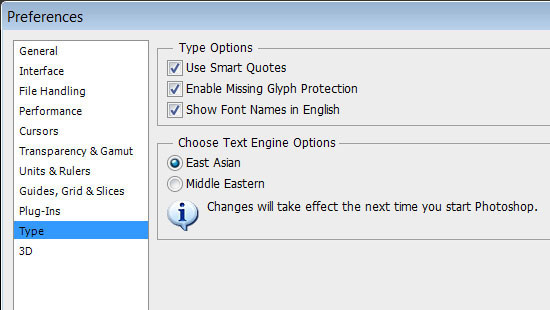
– Photoshop CS6 supports Asian as well as Middle Eastern and North African characters.
You can choose the Text Engine that supports those characters by going to Edit -> Preferences -> Type -> Choose Text engine Options.
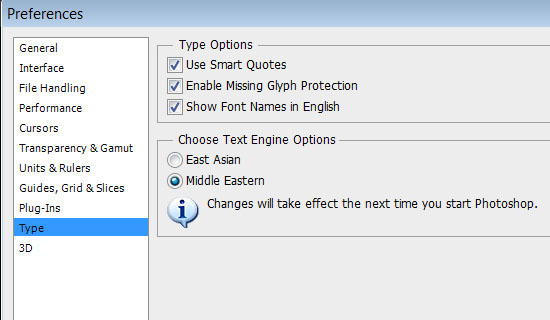
– Then, you can go to Type -> Language Options -> Middle Eastern Features.
This will add the Middle Eastern related settings to both the Character and Paragraph panels.
Character and Paragraph Panels’ Menu Options
There are a couple more options hidden in the Character and Paragraph Panels’ Menus. You can access those through the pop-up menu icon at the top right corner of each panel.
Character Panel’s Menu Options
– There are some options that are already available in the Character panel, like the second, third, and Middle Eastern Features options.
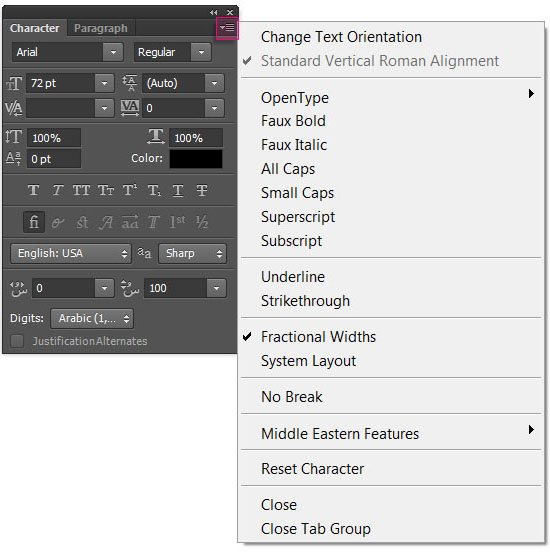
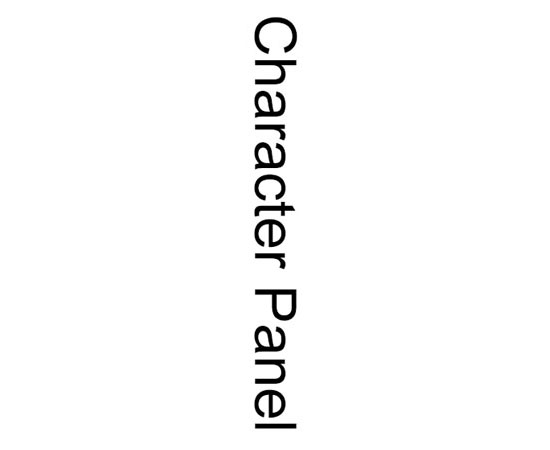
– Change Text Orientation: Switch between horizontally and vertically aligned text. Each click will switch once.
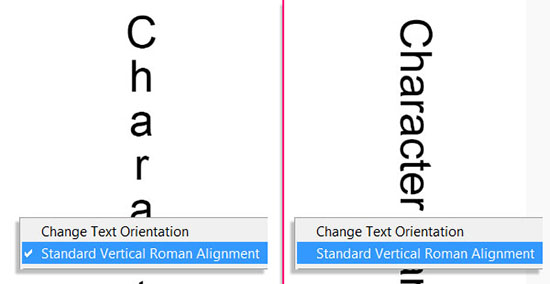
– Standard Vertical Roman Alignment: For this option to work, the Text Engine should be set to East Asia, as it works only on vertical type.
When the Standard Vertical Roman Alignment option is checked, the letters will flow from top to bottom. When it’s un-checked, they will flow from left to right on their side (the same effect of rotating horizontal text 90° CW).
– Fractional Widths: This setting rounds character widths to the nearest part of a pixel instead of a whole pixel. It’s turned on by default because it usually tightens text spacing. But it is better to turn it off for any smaller than 20-point text to avoid making it hard to read.
– System Layout: This option reverts text to the way your particular operating system displays it. It switches character widths to whole pixels and turns off anti-aliasing.
It is good to use when designing text for the Web as it adds extra space and letter sharpness making very small text a bit easier to read.
– No Break: This is a Hyphenation-related option. It forces Photoshop to re-justify the text to un-break/not hyphenate a selected word.
So you select the hyphenated word, then choose the No Break option. This is used for words that are hard to read when sliced up in two parts.
– Reset Character: This option restores the Character settings to their defaults. (If you don’t have any selected text, the newly restored settings will affect the next thing you type.)
Paragraph Panel’s Menu Options
– Unlike the character panel’s menu, the Paragraph panel’s menu options do not exist in the Paragraph panel itself.
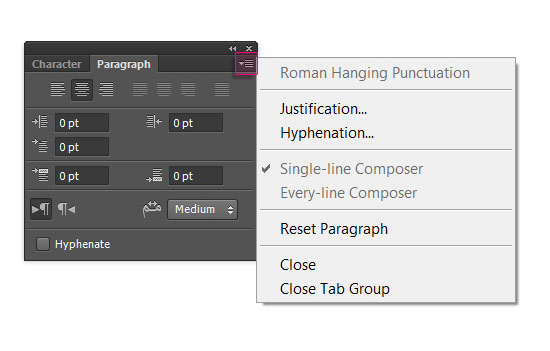
– Roman Hanging Punctuation: This option places the punctuation outside the text margin, while keeping the letters themselves perfectly aligned.
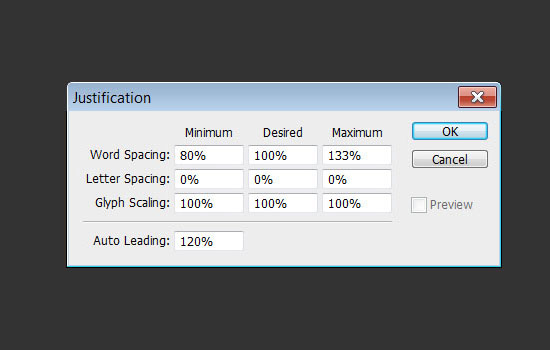
– Justification: This will open the Justification dialog box. There, you control the distance between words and letters when they are spread to make the margins perfectly straight, how far the glyphs are stretched, and what the leading value is.
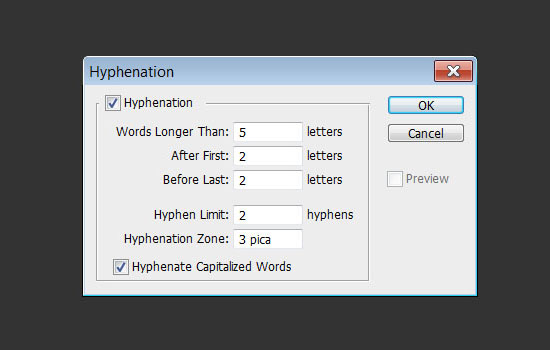
– Hyphenation: This will open the Hyphenation dialog box. There, you control the minimum length of words that can be broken across lines, where to break them (after how many letters), and how many consecutive lines can have hyphenated words at the end (a good value for that is 2). The Hyphenation Zone field controls the distance from the right margin where the text gets hyphenated.
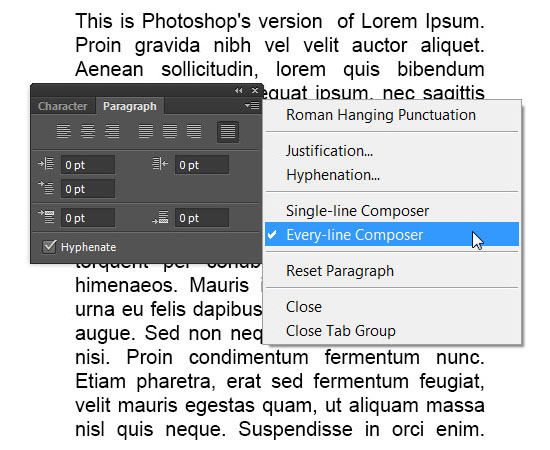
– Single-Line Composer: Composes each line individually, no matter how many lines the paragraph contains.
This is a good option for one line of text, or if you want to insert manual line breaks.

– Every-Line Composer: Composes the paragraph as a whole, so that the lines are arranged a way that avoids not-visually-pleasing line breaks.
This is a good option (automatically used by Photoshop) for more than one line of text, and it avoids hyphenation whenever possible.
– Reset Paragraph: This option restores the Paragraph settings to their defaults.
Conclusion
That’s it for the Character and Paragraph panel options in Photoshop CS6. Many useful ways to handle text and text formatting, and various settings to control the outcome.
In the next part, we’re going to discuss the new CS6 Type menu.
Did you enjoy this post? Please consider donating to help us cover our server costs.

Thank you for this, as always –perfect timing too! 🙂
Awesome! Glad you found it helpful.
Many thanks for the comment 🙂
Great!!!
Thank you!
Good job!! thx a lot!!!
You’re very welcome 🙂
Thanks for the comment.