
Vintage Tiles Text Effect
This tutorial will show you how to create some letters, convert them to shapes, exclude them from rounded rectangles, then apply a simple layer style to create lovely vintage looking tiles. Then, a nice action will be applied to enhance the coloring of the final result.
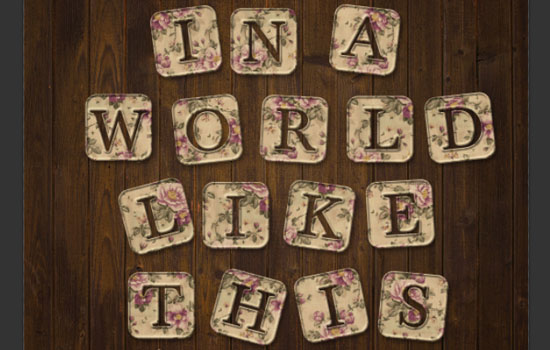
The Final Result

Tutorial Details
- Software Used : Photoshop
- Version : CS6 Extended
- Time : 0:30 – 0:45
Resources
- Libre Baskerville font.
- Wood Texture 2 by Rifificz.
- Motivos Florales by ValeCat.
- Photoshop Action 24 by saturn-rings.
Step 1
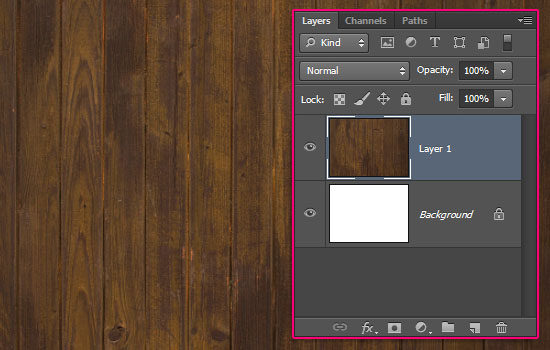
Create a new 1100 x 800 px document. Place the Wood Texture 2 image on top of the Background layer, and resize it as needed.
With the Foreground and Background colors set to Black and White, double click the wood texture layer to apply a Gradient Overlay effect:
- Blend Mode : Soft Light
- Opacity : 55%
- Style : Reflected
- Scale : 150%
- Check the Reverse box
- Choose the Foreground to Transparent gradient fill
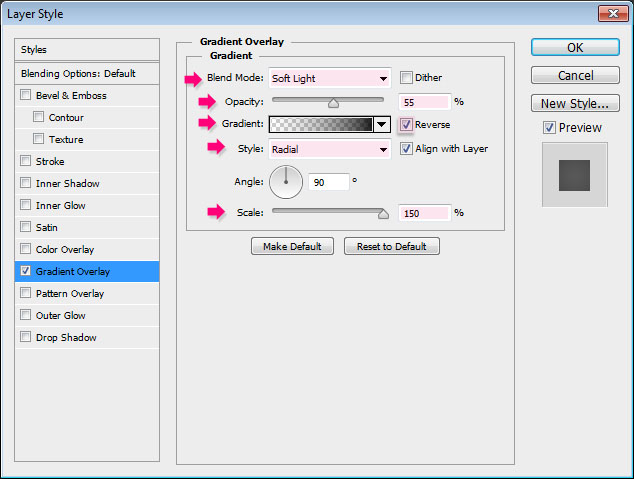
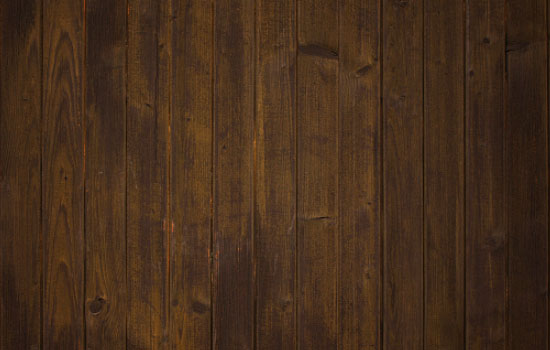
This will darken the corners a little bit.
Step 2
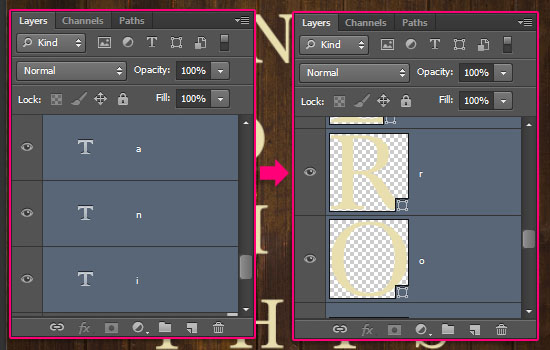
Create each letter of the text in a separate layer. If you have a numeric keypad, a faster way to do this would be by typing the letter, hitting the numeric keypad’s Enter/Return key, then click again to type another letter, and so on.
The font used is Libre Baskerville, but you can use any other font you like. The font Size is 130 pt, and the color is #e8deae. The letters are created in All Caps, but it is optional.
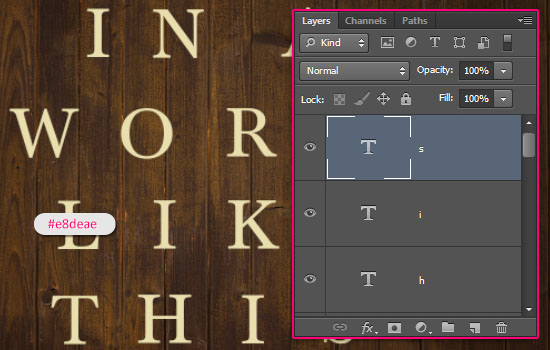
Once you’re done creating the letters, select all the text layers (click the one at the top, then press and hold the Shift key, and click the last one at the bottom). Then, right click any one of them and choose Convert to Shape.
This will convert all the selected text layers to shape layers.
Step 3
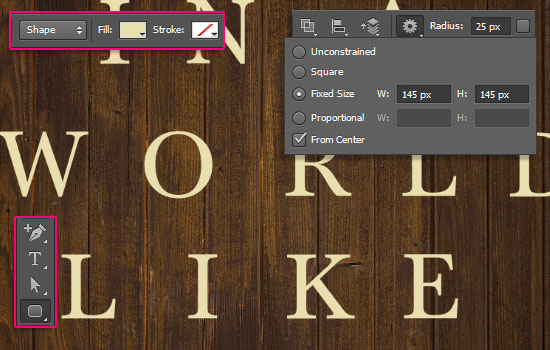
Pick the Rounded Rectangle Tool, choose the Shape option in the Options bar, and click the Exclude Overlapping Shapes icon. Then click the geometry settings icon, click the Fixed Size button, set both the Width and Height values to 145 px, and check the From Center box.
(If you are using a different font Size, you’ll need to use different dimensions.)
Change the Radius value depending on how rounded you want the rectangle corners to be. Here, it is 25 px.
This will help you create fixed size rounded rectangles with one click. Don’t forget to click the Unconstrained option back again after you’re done with the tutorial. 😉
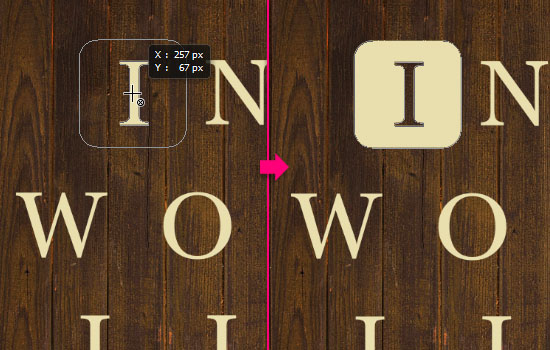
What you will need to do for each letter is the following:
1 – Select the letter’s shape layer.
2 – Always make sure that the Exclude Overlapping Shapes icon is active in the Options bar.
3 – Click and drag slightly so that the letter is in the middle of the rounded rectangle.
4 – Release the mouse button, and the letter will be excluded from the rectangle.
5 – If the letter is not perfectly positioned in the middle of the rectangle, you can undo and recreate, or fix this as shown in the next step.
Pick the Direct Selection Tool, click the tile you want to modify, then click and drag to select the shape of the letter inside it.
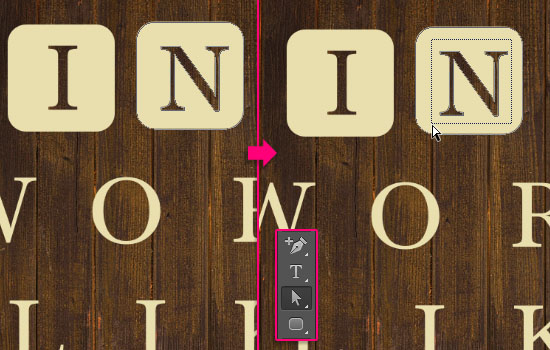
Use the Arrow keys to move the letter shape as needed, and make sure to hit the Enter/Return key when done to remove the selection.
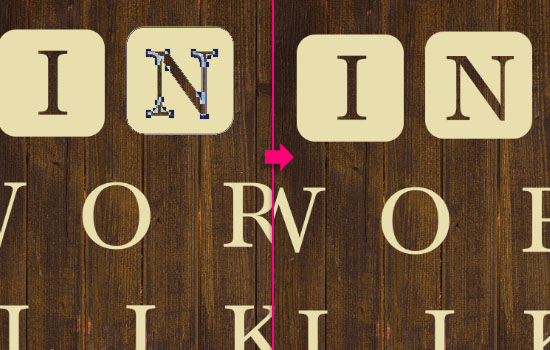
When all the tiles are created, you can select and rotate some of them by going to Edit > Transform > Rotate. And After you rotate each letter, hit the Enter/Return key to accept the changes.
Tip: You can check the Auto Select box and choose Layers from the drop down menu in the Move Tool‘s Options bar, so that you can select the tiles by directly clicking them. Make sure to un-check the box when done though.
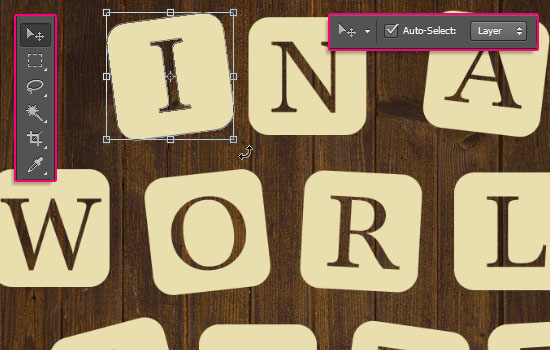
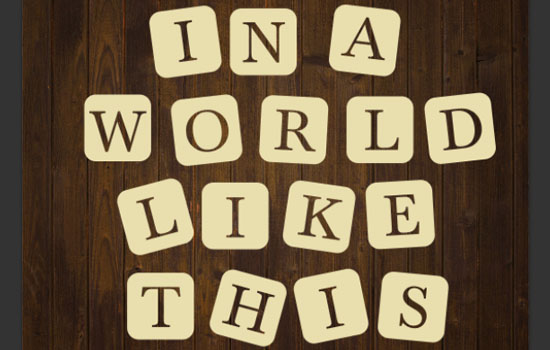
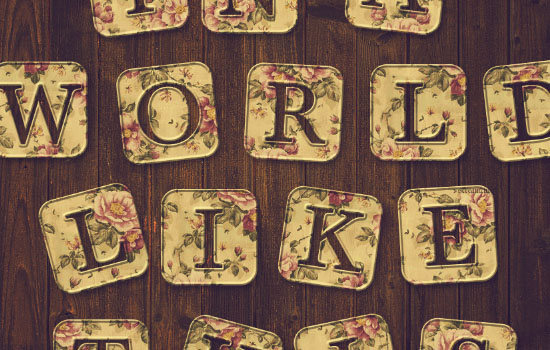
Place the letters as you like in the scene, before you move on to the next step.
Step 4
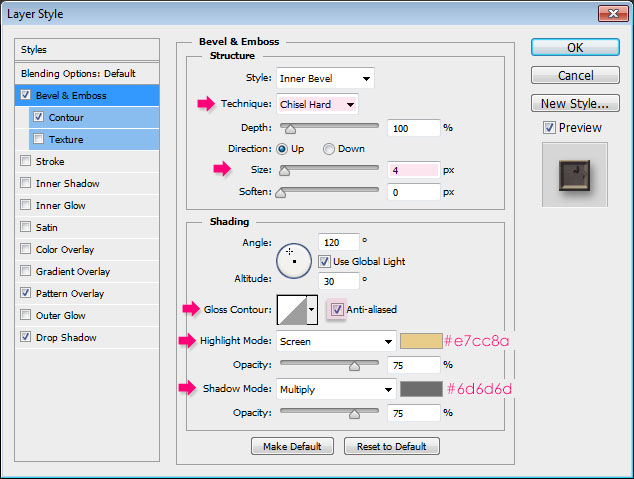
Double click a tile’s layer to apply the following Layer Style:
– Bevel and Emboss
- Technique : Chisel Hard
- Size : 4
- Check the Anti-aliased box
- Highlight Mode : – Color :
#e7cc8a - Shadow Mode – Color :
#6d6d6d
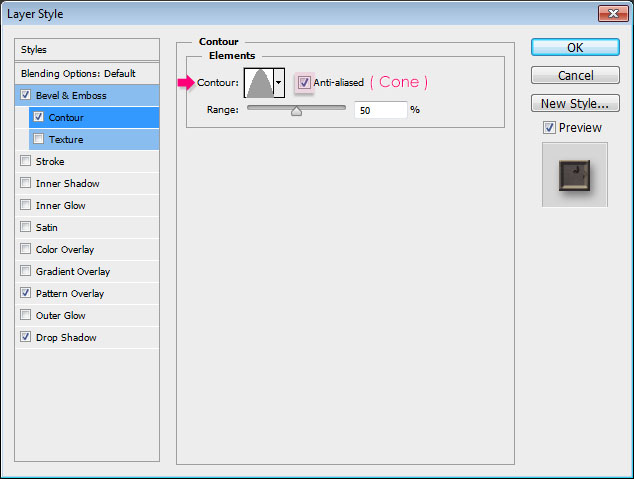
– Contour
- Contour : Cone
- Check the Anti-aliased box.
– Pattern Overlay
- Blend Mode : Multiply
- Pattern : Floral3 (from the “Motivos Florales” pack)
You can use the other patterns, or use totally different ones if you like, but you might need to change the tile color or the Pattern Overlay Blend Mode.
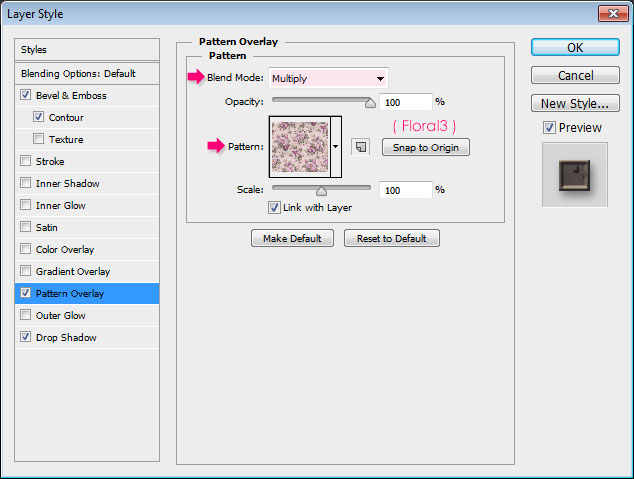
You can click and drag the pattern to move it inside the tile if you don’t like how it looks. This can also be done any time later. You’ll just need to double click the layer to open the Layer Style box, then select the Pattern Overlay tab, and click and drag the pattern.

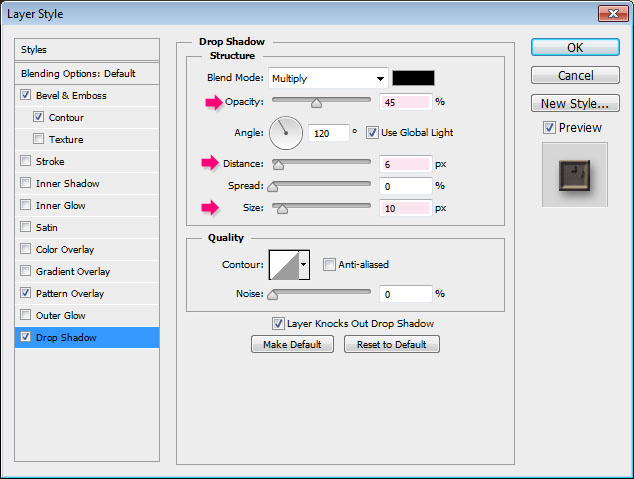
– Drop Shadow
- Opacity : 45%
- Distance : 6
- Size : 10
This is what you should get. Right click the styled layer and choose Copy Layer Style.

Select all the remaining tile layers, right click any one of them, and choose Paste Layer Style.
Double click any tile you want to move the pattern inside to do so as explained above, and make sure to apply any other changes before moving to the next step.
Step 5
The last step is applying the action. To do that, you first need to save the final result as an image (a .jpg file), then open it in Photoshop.
Load the .atn file of the Photoshop Action 24, then open the Actions panel (Window > Actions). Select the action tab (will be at the bottom of the Actions panel), then click the Play selection icon.
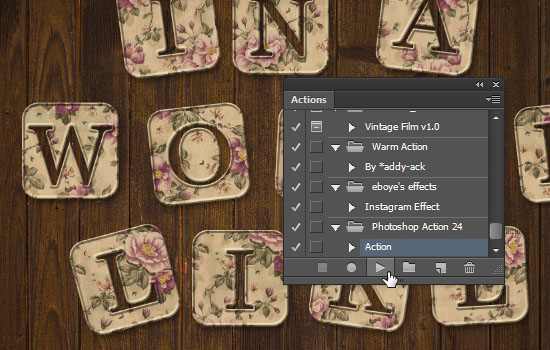
The action will do the rest of the work and give you a nice final result. 🙂
Keep in mind that you can use any other font you like. For example, the font Bree Serif is used below:
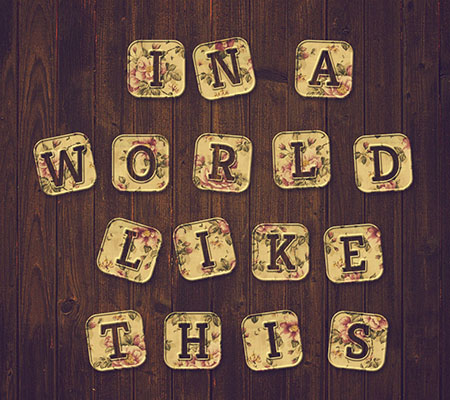
This is the final result once again. 🙂
Did you enjoy this post? Please consider donating to help us cover our server costs.


Beautiful text effect, I love it!
Glad you do!
Thank you very much.
Beautiful! I always wait for your tut´s I love´m and usually try to make what you show us. I´v got PS CS5.1 and like playing there and you have the most awesome text-tut I´v found online
That’s great to know!
Your words mean a lot, I really appreciate all the support … It always means a lot.
Thanks a bunch for the lovely comment 🙂
– Once you’re done creating the letters, select all the text layers (click the one at the top, then press and hold the Shift key, and click the last one at the bottom). Then, right click any one of them and choose “Convert to Shape”.
I´m having trouble here. I have PS CS5.1 and when I try to “convert” the text this is what come up: Could not complete your request because the type layer uses a faux bold style.
any idea what´m I´m doing wrong or not doing at all?
This is an error message that appears when the Bold attribute is assigned to text.
To fix this, with all the text layers selected, go to Window -> Character to open the Character panel, and un-click the Faux Bold icon if it’s clicked. Check this image please.
Hope this helps.
If the problem still exists, please feel free to add a reply with more details.
You really are amazing 🙂 did you know that – That I think was my problem it was checked and is now unchecked and I´m going to try this tut again.
Thank you SO VERY VERY VERY much for your help AND FOR YOUR TUTORIALS 🙂
You’re very welcome Tora 🙂
Hope everything works out fine this time.
Many many thanks for your kind words and for the support 🙂
arrrrrrg still having a bit of a problem that I hope you can help me with when I try to click on the “Exclude Overlapping Shapes” nothing happens – can you imagine why?
Is the icon grayed out? You might need to click the shape layer thumbnail before you click the icon, then click and drag to add the tile.
Please feel free to leave a reply if the problem still exists.
it looks like it´s “greyed out” I have a screen shot if I could send it too you? no matter what I do it´s not allowing me to click 🙁
So thankful for your help <3
Please make sure to include the Layers panel in the screenshot, then you can upload it to tinypic.com and add the link in a reply so that I can check it out 🙂
It also might help to see if you have the Target Path (View -> Show -> Target Path) option checked. If it is, can you see the work path when you click the shape layer thumbnail?
Thanks for taking the time to look at this for me. Here´s a link
http://i265.photobucket.com/albums/ii203/tora1313/my-work-1.jpg
No problem 🙂
Let’s see… Is the “Shape” option selected (to the right of the Options bar at the top) or the “Path” option? If it is “Path”, then changing it to “Shape” might solve the problem.
Also, please make sure that the Mode (Image -> Mode) is set to 8 Bit/Channel.
Can you try that and tell me what happens please?
Sure thing, I´ll do it right now 🙂
do you mean the “shape” to the left??? not the right at the option bar at the top?
It´s selected as “shape layer”
when that´s selected I cant click on the “Exclude Overlapping Shapes”
but when it´s on the “Paths” to the left in the option bar at the top then I can click on something called “Exclude Overlapping Path areas 🙁
The Mode (Image -> Mode) is set to 8 Bit/Channel 🙂 that´s the only thing right LOL LOL
It is the one shown here. Do you have it as the active icon?
Did you try closing Photoshop then reopening the file and see if you can add the tiles?
🙁 well I guess I will not be able to do this 🙁 I have the “shape layer” selected and can´t click on the Exclude Overlapping Shape Areas
I´v even turned PS SC off and opened it up again with NO LUCK – again I like to thank you for ALL YOUR TIME AND HELP
Is there a problem in resetting the preferences?
If you would like to try that, simultaneously hold down the Command+Option+Shift keys as you launch the application (not after).
I’m sure the problem is something really simple! If you can try resettings, please go ahead and tell me what happens.
Do you have any Photoshop related plugins installed? Those might cause problems sometimes as well.
Thank´s for not giving up on me yet 😉
I´m just wondering – I´m not having any trouble changing the preference but not sure what I should change there – Photoshop-Preference and then……………….
I’m glad that you’re not giving up on the issue as well, that’s the spirit 😉
As for the preferences, you don’t need to change anything under Preferences. I meant resetting them back to their default values.
To do so, simultaneously hold down the Command+Option+Shift keys as you launch Photoshop (not after).
Then, open the file and try to exclude the shapes once again.
Fingers crossed this will solve the problem. If not, at least we’ll know it’s not a preferences/settings issue, and we’ll try something else.
Just Goggled why can´t I…. LOL LOL and found this article about having the Vector Mask selected to e able to click on the Exclude button and I think that might work 🙂 going to try working with that for a wile I´ll keep you posted 😉
I was referring to the vector mask when I mentioned “You might need to click the shape layer thumbnail before you click the icon, then click and drag to add the tile.”
But it was selected in the screenshot you sent, so that’s kinda weird! Hopefully this will work now though.
Please feel free to add any updates 🙂
OK I´v been trying this out and here is a link to just ONE letter
http://i265.photobucket.com/albums/ii203/tora1313/H.jpg
if you care to take a look. Some things I was not able to do but what do you think of this – please be direct 🙂 and I want you to know that you are the BEST – thanks for not dumping me LOL LOL
No problem at all, glad things worked out in the end 😀
The result is great so far. But I think you are using a bigger font size than the one in the tutorial.
If that’s the case, you’ll also need to use bigger layer style values as well.
Other than that, I think all is awesome.
Thanks a lot for the kind words, they truly mean a lot 🙂
I did use font size 130 but I could not move the font inside the “frame” or what´s it called 🙂 But I LOVED your help and that means a lot to me 🙂 now I want to try some others tutorials you have here, they are all so fantastic 😉
I am stubborn when it comes to my laptop LOL I don´t want it to “win” ME LOL LOL but I would NEVER have been able to do this without YOU <3
Just always make sure that the vector mask is selected.
Glad you were able to create the effect though 🙂
Good luck with the other tutorials, have fun 😉
Thanks for the kind words.
What an excellent tutorial!
I’ve been playing with photoshop for years, but always seem to have difficulty with making text look nice. So much so, that I’ve slipped into the bad habit of being lazy and just clicking on pre-defined layer styles until it looks half decent and leaving it at that.
I’ve just completed your tutorial, using a different background, font, text and pattern in around half an hour and the outcome looks great!
You’ve inspired me to go further into text effects again.
Thank you 🙂
Super glad to know that you enjoyed the tutorial and got inspired to check out more text effects 😀
Your words just made my day! They truly mean so much!
Thanks a lot for the comment 🙂
You’re very welcome! 🙂
Excellent tutorial!
Thank you very much.
Love the look of this tutorial! I am having trouble at step 3. I follow the instructions up to step 3 and make the selections on the options bar yet when I select a letter I do not see the rounded rectangular shape around the letter and it shades in the entire background (which covers up all the other letters) the color of the letter. On the plus side it does show the wood grain letter. Help! What am I missing? Thank you
I’m guessing that either the “Exclude Overlapping Shapes” shapes option is not selected, or that when you create the rectangle, the original text shape layer’s thumbnail isn’t selected.
If this is not the case, can you upload a screenshot of the problem please?
Thanks for the comment 🙂
Thank you for your help – your tips helped and I was able to complete the tutorial. Love it!
That’s great to know!
Many thanks for the kind words 🙂
I cannot select “Exclude Overlapping Shapes” after I pick the rounded rectangle. I still have all the text highlighted from step 2 is that why? I am using CS 5 also.
How can the text still be highlighted after you convert it to shapes? Did you make sure to convert all the letters to shapes?
If so, you might need to click the shape layer’s thumbnail in order to be able to select the “Exclude Overlapping Shapes” option.
Please feel free to upload a screenshot of the issue if it still exists.
Easy to do, but very nice effect. Thank you for your wonderful work Rose!
2nd tutorial from you I followed. Looking forward for more. One more time thank you!
That’s absolutely wonderful to know.
Very glad you’re enjoying the tutorials.
Thank you very much for the kind words 🙂
I’m a beginner, I started ps today, and I find very very helpful these tutorials, you help me a lot, I want to say Thank You!
Next step, create my own artLogo and ready for my Youtube Channel!
Really glad to know you found them helpful!
Thank you very much for the absolutely kind words, appreciate it 🙂
Hy Rose. I’m really love all your tutorials. thank’s for your idea.
Cool variation!
Thank you very much for sharing your work and for the comment 🙂
very nice … Thank you Rose ….I love It
That’s a really lovely outcome!
Thanks a lot for the comment and for sharing your work 🙂
Thanks, it is a very good tutorial and easy to follow, I love it 🙂
Glad you enjoyed it!
Many thanks for the kind words 🙂