
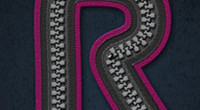
Wrapped Gift Box Text Effect
This tutorial explains how to use the Bevel and Emboss layer effect, rectangle shape layers, and some simple tricks to create a 3D-like wrapped gift box.
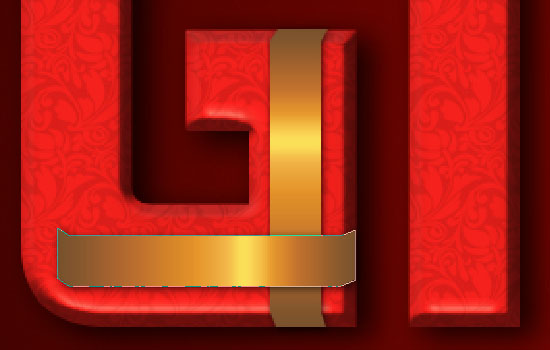
The Final Result:

Tutorial Details
- Software Used : Photoshop
- Version : CS6 Extended
- Time : 1:00 – 1:45
Resources
- Kimberley font.
- Patterns: Damask Wallpaper by StrangeClaire.
- Texture14 by MindfulArray.
- gradient-shapes for Photoshop by ilnanny.
- Green Christmas bow by LucieG-Stock.
As always, if you’ve got anything you’d like to share or suggest, go ahead and send us a message through the contact form.
This text effect is yet another simple Thank You ‘gift’. Hope you like it.
Rose
Thanks to Sapri Waldi for suggesting the idea as well.
Step 1
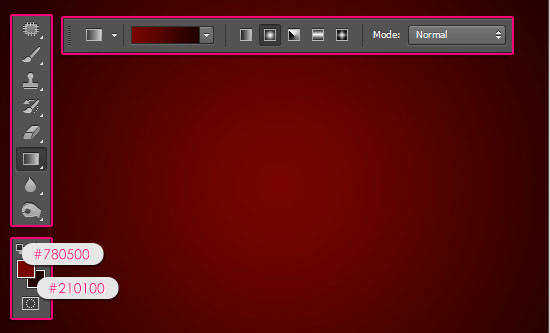
Create a new 1024 x 786 px document. Set the Foreground color to #780500 and the Background color to #210100, pick the Gradient Tool, click the Radial Gradient icon in the Options bar, then click and drag from the center of the document to one of the corners.
Create the text in All Caps. The font used is Kimberley, the Size is 331 pt, and the color is #ff221d.
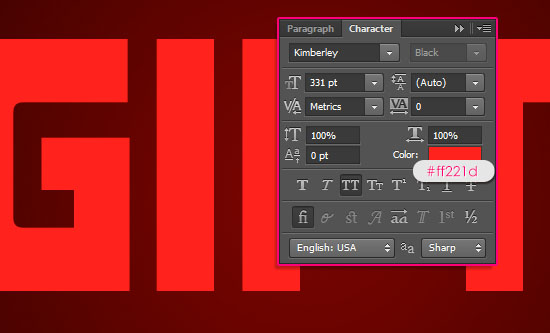
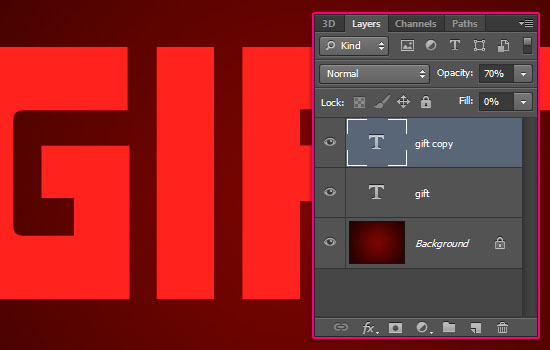
Duplicate the text layer, and change the copy’s Opacity to 70%, and its Fill value to 0%.
Step 2
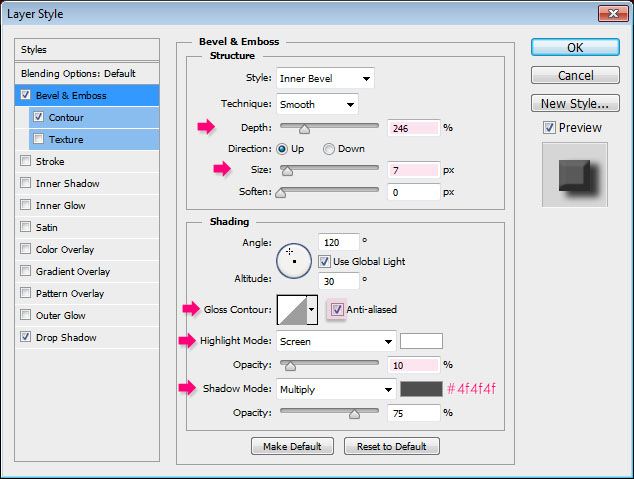
Double click the original text layer to apply the following Layer Style:
– Bevel and Emboss
- Depth : 246
- Size : 7
- Check the Anti-aliased box
- Highlight Mode – Opacity : 10%
- Shadow Mode – Color :
#4f4f4f
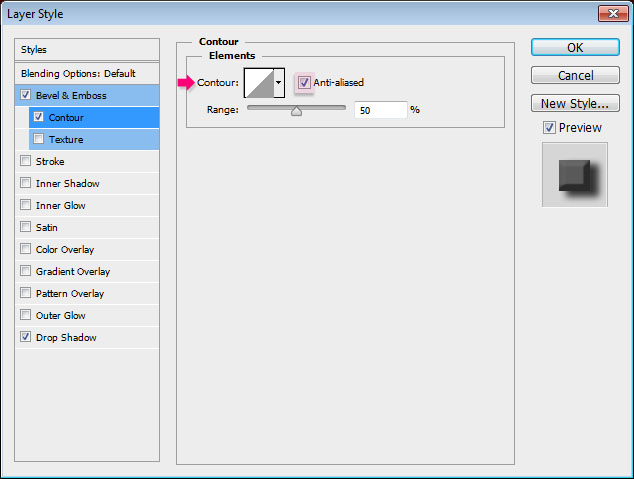
– Contour
- Check the Anti-aliased box.
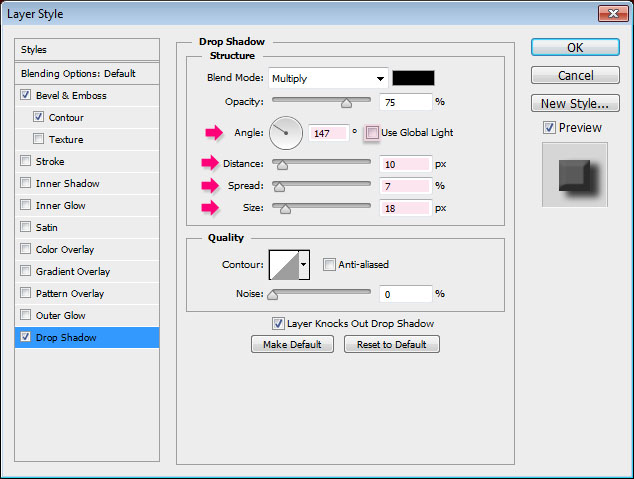
– Drop Shadow
- Uncheck the Use Global Light box
- Angle : 147
- Distance : 10
- Spread : 7
- Size : 18
This will make the text look like a 3D box. But wrapped gifts are usually a bit more glossy and shiny. And this is what we’ll add in the next step.

Step 3
Double click the copy text layer to apply the following Layer Style:
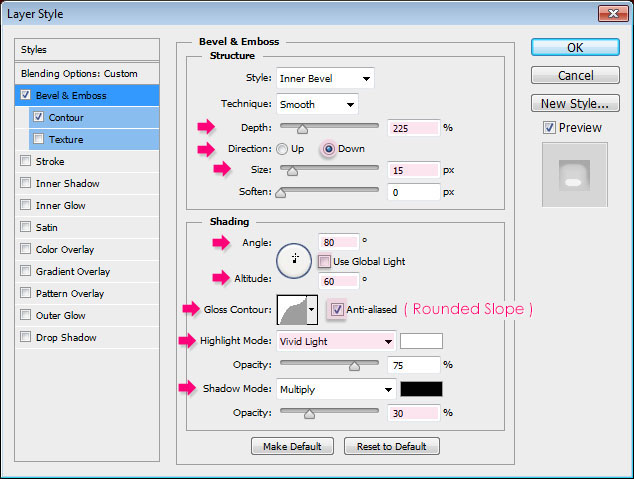
– Bevel and Emboss
- Depth : 225
- Direction : Down
- Size : 15
- Uncheck the Use Global Light box
- Angle : 80
- Altitude : 60
- Gloss Contour : Rounded Slope
- Check the Anti-aliased box
- Highlight Mode : Vivid Light
- Shadow Mode – Opacity : 30%
– Contour
- Contour : Half Round
- Check the Anti-aliased box.
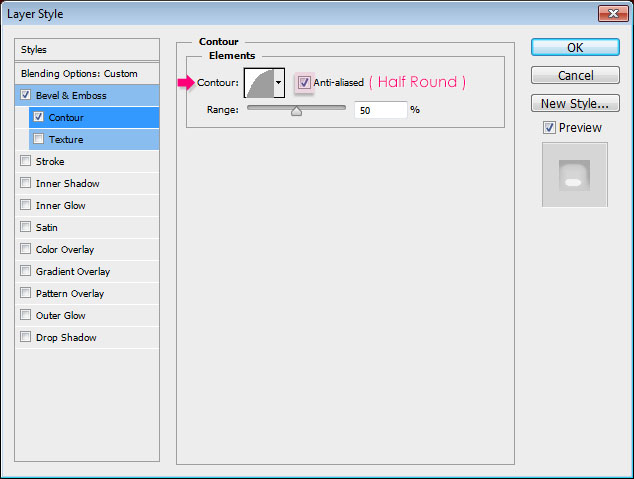
This will create smooth shiny edges.

Step 4
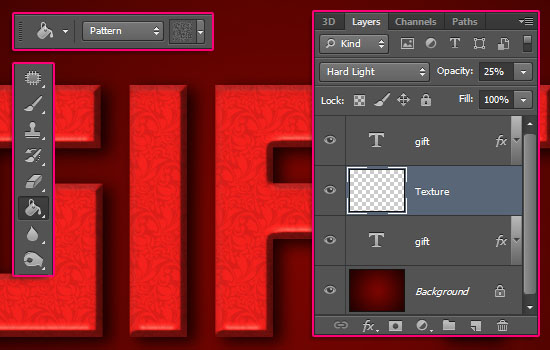
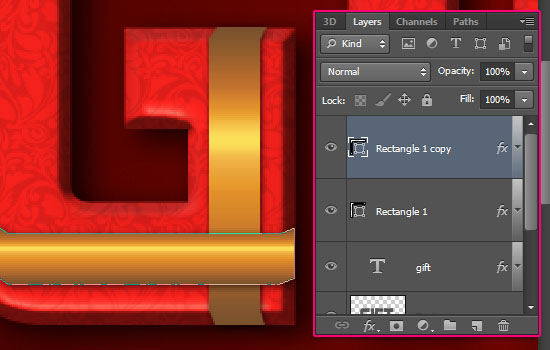
Ctrl/Cmd + click a text layer’s thumbnail to create a selection.

Create a new layer between the two text layers, call it Texture, then change its Blend Mode to Hard Light and its Opacity to 25%.
Load the Patterns: Damask Wallpaper pack, and pick the Paint Bucket Tool. Change the Fill to Pattern in the Options bar, and choose the CG_wallpaper11.png pattern.
Fill the selection with the pattern then go to Select > Deselect to get rid of the selection.
Step 5
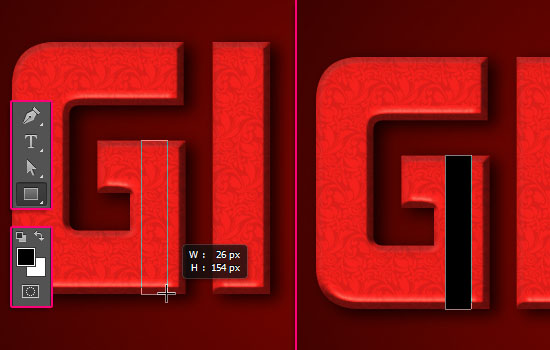
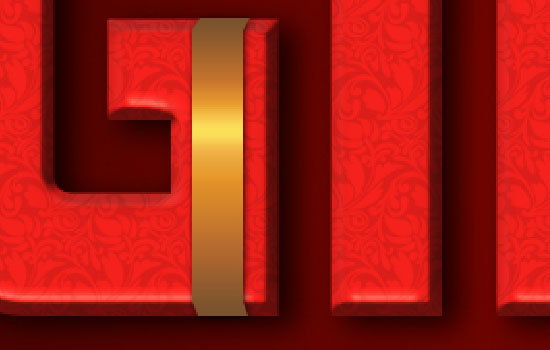
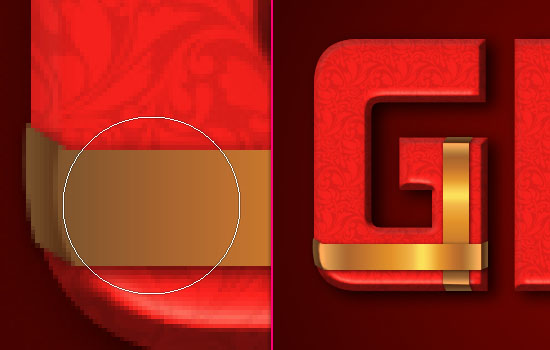
Set the Foreground and Background colors to Black and White, then pick the Rectangle Tool. We are going to create the ribbons now. So draw a rectangle on the first letter you have.
Choosing the part of the letter to cover is up to you, and so is the ribbon’s width. Just make sure that the ribbon does not cover more than 50% of the part you place it on.
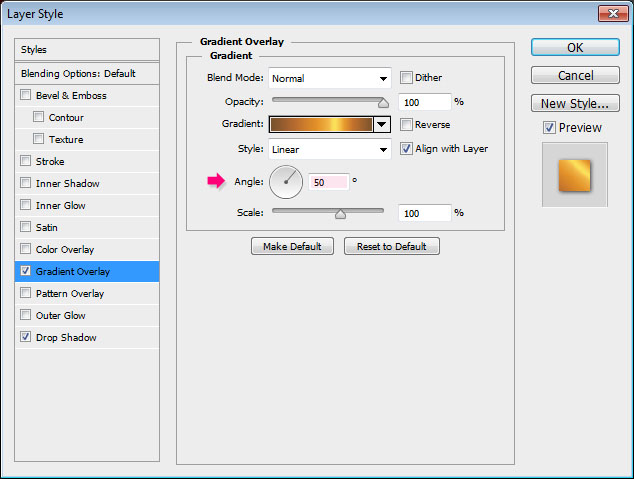
Double click the shape layer to apply the following Layer Style:
– Gradient Overlay
You can use any of the gradients from the Goldmedal.grd file in the gradient-shapes for Photoshop pack. The one used here is Brass Bs 30.

– Drop Shadow
- Distance : 1
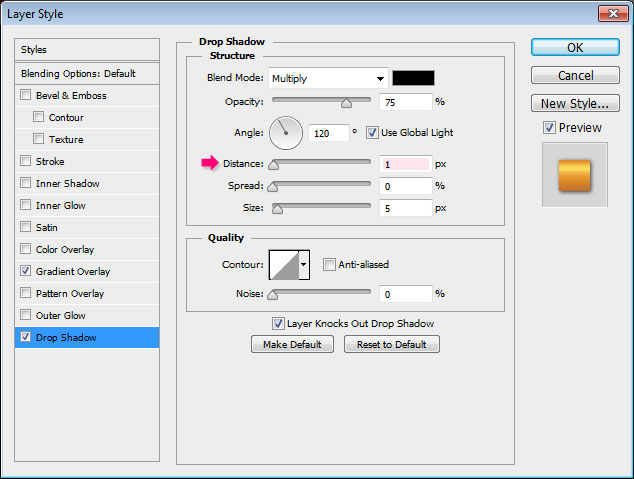
This will make the ribbon look brighter and more realistic.

Step 6
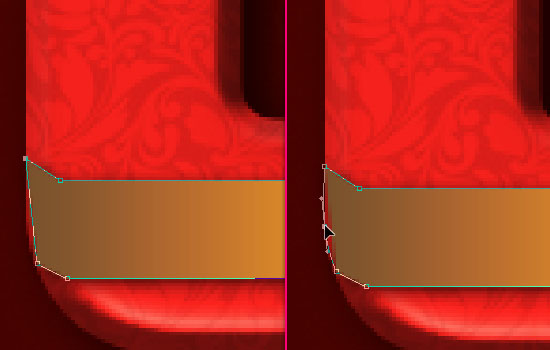
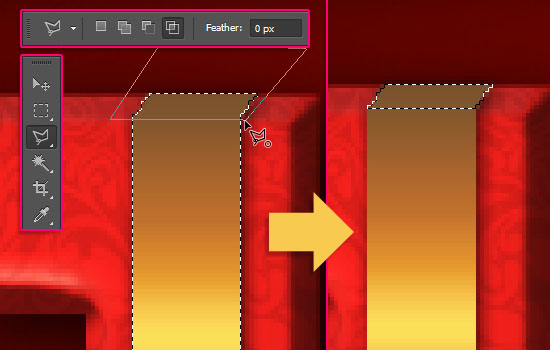
Use the Add Anchor Point Tool to add two anchor points where the edge (beveled part) of the letter is.
Pick the Direct Selection Tool, then click and drag to select the two original anchor points of the rectangle. Move those points using the keyboard’s arrow keys to the right.
Notice that the points added create a curve when the original points were moved. This will fixed next.
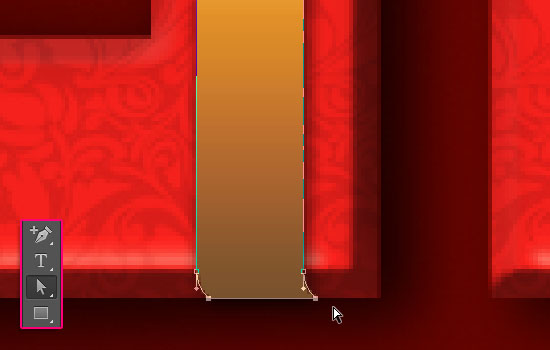
To change the corners into sharp ones, use the Convert Point Tool, and click once on each anchor point.
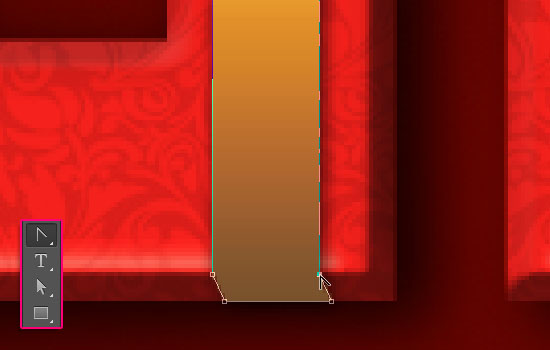
Do the same to the upper part of the ribbon.
Step 7
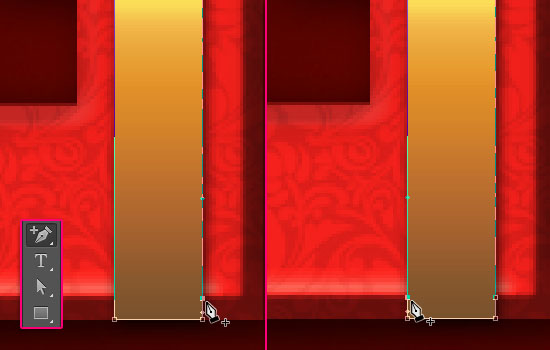
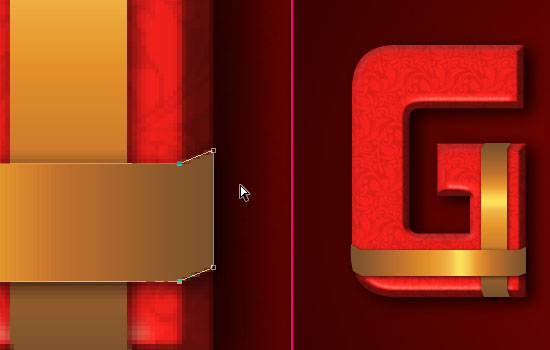
Duplicate the Rectangle shape layer, then go to Edit > Transform Path > Rotate 90° CW. Notice that this rotates the Gradient Overlay as well.
Double click the duplicated layer, then change the Gradient Overlay Angle to 0 to match the new shape’s angle.

The right side of the ribbon looks fine, but the left side is a bit tricky.
When you add anchor points to the left side, keep the curve, and move the points separately to cover the corner of the letter.
As for the rights side, just select all the anchor points and move them to the edge.
Step 8
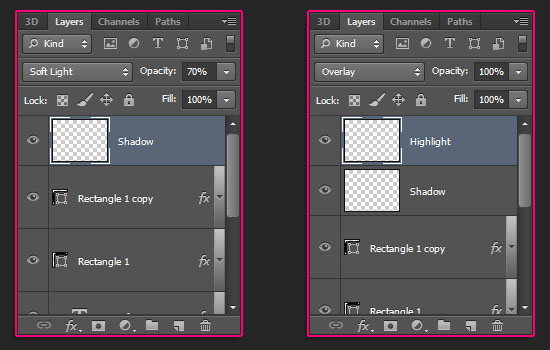
The ribbons still look a bit flat, so we’ll add some shadows and highlights to give them depth and dimension. Create a new layer on top of all layers and call Shadow, then change its Blend Mode to Soft Light and its Opacity to 70%. Create another new layer on top of the Shadow layer, call it Highlight, and change its Blend Mode to Overlay.
Make sure to keep these two layers on top of ALL the ribbon layers.
Ctrl/Cmd + click one of the ribbons’ shape layers to create a selection.
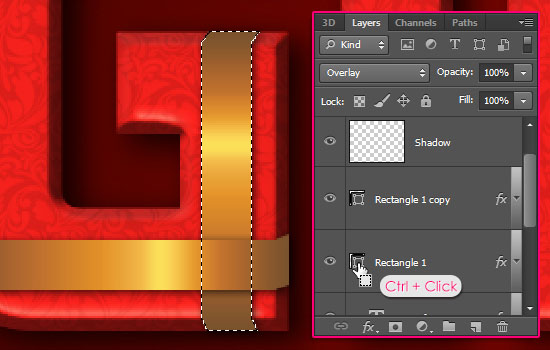
Pick the Polygonal Lasso Tool, and click the Intersect with selection icon in the Options bar. Then, draw a selection around the darker area of the letter’s edge, and make sure to trace the bevel’s edge precisely.
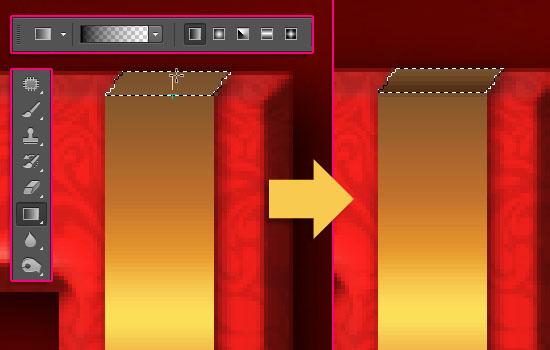
Pick the Gradient Tool, choose the Foreground to Transparent fill, and click the Linear Gradient icon in the Options bar. Make sure that the Shadow layer is selected, and that the Foreground color is set to Black, then click and drag from the lower edge of the selection to the upper one.
Ctrl/Cmd + click the ribbon’s shape layer to create a selection once again. This time, use the Polygonal Lasso Tool to draw a selection around the lighter area of the letter’s bevel. Switch the Foreground and Background colors so that the Foreground color is set to White, and make sure that the Highlight layer is selected now, then create the gradient from the upper edge to the lower one.
Press Ctrl/Cmd + D to get rid of the selection when you’re done.
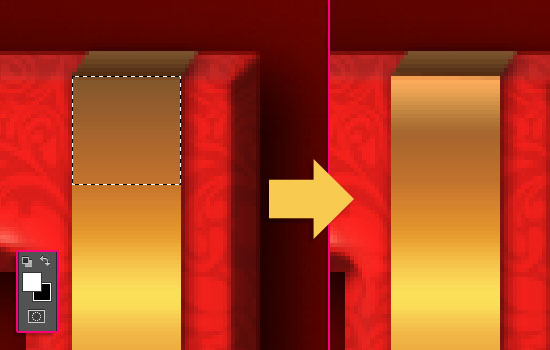
As for the round corners of the letters, use the Eraser Tool with a hard round brush to shape the Shadows and the Highlights if you don’t want to create complex selections.
Open the Green Christmas bow, and remove the Background using the Magic Wand Tool. Place the bow on top of all layers, then press Ctrl/Cmd + T to enter the Free Transform Mode. Resize and rotate the bow as you like, then hit Enter/Return to get out of the Free Transform Mode.
Place the bow where the two ribbons intersect.

Step 9
This is optional, but you can add a ribbon on the top left or right corners of some letters. To do so, create a new rectangle, apply the ribbons’ layer style to it, rotate it, and modify its corners.

Once again, you’ll need to change the Gradient Overlay Angle. Try different values to see which one matches the ribbon’s angle.
Once you’re done, add the shadows and highlights just like you did before.

Another cool tip is that you can move the gradient around while modifying the Gradient Overlay, by simply clicking and dragging the gradient inside the ribbon.

Repeat the same process for the rest of the letters. This might be a bit time consuming, but the final result will look awesome.

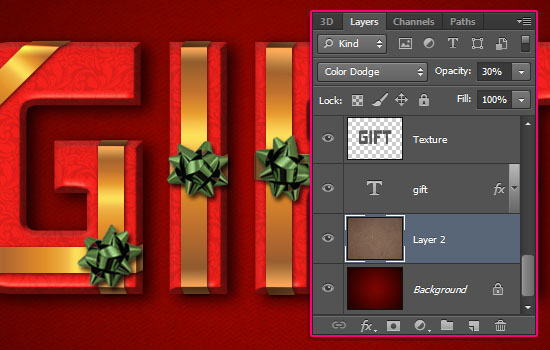
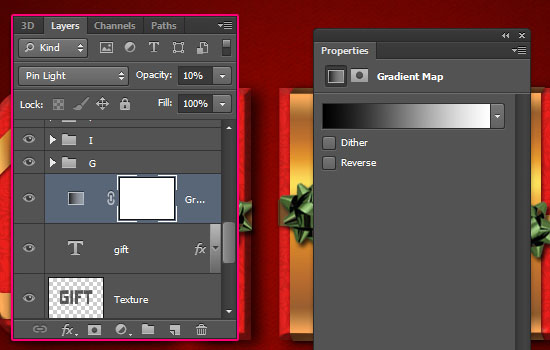
Step 10
Place the Texture14 image right on top of the Background layer, then change its layer’s Blend Mode to Color Dodge, and its Opacity to 30%. This will add a nice subtle texture to the background.
Click the Create new fill or adjustment layer icon down the Layers panel and choose Gradient Map.
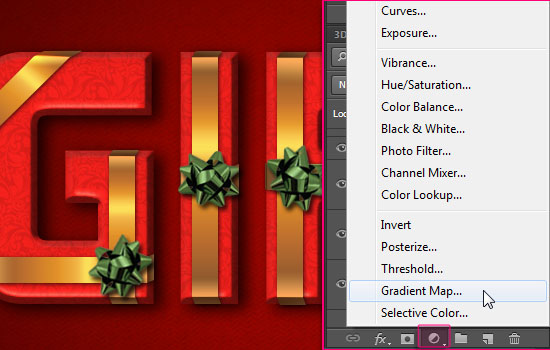
Place the adjustment layer between the text layers and the ribbon layers, so that the ribbons won’t be affected. Then change the adjustment layer’s Blend Mode to Pin Light and its Opacity to 10%, and choose a simple Black to White gradient. This helps desaturate the bright reds a little bit which brings out the texture a bit more.
And your gift is ready now! Hope you like it 🙂
Did you enjoy this post? Please consider donating to help us cover our server costs.


Thanks for these 2 wonderful years, good job!!!
Bernd.
Thank you so much, I appreciate it 🙂
I always enjoy your tutorials. I’ve learned a lot of cool techniques to apply to my own graphics. With this tutorial I found it a bit helpful to put guidelines on the bevelled corners to create nice even points. Thanks.
That truly means a lot. It’s always great to know that the techniques are being useful for different things.
Thank you so much for the comment.
Great idea for a text effect! thanks for the tutorial
Glad you like it.
Thanks a lot for the comment.
A really big thanks for the tips. I’ll use this for my GF’s HBD card.
Aww that’s so sweet 🙂
Hope she’ll like it.
Thanks a lot for the comment.
I just had to say “Thank you!!”. Your tutorials are amazing, I love the sense of light and the delicate coloring. The first one I tried was with the cookies and rack and it was really challenging (I still think of them as Those Damned Cookies) but I learned so much. I was wishing that you would do a balloon effect tutorial and then you did. Is there any way to achieve a similar effect for those of us with an older PS version without 3-D?
Thanks again for all your hard work and beautiful turorials!
The “Damned Cookies” part had me laughing 😀 It was an advanced tutorial though, as every detail was created from scratch, but I’m glad you found it useful.
I will try to create a balloons text effect without 3D, that’d be cool.
Thank you so much for your kind words, I really appreciate them.
Have a nice day 🙂
Oh wow! Thank you so much Rose!
Yes, the tutorial was so grueling –turns out that I can’t do Smart Objects with the Reticulation filter in CS2 (I finally googled it), –it was a road block until I figured a way around it, then I kept at it and am so glad I did. The fact that this tutorial built the cookies and rack from the ground up is so fantastic!
It was SO difficult, that I decided to do it all over again (yikes) only this time with rack-creatures:
http://www.flickr.com/photos/wp-crickett/
Nothing like repeating a lesson to really let it sink in! :o)
I absolutely like what you created. It is always fun to see the technique applied in different ways and for different things. Very well done as well.
Glad that things worked out pretty well and that you learned something new. Hopefully you’ll find the other tutorials useful too.
Big thanks once again for the comment and the link.
Regards 🙂
Thanks so much for tutorial but im having problem using the anchor point tool to place anchors on the ribbons. Ive look thru the steps and everything is right but i just cant select and add points. Anyone help please 🙁
Does a gray border appear around the rectangle shape when you are using the Direct Selection Tool? You might need to click inside the rectangle first before you start adding and moving anchor points.
Hope this helps. If the problem still exists please feel free to add a reply.
Thanks for the comment 🙂
Wow, I happened to have found this tutorial just before my girlfriend’s birthday and I plan to give this to her as a card. I am certain she will like it.
Took me half of the afternoon, but I got a satisfactory result now. Now I just want to thank you for the tutorial which you made really easy to do. Couldn’t ask for more. It’s just awesome people like you share their knowledge and skills. Thank you.
Awww … That’s so sweet 🙂 I hope she likes it.
It always makes my day reading comments like yours.
A very Happy Birthday to your girlfriend …
Thanks a lot for the nice comment, I really appreciate it.
Just a question, how are you adding the anchors?DO you have to add the pen tool first to select the area you want to anchor or what? I am having a hard time with this portion of it. Also, not real sure how to change the background colors. I have CS4 and I know how to do foreground just not background. Thank you for your help!
Once you have the shape, pick the Add Anchor Point Tool (not the Pen Tool), then click wherever you want to add an anchor point on the path you have.
As for the Foreground and Background colors, you can change them by clicking the color squares shown in the screenshots, then type the color code in the small box next to the # sign in the Color Picker window. Clicking the color square at the front will change the Foreground color, and clicking the square at the back will change the Background color.
Hope this was helpful.
Please feel free to add a reply if the problem still exists.
Your work is great Dude. Keep it up.
Thank you very much, appreciate it!
(I’m a girl though ^_^)
Wonderful effect! Time and effort consuming, but worth it! I’ll use it on greeting cards.
It definitely is, but glad you found it worth it!
Great to know you’ll use it in greeting cards as well, sounds awesome 🙂
Thanks a lot for the kind comment.
Awesome tutorial … lovv the idea ..
M gonna use this idea on the coming valentine’s day ..
That’s great to know! Hope yours will turn out amazing.
Thank you very much for the nice comment.
Good!
Using this for a Holiday Card Event!
Wonderful!
Thanks a lot for the comment 🙂