
3D Layered Blocks Text Effect in Photoshop CC 2014
This tutorial will show you how to play around with Photoshop’s Shape and 3D options and settings, to create a simple clean 3D text effect pretty easily and quickly.
The Final Result

Tutorial Details
- Software Used : Photoshop
- Version : CC 2014
- Time : 0:45 – 1:45
Resources
- Titillium font (Titillium Black).
To all our amazing readers, subscribers, and followers; your support, kind words, lovely comments, and wonderful work you share with us mean so much!
So big thank you to all of you, you definitely rock 😉
If you’ve got anything you’d like to say or suggest, just go ahead and send a message through the contact form.
Best regards,
Rose
Step 1
Create a new 1360 x 1240 px document and fill the Background with the color #fcfcfc.
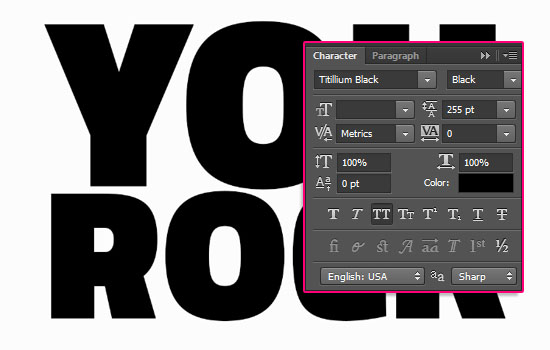
Then, create the text in All Caps using the font Titillium. If you’re creating more than one line of text, make sure to adjust the font Size for each line, as well as the Leading value.
Here, the font Sizes used are 467 and 360, and the Leading value is set to 250.
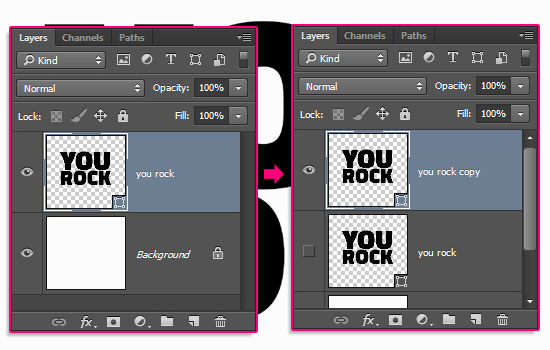
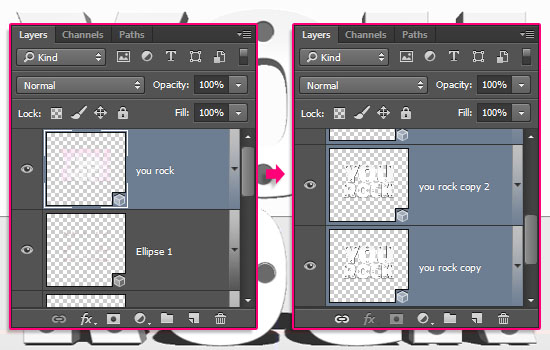
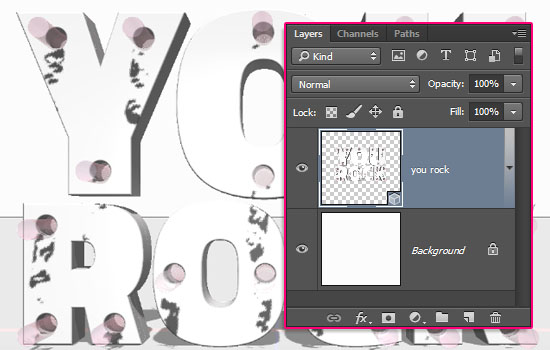
Right click the text layer and choose Convert to Shape. Then duplicate the shape layer and make it invisible by clicking the eye icon next to it.
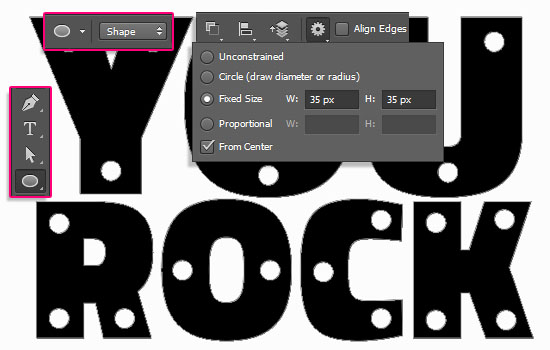
Pick the Ellipse Tool, make sure that the Shape option is active in the Options bar, then click the Geometry Options icon. Set the Fixed Size‘s W and H values to 35, and check the From Center box.
Click the Subtract Front Shape icon (if this changes the shape just go to Edit > Step Backward), then start clicking and dragging slightly to subtract some circles from the letters’ corners.
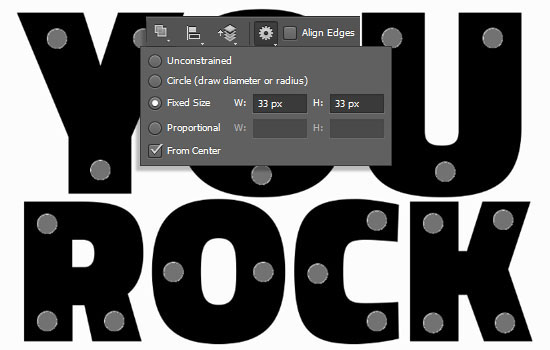
Create a new layer, click the Geometry Options icon again, and change the Fixed Size‘s W and H values to 33. Choose the Combine Shapes option, then start clicking and dragging inside each circle to fill it with the slightly smaller one. You might need to zoom in quite a bit to be able to place the circles precisely.
Step 2
Once you’re done, go to 3D > New 3D Extrusion from Selected Path. This will convert the shape layer into a 3D layer.

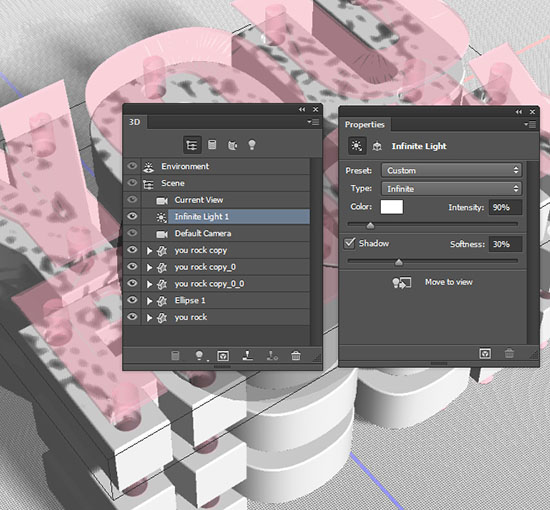
To access the 3D mesh Settings and properties, you’ll need to open two panels: The 3D panel, and the Properties panel (both found under the Window menu).
The 3D panel has all the components of the 3D scene, and when you click the name of any of those, you’ll be able to access its Settings in the Properties panel. So make sure to always select the name of the element you want to modify in the 3D panel before you change its Settings in the Properties panel.
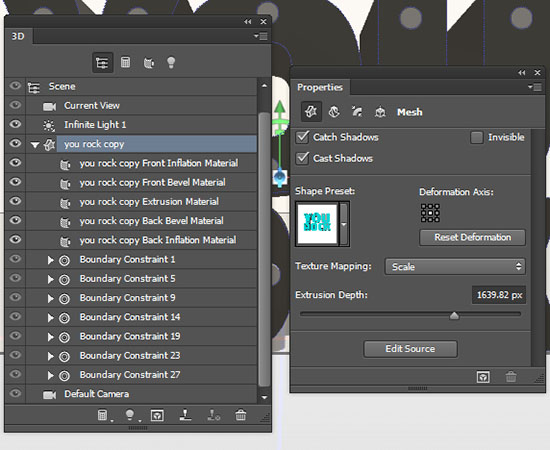
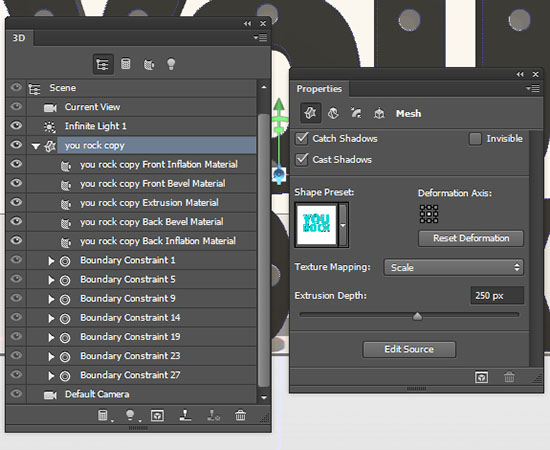
Select the 3D Mesh‘s name tab in the 3D panel, then change its Extrusion Depth value to 250 in the Properties panel.
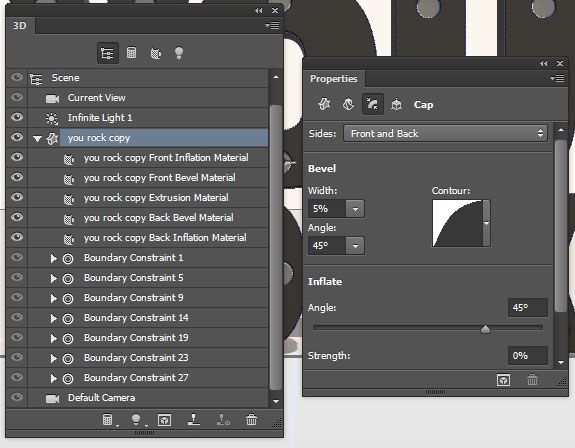
Click the Cap icon at the top of the Properties panel, then change the Sides to Front and Back, the Width to 5%, and the Contour to Half Round.
Step 3
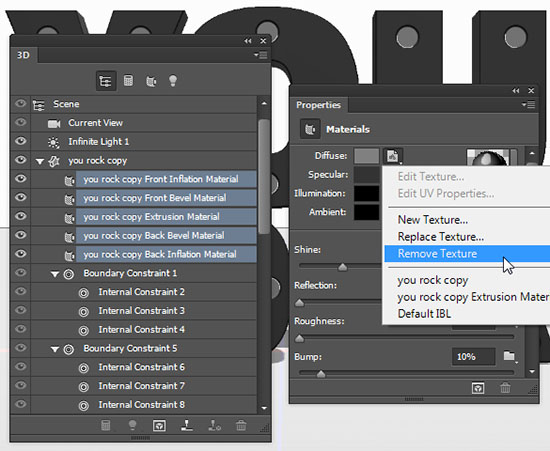
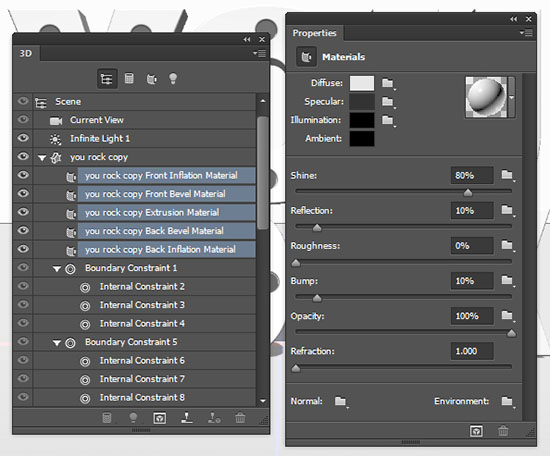
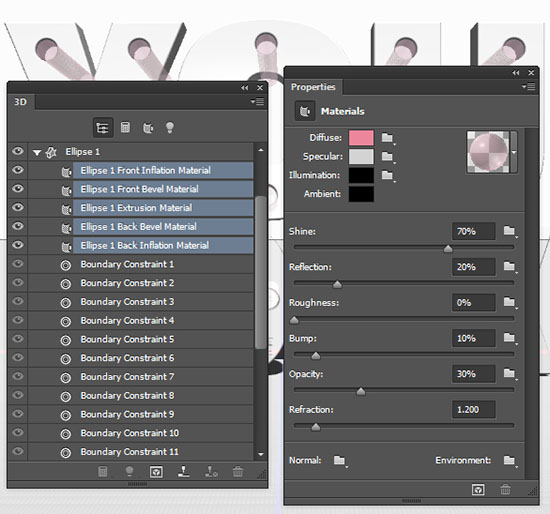
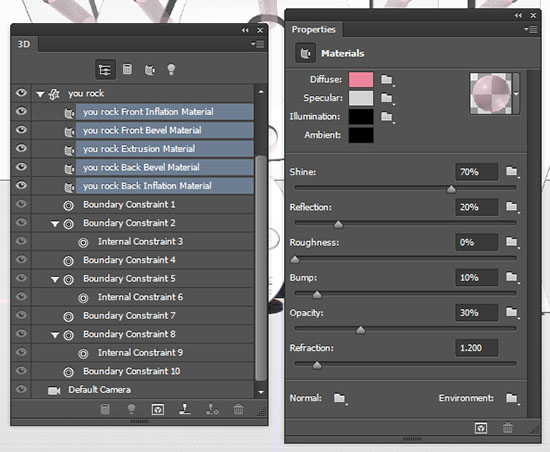
Select all the 3D Mesh Material tabs in the 3D panel, then click the Diffuse texture icon in the Properties panel and choose Remove Texture.
Change the rest of the Settings as shown below – the color values used in RGB are:
Diffuse : 231,231,231
Specular : 51,51,51
Illumination : 0,0,0
Ambient : 0,0,0
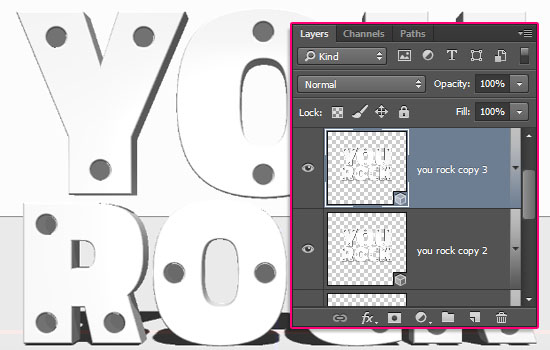
Create two more copies of the 3D layer you’ve just modified.
Step 4
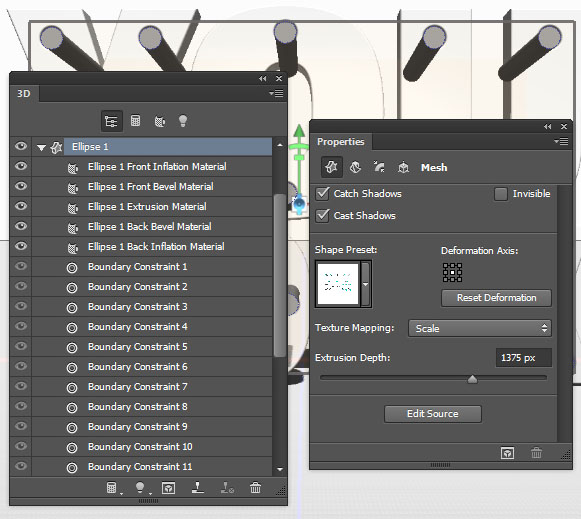
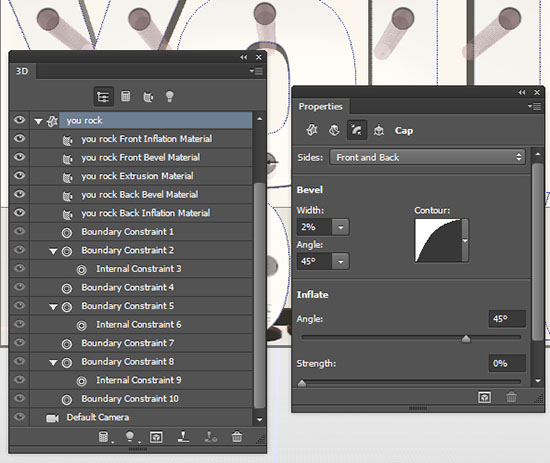
Select the Ellipse 1 layer, then go to 3D > New 3D Extrusion from Selected Path. Change the Mesh’s Extrusion Depth to 1375.
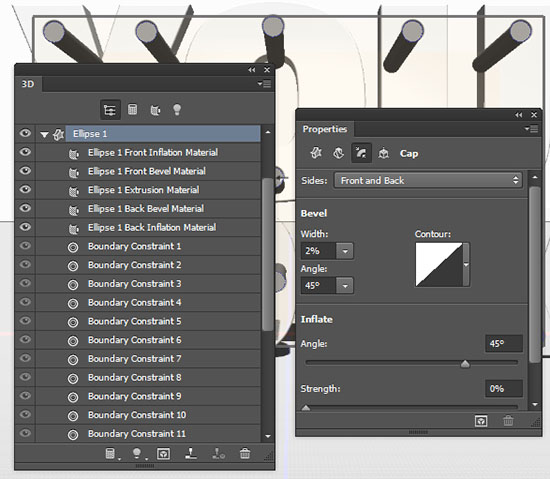
Under the Cap tab, change the Sides to Front and Back and the Width to 2%.
Select all the Material tabs, remove the Diffuse texture, then change the rest of the Settings as below:
Diffuse : 235,134,157 – But you can use any other color you like as well.
Specular : 211,211,211
Illumination : 0,0,0
Ambient : 0,0,0
The low Opacity value can increase the rendering time a lot. So you can keep it at a 100% if you want to get a much quicker render.
Step 5
Make the original shape layer visible by clicking inside the empty box next to it, then go to 3D > New 3D Extrusion from Selected Path, and change the Mesh’s Extrusion Depth to 20.

Under the Cap tab, change the Sides to Front and Back, the Width to 2%, and the Contour to Half Round..
Apply the same Ellipses‘ material to this mesh as well.
Step 6
Drag the original shape layer to the top, then select all the 3D layers you have.
Go to 3D > Merge 3D Layers to place all the meshes in one scene.
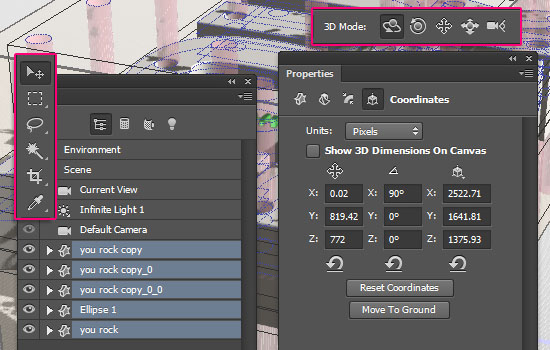
Select the Move Tool and check its Options bar. You’ll find a set of 3D Modes for the tool to the right of the bar. When you choose one of those, you can then click and drag to perform any changes (on the selected element in the 3D panel).
Click the Current View tab in the 3D panel to change the camera angle.
Then, select all the 3D mesh tabs in the 3D panel, click the Coordinates icon in the Properties panel, and change the X Rotation Angle to 90. After that, go to 3D > Move Object to Ground Plane to make sure it is not floating above the ground.
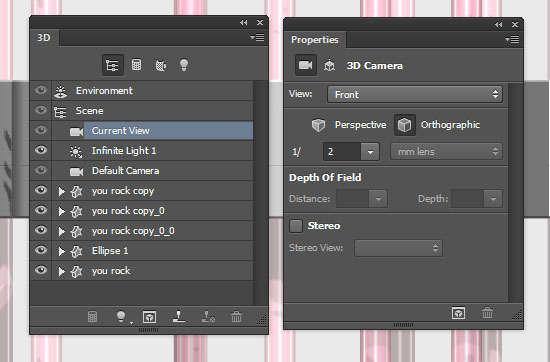
Click the Current View tab in the 3D panel again, then choose Front from the View drop down menu.
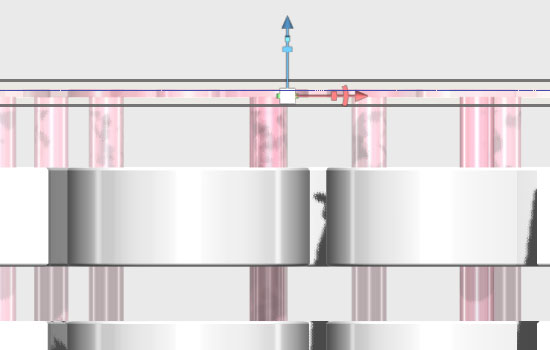
Zoom in if needed, pick the Move Tool, and start placing the meshes as you like vertically. Click the mesh in the 3D scene (or select its name in the 3D panel), and use the 3D Axis to make any changes.
The arrows at the ends of the axis move the mesh, the part below them is used for rotation, and the cubes are used for scaling. The cube in the center is used to scale the object uniformly. All you need to do is click and drag the wanted part.
You might as well need to check the Top view to make sure all meshes are in place.
Click the Default Camera tab in the 3D panel when done, then click the Infinite Light 1 tab, and change its Shadow Softness value to 30%.
Use the Move Tool to get a camera angle you like for the final render, and when done, go to 3D > Render.
The rendering might take some time, especially if you are using transparent materials. But you can stop it any time by pressing the Esc key.
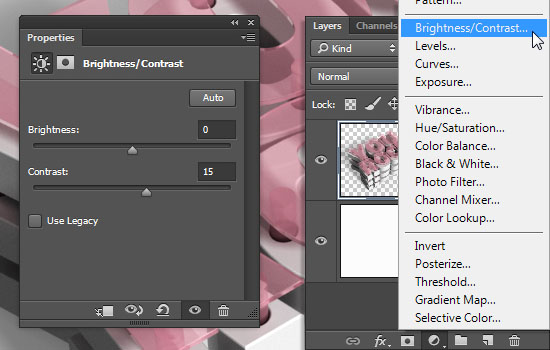
When the rendering is done, click the Add new fill or adjustment layer icon down the Layers panel and choose Brightness/Contrast, then change the Contrast to 15.
And you’re done!
Hope you enjoyed the tutorial and found the tips and tricks used helpful 🙂
Did you enjoy this post? Please consider donating to help us cover our server costs.


Photoshop is not allowing me to set the extrusion value to 250 px. It says invalid numeric entry Why?
250 px is 6,61 cm. You can use this way.
I am not able to use pixels in the 3d properties panel for the extrusion depth. Do I have to convert pixels to inches?
What is the document Resolution you’re using please (Image > Image Size)?
Can you use the slider to change the value?
“Create a new layer, click the Geometry Options icon again, and change the Fixed Size‘sW and H values to 33. Choose the Combine Shapes option”
The ‘Combine Shapes’ option is greyed out when the new empty layer is selected… :S
Create the first shape on the new layer, then try to choose the Combine Shapes option once again, It should work fine when you already have a shape on the new layer.
Hope this helps 🙂
Worked like a charm. Thank you 🙂
Awesome!
You’re very welcome 🙂
it work with cs6?
It should work fine. If you face any issues while creating it, please feel free to leave a comment 🙂
Now I’m using Cs6. A lots of opportunity to make anything like yours. But your creation must be like an inspirational quote for everyone who love Graphic Design.
There sure are. Almost any 3D text effect created in CC+ versions can be achieved in CS6 as well.
Super glad you enjoyed the tutorial. Your kind words mean a whole lot indeed!
Many thanks for the awesome comment 🙂
thanks for tutorial, my attempt
This is awesome! Nice color too 😉
Thanks a lot for sharing your work and for the comment.
This is my first time to use photoshop and I tried so hard to do that. And some of the steps are not easy for me. It took me 4 days to complete this 3D shape. Thank you very much for this good tutorial.
I really like how yours turned out, definitely well done!
Thank you very much for the comment and for sharing your work 🙂
Step 4. I just made the duplicate copies of the 3D layer and in step 4 it says to select Ellipse layer… There is no Ellipse layer? I might have missed something I’m not sure but this is my first time trying the 3D tools. I’m using CS6. Any thoughts?
It’s the layer of circles you created in the very last part of Step 1. Do you have that layer?
POSTED A DIFFERENT REPLY. I was confused about the ellipse’s size but after moving on with the tutorial I now know why they are so large. Sorry to bug you with this post.
No I’m working in cs6. In step 1 when you create the new layer and combine shapes on that new layer (for the inside of the holes) I am unable to do that on a new layer. ( I get an error telling me there are no pixels selected.) I can do it on the current layer but not a new layer. So I’ve been trying different things. I made the paths for the inside of the rivets holding the text together, duplicated the you rock copy layer deleted all the paths except for the inside of the rivets (combine shapes task is step 1) and filled the selection with 50% gray. Then I renamed the layer to ellipse 1 and it seemed to work (I did have to convert to 3D layer using the selection option) remembering to delete the the inside circle shape on the you rock copy layer. Then I got to the 3D merge of the layers the ellipse’s are huge which scared me but I know why now after moving the layers for the layered effect. I snap object to ground plane under the 3D pull down menu (my properties window doesn’t have the ground plane button). Anyway I’m trying to scale the ellipse’s but that’s not working either. This is my first time working with the 3D tools so I’m working blind. These are just a few things I’ve encountered maybe they will help someone else with cs6. I’m still working on a few things but will post my image when I’m finished. YOU DO ROCK. I LOVED THIS tutorial! It really gave me great exposure to the 3D tools. Thank you so much for sharing.
Are you sure you are using the Ellipse Tool and not the Elliptical Marquee Tool?
Can you please try to create a new layer for the ellipses, create the first circle, then click the Combine Shapes option, and continue creating the rest of the circles?
Also, make sure that you have the Shape option is selected in the Options bar at the top, and not Path or Pixels.
I think you did a great job working around the issue actually, so well done 😉
As for the size of the 3D ellipses, you just need to decrease the Extrusion Depth value in the Properties panel, or you can Scale them along the Z Axis (not uniformly).
Thank you very much for the absolutely kind words, they really made my day 😀
Step 4 I don’t have an Ellipse layer, I have no idea where that came from. Did you rename it?
Thank you for helping to take the big scary out of 3D, which i’m very new to. Great tutorial! Thanks so much for sharing your knowlege and technique.
That’s great to know!
Really glad you found the tutorial helpful.
Many thanks for the kind comment 🙂
A shape layer can have any color you like, actually. You can also remove the Diffuse texture and change the Diffuse color for each 3D mesh/layer you have.
So you can have as much colors as you like, whether for the shape layers, or for the 3D meshes. I would say that changing the Diffuse color is the more efficient way since you can get the right color in the 3D Scene.
Hope this helps.
Please feel free to leave any other questions you have 🙂
Thanks a lot for the kind comment.
Thank you very much for your kind reply.
I probably wasn’t very clear in what I am trying to achieve (and I’m a total noob with PS I’m afraid)
Maybe the attached picture clarifies what I am trying to do:
These two letters in my understanding have to remain on different layers to make sure they are not in the same color. When combining the initial layers (the one that are to be copied and extruded) only one color seems to be possible. At least I haven’t found how to maintain different colors.
After extrusion I can alter all the material properties all right but only layer wise. I cannot – as in my example – color the A red and the B blue, when I had the letters combined before. (Maybe with some filters?)
I CAN color any sublayer differently of course (like the one green A)
So if I wanted to have lets say 3 different shapes that need to be in different colors I needed to do all the extrusion steps 3 times. It gets confusing quickly 🙂 And PS warns about too many active light sources (which can be adjusted in the settings but I get the feeling that I would face some exponential growth and PS would give up eventually if I took it too far :))
Does that make any sense?
Thanks again if you take the time to reply once more!
https://uploads.disquscdn.com/images/32ab2527486efc49f441696e9f04ce552b4005a9c7c464d7f21c1eadaabc6bec.png
Sorry for the late reply.
I think I get what you mean.
One thing I would suggest is, once you extrude the letters you have, you can then select the mesh of the layer you want to give different colors, then go to 3D > Split Extrusion.
What this does is separate the selected 3D mesh, so that you can control each letter’s material separately as well.
So you basically create the 3 shapes in the same shape layer, extrude it, and if you like, you can merge it with the other 3D layers in one scene, then, you select the top layer’s mesh tab in the 3D panel, and go to 3D > Split Extrusion.
That will separate the shapes, and you should be able to assign different materials to each one of them.
The other layers will still be connected, though, unless you select each of the layers’ mesh tab, and split it as well.
Hope this helps.
Please feel free to add another reply if I still don’t answer your question, or if you have any other questions as well.
Regards 🙂
I am a graphic designer. Also i have a IT firm. I read this post. This is very useful for me.Thanks fot this post.
It is extremely helpful for me. Thank you for taking the time to discuss this. I feel strongly about it and love learning more on this topic. Thank You
We do our best and thank you for supporting our site !
Hey so I’m on step 3 trying to move the shape text to the New 3D Extrusion from Selected Path but it won’t allow me. The error says that the Selected Path is too complex. I tried with fewer letters (only 2) and the same error comes up, I also tried to not remove the ellipse shape from the text shape and the same happens… Any ideas?
Hi
I encountered a problem in merge 3d layers. After I selected all the shape objects (5) to merge, the objects farther in the back is larger than the front when I pressed the shift key when I executed the merge 3d layers command. If I did not press the shift key, the ellipses will not aligned and went through the holes. How should I fix this?
thanks
I am sorry for not including my ps version. it is ps cc 2017
How do I make the render faster. its telling me the estimated time us 6h;22m;41s.
Make another layer, tap the Geometry Choices symbol once more, and change the Settled Size’sW and H esteems to 33. Pick the Consolidate Shapes choice
Photoshop is the one of the best photo editing tool for its unique feature and most of the professionals use this tool. So here this article is so fabulous, the presentation of Photoshop 3d layer this is really awesome. This tutorial is really understandable for images every sector is really clear, if anyone see this first to last then they don’t need to see any video tutorial, because of images made this article so easy for understand. For image editor this is an ideal post, thanks man for your valuable information.
I also try to do create this type of text effect. Finally, i have done it for 3 hours.