
Chalk Text Effect
This tutorial explains how to modify a simple chalk brush then use it to create a nice colorful chalk text effect.
The Final Result

Tutorial Details
- Software Used : Photoshop
- Version : CS6 Extended
- Time : 0:30 – 0:45
Resources
- Blokletters Potlood font.
- Blank Vintage Chalkboard by Nicolas Raymond.
Step 1
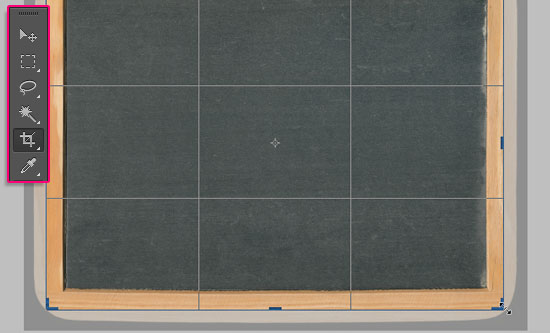
Open the Blank Vintage Chalkboard image, then use the Crop Tool to get rid of the corners and the black background.
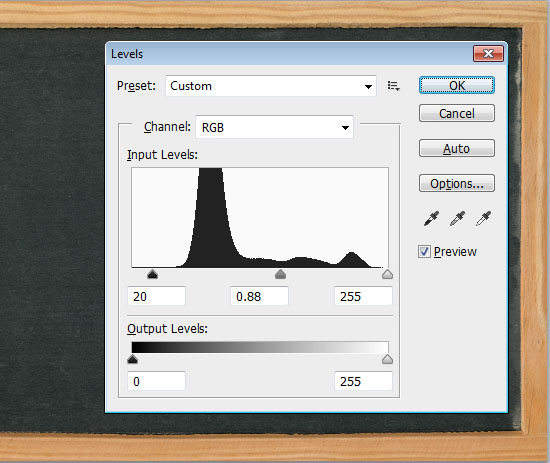
Go to Image > Adjustments > Levels, then change the Shadows value to 20, and the Gamma value to 0.88. This will darken the image.
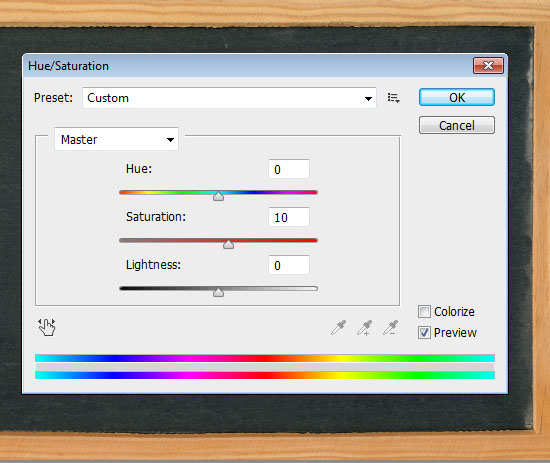
Go to Image > Adjustments > Hue/Saturation, and change the Saturation value to 10. This will make the colors a bit more vivid.
Step 2
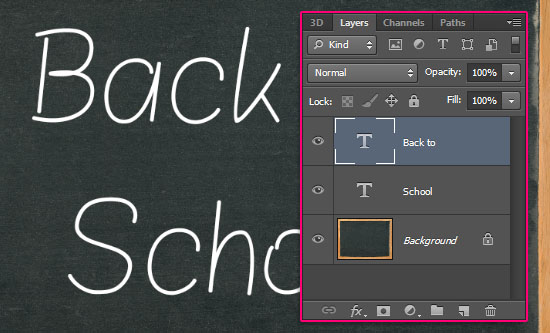
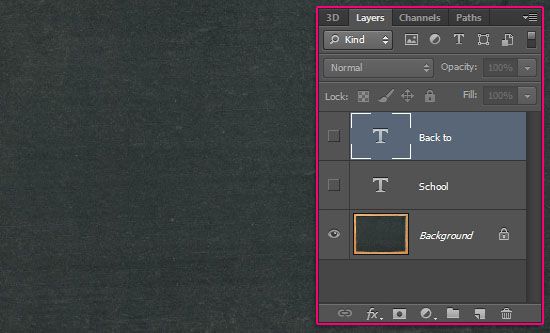
Create the text in white using the font Blokletters Potlood, and the font Size 270 pt.
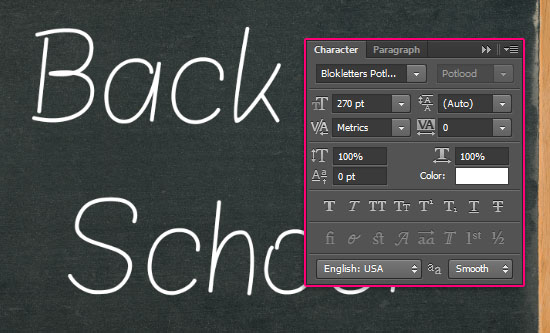
The text in this tutorial is created in two separate layers to demonstrate using more than one color, but you can go ahead and write your text in one layer.
Step 3
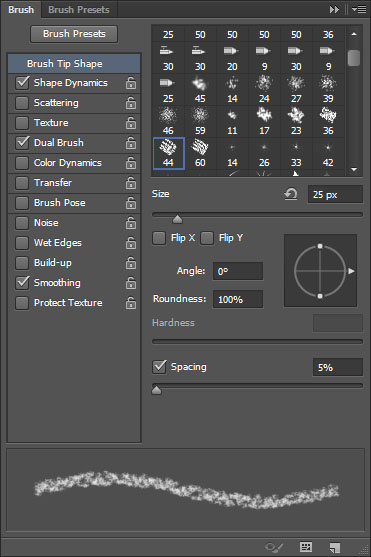
Open the Brush panel (Window > Brush), then modify the Settings as shown below:
Brush Tip Shape
Choose the Chalk 44 pixels brush.
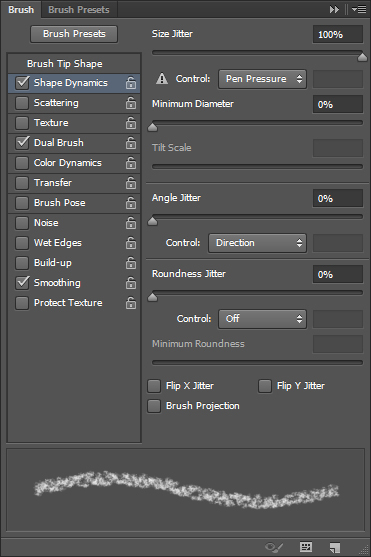
Shape Dynamics
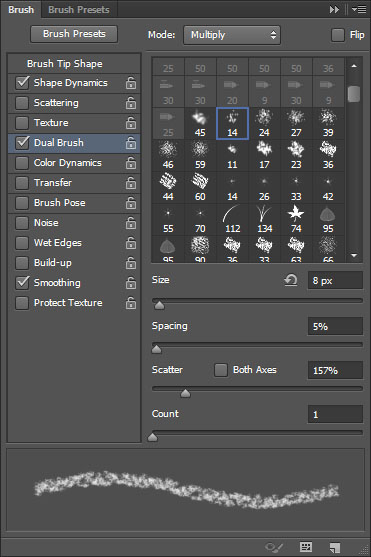
Dual Brush
Choose the Spatter 14 pixels brush.
Step 4
Make the text layer(s) invisible by clicking the eye icon(s) next to them.
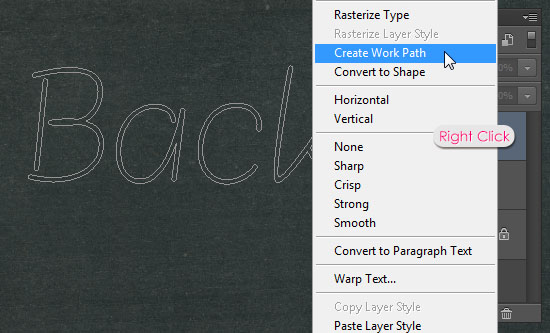
Right click the text layer and choose Create Work Path.
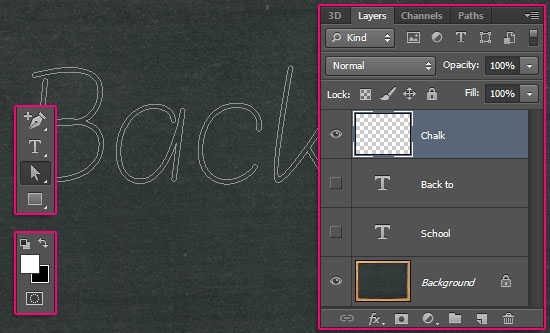
Pick the Direct Selection Tool, set the Foreground color to White, and create a new layer on top of all layers then call it Chalk.
Right click the work path and choose Stroke Path.
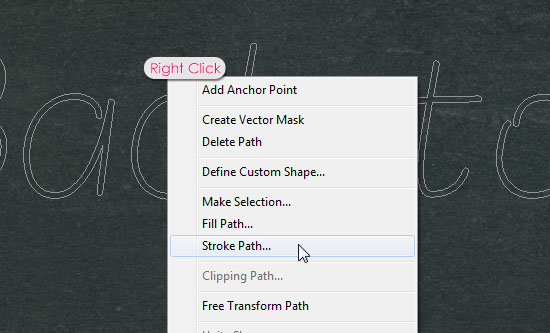
Choose the Brush option from the Tool drop down menu, and make sure that the Simulate Pressure box is un-checked.
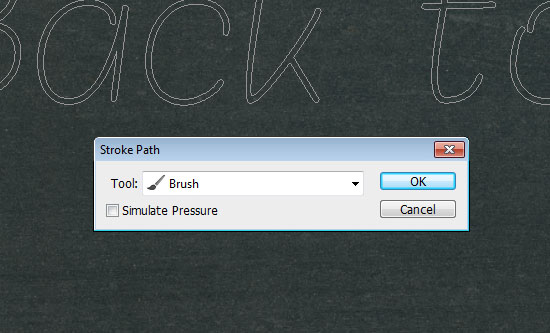
This will stroke the path with the chalk brush. Hit Enter to get rid of the work path. Keep in mind that different font sizes might need different brush sizes.

Step 5
To stroke each letter with a different color, you need to create the work path first, then, click and drag using the Direct Selection Tool to select the letter’s anchor points.
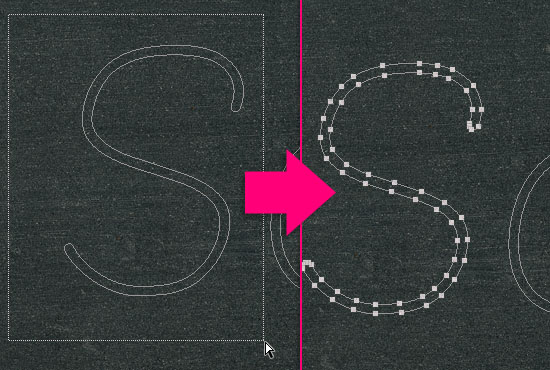
Set the Foreground color to whatever color you like, lighter tones will look better. Then, stroke the path as you did previously. Don’t hit Enter/Enter until you’re done stroking all the letters.

The colors used here are:
- S –
#f5989d - c –
#fff799 - h –
#bd8cbf - o –
#fdbd89 - o –
#79bcde - l –
#82ca89

Step 6
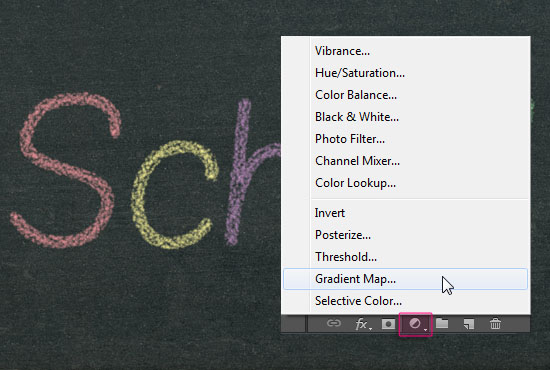
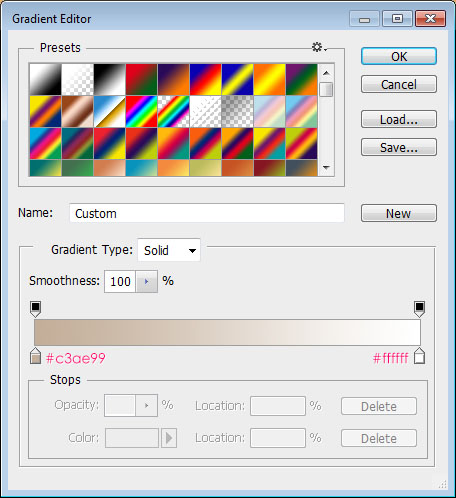
The last thing we’re going to do is add a simple adjustment layer to enhance the coloring a little bit. To do so, click the Create new fill or adjustment layer icon down the Layers panel, and choose Gradient Map.
Make sure that the adjustment layer is on top of all layers, then change its Blend Mode to Multiply and its Opacity to 40%.
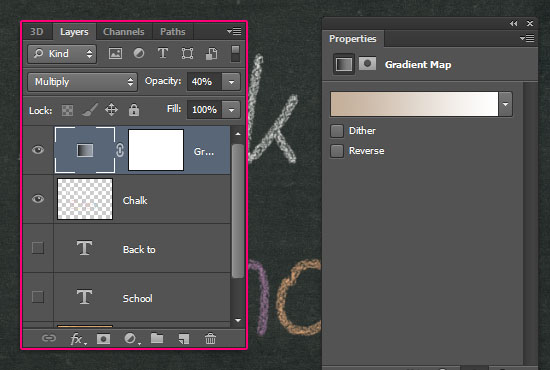
The gradient uses two color, #c3ae99 to the left, and #ffffff to the right.
And you have your chalk text ready! Old school stuff, but timeless indeed 🙂
This is a Facebook cover version (Right click > Save Image / as…).
Have a great school year 😉

Did you enjoy this post? Please consider donating to help us cover our server costs.


Fantastic – i love the chalk text.
Thank you so much for your great work . Thank you for sharing with us.
Glad you do 🙂
Thank you very much for your kind words.
Thank You! 😀
You’re welcome 🙂
Thanks for the comment.
Wonderful tutorial, I never thought of applying brush effects using your method, but I think it opens the door to a lot of other possibilities beyond a chalk board.
Thanks also for crediting and linking back to my chalk board image on deviantart (it’s me somadjinn 🙂 Do you think it would be too much to ask if you could change the link to point to the same image on my free stock photo website? http://freestock.ca/objects_g58-blank_vintage_chalkboard_p1679.html
At the same time, you might find other practical images to use in your tutorials.
Regards,
Nicolas Raymond
Glad you liked it. There are definitely many ways to use the brushes with all the settings available.
Sure can change the link 🙂 Thanks for the sharing your stock and for the kind comment as well.
Regards.
Welcome 🙂 I bought and scanned that blackboard with the intention of super-imposing type and graphics, and I’m glad you found good use for it too. I’d been thinking of doing the chalk texture part in Illustrator then importing to Photoshop and blending it in, but with this method it’s one less step for me to do in Illustrator.
Thanks for changing the link to freestock.ca by the way. It’s a relatively new website, so I appreciate every bit of extra exposure.
Cheers,
Nick
It’s always great to find such stock for free, so thanks for that 🙂
Glad you found the tutorial helpful as well.
Good luck with your website, and thanks once again.
Regards.
Great effect!!!!
Thanks!
Grandiosa idea , me encanta 😀 (y)
Great idea, I love it 😀 (y)
Glad you do 🙂
Muchas gracias for the comment 😉
Hi, thanks for sharing! I’m working with cs4 and it seams that it only strokes the path and not the filling. Even though I increase the brushsize. Can you help? What am I doing wrong 🙂
Are you using a different font or font size? Does the stroke thicken when you increase the brush size? You can either increase the brush size a bit more until the whole text is filled, or stroke the edges then fill the remaining parts manually.
Hope this helps. If the problem still exists please feel free to add a reply.
I work on cs6,after applying ur settings of brush i dint get the same look as of ur brush looks in the preview,also after applying the stroke path the effect is applied to the borders(i.e the two separate path of fonts)it doesn’t fill the work path.
I used a different font but i don’t think it would affect in any case.don’t know whats the problem:(
Can you help?
Actually, both the font and font size affect the result. When the work path is stroked, only the edges are affected, and the text is not supposed to be filled, but the brush size used here made it look so.
Please check my previous reply and it’ll hopefully clarify the matter a bit more.
Please feel free to add a reply if you have any other queries 🙂
I couldn’t get my font to 270 because of the size of the chalkboard. I did download the image instead of right click, but it was still too small for the size 270 font. Instead I have it at 70. I’ve already stroked each of the letters, and the font shows through – almost glowing. I tried clicking the eye on the text layers, but the chalk is too blurry when I do that. You mention that I can change the size of the brush. Can I do that after I have already done the stroke? Or do I need to go back to the beginning?
Thanks!
As for the image size, you might want to check the Resolution of the document you’re working with (Image -> Image Size). If it is not 72 (300 for example), you’ll need to create a new document and set it to 72, then recreate the effect.
And as for the brush size, this can be a bit confusing. If you can take a screenshot of the issue that’d help a lot. But I’m guessing this might have to do either with the resolution as mentioned above, or with the Opacity of the brush or the layer.
So when the Brush Tool is selected, make sure that both the Opacity and Flow values in the Options bar are set to 100%, and that the layer’s Opacity and Fill values are set to 100% as well.
Hope any of those tips help solve the problem. If not, please feel free to link to a screenshot please.
Regards.
I’m stuck at “Right click the work path and choose Stroke Path.” Should I be on the text layer when I do this? When I right click, I don’t get the menu, I get a box that only says “Background” or “Select Similar Layers.”
What is the chalk layer for?
You don’t exactly need to be on a layer, but the “Chalk” layer should be the active (selected) layer.
To get the “Stroke Path” option, you need to right click inside the document, not right click the layer itself.
Now the work path is basically created based upon the text itself, so that’s why you need to be on the text layer when you create the work path. The “Chalk” layer, however, is for adding the brush stroke, because the brush can’t be applied to the text layer itself unless it’s rasterized. And that will make both the original text and the brush stroke merged in one layer, which we don’t want. That’s why a separate layer is created for the brush.
Hope this helps. Please feel free to add a reply if you still have any questions.
Regards.
I figured it out. I needed to click on the pen tool in order to get the right click menu to show me the “Stroke Path” item.
Thanks so much for this tutorial!
Glad you did 🙂
Thanks a lot for the comment.
The result looks great. Thanks for the instructions.
Thank you for the nice comment.
Thank you…I must admit am kind of a “dev” guy–you know, php/javascript/databases and that sort. But(!), your easy-to-understand tutorials that give GREAT results are inspiring the creative “designer” in me. Good work–keep it coming!
That’s so cool!
Glad you’re enjoying the tutorials.
Thank you very much for your kind words, I really appreciate them.
Regards.
great thanks for this tut
You’re welcome.
Thanks for the comment.
This is awesome 😀
I will use it for my school facebook 🙂
Thank you very much ^^
That’s great!
Thanks a lot for the kind comment 🙂
i need the link of the brushes u used in this tutorial
They are Photoshop default brushes, so there is no download link. Can you find them in the Brush panel? Are you using CS6 or another version?
Hello, I love your tutorial so much, it looks so great.
But my question is, I find the chalk brushes, and follow your instruction, but it did not appear the same as you show on the step 3, help please? I use CS5. Thanks.
Can you please give more details? Like for example, how did yours turn out? What is the difference between the result you got and the one here?
You might need to check that the Brush Tool Opacity and Flow values are set to 100% in the Options bar. And also please make sure to use the exact same settings shown in the tutorial.
Please feel free to leave a reply with more details, and a screenshot of the problem if possible.
I only have a word. A 3 letter word actually. WOW.
Thank you, thank you very much!
Glad you like it 🙂
thanks for tutorial
this tutorial help me for my project for school
keep make a great tutorial
That’s great to know!
Thank you very much for the kind comment and for the support.
why when i stroke path is it just giving me the outline and not filling it in solid. I am new to Cs6 and the steps have me a bit turned around. Please help.
This might be because you are using a different font or font size. Please check this reply for more details.
This looks fabulous! This is the exact look that I am after, but I can make it work on my program. I have Photoshop Elements 8, and by going through your tutorial, the version you are using has a LOT more options available for the brushes. I guess that’s why I’m struggling, I don’t have that many options or even a menu for the brushes. Do you know anything about Photoshop Elements 8? Is there a way I can achieve your look with it?
The brush used is a Photoshop CS6 default brush, but I do believe you can find it in Photoshop Elements as well. Did you try resetting the brush preset you have to get the default brushes?
If you can’t find the used brush, you can use this one instead, and you’ll get a very similar result.
hope this helps.
Thank you so much for the comment.
So awesome. Thank you so much for this. What an excellent tutorial. A++
Very glad you like it.
Thank you very much for the kind comment and the A++, means a lot 🙂
have a file psd ??
Unfortunately, we do not provide PSD source files for free download.
But please feel free to add any queries you have and we’ll make sure to answer them.
Hi,
This tutorial looks great, and I have it almost looking the same, but the font size you’re using is way to big for the blackboard image I downloaded, am I missing something?
Did you make sure to download the blackboard image by clicking the download button below it and not right click then save?
Thanks a lot for the comment 🙂
This is awesome, thank you so much. I used your tutorial to create a chalk effect on a vintage frame brush. I’m using CS2 but it worked perfectly.
That’s great!
Thanks a lot for the comment.
After making this…
i’m remembering the School Days…
we make drawing with color chalk…
Now i’ll use photoshop for Chalk Drawing
Thank you so much for this tuts…
Yeah! Good ol’ school days!
I actually still prefer chalk to whiteboard!
Have fun with it.
Thank you very much for the nice comment.
THANKS YOUR TUTS!
IT’S EASY!
Amazing outcome!
Thanks a lot for the comment and for sharing your work 🙂
i create action for this effect ! but when write “hi teacher” and start action ,but write “back to school” !! … how to solve this problem! plz hlp me
Not really sure how you recorded the action, but this might be because you recorded creating the text, while you should start recording after that.
Hope this helps 🙂
why i cant be like you ? the brush is just follow the work path line , help me !
but , somehow , it’s good ! thanks (^_^)/
Are you using a different font size? That might be the issue.
You can manually fill the empty spaces though 🙂
Was a bit disappointed as this tutorial is out of date. I assumed it would still work in newest Photoshop but even though I searched for tools that were in other areas, settings did not work as indicated. It may help a little to create my own method, but not exactly user-friendly anymore.
Turn photos into chalk effect with this cool technique:
http://www.psd-dude.com/tutorials/chalk-effect-photoshop.aspx