
Lace Stroke Text Effect
In this tutorial, we are going to create a lace brush and modify its settings to create a lace-like stroke, and then, apply some Layer Layer Style to finish up the text effect.
The Final Result

Tutorial Details
- Software Used : Photoshop
- Version : CS5 Extended
- Time : 0:45 – 1:30
Resources
- Damask Modern pattern by TechII.
- Fontleroy Brown NF font.
- Ivory Layer Style.
- Texture-cracked wall by iFlay.
Step 1
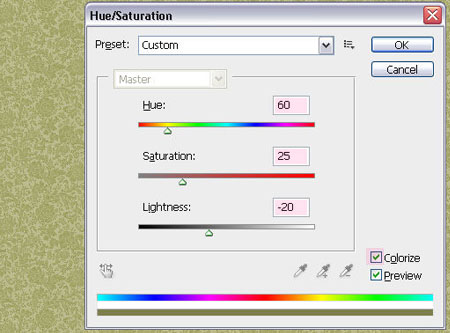
Open the Damask Modern pattern and set the Foreground color to #a9834f.

Go to Image > Adjustments > Hue/Saturation, or press Ctrl/Cmd + U, and check the Colorize box. Then, change the values as shown below.
When you’re done, go to Edit > Define Pattern, and type in Background Pattern for the name.

Step 2
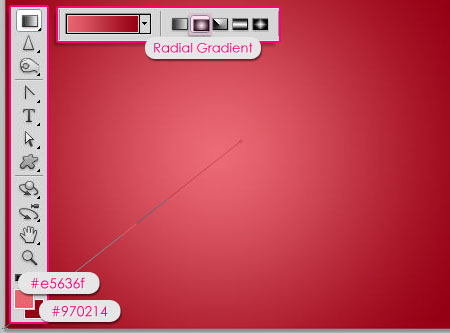
Open a new 1280 x 1024 px document, set the Foreground color to #e5636f, and the Background color to #970214, then create a Radial Gradient by clicking on the center of the document and dragging to one of the corners.
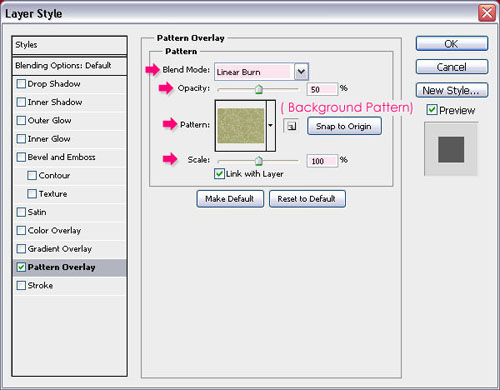
Double click the layer and apply a Pattern Overlay effect, change the Blend Mode to Linear Burn, the Opacity to 50%, and choose the pattern you’ve just defined.
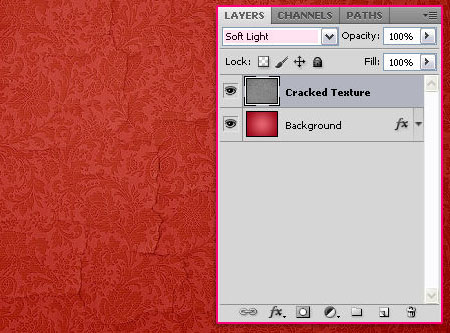
The Background should look like this.
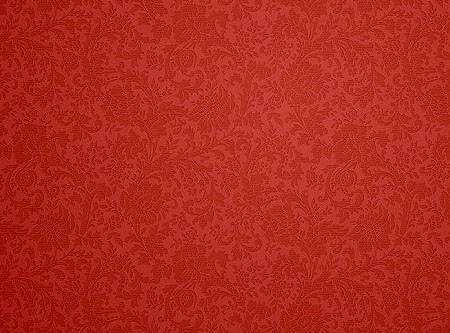
Place the Texture-cracked wall image on top of the Background layer, and change its Blend Mode to Soft Light. This will create a nice background.
Step 3
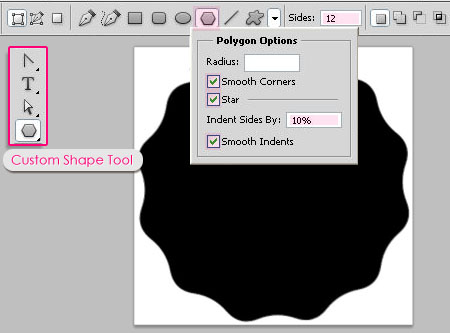
Create a new 270 x 270 px document, and pick the Custom Shape Tool. In the Options bar, click the Polygon Options pop-up menu, then check the Smooth Corners, Star, and Smooth Indents boxes, change the Indent Sides By to 10% the number of Sides to 12.
Draw the shape so that it fits within the document, and make sure that its color is Black.
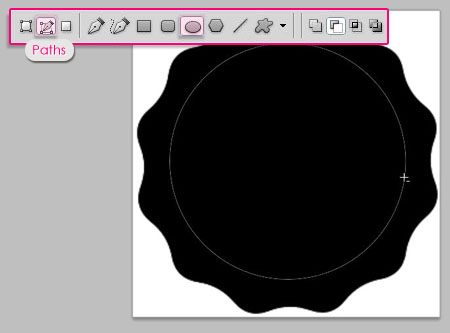
Pick the Ellipse Tool, and click the Paths icon in the Options bar. Create an elliptical path as shown below.
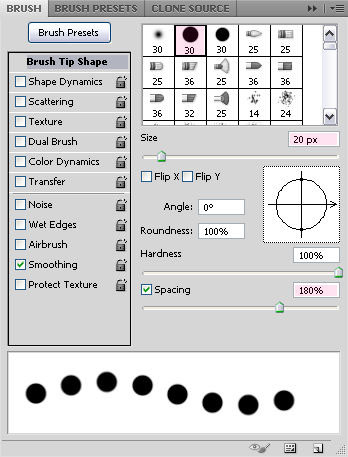
Choose a hard round brush, and open the Brush panel (Window > Brush) to change its Size to 20 px and the Spacing to 180%.
Create a new layer on top of the shape layer, set the Foreground color to White, and pick the Ellipse Tool once again, then right click the path to choose Stroke Path.
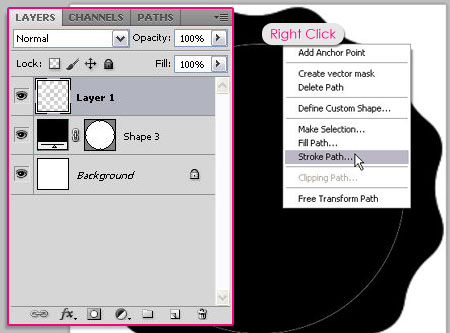
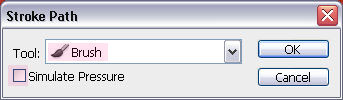
Choose Brush from the Tool drop down menu, and make sure that the Simulate Pressure box is un-checked.
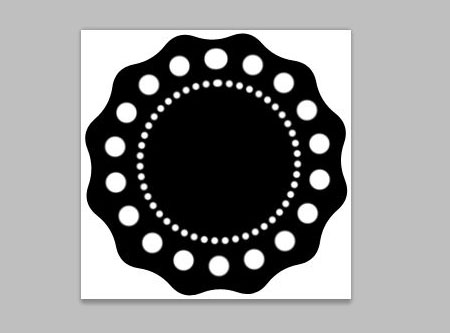
This will stroke the path with white circles. Hit Enter/Return to get rid of the work path.

With the Ellipse Tool still active, draw another path that is smaller than the previous one.

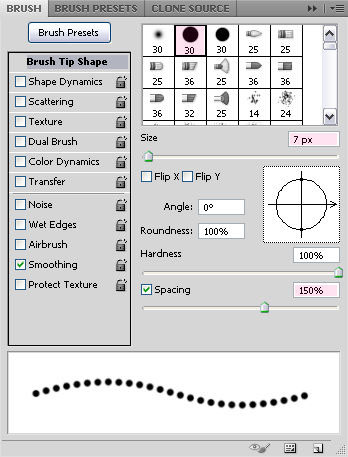
Pick the Brush Tool and change the Size to 7 px and the Spacing to 150%.
Pick the Ellipse Tool again, and follow the same steps to stroke the new path with the new brush.
Remove the eye icon next to the white Background to make it invisible, then go to Edit > Define Brush Preset, and type in Lace for the name of the brush.

Step 4
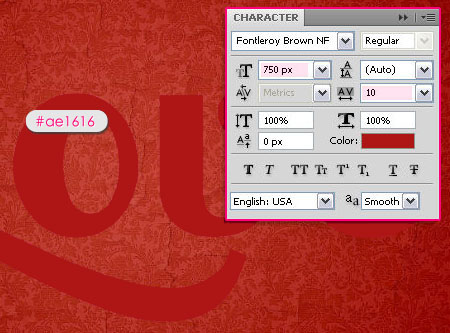
Back to the original document, create the text using the color #ae1616. The font used is Fontleroy Brown NF, and the Size is 750 px. I also changed the Tracking value to 10 to avoid overlapping.
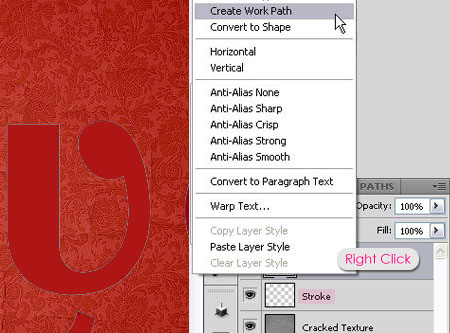
Create a new layer under the text layer and call it Stroke. Then right click the text layer and choose Create Work Path. Once the path is created, select the Stroke layer once again.
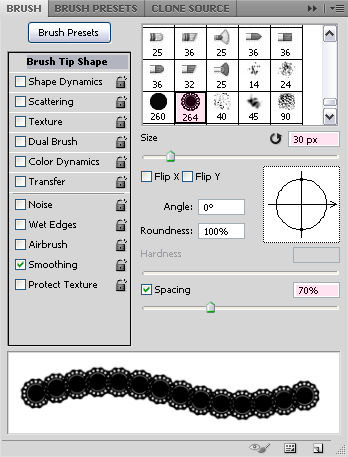
Choose the Lace brush you’ve just created, and in the Brush panel, change the Size to 30 px, and the Spacing to 70%.
Set the Foreground color to #f5f4e6, pick the Direct Selection Tool and right click the path to choose Stroke Path.
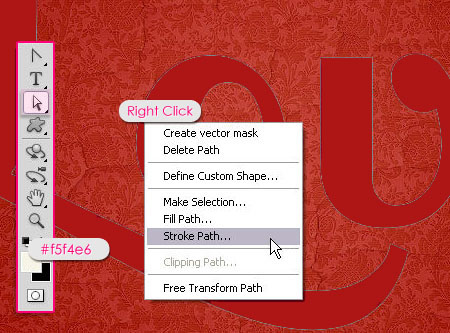
Choose Brush from the Tool drop down menu, and make sure that the Simulate Pressure box is un-checked.

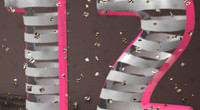
The text should now have a nice lace-like stroke.

Step 5
Double click the Stroke layer to apply the following Layer Style:
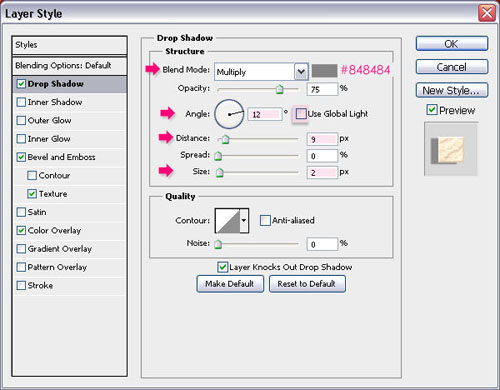
– Drop Shadow
- Color :
#848484 - Uncheck the Use Global Light box
- Angle : 12
- Distance : 9
- Size : 2
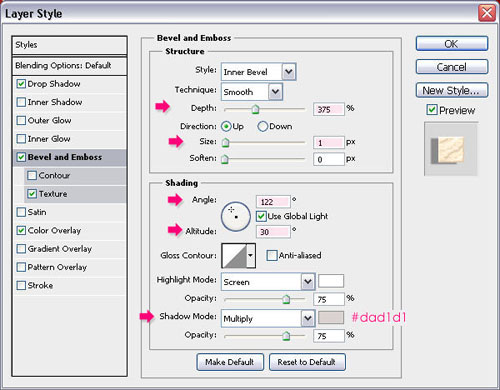
– Bevel and Emboss
- Depth : 375
- Size : 1
- Uncheck the Use Global Light box
- Angle : 120
- Altitude : 30
- Shadow Mode – Color :
#dad1d1
– Texture
- Pattern : Ant Farm
- Depth : 35%

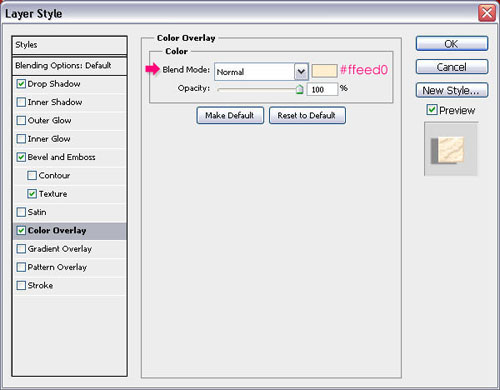
– Color Overlay
- Color :
#ffeed0
Step 6
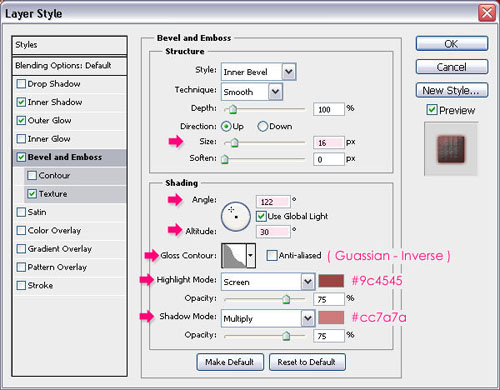
Double click the original text layer to apply the following Layer Style:
– Inner Shadow
- Color :
#b65252 - Uncheck the Use Global Light box
- Angle : 120
- Distance : 0
- Size : 16

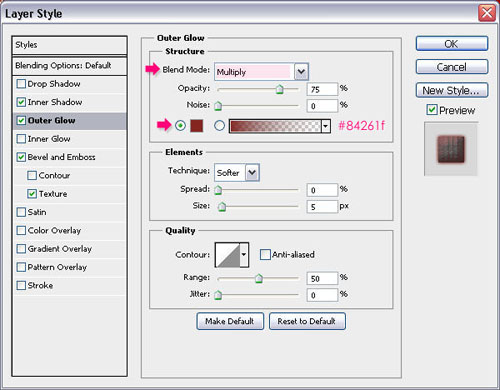
– Outer Glow
- Blend Mode : Multiply
- Color :
#84261f
– Bevel and Emboss
- Size : 16
- Uncheck the Use Global Light box
- Angle : 122
- Altitude : 30
- Gloss Contour : Guassian Inverse
- Highlight Mode – Color :
#9c4545 - Shadow Mode – Color :
#cc7a7a
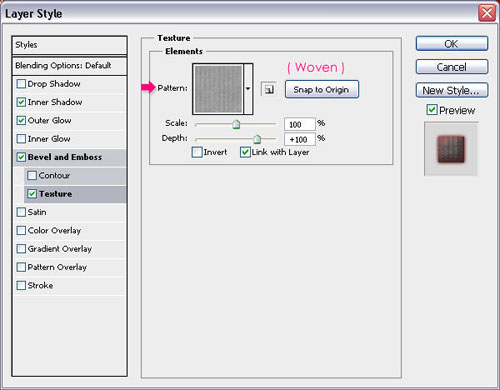
– Texture
- Pattern : Woven
Step 7
This is optional, but you can create a new layer on top of all layers, set the Foreground color to #f5f4e6, and choose a hard brush to draw some circles in order to create the flowers, then apply the Ivory Layer Style.
This is the final outcome!
Did you enjoy this post? Please consider donating to help us cover our server costs.


Really nice Tutorial, very creative way. But I got one more question:
What font are you using for “All you need is”?
Thanks a lot for the comment.
The font used is “Machia”, you can download it from here
i really enjoyed this tutorial.
see my name :
http://www.facebook.com/photo.php?fbid=181567995219018&set=a.147944271914724.25991.146832372025914&theater
i didnt got step 7…
how we can add this layer style in photoshop?
Hey beenish!
That looks awesome! Very well done!
As for Step 7, you need to download the .zip style file and extract it to get the .asl file. Then, open the Styles panel (Window -> Styles), load the .asl file (check this link to know how to do so), and finally, select the layer you’ve drawn the circles on, and click on the new style that appeas in your style panel after loading it, this will apply the style to the layer.
Hope this answers your question.
Thanks for the comment 🙂
Loved your tutorial! I am still learning Photoshop and these tutorial are so well written and teaching me so much. Thanks again!
I’m glad you found the tutorials helpful. Thanks a lot for the comment.
Wow! Great tutorial…^^ thanks..
Where can I get the some nice layer styles?
Please recommend site like you used it.
Hey Moai,
Thanks for the comment. I actually create all the layer styles I use, but you can search deviantart.com for layer styles or simply google “free photoshop layer styles”. Hope this helps!
Thank you..^^
Have a happy day.
Love your tutorial, just wanted to check…… why does your font used for LOVE look different to the Fontleroy Brown NF download? or did you just play around to make it your own 🙂
LOL Don’t worry I figured it out, the settings were wrong and they were coming out in caps….. silly me 🙂 But still a wonderful tutorial.
Hey Kez,
Glad that you liked the tutorial, and figured out the font issue 🙂
Thanks a lot.
Nice and simple.
BTW, love the background.
Thanks a lot!
waaaaaaaaaaaaaaaaaaaaaaw fantactec>> 🙂
^_^
Thanks lola!
I am in the middle of following this tut and I just have to say, thank you for creating it and sharing it freely with us. I sigh at how pretty it is every time I look at the end result.
Aww Susananana! Thank you so much for your kind words, they really mean a lot 🙂
I’m glad you liked the tutorial. Thanks for the lovely comment once again!
Parabens pelo excelente tutorial. Muito lindo . Por favor; se possível eu gostaria de conseguir a “TEXTURE ANTI FARM ” mencionada na 3ª figura da 5ª etapa. Muito obrigado e um grande abraço. Carlos Alberto , da Cidade do Rio de Janeiro – Brasil.
Hello Carlos,
Thank you so much for your comment.
As for the Ant Farm pattern, I’ve added it to the resources section, you can download it here. You just need to extract the file and then load the pattern to use it.
Obrigada once again.
Very nice tut, thanks a lot for sharing, 🙁 I can’t found the Gussian Inverse gloss contour
Hello Hayde,
Please check this image to see how to get the contours.
Hope this helps.
Thank you for the comment.
thank you, thank you, thank you, mmm can I show my results, it´s a little different, maybe because of texture, I use CS5 in spanish, I think I use a wrong texture :S
Lol thank you very much again 🙂
You’re welcome 🙂
Of course you can! I would definitely like to see your outcome of the tutorial, so you can post a link to it in a comment, and I will check it out.
Cheers.
Here is my result :S
http://i389.photobucket.com/albums/oo339/Tamara_75/lunialbum/Clases/PS/Letrasconencaje.jpg
Hey Hayde,
Your result looks awesome! I like how it turned out a bit different. I guess you might really be using a different texture (the original one is this one). Or the size of the text might be the reason, as for a smaller text size you might need to decrease the “Scale” value of the Texture.
But other than that, I think you did a really good job!
Thanks for the link and the comments.
Cheers 🙂
Thanks a lot, I always have problem with the font size, thanks for show me where I can find the texture :). I’m lerning a lot with your tuts,
Gracias 🙂
You’re welcome 🙂
Glad you’re finding the tutorials useful.
Love this look of the lace outline. Fantastic tut, very complete and well-explained. Thank you!
Thank you so much for the kind words 🙂
It was an awesome tutorial. It was really interesting. But, I cannot figure out how did u get the brush marked outside of the text and not all over it. I am getting it all over the letters and not outside of the text alone. Help pls..
Hello Azrim,
The order of the layers is important, you need to get the stroke layer under the text layer, so that the text covers the inner part of the stroke, does this work?
Thanks for the comment 🙂
This is one of the best tutorials I’ve seen. Love, Love, Love it! I would love to know where you learned to be so good at photoshop?
Thanks so much for this!
Wow! Thank you so much! I really appreciate it 🙂
I am self-taught, and I’ve learned most of the stuff through the tutorials around the web. It takes so much practice and passion to be good at anything, and I’m always still learning!
Thanks once again.
Another great tutorial. Here is what I have done with it. http://losingsarah.deviantart.com/art/Lovely-Feelings-264308639
Very nice outcome, I like that you add your own touch as well 🙂
Thanks for the comment.
Very very nice my daughter is been asking me to do something with her name and this was perfect. Thank you very much.
This is how it came out.
http://www.facebook.com/photo.php?fbid=233853806678555&set=a.204747242922545.53767.200519723345297&type=1&theater
Thank you very much for the nice comment, I’m so glad you found this useful.
Very nice result as well 🙂
Cheers to Nathalie 😉
great tutorial. I like the background, the cracked texture and the lace text itself… excelent work!
Awesome! Glad you do.
Thanks a lot for the comment 🙂
I tried Stroke Path but it didn’t come out as expected? Please help! http://imageshack.us/photo/my-images/7/screenshot20120225at847.png/
Did you make sure to change the Spacing value of the brush?
Thank you so much for this tutorial! I do wish I’d found it months ago!
You’re welcome 🙂
Glad you found it anyway 😉
Thanks a lot for the comment.
Love this tutorial, however my lace pattern didnt come out as a strong white colour like yours. any ideas?
Thanks,
Sarah 🙂
Hello Sarah,
When you pick the Brush Tool, make sure that the Blend Mode in the Options bar (at the top) is set to Normal, and that the Opacity and Flow values are set to 100% each.
If the problem still exists, please feel free to leave a reply.
Thanks for the comment.
Fantastic tutorial! Your living expenses must be through the roof with many storage units you must need for all this creativity. Awesome work, on this and your many other tutorials. You’re my newest bookmark! 😉
Oh wow! Thank you very much for the kind words, they really made my day 😀
I’m so glad you like the tutorials.
Thanks once again for the comment.
Hi. Where can I get/ download the woven texture? I don’t seem to have it in my photoshop.
You need to go to Edit -> Preset Manager, and choose “Patterns” from the “Preset Type” drop down menu. Then, click the little arrow to the right of the Preset Type drop down menu, and click “Patterns” near the bottom of the pop-up menu. When the dialog box appears after that, just click Append, and you’ll get the pattern 🙂
Hope this helps.
Thanks! That helps a lot. Love the tutorial. 🙂
Glad it does.
Thanks for the comment 🙂
Hey great tutorial and cant wait to get it to work. But how in at the end of step 3 and beginning of step 4 do i make the holes transparent. When i use the magic wand tool it just makes them black.. Thanks in advance for the help and thanks again for this awesome tutorial!
You don’t need to make them transparent, just before you stroke the path, make sure that the Foreground color is set to White (#ffffff). This will stroke the path with white dots, and white represents transparent in a brush.
Hope this helps. If the problem still exists please feel free to add a reply.
Thank you so much for the comment 🙂
I really enjoyed the time spent trying to emulate your art. It was hard (it’s been short since I work with the program) but it deserved every second.
Below are my results.
With the original text:
http://i1092.photobucket.com/albums/i401/Serie-7/LaceStrokeTextEffect1.jpg
With my name:
http://i1092.photobucket.com/albums/i401/Serie-7/LaceStrokeTextEffect.jpg
Thank you for sharing!! 🙂
Beautiful outcome, well done 🙂
Glad you enjoyed creating them.
Thank you so much for the comment and the links.
It was awsome tutorial, but I had only one problem – the white color in laces and flowers isn’t bright. but more like grey. I’m new at Photoshop, I don’t know what I did wrong?!
When you pick the Brush Tool, make sure that the Opacity and Flow values in the Options bar at the top are set to 100%, and that the Mode is set to Normal.
Hope this helps. Please feel free to add a reply if the problem still exists.
Thanks for the comment 🙂
This is very beautiful tutorial 🙂 Love it. Here’s what i did for my girl. 🙂 http://i1140.photobucket.com/albums/n561/hwangminchan/edits/Jenie.jpg?t=1348761763
thank you for this tutorial. 🙂
Awww that’s so lovely! Hope she liked it 🙂
Thanks a lot for the comment and the link.
Does anyone have the brush for this ? (Lace Brush Preset) I have CS6 and it doesn’t seem to come out, I’ve tried it 7-8 times already, and so frustrated….and when I apply the inner circle (path) inside the polygon, it won’t come up in the layers pallete…Please help !!
At which step exactly do you get a different result? Can you please make sure you are working on the mentioned layers?
You might need to check that the “Shape” option in the Options bar is the active one (and not Paths) when creating the first shape.
If the problem is with the brush, make sure that the Opacity and Flow values are set to 100% in the Brush Tool’s Options bar.
If the problem is something else, please feel free to add more details, and screenshots of the issue if possible.
Regards.
So cute! It helped me a lot! Thank u so much (:
I love ur website! Congrats
That’s very sweet of you to say 🙂
Thanks a bunch for the kind words.
I learned so much from this! Thanks for taking the time to post it!
That’s great to know.
Thanks a lot for the kind comment.
So good! Thanks 🙂
Glad you think so 🙂
Thanks for the comment.
This work is very nice.
But I have a problem, how can I do the gaussian inverse contour?
Help me, please.
You need to load the Contours. Check this image to see how please.
Thanks a lot for the comment 🙂
Hi! I actually tried to create my own design based on your tut. It’s a great tut, btw. However, when I tried to create another word (with the same size, font, and color like “Love”), I cannot stroke path. I created work path and created new layer for stroke, but when I clicked “Stroke path” by select tool, it didn’t pop up any panel. I tried “Path channel” but I didn’t work. It would be nice if you can explain for me how “work path” works and “stroke path” works.
Thanks a lot!
I love you website too! <3
So you actually can click “Stroke Path”? Or is it grayed out?
When you mentioned “but when I clicked “Stroke path” by select tool”, did you mean the Direct Selection Tool? Because that is the tool that should be selected. This is shown in the 4th image under Step 4.
You might need to go to View -> Show -> Target Path (make sure it is ticked), or go to Image -> Mode, and make sure that the “8 Bits/Channel” is the selected option.
Also, please check the layers order, and make sure that there is no layer on top of the stroke layer blocking its contents.
Hope this helps.
If the problem still exists, please feel free to leave a reply.
Thanks a lot for the kind words 🙂
Hi, im from indonesia. Thx alot…this is very nice tutorial. Now i got my “cool’ bussines card design
That’s super awesome to know!
Many thanks for the nice comment 🙂
thank’s is very good job
Thank you very much 🙂
You need to load it. To do so, go to Edit -> Preset Manager, and choose “Patterns” from the “Preset Type” drop down menu. Then, click the little arrow to the right of the Preset Type drop down menu, and click “Patterns” near the bottom of the pop-up menu. When the dialog box appears after that, just click Append, and you’ll get the pattern 🙂
Hope this helps.
Brasil 😉 “make love, not war”
That’s really nice!
Looks like you’ve used different values somewhere, but it still turned out lovely 🙂
Thanks a lot for sharing your work.
Wow! This is gorgeous and turned out perfectly! Thank you so much! Cheers