
3D Letters on a Shelf Text Effect in Photoshop CC
This tutorial will show you how to use Photoshop CC’s Shape Attributes and 3D capabilities to create a simple, yet sophisticated 3D letters on a shelf text effect. The focus is on creating the shapes, working with the materials, and modifying the lighting in order to get the soft, kind of vintage looking final result.
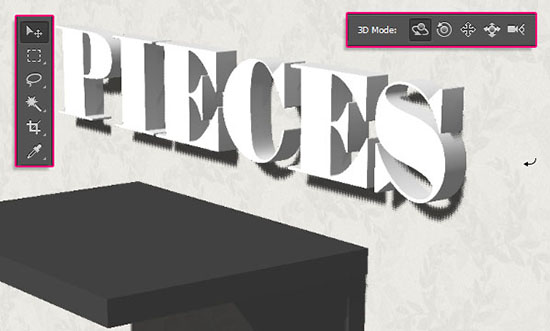
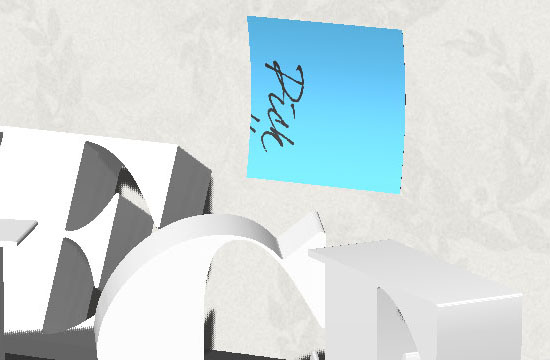
The Final Result

Tutorial Details
- Software Used : Photoshop
- Version : CC
- Time : 1:30 – 2:00
Resources
- Fette Bauersche Antiqua font.
- dearJoe four font.
- White Paper by dabbex30.
- Xv pattern by Lasma.
- csp_true_sky_gradients.grd Gradient file (at the bottom of the linked page).
Step 1
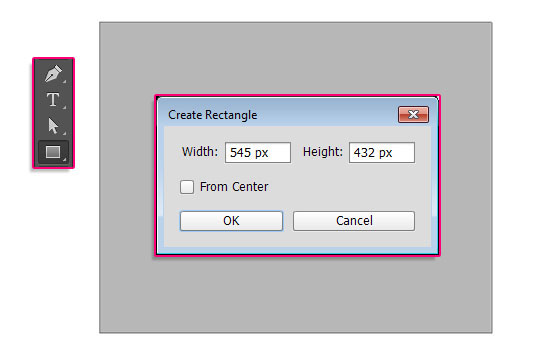
Create a new 1600 x 1200 px document. Pick the Rectangle Tool, then click once inside the document to get the Create Rectangle dialog box. In that box, set the Width to 545 px and the Height to 432 px, then click OK. Choose a light gray color for the rectangle.
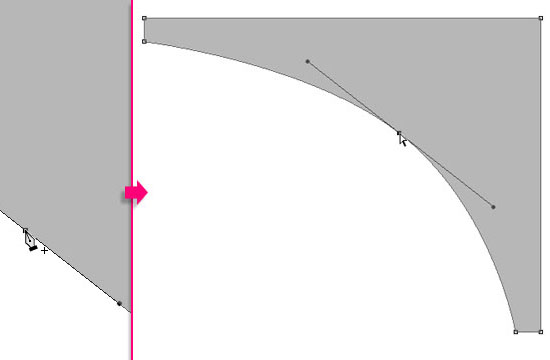
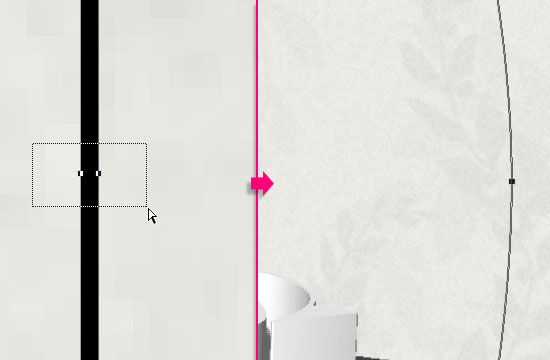
Pick the Add Anchor Point Tool, then add an anchor point near the top left corner, and another one near the bottom right corner.
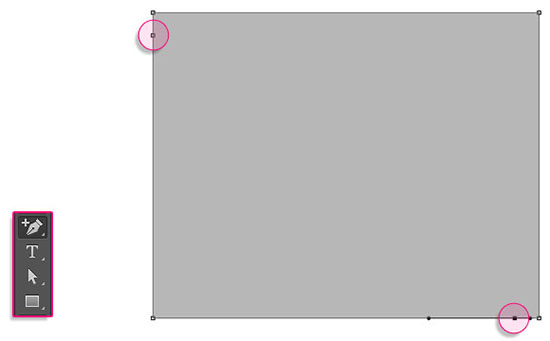
Pick the Convert Point Tool, then click each of the two points you added in the previous step once to convert the smooth anchor points to corner anchor points.
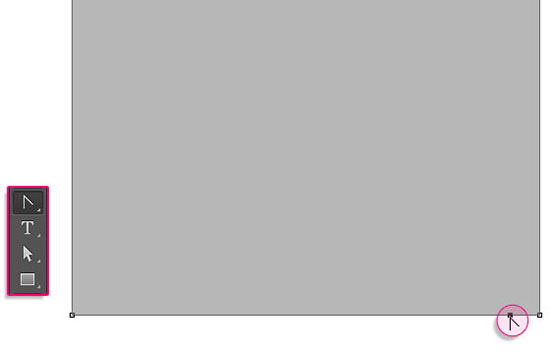
Pick the Delete Anchor Points Tool, and click the bottom left corner anchor point to delete it.
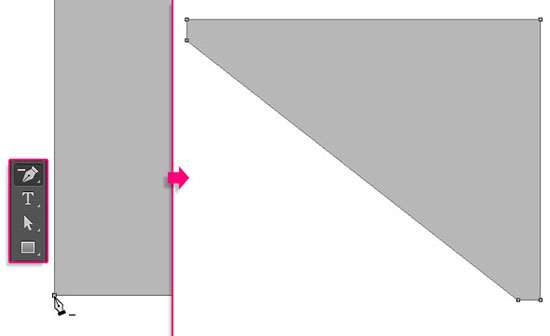
Use the Add Anchor Points Tool again to add an anchor point near the center of the resulting diagonal line, then select that point and move it inwards to form the shape shown below. This will be the lower shelf parts’ shape.
Use the Rectangle Tool to create a 545 x 35 px rectangle right on top of the shape you’ve created. This will be the top part of the shelf. Use a darker shade of gray for this rectangle.

Create the text in All Caps using the font Fette Bauersche Antiqua. The font Size is 200 pt, but it doesn’t really matter since you’ll be able to scale the text when you convert it to a 3D mesh anyway.

Create a new layer on top of the Background layer and call it Wall, then fill it with the color #e9e9e9.

Step 2
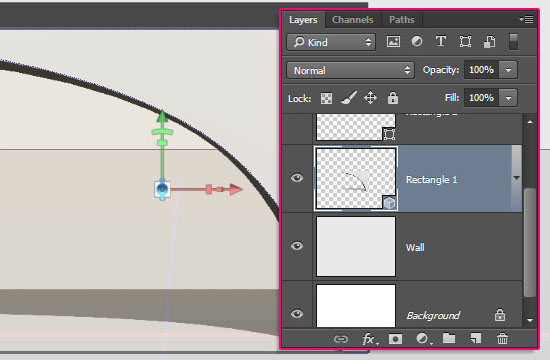
Click the Rectangle 1 layer, then go to 3D > New 3D Extrusion from Selected Path. This will convert the shape layer into a 3D layer.
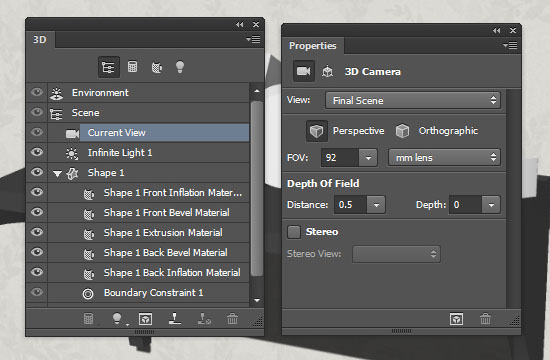
To access the 3D mesh settings and properties, you’ll need to open two panels: The 3D panel, and the Properties panel (both found under the Window menu).
The 3D panel has all the components of the 3D scene, and when you click the name of any of those, you’ll be able to access its settings in the Properties panel. So make sure to always select the name of the element you want to modify in the 3D panel before you change its settings in the Properties panel.
Select the Rectangle 1 tab in the 3D panel, and change its Extrusion Depth in the Properties panel to 85 px.
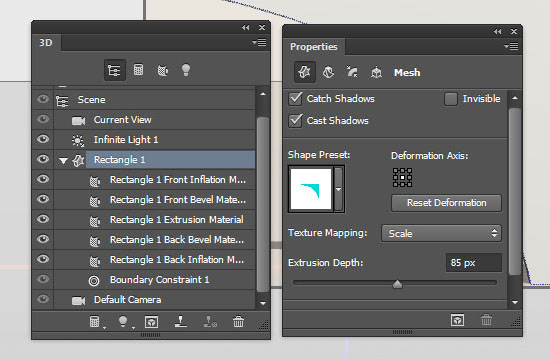
Click the Cap icon at the top of the Properties panel, and change the Bevel Width to 1 and the Contour to Half Round. This will help make the edges less harsh.
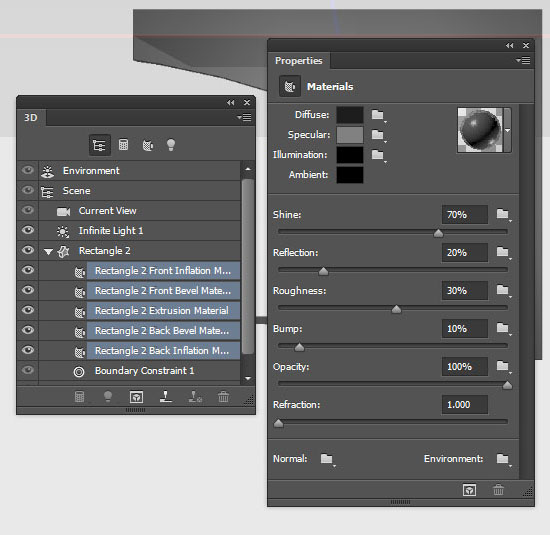
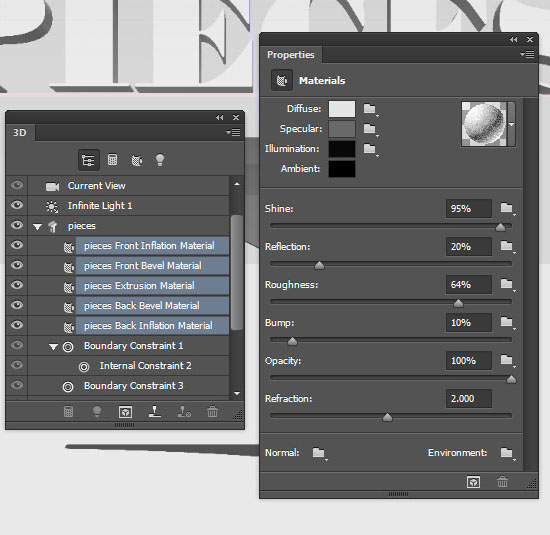
Select all the Rectangle Material tabs in the 3D panel, then click the Diffuse texture icon in the Properties panel and choose Remove Texture.
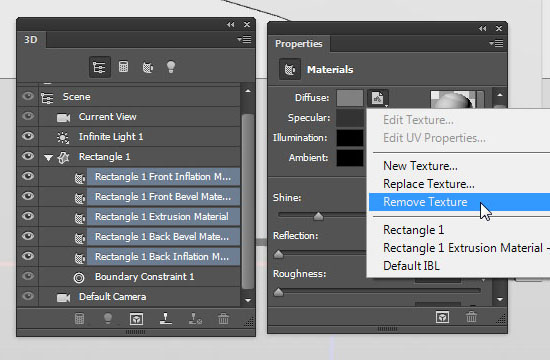
Change the Rest of the Settings as shown below. The colors in RGB are:
Diffuse: (29, 29, 29)
Specular: (129, 129, 129)
Illumination: (0, 0, 0)
Ambient: (0, 0, 0)
The Roughness value helps create a more realistic material.
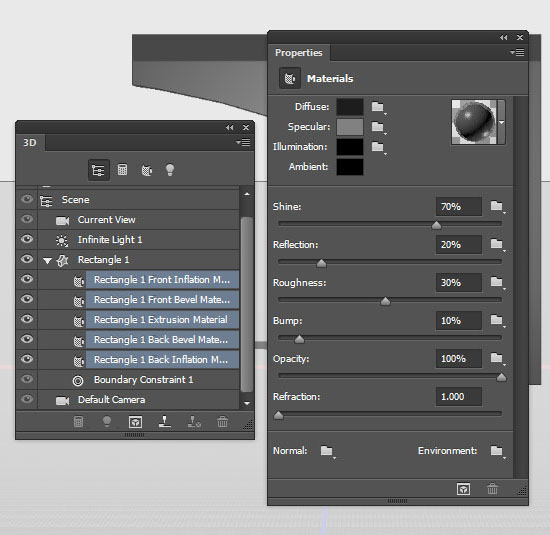
Duplicate the 3D layer after you’re done changing the values.
Step 3
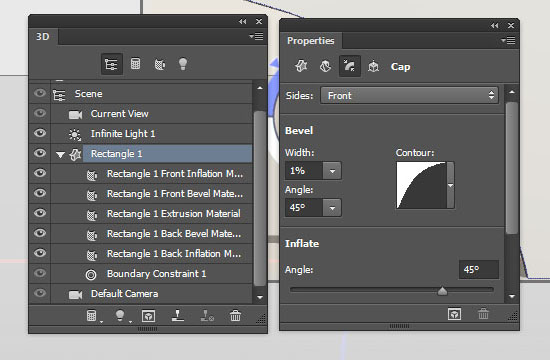
Select the Rectangle 2 layer, then go to 3D > New 3D Mesh from Selected Path. Change the Extrusion Depth to 2270.
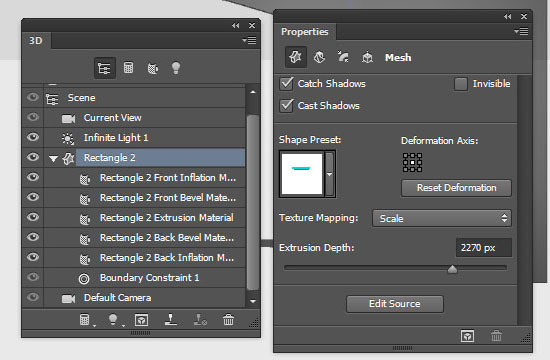
Click the Cap icon at the top of the Properties panel, choose Front and Back from the Sides drop down menu, change the Bevel Width to 1 and the Contour to Half Round.
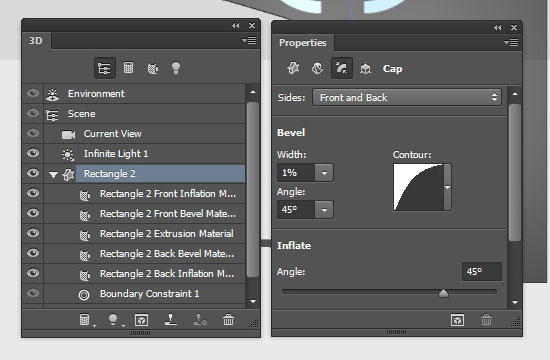
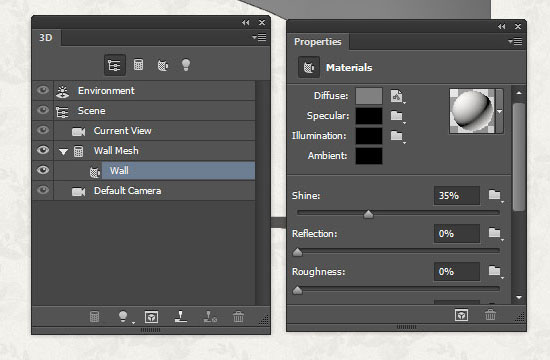
Select all the Material tabs, remove the Diffuse texture, and change the rest of the Settings to create the same exact material of the lower part of the shelf.
Step 4
Select the text layer, then go to 3D > New 3D Extrusion from Selected Layer. Change the Extrusion Depth to 200 px, or any other value you like depending on the letters’ size you want.
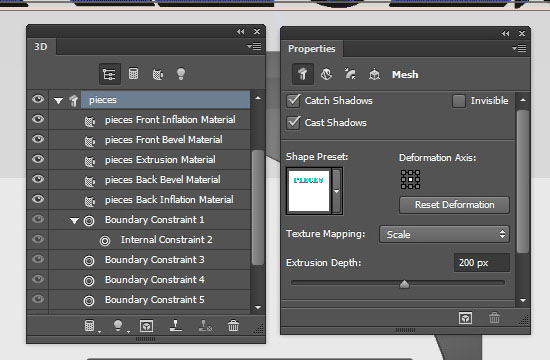
Click the Cap icon at the top of the Properties panel, choose Front and Back from the Sides drop down menu, change the Bevel Width to 1 and the Contour to Half Round.
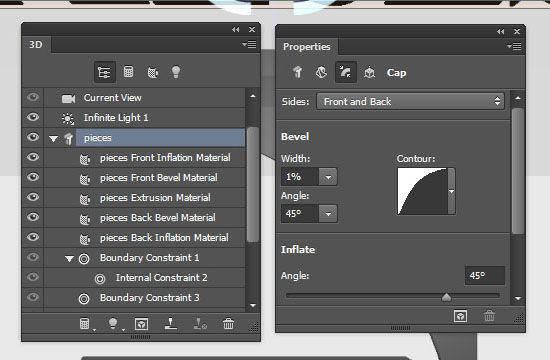
Select all the Material tabs, remove the Diffuse Texture, and change the rest of the Settings as shown below:
Diffuse: (229, 229, 229)
Specular: (105, 105, 105)
Illumination: (191, 191, 191)
Ambient: (0, 0, 0)
Step 5
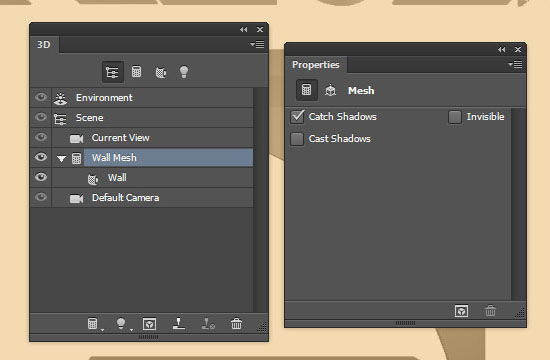
Select the Wall layer, go to 3D > New Mesh from Layer > Postcard. Select the Mesh tab in the 3D panel, then un-check the Cast Shadows box in the Properties panel. This will prevent the plane from casting any shadows, which will result in a cleaner outcome.
Click the Material tab, then click the Diffuse texture icon and choose Edit Texture.
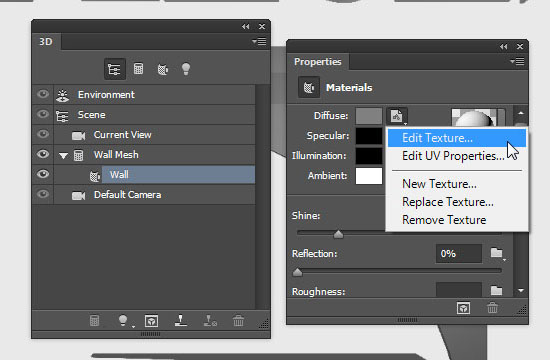
This will open the texture’s file, where you can edit it.
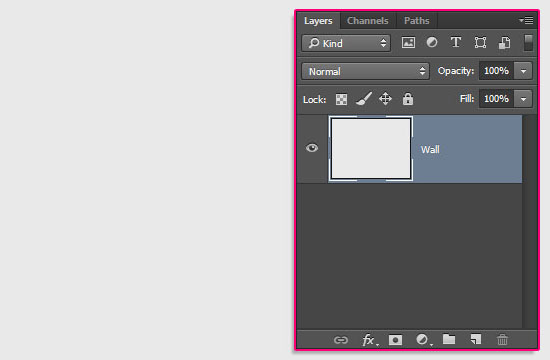
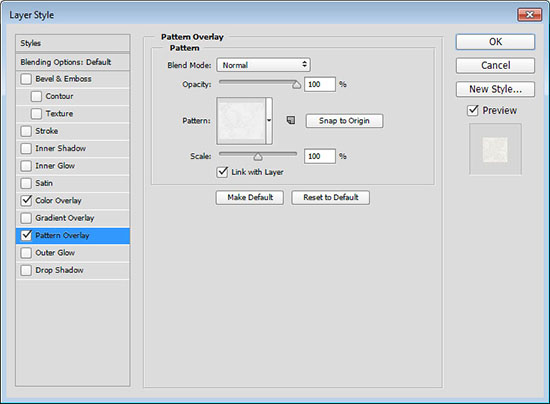
Double click the Wall layer to apply the following Layer Style:
– Color Overlay
- Color :
#7e7c77 - Blend Mode : Color
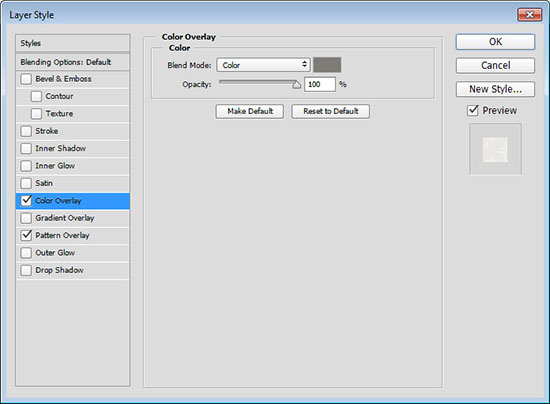
– Pattern Overlay
- Pattern : Xv
Go to File > Save, then File > Close to save the changes and apply them to the 3D document.

Change the Shine value to 35%, and if there is an Opacity texture, remove it.
Step 6
Drag the Wall layer on top of all layers, then select all the 3D layers you have.
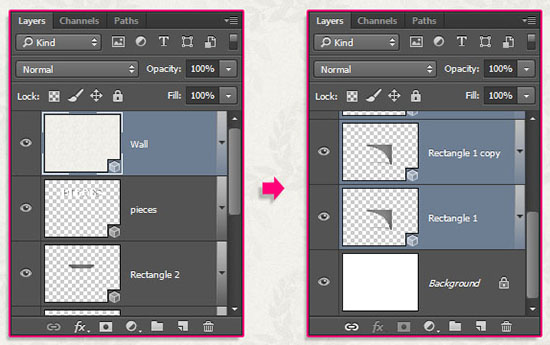
Go to 3D > Merge 3D Layers. This will place all the 3D layers in one scene. Rename the merged layer to Final Scene.
Step 7
Select the Move Tool and check its Options bar. You’ll find a set of 3D Modes for the tool to the right of the bar. When you choose one of those, you can then click and drag to perform any changes (on the selected element in the 3D panel).
So with the Current View tab selected in the 3D panel, you can click and drag to change the camera view.
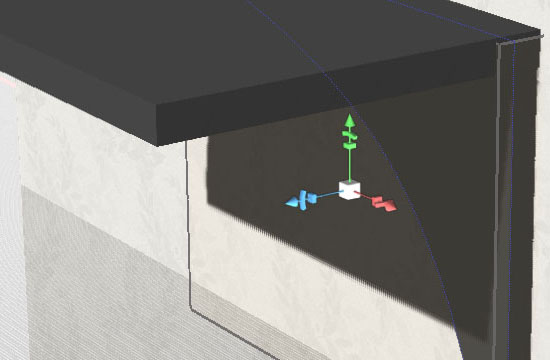
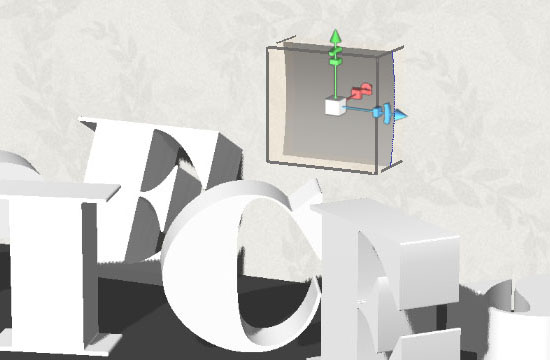
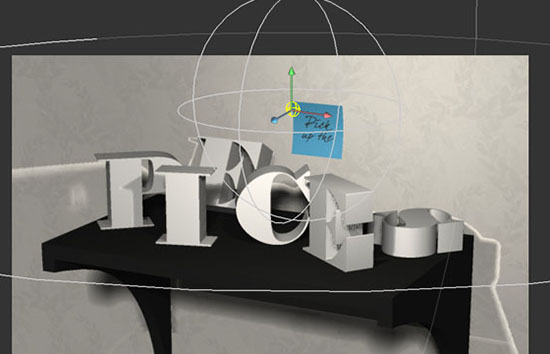
You can also use the 3D Axis to move the meshes around with the Move Tool selected. The arrows at the ends of the 3D Axis move the mesh, the part below them is used for rotation, and the cubes are used for scaling. The cube in the center is used to scale the object uniformly. All you need to do is click and drag the part you need to perform the changes.
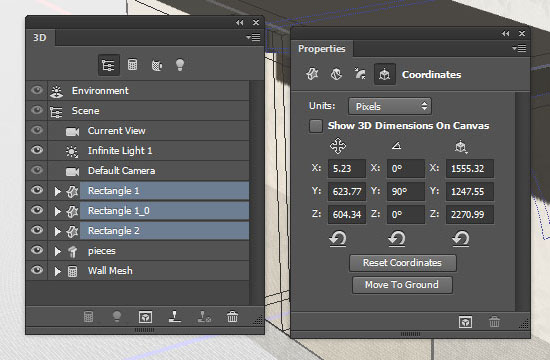
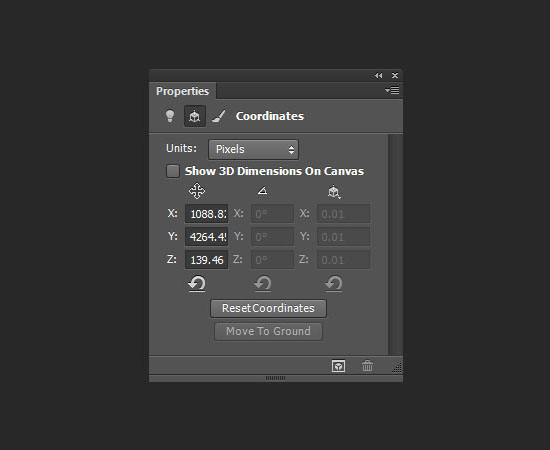
You can also enter numerical values for the meshes’ coordinates. So select all the Rectangle mesh tabs in the 3D panel, then click the Coordinates icon at the top of the Properties panel and change the Y Rotation Angle value to 90°.
Step 8
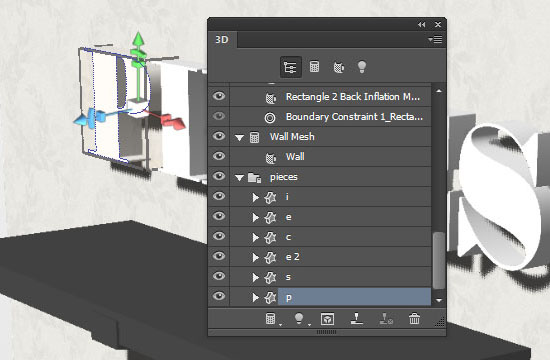
Select the text mesh name, then go to 3D > Split Extrusion. This will separate the text letters so that you can move each letter individually.
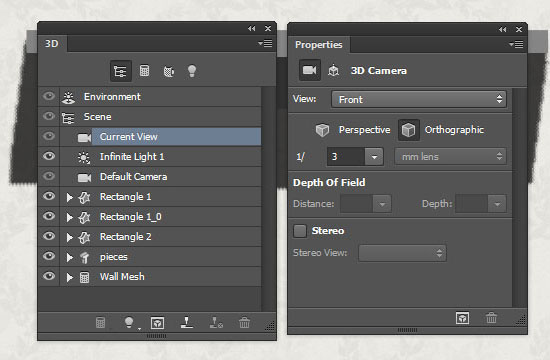
One of the tips to place the meshes accurately in the 3D scene, is to use the different camera views.
For example, click the Current View tab in the 3D panel, then choose Front from the View drop down menu in the Properties panel. You can then move the meshes and place them on top of each other much more easily.
Check out the different available views whenever you need to. You can always go back to the Default camera view when you’re done.
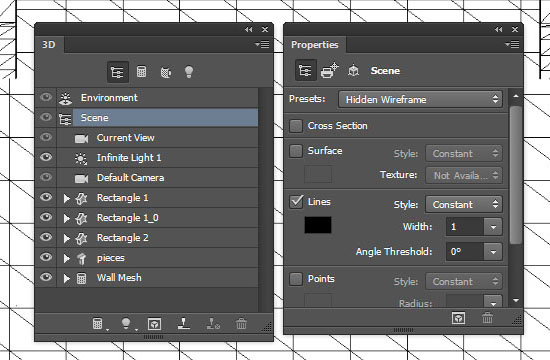
Another trick is to use the different Scene Presets. So if you click the Scene tab, you’ll find a list of Presets that you can use to make placing the meshes more convenient.
The Hidden Wireframe preset will help you better see the meshes’ borders, and it’s much lighter than the Default preset, so you can move the elements faster.
Once you’re done, make sure to choose the Default preset.
One last tip, is saving the final camera view you like. So after choosing a camera angle you like for the final result, you’ll need to go back and forth between the other camera views in order to place the meshes.
Instead of trying to get the view you like back each time after changing the camera view, you can simply save it and get back to it with one click.
To do so, click the Current View tab, then choose the Save option from the View drop down menu.
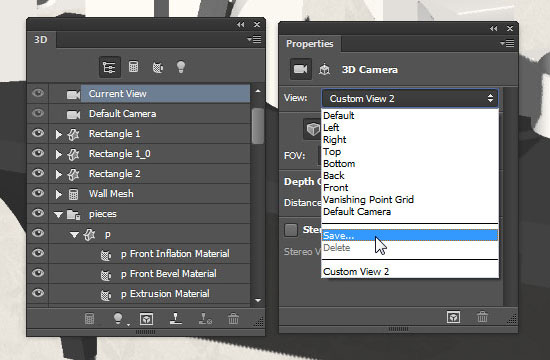
Type in a name for the view you’re saving.
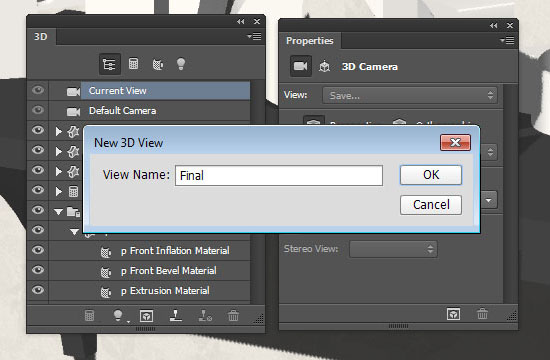
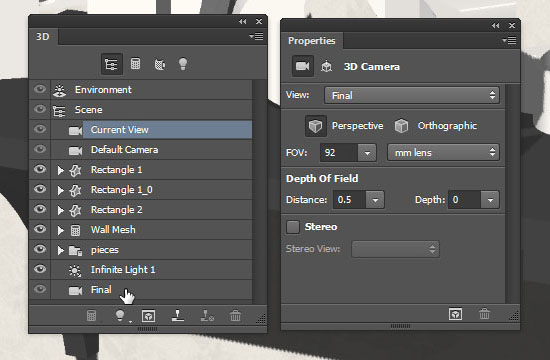
The view will be added to the list, as well as to the 3D panel. So now any time you change it, you can go back to it by clicking its tab or choosing it from the drop down menu.
Keep in mind that you can save more than just one camera view if you need to.
Using the different tools and tips, place the 3D meshes as you like in the 3D scene. Take your time with this step in order to get a great final result.

Step 9
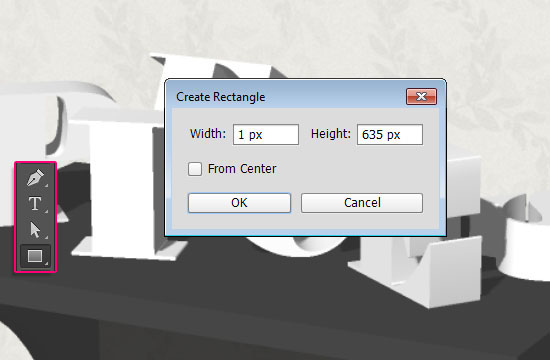
Pick the Rectangle Tool and click once to create a thin 1 x 635 px rectangle.
Pick the Add Anchor Points Tool, zoom in to the center of the rectangle, then add an anchor point on each side.
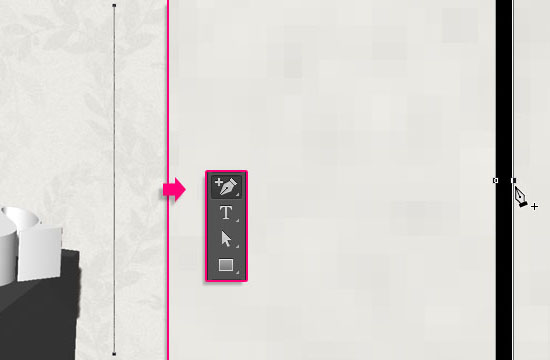
Use the Direct Selection Tool (A) to click and drag to select the two points you created, then use the Right Arrow Key to move the points to the right, creating a curved shape.
Go to 3D > New 3D Extrusion from Selected Path. Click the Current View tab, and choose the Final Scene view from the drop down menu.
Select both 3D layers then go to 3D > Merge 3D Layers to add the new 3D mesh to the scene. Then scale, rotate, and move the paper mesh to place it on the wall.
Step 10
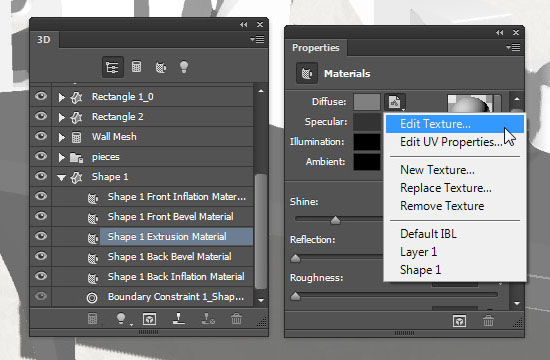
Click the Extrusion Material tab in the 3D panel, then click its Diffuse texture icon and choose Edit Texture.
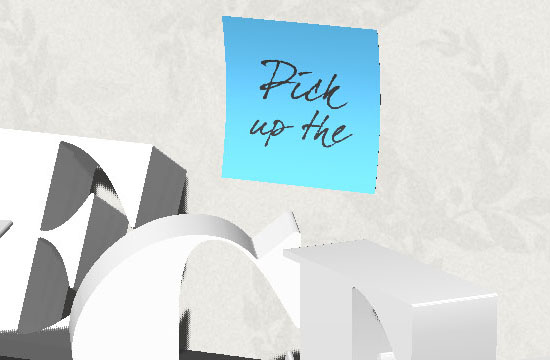
Fill the layer you get with any color you want. Here, the color #51baf0 is used. Then create the text you want to add using any font, color, and size you like.
The font used in this tutorial is dearJoe four, the color is #212121, and the Size is 150 pt for the first line and 130 pt for the second. The Leading value is also changed to 120.
Place the text in the middle of one of the document’s sides, then save the file. Don’t close it yet, but go back to the 3D scene’s tab and check how the text looks.

You’ll most probably get the text floating somewhere in the paper. So go back to the texture file and modify the text accordingly.
You can rotate the text by going to Edit > Transform, and use the options you have there. Move the text, resize it, and rotate it as needed.

You might need to save the file and check the result in the 3D scene a couple of times until you get the result you like.
Once you like how the text looks, place the White Paper texture right below the text layer, and change its layer’s Blend Mode to Multiply.
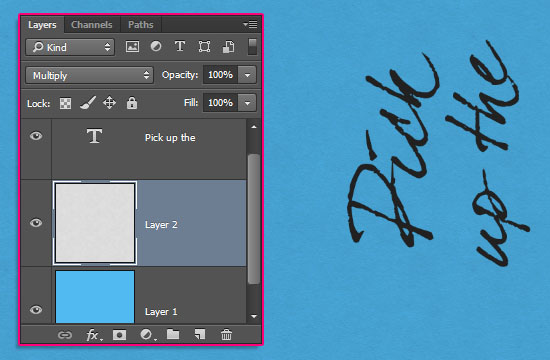
This will help make the paper look less flat and a bit more realistic.

Step 11
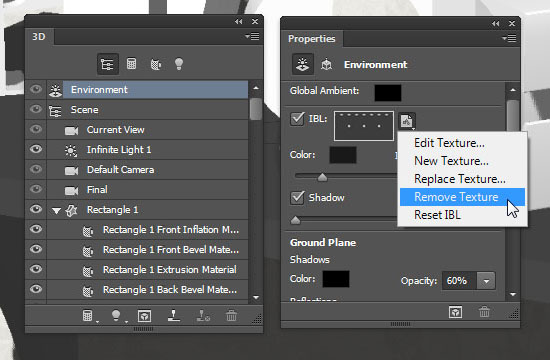
Click the Environment tab in the 3D panel, then remove the IBL texture.
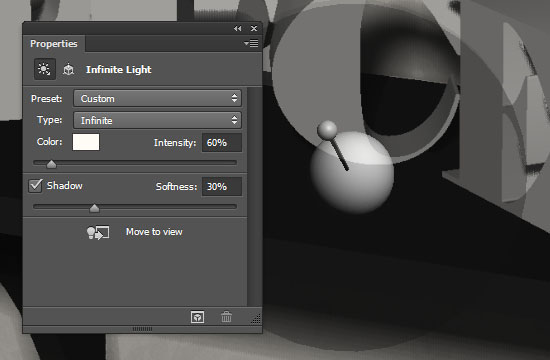
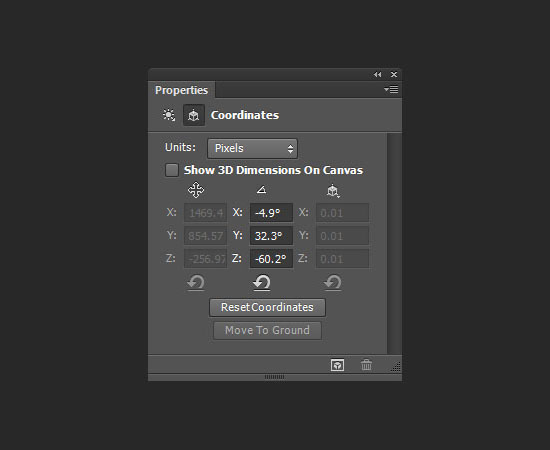
Click the Infinite Light 1 tab, then change its color to (255, 251, 245), its Intensity to 60%, and its Shadow Softness to 30%. Use the Move Tool to move it around as you like.
You can also use the Coordinates values of this tutorial:
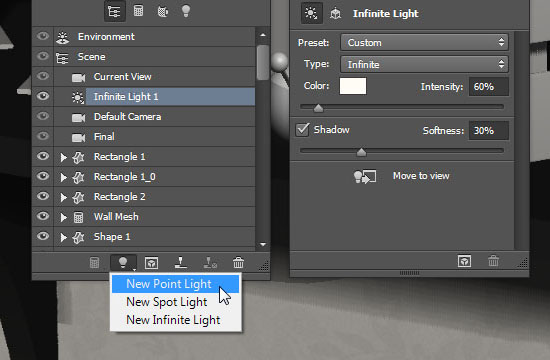
Click the Add new Light to Scene icon down the 3D panel, and choose New Point Light.
Change the Point Light 1‘s color to (255, 249, 232), its Intensity to 60%, and its Shadow Softness to 30%.
Check the Light Falloff box, and choose the values you like for the Inner and Outer fields. What the Falloff does basically is make the light fade out as it gets further from its source. So move the light and change the Falloff values until you like the result.
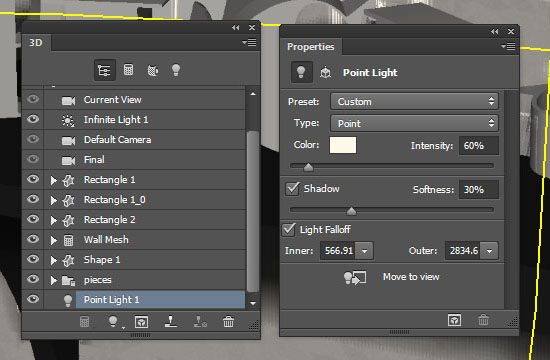
The Coordinates values for the Point Light are:
Finish off working with the scene, then go to 3D > Render. The rendering might take some time, but you can stop it any time by pressing the Esc key.
When the rendering is done, you’ll end up with a nice, clean result.

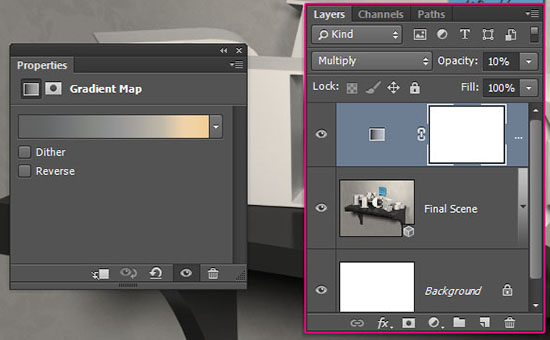
Step 12
Click the Create new fill or adjustment layer icon down the Layers panel and choose Gradient Map.
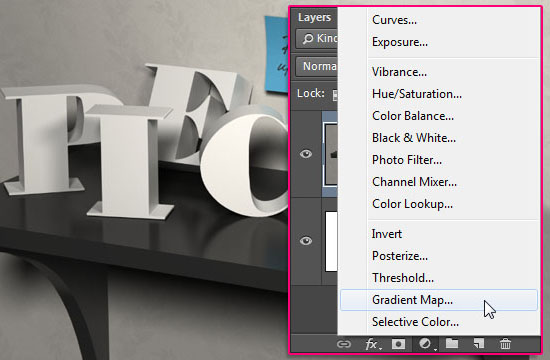
Choose the Gradient shown below, then change the adjustment layer’s Blend Mode to Multiply and it Opacity to 10.
And you’re done!
Hope you enjoyed the tutorial and found the tips and tricks used helpful 🙂
Did you enjoy this post? Please consider donating to help us cover our server costs.


Step 3: 3D > New 3D Mesh from Selected Path. isn’t an available option…stuck on this step 🙁
Is it grayed out or not available at all? Are the other options grayed out as well?
You might need to check your 3D settings under Edit > Preferences > 3D and Edit > Preferences > Performance (make sure that the Use Graphics Processor box is checked).
Hope this helps.
same problem in step 3(it’s grayed out) + i have the Extrusion Depth in centimeters,&
i have another problem with the 4th step i have the Settings like 0,0000 & when i tried to get them couldn’t it gives me an error msg says that the value is between 0,0000&20,0000 i entered them this way 0,229 but i didn’t get the same result so i stoped there….plz help
Did you make sure to check my reply to the previous comment below? This might be related to the 3D settings, so please make sure to check them out.
As for the units, you might need to change them to Pixels by going to Edit > Preferences > Units & Rulers (change the Rulers unit to Pixels).
Hope this helps.
Thankx..that worked for me but i still have problem with this values
Diffuse: (229, 229, 229)
Specular: (105, 105, 105)
Illumination: (191, 191, 191)
Ambient: (0, 0, 0)
i have the RGB values as 0,0000 or as 20,0000 max can’t get them!!!
You need to change the RGB values in the bottom right corner of the Color Picker dialog box (not the ones under the 32-bit value at the top). Can you change them?
Yes i did that already but i got a different result
I can see that the values in the screenshot are set to 128, and that’s bigger than 20.
What exactly happens when you enter the values? (You need to enter each number in a separate filed, so the numbers shown are three different values: One for the R field, one for the G, and one for the B).
this is how i get the RGB
Can I please get some help?
Done everything same but after rendering it looks like this
My final result and yeah I am the first one posting this 🙂
Heeey! Glad you solved the issue. You can always play around with the light settings to get different outcomes.
Your result looks great though! Thanks a lot for sharing it 🙂
I’m trying this out(>w<)hope it works
it looks so realistic!
Fingers crossed it will 😉
Thanks for the comment 🙂
Great Tutorial Rose
As Always
I Saw Many Of Your Tuts But Posting An Image First Time..
That’s a very good outcome!
Really glad you’re enjoying the tutorials 🙂
Thank you very much for the comment and for sharing your work.
This is what my shelf looks like, I can’t figure out what I did wrong? I’m certain my dimensions are correct. Please help?
You might need to check the anchor points of the original shape.
It looks like a point is missing or a line is disconnected.
Can you upload a screenshot of the shape’s anchor points?