
Simple Bokeh Text Effect
Bokeh, in Photography, is a word that describes “the way the lens renders out-of-focus points of light” Wikipedia.
It adds an absolutely stunning touch to photographs, and creates a really nice effect.
This tutorial is inspired by this technique, and will show you a super easy way to create a dazzling beautiful bokeh text effect, using a simple brush and a layer effect.
The Final Result

Tutorial Details
- Software Used : Photoshop
- Version : CS6 Extended
- Time : 0:20 – 0:35
Resources
- Ethon font.
- Neou (OT1) font.
- Light/Bokeh Texture 21 by xnienke.
Step 1
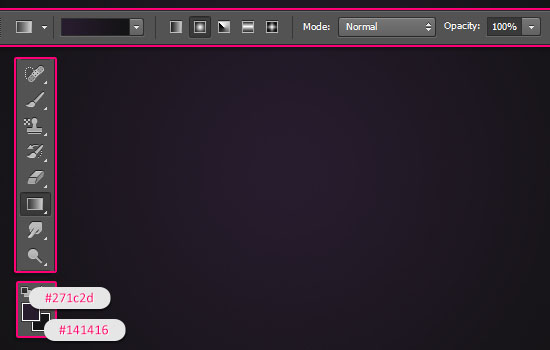
Create a new 1000 x 600 px document. Set the Foreground color to #271c2d and the Background color to #141416. Pick the Gradient Tool, choose the Foreground to Background, Radial Gradient, in the Options bar. Then click and drag from the center of the document to one of the corners to create the Background gradient.
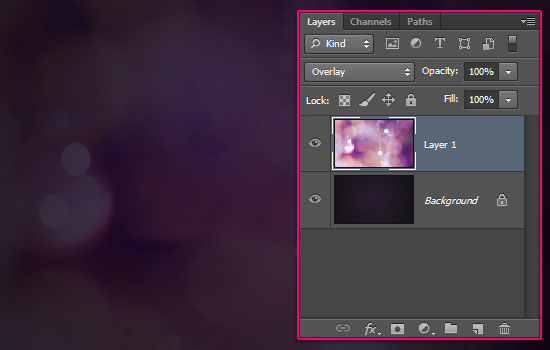
Place the Light/Bokeh Texture 21 on top of the Background, then change its layer’s Blend Mode to Overlay.
Create the text in White using the font ETH, and open the Character panel (Window > Character). Set the font Size to 310 pt and the Tracking value to 70 (to avoid overlapping).
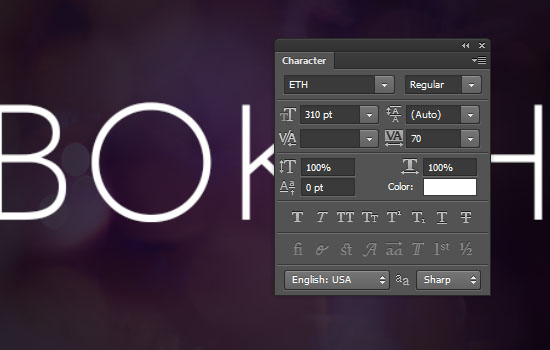
* You can use a different font Size, but you’ll need to change the other values used accordingly.
Step 2
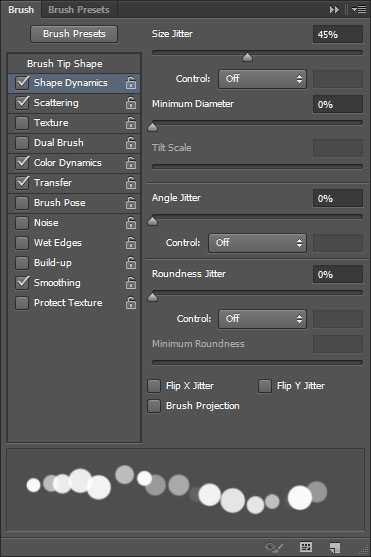
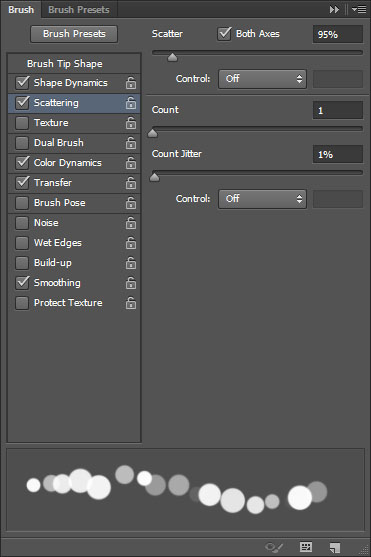
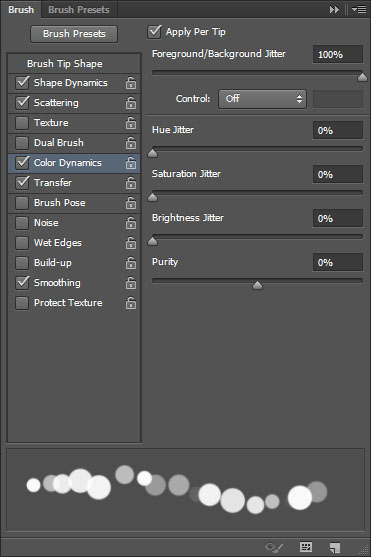
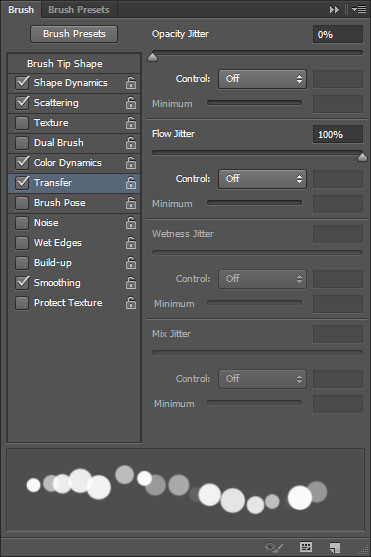
Pick the Brush Tool, choose a hard round brush, and open the Brush panel (Window > Brush) to change its Settings as below:
Brush Tip Shape
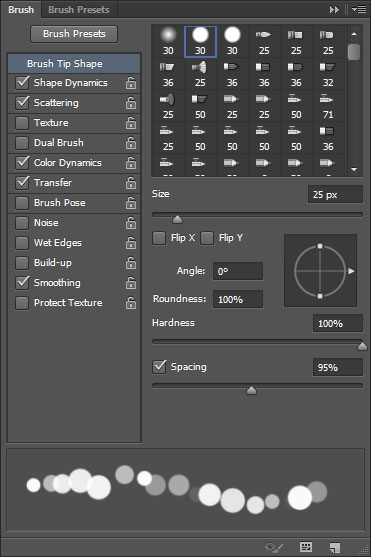
Shape Dynamics
Scattering
Color Dynamics
Transfer
Step 3
Right click the text layer and choose Create Work Path. Then, make the text layer invisible by clicking the eye icon next to it.
Create a new layer on top of all layers and call it Bokeh, set the Foreground color to #f06eaa and the Background color to #6dcff6, and pick the Direct Selection Tool.
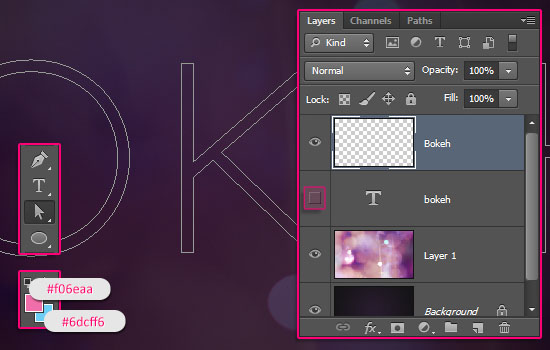
Right click the work path and choose Stroke Path. Then, choose Brush from the Tool drop down menu, and make sure that the Simulate Pressure box is un-checked.
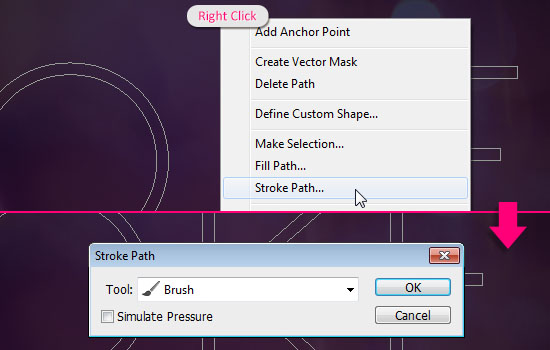
This will stroke the path with the bokeh brush. If you don’t quite like how the stroke turned out, you can undo and stroke the path again. Each time you will get a different result.
When you like the result, hit the Enter/Return key to get rid of the path.

Step 4
Double click the Bokeh layer to apply an Inner Glow effect:
- Source : Center
This will make the glow illuminates from the center instead of the edges.
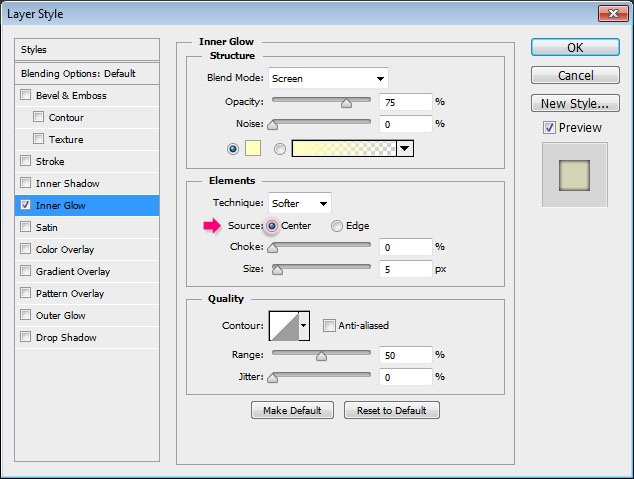
This should add a nice glow to the bokeh text.

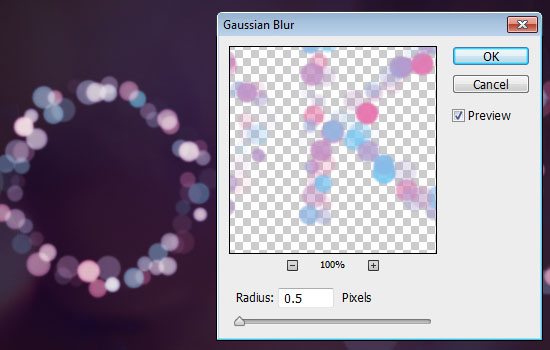
Go to Filter > Blur > Gaussian Blur, and set the Radius value to 0.5. This will add a subtle blur to the bokeh, making it softer and more realistic.
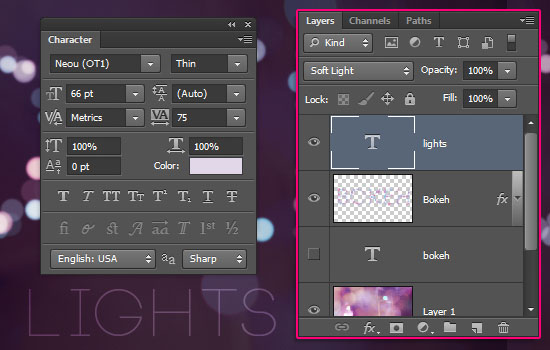
Step 5
Finally, the word LIGHTS is added using the font Neou (OT1), the font Size 66 pt, the color #e2d6e9, and the Tracking value 75.
Its layer’s Blend Mode is changed to Soft Light as well.
And there you have it! Your awesome bokeh text effect 🙂
Hope you enjoyed the tutorial and found it helpful.
Did you enjoy this post? Please consider donating to help us cover our server costs.


Thanks – I always learn something about brush settings with your tutorials…. 🙂
You’re welcome. That’s great to know!
Thanks a lot for the comment 🙂
thanks for such a nice tutorial 🙂
here’s my tryout..
http://i1181.photobucket.com/albums/x427/pak-world/colorsoflife_zpsd3b85227.png
Nicely done!
Thanks a lot for the comment and for always sharing you results with us.
Cheers 🙂
amazing!
Thank you!
Clear tutorial and well illustrated. Thanks a lot for sharing mate.
You’re welcome.
Thank you very much for the comment.
Thanks man, nice tutorial. greatest of all time =D
Very glad you like it.
Thanks a lot for the kind comment.
(I’m a girl ^_^)
WOW!
Thank you very much for the comment!
You’re very welcome!
Thank you too 🙂
good!I like it,thanks
Glad you do.
Thanks for the comment 🙂
AMAZING! Thank you so much!
Learned something new for my future projects
That’s great to know!
Very glad you will.
Thanks a lot for the amazing comment 🙂
the stroke path doesn’t work, i’ve followed the instructions above. help 😀
Is the option grayed out? Is the “Bokeh” layer selected? What exactly happens when you try to stroke the path?
Hi there. Lovely tutorial. I’m just having one issue. When I select stroke, it only does the pink bokeh. not the blue as well. Any Suggestions. I’ve started over 3 or 4 times and get the same problem.
Did you make sure to change the Color Dynamics settings as shown in Step 2? That’s the part that controls the color changing.
If you did but the problem still exists, please feel free to add a reply with any more details or screenshots of the issue.
Thanks for the comment 🙂
That was it! Thank you so much!
You’re very welcome.
Glad the problem was solved 🙂
thanks for the tutorial!!
You’re welcome 🙂
Thanks for the comment.
Great Tutorial! I’m very new to photoshop but i followed this and it turned out perfect! Thanks
That’s awesome to know!
Thanks a lot for the nice comment 🙂
Big Respects and thanks for this tutorials. Well done.
That means a lot!
Many thanks for the kind comment 🙂
I love the color and the effect so much! Thank you for sharing!! ^_^
Really glad you do 🙂
Thank you very much for the lovely comment.
thanxxxxxx it soo cute
Beautifully done 🙂
Thank you very much for the comment and for sharing your work 😉
This is amazing!
Thanks for the comment and for sharing your work 🙂
Thank man. You are great!
Amazing result!
Many thanks for the comment 🙂
Thanks for the tutorial. I took a different bokeh background and made the font a little subtle cause I want the second font to stand out a bit more. 😀
Amazing variation!
Thanks a lot for sharing your work and for the comment 🙂
Thanks A Lot for the tutorial…I learned A lot
Really glad to know that!
Very nice result.
Thanks a lot for the comment 🙂
Help me was in step 3 does not seem to make you leave me to select the brush that will select the text and convert it into bokeh
Do you mean the Tool menu? Can you choose Stroke Path?
Awesome Text Effect. The screenshot help easy to grasp the effects.
Thanks a lot. its really good and everyone can do it easily by your education. thank you very much