
Colorful Light Text Effect
In this tutorial, we will create a nice bright colorful light text effect.
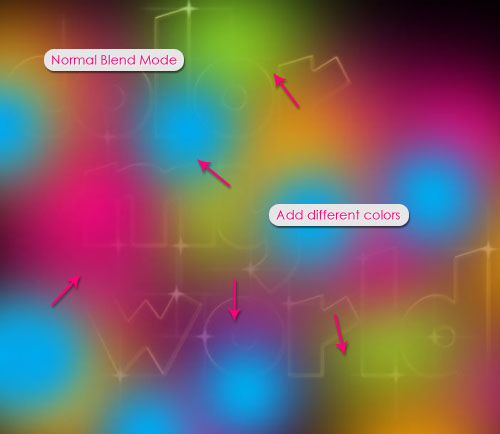
The Final Result

Tutorial Details
- Software Used : Photoshop
- Version : CS5 Extended
- Time : 0:30 – 0:45
Resources
- ThickDeco font.
- Sparkle Brushes by ~Scully7491.
Step 1
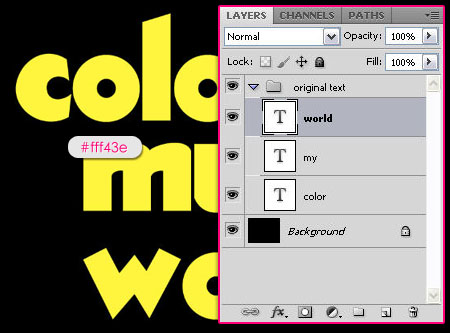
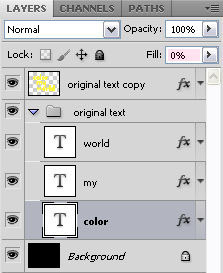
Create a new 1024 x 768 px document and fill the Background with Black. Create the using the font ThickDeco, the Size 250 px, and the color #fff43e. If you want to arrange the words separately, create each one in a separate layer, then group them and call the group original text.
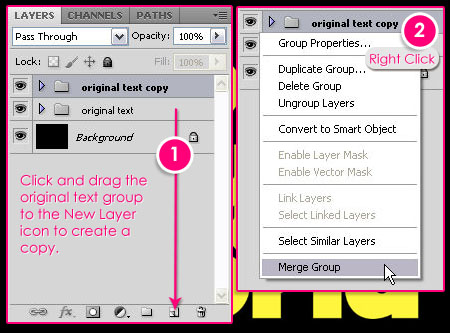
Duplicate the group, then right click the copy, and choose Merge Group.
Step 2
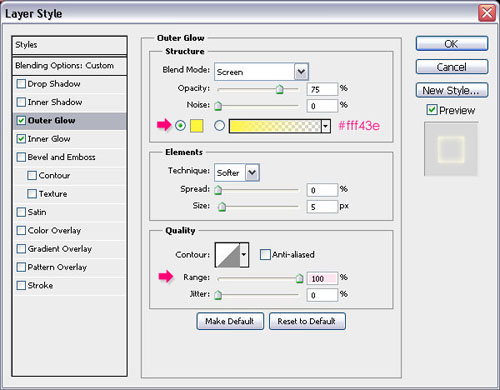
Go back to the original text group, and double click any of the layers to apply the following Layer Style:
– Outer Glow
- Color :
#fff43e - Range : 100
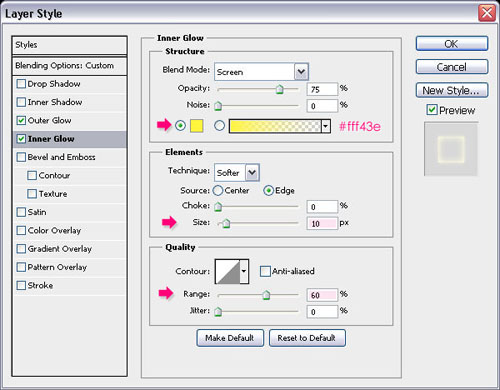
– Inner Glow
- Color :
#fff43e - Size : 10
- Range : 60
Click OK, then change the layer’s Fill value to 0.
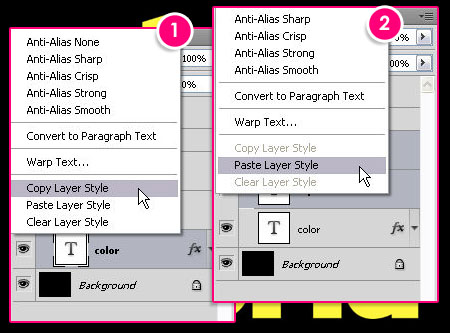
Now, we want to copy the style to the other layers in the group. So right click the styled layer, and choose Copy Layer Style, select all the remaining layers in the group, then right click any of them and choose Paste Layer Style.
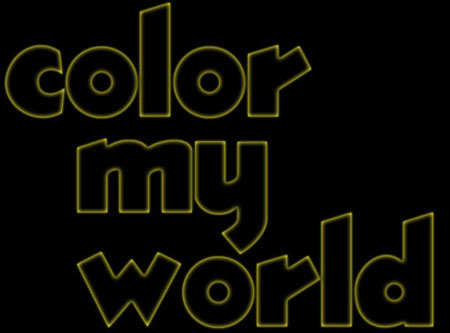
This is what you should get. (You will need to remove the eye icon next to the merged group’s layer on top of the original text group to see the changes, but don’t forget to click it back so that it’s visible again.)
Step 3
Double click the original text copy layer to apply the following Layer Style:
– Inner Glow
Use the default values.
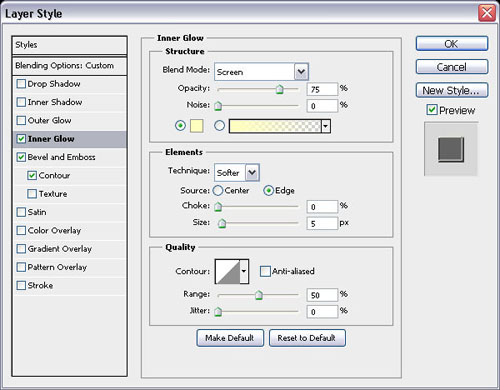
– Bevel and Emboss
- Depth : 225
- Size : 2
- Gloss Contour : Valley Low
- Check the Anti-aliased box
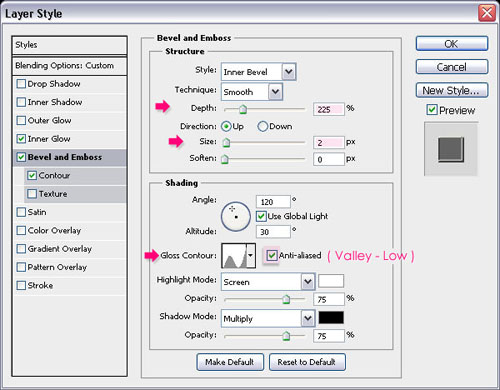
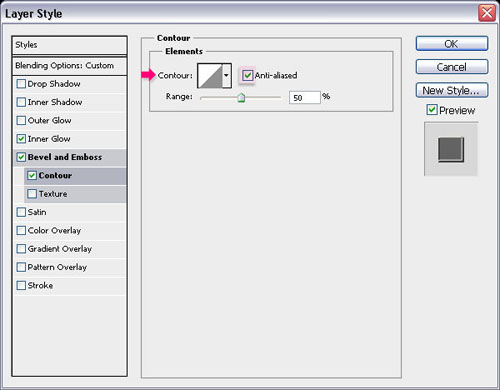
– Contour
Just check the Anti-aliased box.
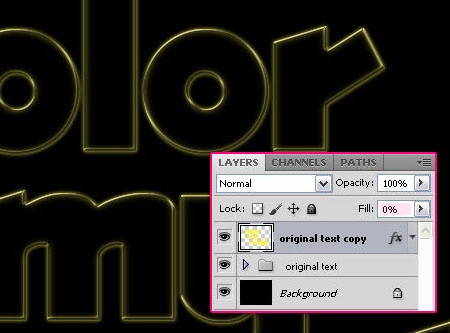
When you hit OK, change the original text copy layer’s Fill value to 0.
Step 4
Set the Foreground color to White, create a new layer and call it Sparkles.
Choose the brush shown below from the Sparkle Brushes pack. Change the brush Size as you like, here, it is something around 35 px. Start adding some sparkles randomly all over the text edges, but try not to overdo it and keep it simple.
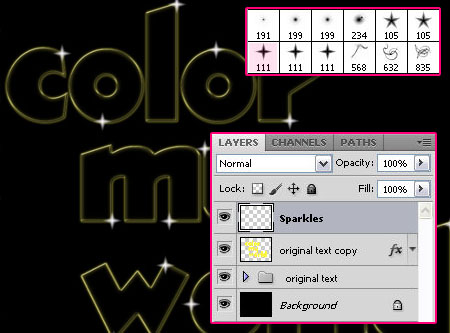
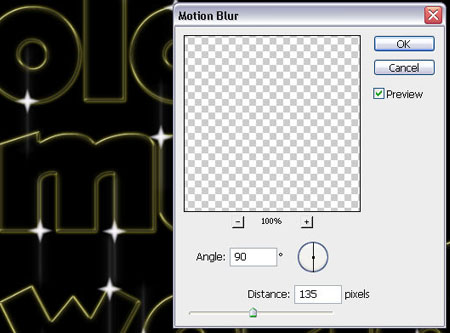
Once you’re done adding the sparkles, create two duplicates of the Sparkles layer, and rename them to Vertical Blur, and Horizontal blur.
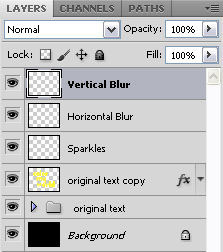
Select the Vertical Blur layer, then go to Filter > Blur > Motion Blur, change the Angle to 90, and the Distance to 135.
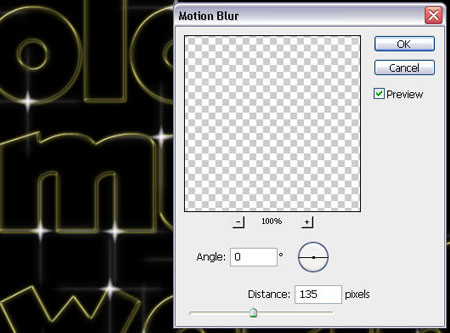
Now, select the Horizontal Blur layer, and again, go to Filter > Blur > Motion Blur, but this time, change the Angle to 0, and keep Distance as it is.
Step 5
The final step is adding the colors. Create a new layer on top of all layers, call it color, and change its Blend Mode to Color. Then, choose a soft round brush and change its Size to something around 250 px. You can use the [ key to increase its size and the ] key to decrease it while you’re adding the colors if needed.
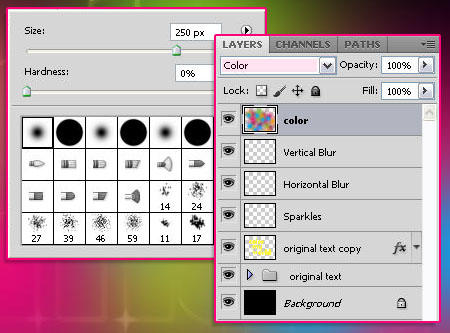
Pick some bright vivid colors and start clicking inside your document to add different color spots everywhere, until the whole text is covered.
Also, you can switch between the Normal and Color Blend Modes to check things out if needed.
Once you’re done coloring, make sure to change the Blend Mode to Color, and you’re done!
Did you enjoy this post? Please consider donating to help us cover our server costs.


Nice work!..Thanks..^^
You’re welcome 🙂
Brilliant! Great idea!
Thank you! Glad you liked it.
I learned to use many photoshop skills.Thanks..^^
please recomend another Tutorial site.
and I’ll wait your tutorial.
Was late but, Happy new year.
I’m really glad you found the tutorials useful, and I appreciate the time you took to leave your comments and feedback, so thank you as well.
There are a couple of really good sites out there to learn from, I would recommend http://psd.tutsplus.com/, http://designinstruct.com/, and http://abduzeedo.com/. There are so many other sites of course, but these are among the ones I visit regularly.
Happy New Year to you too 🙂
Thank you so much for your recomend site.
I’m happy to know you..^^
You’re welcome 🙂
love it! thanks so much
Thanks for the comment 🙂
really useful…thanks
You’re welcome.
THANKS,WE USE THIS IN OUR PHOTOSHOP,AND
IT REALLY WORKS,GREAT,,
That’s amazing to know.
Thanks a lot for the comment 🙂
Muito show, fiz também e postarei em breve no meu blog.
http://www.artesdostol.blogspot.com.
Paz e sucesso, sempre.
Abç.
Isso é incrível, muito obrigada
otimo e simples jsuashas
Obrigada 🙂
As always I love your text tutorials. The instructions are easy to follow because of all the detail that you add. Todah/Thank you for sharing! Shalom Tehillah
Thanks a lot Lilly. I’m really grateful for your kind comments.
Best regards 🙂
Nice On3…….
I like it……!!!!!!
Glad you do!
NICE WORK GOOD JOB KEEP IT UP:)
Thanks a lot 🙂
thanks so much
You’re welcome!
Love it! It was easy to follow and looks really pretty. Thanks!
Glad you do!
Thanks for the comment.
hi
nice very nice thanxx
You’re welcome, thanks for the comment 🙂
you got amazing skills with layer styles… i haven’t notice that layer styles can do all that until now… and thanks for the tutorials..
Thank you so much!
Layer styles are definitely great! I’m glad you found the tutorials useful.
Thanks again.
Very awesome! Loved seeing it develop. Thank you for your creative talent and for sharing!
Thank you Susananana, glad you enjoyed the tutorial 🙂
OMYGOSH! THANKS! this is so nice 😉 and it works!
Hello Sarah,
Glad you liked it!
Thanks a lot for the comment 🙂
How would you be able to do this with a transparent background, as in for a t-shirt design. When i hide the background and save as .png it comes out completely different.
Hello Tyler,
Actually I don’t think this can be done, as the whole effect is based on the dark black background, and the blend modes interact with the background as well. So I don’t think it is possible for the effect to look the same on a transparent or white backgrounds, sorry for that!
Cheers.
It does. I tried it
Oh wait. Sorry I was thinking about the wooden text effect. My bad
Great tutorial
Thank you.
thank you so much this has helpe me majorly
You’re welcome.
So glad you found it useful 🙂
Ual… muito interessante esse efeito, parabéns
Muito obrigada 🙂
fun! tried this out and i really like it. thanks for sharing 🙂
Awesome!
Thanks for the comment 🙂
Very nice, i loved it 😀
thank you very much :3
You’re welcome 🙂
I’m really glad you like it.
Thanks for the comment.
your tutorial its awesome. I followed your step and done my text..Thank you so much..
You’re welcome!
Thanks a lot for leaving a comment 🙂
Nice tutorial I love it but I Think the ver. and horz. blur need to look a little softer ,, Just sayin’ 😀
That’s my result
http://i56.tinypic.com/21cxq3d.jpg
Thanks!
I kinda went for an extra bright effect, but you can always adjust the values as you like.
Great outcome by the way 🙂
Thanks once again
This was soooo much fun! And found at the right time 😉
Great! Glad you did 🙂
Thanks for the comment.
what version of photoshop are you using? i have PS 9.0/cs2 will your tutorial work. of course I have not tried yet.
I’m using CS5 extended, but if you have all the layer styles applied you should be able to create this in CS2.
If you have any questions when using your version you can leave another comment and I’ll try my best to help.
Amazing tutorial!!
i love the effect,its so easy!!
thanks for it!
i used CS4 and work!
Thank you so much for the comment and the feedback 🙂
Thank you very much. I had a great time following this tutorial. This tutorial have easy steps so anyone can easily catch it.
You’re welcome.
Glad you liked it and found it easy to follow.
Thanks a lot for the comment 🙂
Wonderfully written tutorial. I love how you used screenshots to back up your written directions. I tried it and will be modifying now to fit a header.
Thank you so much for all the work you put into these tuts you publish.
Thanks a lot for the kind words 🙂
Glad you found it useful.
Cheers 😀
Hey there! I thought I should congratulate you on your excellent work, not that you haven’t been told already of course. 😀
But I must say that you do the best tutorials by far, and I’ve learnt a lot of new photo-shopping skills by doing them. Maybe one day I can be as good as you. 😀
It’s clear that you put in a lot of time and effort and It has certainly paid off, s well done!
You also take the time to reply to every comment showing you put your visitors before yourself, it really is heart-warming to see there is still humanity in this world. 🙂
Hello Redjan,
Thank you so very much for your amazing, and really special, comment. I definitely appreciate it, and it sure means a lot to know that you like the tutorials, and that you take the time to leave such a nice comment.
Thanks once again for the support.
Best regards,
Rose
Thank you soo much!!
Very good job!
You’re welcome.
Thanks for the comment.
Wooo…. That was awesome….. I have succesfully Completed it to a great effect…. U rock man…… Thanks a ton man…….. 🙂
That’s great to know.
Thanks for the comment (I’m a girl though 🙂.
Thank you so much! It worked!
Awesome!
Thanks for the comment 🙂
Your tutorial is very helpful, but i am having a problem with motion blur.i can’t get the same one as yours.The blur is spreading and its not narrow.
Hello Arul,
Did you make sure that you are using the Motion Blur not the Gaussian Blur? Also, please check the values you are using once again.
If the problem still exists, please feel free to add a reply with more details.
Thanks a lot for the comment.
First of all thank you very much for your reply, only in the psd file it is spreading, but when i extract it in jpg format its ok.Once again thank you very much for such a wonderful tutorial.
No problem 🙂
Are you working in the CMYK mode? This might be the cause of the problem, so try working in RGB instead.
Thanks a lot for the nice words 🙂
Waw! Very Good tut! really i liked it ! Keep going !
Happy you did 🙂
Thank you so much.
loved this tutorial greetings form argentina!!
That’s awesome to know.
Thanks a lot for the comment 🙂
i cant merge group 🙁
Why not? Do you get any error message?
awesome,, thank lot
i will try .,.
i want be design, ok by the way have you tutor or anythink to learn english conversation,
Glad you will 🙂
I do not have links for English tutoring unfortunately, but you can always use Google for help 😉
Good luck and thank you for the comment.
Great Tutorial 😀
*Thanks for sharing 🙂 (Y)
Glad you like it.
Thanks a lot for the comment 🙂
i’m impress for this text design
Happy to know you like it.
Thanks a lot for the comment.
Thanx Fot If – Workz Greate 🙂
You’re welcome!
Thanks a lot for the comment.
Great effect and easy to do, thanks!
Here you can see my example:
http://car51.altervista.org/_altervista_ht/nuova/notte_luci.jpg
Your tutorials are interesting indeed and very well explained , they help me to know better the Photoshop’s potentialities 🙂
That’s really awesome to know! It means so much that you found them helpful 🙂
Nice outcome, and the font you used kinda gave it a more tech-like feel, which is cool!
Thanks a lot for the kind words and for sharing your work with us 🙂
gloss contour: valley – low and ring are the same thing??
I’m using photoshop cs6 and i dont have the valley – low…
btw great tutorial..
They are different ones, but you’ll need to load some contours to get it.
To do so, go to Edit > Presets > Preset Manager, and choose “Contours” from the “Preset Type” drop down menu. Then, click the little arrow to the right of the Preset Type drop down menu, and click “Contours” down the pop-up menu. When the dialog box appears after that, just click Append, and you’ll get the contour used along with a couple of other useful ones as well 🙂
Hope this helps.
Thanks for the comment.
OMG!!that totally helpfull..
another question- the stock (the brush and text-font) are free to use??I mean can i use this tutorial and the stock to design my own t-shirt?(print??)
u know what i mean, right?
Sure. Unfortunately though, the font is a donationware for commercial use, and the brushes are for personal use only. So if you’re designing the T-shirt for your own personal use, you can go ahead and do that.
But if you want to sell the T-shirt, then I don’t think that’s possible!
Thanks again for the comment 🙂
nice tutorial
Thank you 🙂
You’ll need to change the layer’s Blend Mode to Color, did you do that? If so, can you please attach a screenshot of the issue?
Loved this tutorial had to give it a few goes but Im happy with what I have Thank You
Glad you enjoyed it!
Thanks a lot for the kind words 🙂