
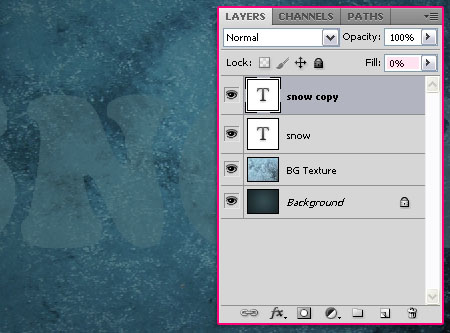
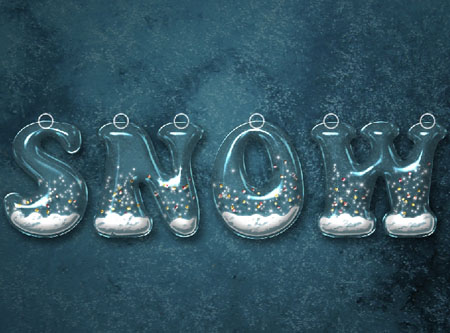
Glossy Snow Globe Text Effect
This tutorial explains how to create a snow globe inspired text effect, using a couple of brushes and Layer Styles.
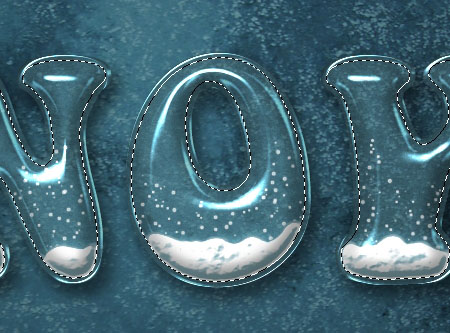
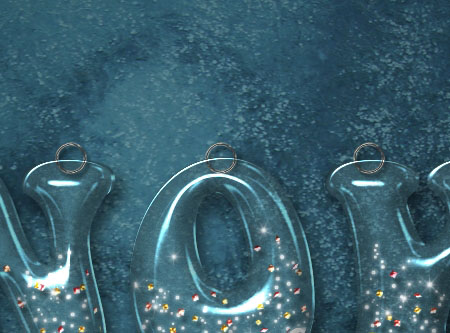
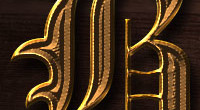
The Final Result

Tutorial Details
- Software Used : Photoshop
- Version : CS5 Extended
- Time : 1:00 – 1:45
Resources
- font.
- Frost texture by Rubyfire14-Stock.
- Brushes O5 (Sparkles Brushes) by apple-instinct.
- Golden Particles Gradient.
- Red Particles Gradient.
- Hangers Layer Style.
- Pins Layer Style.
Step 1
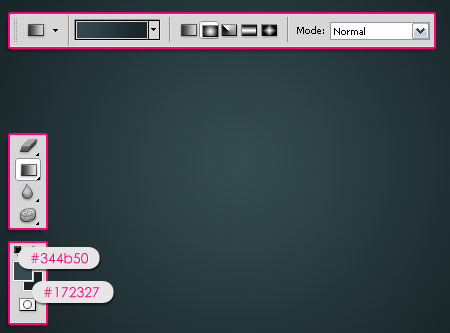
Create a new 1024 x 768 px document. Set the Foreground color to #344b50, and the Background color to #172327, then, create a Radial Gradient from the center of the document to one of the corners.
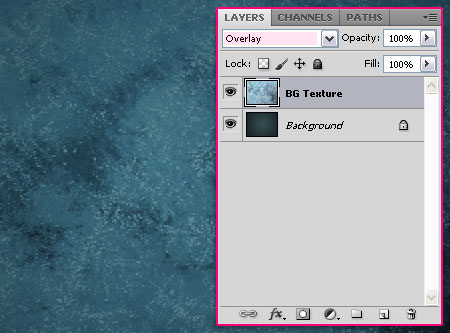
Place the Frost texture on top of the Background layer, and change its Blend Mode to Overlay.
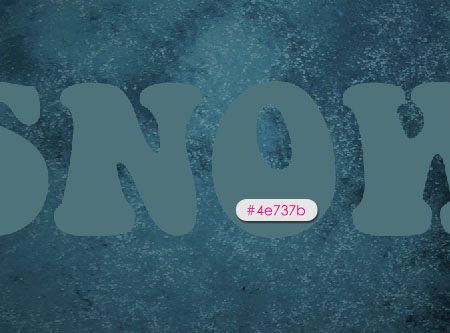
Create the text using the font Keep on Truckin’ FW in All Caps. The Size is 300 pt, and the color is #4e737b.
Change the text layer’s Fill value to 50%.
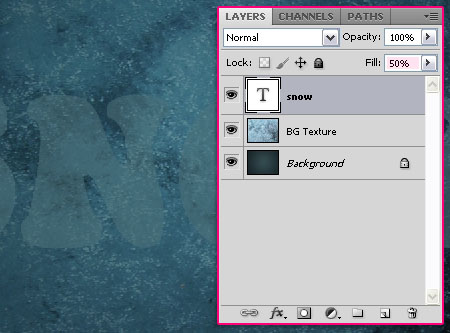
Duplicate the text layer and change the copy’s Fill value to 0.
Step 2
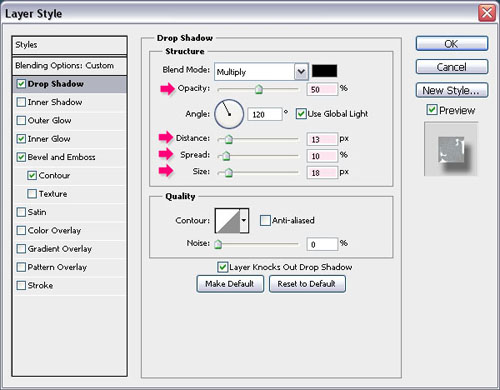
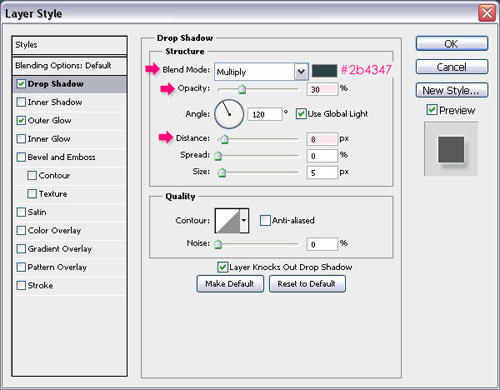
Double click the original text layer to apply the following Layer Style:
– Drop Shadow
- Opacity : 50%
- Distance : 13
- Spread : 10
- Size : 18
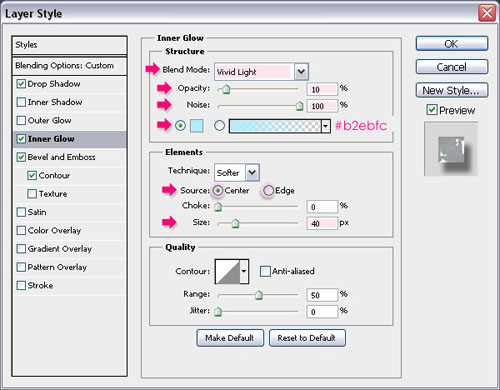
– Inner Glow
- Blend Mode : Vivid Light
- Opacity : 10%
- Noise : 100
- Color :
#b2ebfc - Source : Center
- Size : 40
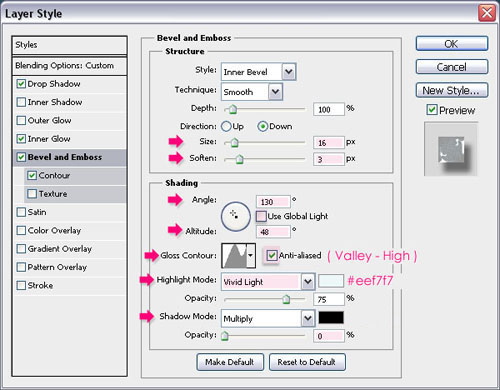
– Bevel and Emboss
- Size : 16
- Soften : 3
- Uncheck the Use Global Light box
- Angle : 130
- Altitude : 48
- Gloss Contour : Valley – High
- Check the Anti-aliased box
- Highlight Mode : Vivid Light
- Color :
#eef7f7 - Shadow Mode – Opacity : 0%
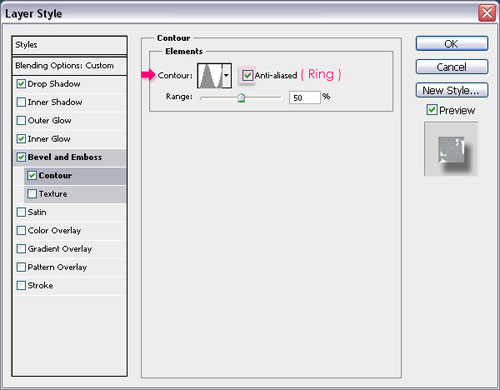
– Contour
- Contour : Ring
- Check the Anti-aliased box.
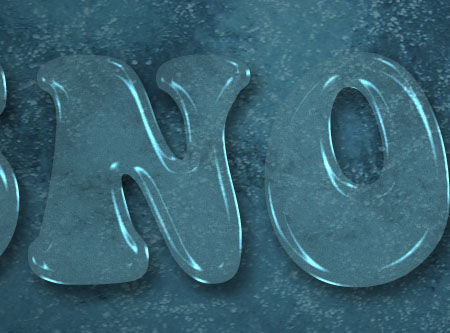
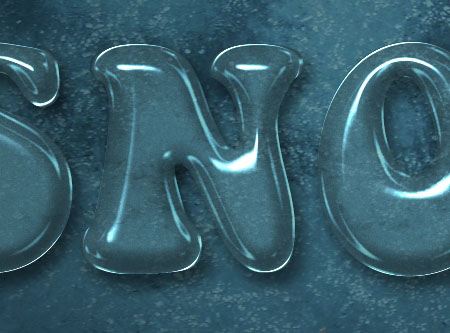
This is how the text should look like.
Step 3
Double click the copy text layer to apply the following Layer Style:
– Inner Shadow
- Color :
#404040 - Distance : 0
- Size : 10
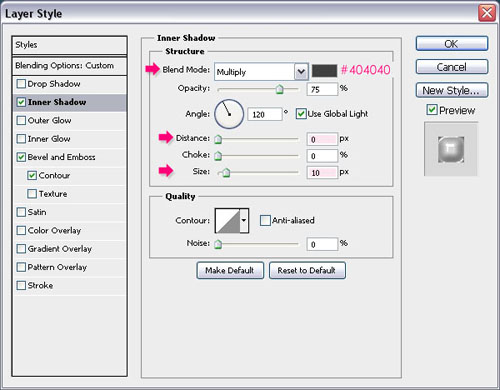
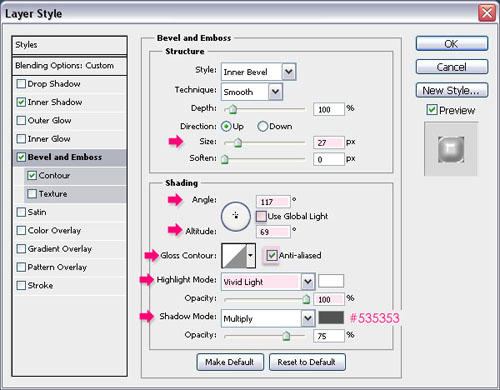
– Bevel and Emboss
- Size : 27
- Uncheck the Use Global Light box
- Angle : 117
- Altitude : 69
- Check the Anti-aliased box
- Highlight Mode : Vivid Light
- Opacity : 100%
- Shadow Mode – Color :
#535353
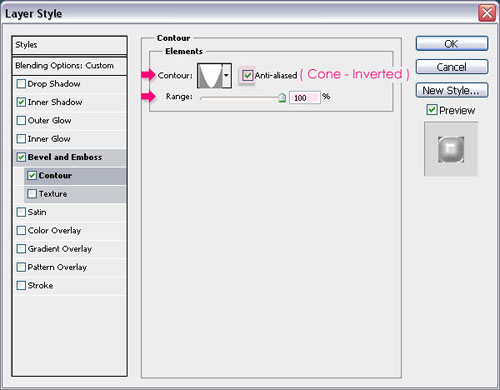
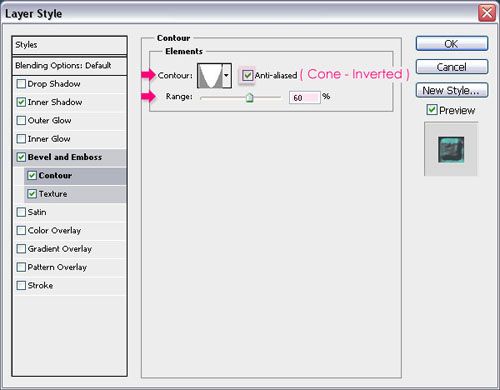
– Contour
- Contour : Cone – Inverted
- Check the Anti-aliased box.
- Range : 100%
This is what you should get.
Step 4
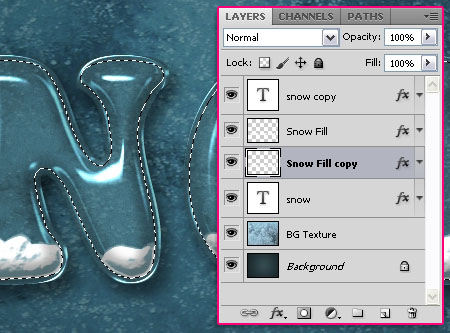
Create a new layer between the two text layers and call it Snow Fill.

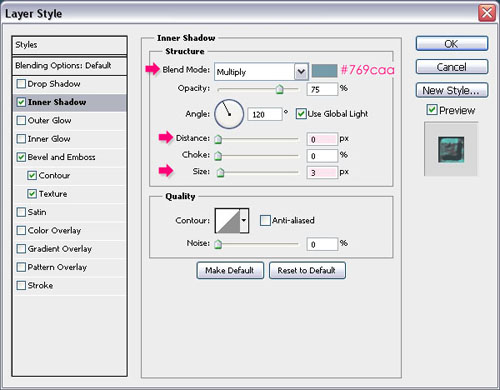
Double click the Snow Fill layer to apply the following Layer Style:
– Inner Shadow
- Color :
#769caa - Distance : 0
- Size : 3
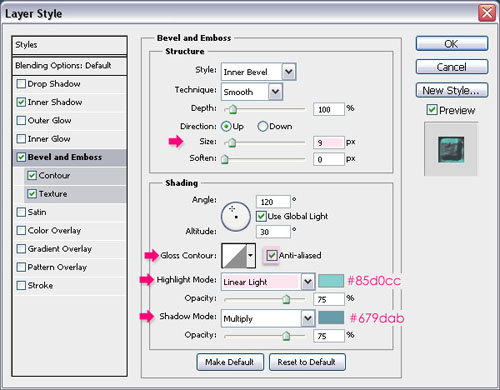
– Bevel and Emboss
- Size : 9
- Check the Anti-aliased box
- Highlight Mode : Linear Light
- Color :
#85d0cc - Shadow Mode – Color :
#679dab
– Contour
- Contour : Cone – Inverted
- Check the Anti-aliased box.
- Range : 60%
– Texture
- Pattern : Clouds

Click OK and open the Brush panel (Window -> Brush). Choose a hard round brush tip and modify its Settings as shown below:
Brush Tip Shape
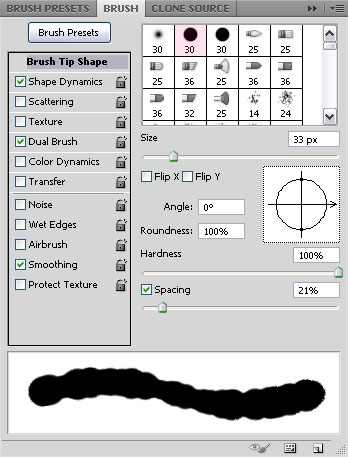
Shape Dynamics

Dual Brush
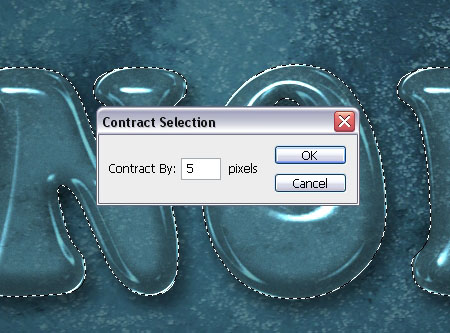
Now, press the Ctrl/Cmd key and click a text layer’s thumbnail to create a selection.
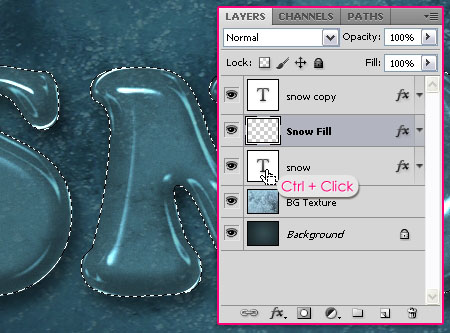
Go to Select -> Modify -> Contract, and contract the selection by 5 px.
Set the Foreground color to White, then, use the brush you’ve just modified to add some snow at the bottom of the letters.

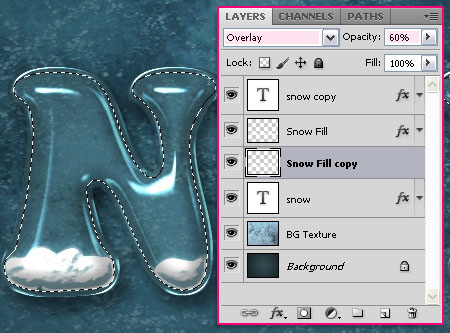
Duplicate the Snow Fill layer, and drag the copy below it.
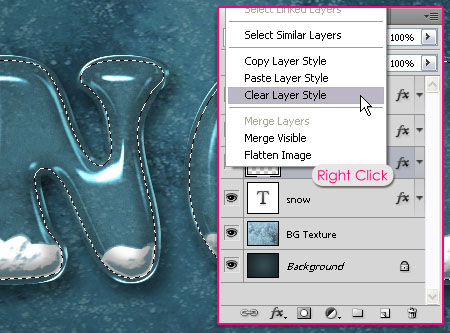
Right click the Snow Fill copy layer and choose Clear Layer Style.
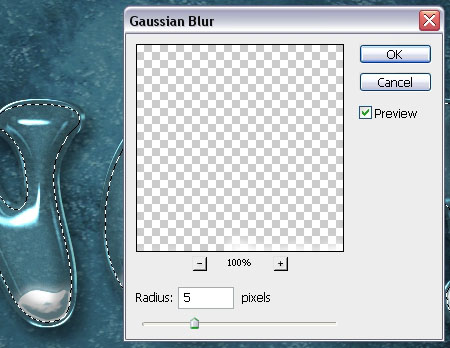
Go to Filter -> Blur -> Gaussian Blur and type in 5 for the Radius.
Change the Snow Fill copy layer’s Blend Mode to Overlay and its Opacity to 60%.
Step 5
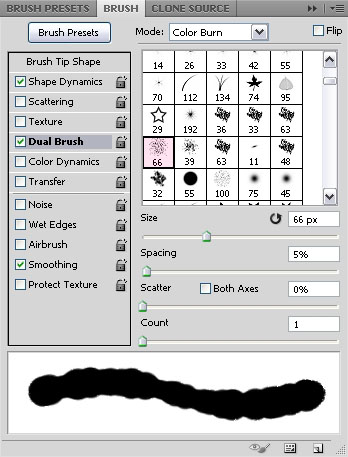
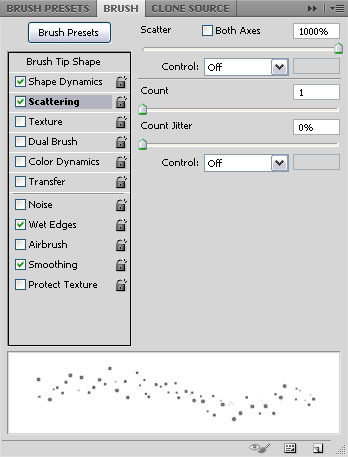
Once again, go to the Brush panel, and choose a hard round brush, then change its Settings as shown below:
Brush Tip Shape
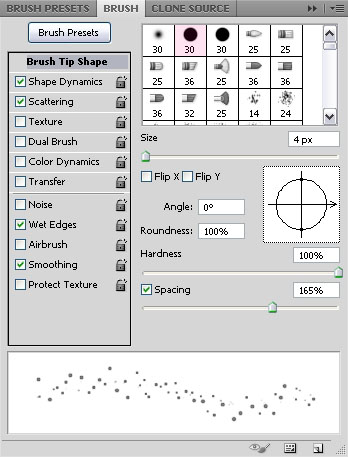
Shape Dynamics

Scattering
Check the Wet Edges box.
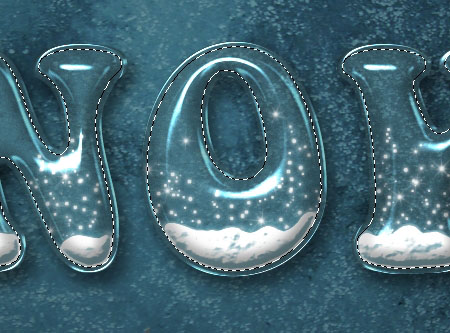
Create a new layer on top of the Snow Fill layer, and call it Snow Sparkles.
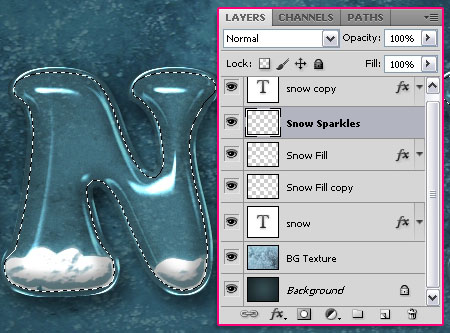
Use the modified brush to scatter some snow in the lower half of the letters.
Double click the Snow Sparkles layer to apply the following Layer Style:
– Drop Shadow
- Color :
#2b4347 - Opacity : 30%
- Distance : 8
– Inner Glow
- Color :
#ffffff
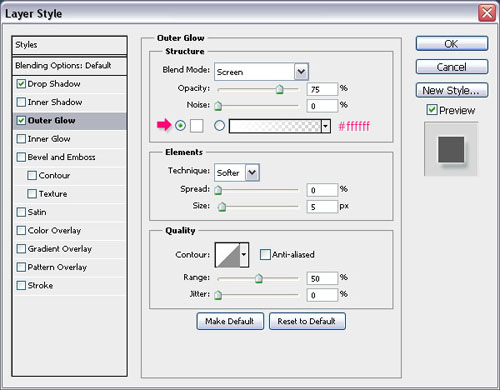
This will add a nice glow.
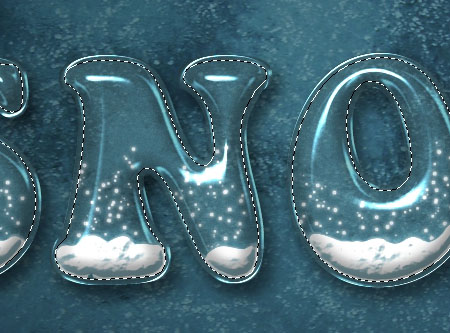
Step 6
Create a new layer on top of the Snow Sparkles layer and call it Star Sparkles, and apply the same Snow Sparkles‘s Layer Style to it. (Right click the Snow Sparkles layer, choose Copy Layer Style, then right click the Star Sparkles layer and choose Paste Layer Style.)
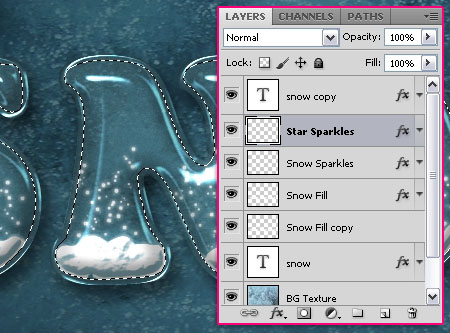
In the Brush panel, choose a brush from the Brushes O5 set, (the one used here is “467986”), then change its Settings as shown below:
Brush Tip Shape

Shape Dynamics
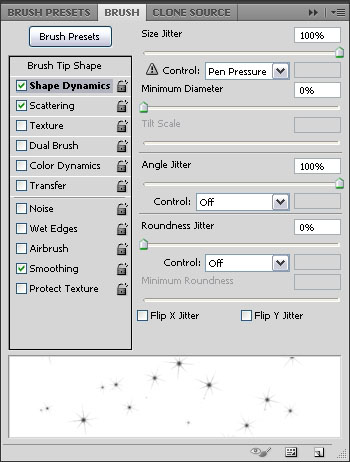
Scattering
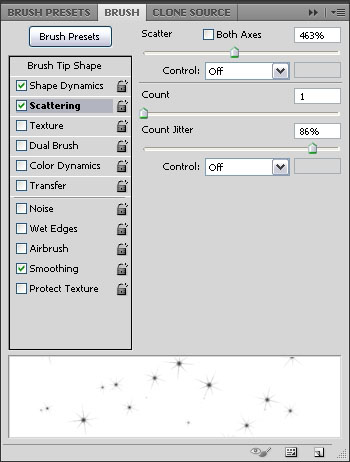
Scatter some sparkles inside the letters.
Step 7
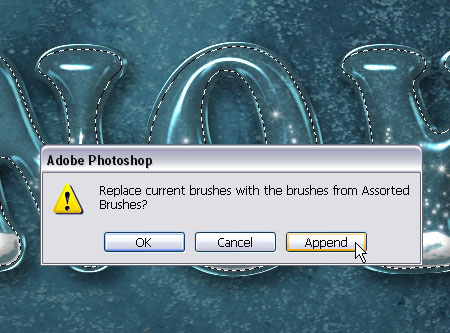
Select the Brush Tool, and open the Brush Preset Picker. Click the pop-up menu icon in the top right corner, then, click Assorted Brushes.
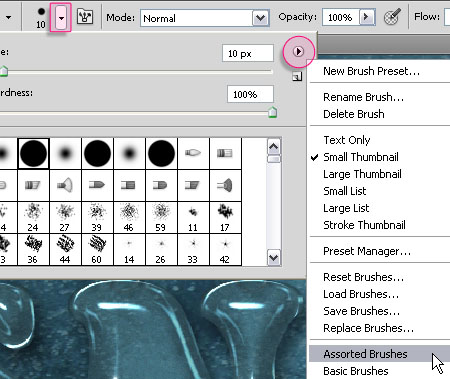
Click Append to add the brushes to your current set.
Pick the Diamond brush, and modify its Settings as shown below:
Brush Tip Shape
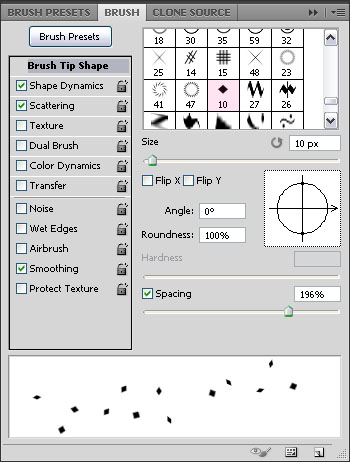
Shape Dynamics
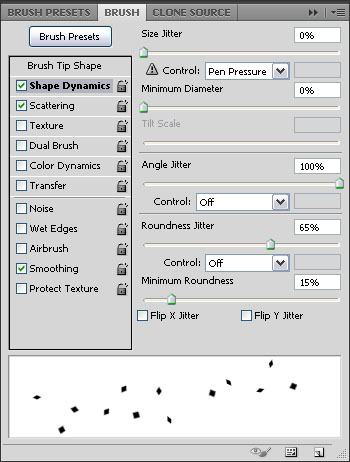
Scattering

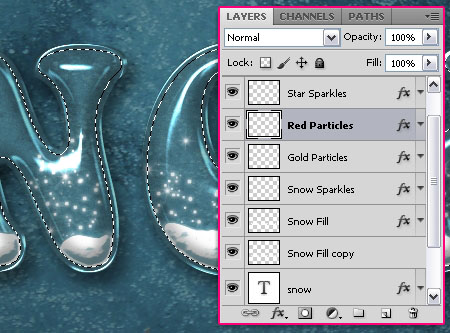
Create a new layer on top of the Snow Sparkles layer and call it Gold Particles.
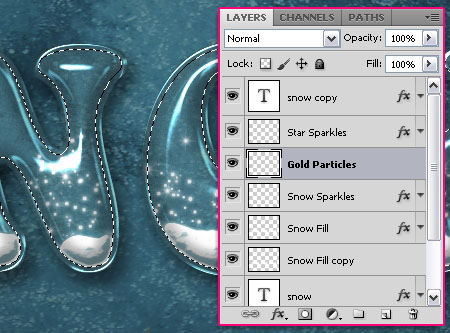
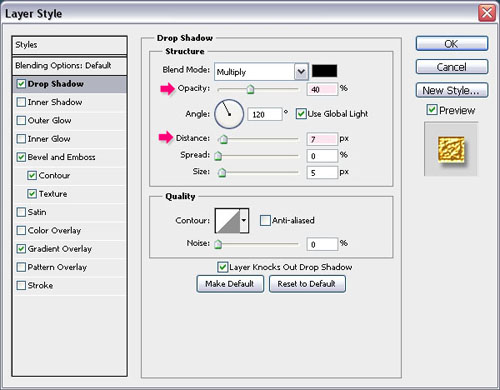
Double click the Gold Particles layer to apply the following Layer Style:
– Drop Shadow
- Opacity : 40%
- Distance : 7
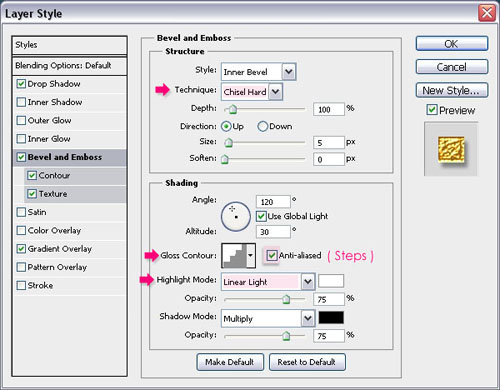
– Bevel and Emboss
- Technique : Chisel Hard
- Gloss Contour : Steps
- Check the Anti-aliased box
- Highlight Mode : Linear Light
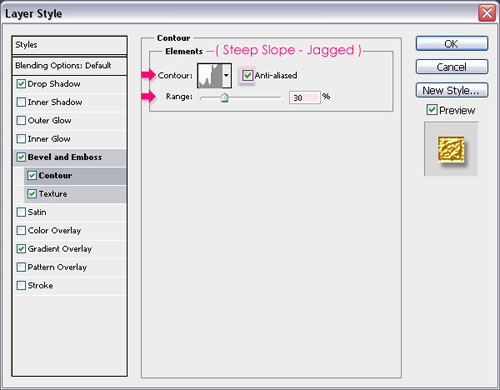
– Contour
- Contour : Steep Slope – Jagged
- Check the Anti-aliased box.
- Range : 30%
– Texture
- Pattern : Metal Landscape
- Scale : 50%
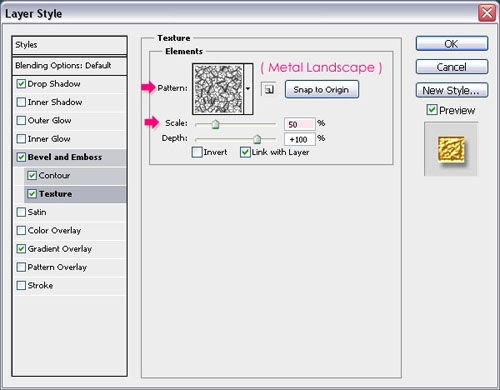
Gradient Overlay: You can have fun with this. Choose any gradient you like, and it will work! You can download the one used here as well.
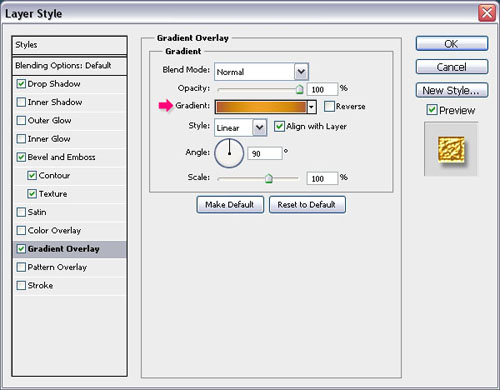
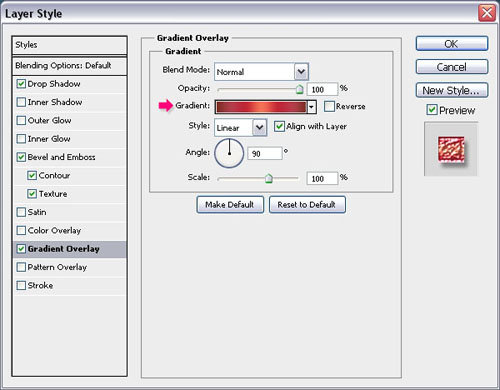
Duplicate the Gold Particles layer and rename it to Red Particles, then double click it to apply a different Gradient Overlay. This one is available for download too.
Select the Gold Particles layer so that it is the active layer, and add some particles using the modified “Diamond” brush.
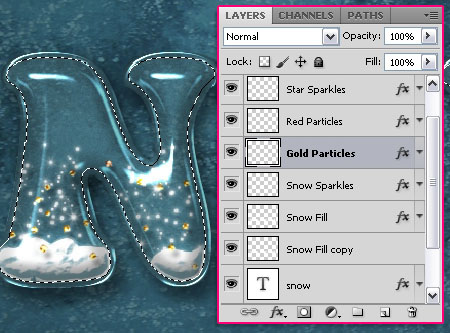
Then, select the Red Particles layer, and add more particles.
Once you’re done, go to Select -> Deselect to get rid of the selection.
Step 8
Pick the Ellipse Tool, and click the Paths icon in the Options bar. Then, create a new layer on top of the Star Sparkles layer and call it Hangers.
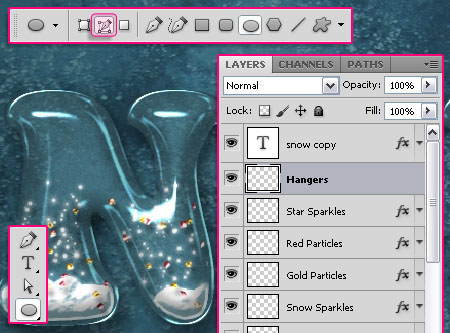
Draw a small circle so that its center intersects with the letter’s top.
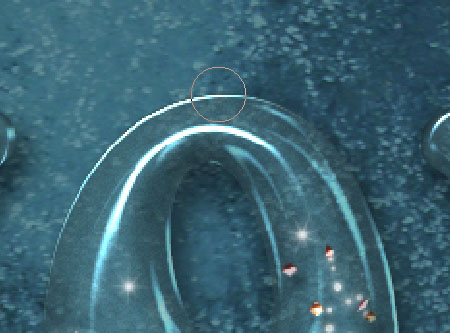
Pick a hard round brush, and set its Size to 3 px.
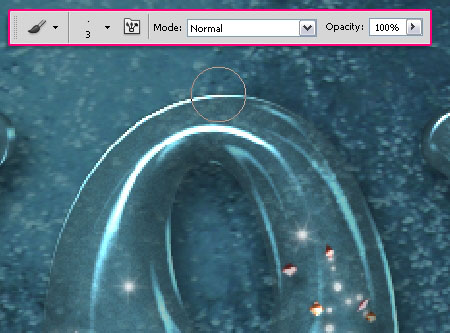
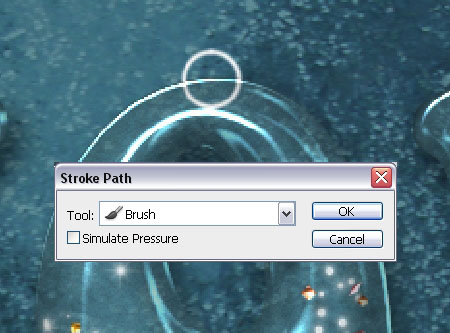
Pick the Ellipse Tool again, set the Foreground color to White, make sure that the Hangers layer is still selected, right click the path you created, and choose Stroke Path .
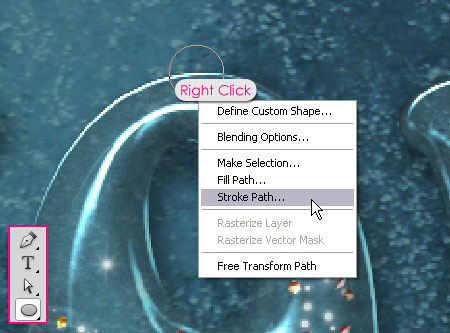
Choose Brush from the Tool drop down menu and make sure that the Simulate Pressure box is un-checked. Hit Enter to get rid of the path.
Duplicate the layer to add hangers for all the other letters.
Select all the duplicated Hangers layers, then go to Layer -> Merge Layers to merge them all in one layer.
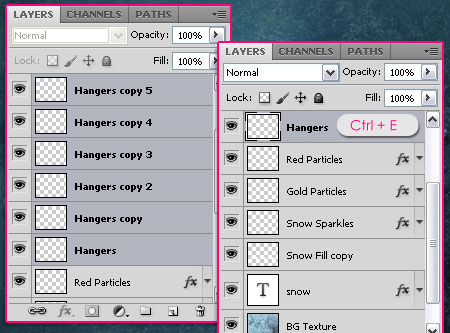
Apply this Layer Style to the merged layer.
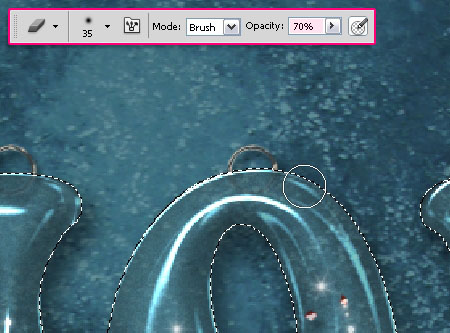
Select the text (Ctrl/Cmd + click a text layer’s thumbnail), then pick the Eraser Tool, set its Opacity in the Options bar to 70%, and erase the inner half of the hangers. Once you’re done, press Ctrl/Cmd + D to get rid of the selection.
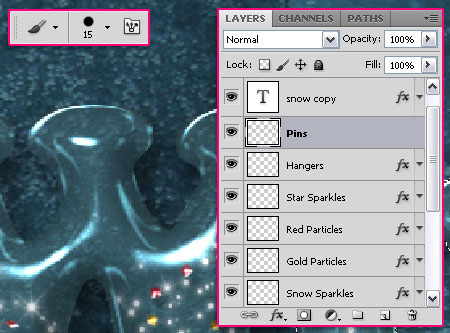
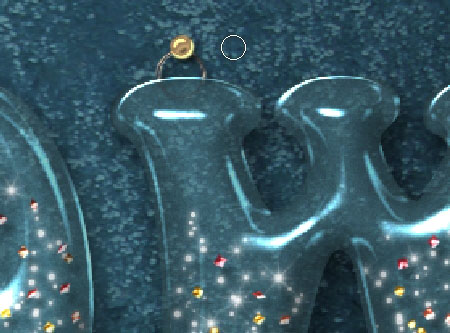
Create a new layer on top of the Hangers layer and call it Pins, then, apply this Layer Style to it. Choose a hard round brush and set its Size to 15 px.
clickce to add a pin on the top of each hanger.
Once your pretty snow globe letters are all hung up, you’re done!
.
Did you enjoy this post? Please consider donating to help us cover our server costs.

Great tutorial 😀 Thank you very much!
Thanks a lot for the comment 🙂
thanks a lot! This is what i´ve done: http://dc433.4shared.com/img/EgB9gH1a/s3/FROSTY.jpg
Nice outcome 🙂
Thanks a lot for the comment and the link.
I love your Snow tutorial but unfortunately I don’t have a software program to make it. Is there any way you would share the word art with some us who don’t have programs?
Thank you and Merry Christmas.
Thanks for the comment, but I did not quite understand what you mean by the “word art”, so can you please clarify that to me?
Thanks once again 🙂
very clear instruction, I will try this, it looks realy cool, thank you
Hope it turns out great 🙂
Thanks for the comment.
It looks very unique, I love it! thanks for sharing the tutorial 🙂
Thank you so much, glad you liked it 🙂
Another great tutorial. I always look forward to the ones you write.
Thanks for sharing.
I’m really glad to know that 😀
Thank you so much for the kind words.
Great tutorial Rose. 🙂
Thanks a bunch 🙂
Very clear instructions. Thank you
Thank you for the comment 🙂
Thank for this tutorial!
🙂
Thanks for the comment 🙂
grazie per il tutorial ^^
Grazie for the comment 🙂
Bravo (de Saint-Etienne, France) pour ce magnifique tutoriel !!!
Merci beaucoup for the comment 🙂
Good job Rose! But I can’t find out “PinsLayerStyle”? Where’s it? I’ll translate this tut to vietnamese 🙂
Oh! I’m sorry! I found it 😀 many thanks 😀
No problem 🙂
Please don’t forget to link back 😉
Thanks for the comment 🙂
One word…AWESOME!
Thank you so much 🙂
Sry. Where’s Clouds Pattern ? 🙁
Oh~ sry, i found it :)). Great tut 😉
No problem 🙂
Thanks a lot for the comment.
Oh never knew you can make glass out of just layer styles! Thanks for the tip rose
Glad you found the tutorial useful.
Thanks a lot for the comment 🙂
thanks for a very useful tutorial. can i achieve this effect on a cs3 extended?
Yes you can.
Thanks a lot for the comment 🙂
Really cool.
Thanks 🙂
Very nice. Thank a lot.
You’re welcome.
Thanks for the comment 🙂
Thanks for sharing this fun effect! Very well-written tutorial 🙂
You’re welcome 🙂
Thanks a bunch for the comment 🙂
Super tut !
Thanks a lot 🙂
How to click modify ?
when you click Fill Snow And Snow ?
it doesnt work at mine 🙁
Hello Julia,
Did you make sure that the “Snow Fill” layer is selected (active) before you click Modify?
This is wonderful tutorial thank you.
Thanks a bunch for the comment 🙂
where is the font?
What font?
The main font is mentioned in Step 1. It is “Keep on Truckin’ FW“.
Cool!!! this tutorial is amazing thanks!!
You’re welcome.
Thanks a lot for the comment 🙂
Nice effect! This is perfect for desktop wallpaper during Christmas. You are really genius person. I am wondering if I could do the same way that you do. By the way I love the concept of your design.
~Ashley
Thank you very much Ashley, this means a lot 🙂
Glad you liked the effect.
Regards.
Thanks! It’s a great tutorial!
Thanks for the nice comment 🙂
Good text effect tutorial.This is one of my best text tutorials.
Amazing!
Thanks a lot 🙂
Really AWESOME tutorial!! THX!!
Glad you think it is 😀
Thank you for the comment 🙂
Wow. This is Amazing!
Thank you very much
You’re welcome, glad you liked it.
Thanks a lot for the comment 🙂
I don’t have “Valley – High” . Where Can I find It ?
As mentioned above, you can check this image to see how to get it.
Hope this helps 🙂
Oh! Thanks For Your Help !! 😉
You’re welcome 🙂
I don’t found the next textures =( Clouds-Metal Landscape .Plesa help me .Thanks for this tutorial 09
Do you mean the “Frost” texture? The link is working fine for me, but you can try the direct download link here. Hope this works.
Thanks for the comment 🙂
I try your tutorial & I will share your post in my language (myanmar). thanks a lot
Awesome! But please don’t forget to link back 😉
Thanks for the comment 🙂
I was pleasantly surprised with the simplicity of this very well explained tutoriel and with its beauty. Thank you very much. (I am French and I used a translator to write you. Sorry if it is not top.)
Hello Patrick,
I’m so glad you liked the tutorial and found it easy to follow.
Merci beaucoup for your kind words 🙂
Thank you for tutorial and PSD box.
it is the clearest tutorial ever!!!
Thanks a lot for the nice comments 🙂
Glad you liked it.
Very sleek, looking at the outcome makes you happy :)) , thinking of Christmas 😀
That’s so nice of you, makes me glad it does 😀
Thanks a lot for the comment 🙂
Excellent tutorial,I love this!
thanks for sharing!
Glad you do 🙂
Thanks for the comment.
i really enjoy doing this tutorial!! thanks a lot!!
That’s awesome to know!
Thank you for the comment 🙂
WOW! Thank you very much for the tutorial. It was very helpful.
Happy you found it helpful.
Thanks a bunch for the comment.
Nice tutorial.thank you so much
You’re welcome, and thanks for the comment 🙂
Hey I love it.
I did it
It was so great
Awesome! Glad to know that 🙂
Thanks for the comment.
Love this tutorial, makes it so easy!
here’s what I’ve made: http://mjumpringles.deviantart.com/#/d4yb7n7
Lovely design and nice additions.
Thank you for the comment and the link 🙂
Great Tutorial. Txh 😀
Here’s what I’ve made: http://imageshack.us/a/img222/2131/12229098.jpg
Absolutely beautiful and well done 🙂
Thanks a lot for the comment and the link.
Thank you SO MUCH for this awesome tutorial, I loved it, wish I could send you a link to what I did but no sure how to do that 🙁
It´s very easy to follow your directions and I like how many pics you have posted to follow 🙂 🙂
Very happy you enjoyed it and found it easy to follow.
You can share your outcome by uploading the final image to tinypic.com, then posting the link in a comment here … Would like to see your outcome indeed 😀
Thank you very much for your lovely words, they mean a lot 🙂
ty very much, I learned so much new things how to do … just great post and easy for understanding from beginners like me … thank you .. like this post really much and letters also. Never imagin it possible to make something like that 🙂
That’s amazing to know! Really glad that you were able to follow the tutorial easily and that you found it useful.
Thank you very much for your kind words 🙂
Hi textuts, how to apply HangersLayerStyle… I download it and extract it , then click on it with right button of the mouse and there didn’t saw option to install it. Then just double click on the HangersLayerStyle and it show my photoshop window, but nothin change as on the picture you show – http://prntscr.com/l83uz .
Don’t know how to do it, pls help 🙂
Here is my text, everything is nice, till this step …
screenshot: http://prntscr.com/l841e
I found something – here dl link for download layer style for “Pins layer” , not working 🙂 I’m sorry of that make a problems, it’s just for info … maybe need change link with working one, because theme is very good and a lot of people use it 🙂
screenshot : http://prntscr.com/l85px
screenshot 2: here is for what about talk http://prntscr.com/l85sw
I will try with on other way to take this effect 🙂
Thank you 🙂
As for the Layer Style, the link works fine for me. Try to right click it and choose the Save or Save as option instead of clicking it directly.
Once you download the file and extract it, you’ll need to load those styles inside Photoshop.
Check this page and hopefully it’ll help you understand how to do so. Just choose Styles instead of Swatches.
After the styles are loaded, select the layer you want to apply the styles to, open the Styles panel (window -> Styles), and click the icon of the style you just loaded.
Hope this was helpful. Please feel free to add any other queries you have.
Great job,
I can’t find the pins layer styal
sorry i found it … thanks again
No problem ^_^
Thanks a lot for the comment.
Thank you for replay … I’m in love from all your work. You should be lost much time for everything, but made so much people happy and will make 🙂
Today will try something new , because everything is great. And you explain very well 🙂
Wish you happy Holidays and New year 🙂
Aww! Thank you so very much 🙂 It’s the awesome comments like yours and all the support that makes it worth it 😀
I really appreciate your kind words, and I’m glad you found the tutorials helpful.
Very happy holidays and new year to you too.
Cheers 😀
Hey just working on the tutorial and stuck on one step.. I’m trying to fill the snow text layer in with the brush, but it keeps asking me to rasterize the layer.. I’ve done that and the snow comes up blue and not white, what should I do?
You’re most probably adding the snow on a text layer (a text layer is selected). Make sure to select the “Snow Fill” layer, so that it is the active layer, before you start adding the snow with the brush.
Hope this helps.
Please feel free to add a reply if the problem still exists.
I think you should add to the step before painting the snow inside the letters, something like “change your foreground color to white”. I still had the colors from the gradient, and…well, let’s just say, it didn’t look like snow at all. 😀
But great tutorial anyway.
You’re absolutely right! Fixed now.
Thank you for pointing that out, and for the nice comment 🙂
i love it! thank you sooo much.
Very glad you do 😀
Thanks a lot for the comment.
Very Nice Tutorials
Thanks a lot 🙂
where’s the ‘metal landscape’ pattern?
It comes with Photoshop, but you need to load it if you can’t find it. To do so, go to Edit -> Preset Manager, and choose “Patterns” from the “Preset Type” drop down menu. Then, click the little arrow to the right of the Preset Type drop down menu, and click “Patterns” near the bottom of the pop-up menu. When the dialog box appears after that, just click Append, and you’ll get the pattern 🙂
Hope this helps.
Ow I found it! thank you. . I like your tuts..
Cool!
Very glad you do 🙂
Thanks a lot.
love it!, but unfortunately step 4 ( Snow Fill) i followed the steps as clearly stated, but somehow the snow effect didn’t turn out white, the effect was a bit faded out, please could you help me! Much appreciated
When you pick the Brush Tool, please check that the Opacity and Flow values in the Options bar are set to 100%. The “Snow Fill” layer’s Opacity and Fill values should be set to 100% as well.
If they are, please feel free to leave a reply with a screenshot of the issue.
Thanks for the comment 🙂
Glad you like it 😀
Muchas gracias for the comment 🙂
This tutorial is awesome, thank you very much. I did run into a problem with the pin layer. I loaded the pinlayer style provided but when I go to add the pins, they look nothing like in the picture 🙁
Are you using the same brush size for the pins? If so, then can you please upload a screenshot of the issue?
Thanks a lot for the comment 😉
This tutorial was very helpful. Well put together and just all around great. Thanks.
Glad you found it so!
Many thanks for the kind words 🙂
wonderful!
Thanks for this tutorial
Glad you like it!
Thanks a lot for the comment 🙂
Hi! I tried making this effect, unfortunately when I cannot apply the Hangers Layer Style and Pins layer Style. I loaded them but I couldn’t find them. The Hangers and Pins layer styles don’t appear on my list of layer styles. Can you please help me with that problem?
I love this tutorial, by the way. It’s really fun to do!
How did you load them to Photoshop? They should appear just fine. Did you try loading them from the Styles panel itself?
This is amazing, Thanks for share it.
Glad you like it 🙂
Thanks for the comment.
Very glad to know that!
Thank you very much for the absolutely kind words ^_^
Thank you again Rose, I just love your tut so easy to follow..xoxox
Another lovely outcome indeed!
Very glad you’re enjoying the tutorials 🙂
Thanks a lot for the kind words and for sharing your work 😀