
Number Candles Text Effect – Part 1
Candles come in different shapes and sizes, but they all look beautiful once lit, specially if they are on top of a delicious chocolate cake… I mean, seriously!
This tutorial will explain a quite simple technique for creating a 3D text without using any 3D tools. Then, it will guide you, step-by-step, through the other details of shaping the candles, adding lights and shadows, placing the candles on top of a cupcake, and modifying the lighting of the final result using a lovely action.
Since there are many bits and pieces in the tutorial, it will be divided into two parts.
The first part will explain creating the 3D candle shape, adding the stroke, creating the wick and the flame parts, and adding the basic lighting.
The second part will explain how to add the candles to the cupcake, add more lights and shadows where needed, applying the action, and some cool modifications you can add to the final result.
16 is for my lovely sister’s sweet sixteen birthday that she celebrated a couple of days ago 🙂
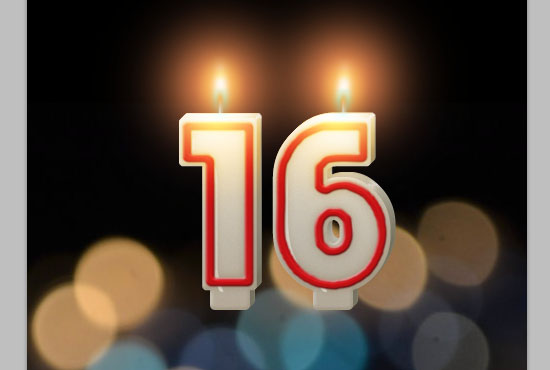
The Final Result

Tutorial Details
- Software Used : Photoshop
- Version : CS6 Extended
- Time : 0:30 – 0:45
Resources
- Familian font.
- Stock Blue Bokeh by AdrianaFilip.
- gradient-shapes for Photoshop by ilnanny.
Step 1
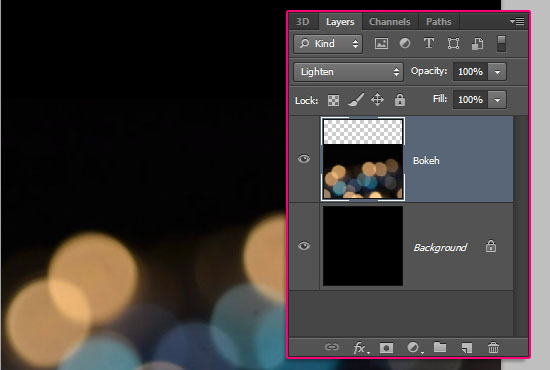
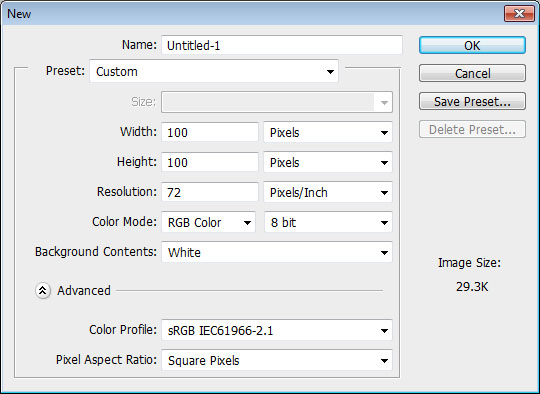
Create a new 500 x 500 px document, set the Resolution to 300, and fill the Background with Black.

Place the Stock Blue Bokeh image on top of the black background, change its Blend Mode to Lighten, then move it downwards so that the top third of the canvas is all black.
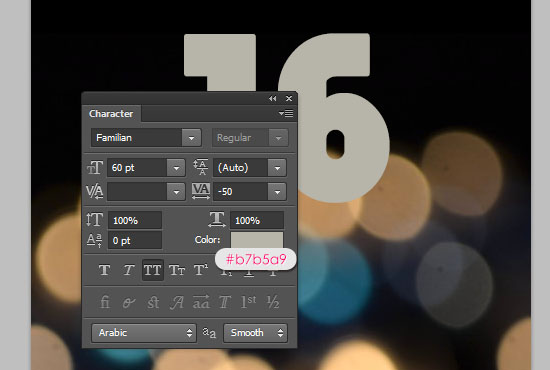
Create the text using the font Familian. The font Size is 60 pt, the Tracking value is set to -50 to reduce the spaces between the numbers, and the color is #b7b5a9.
You can create numbers, letters, both, whatever you like, as long as you use the same values.
Just keep in mind that the text will be placed on top of a cupcake. So one or two characters are perfect. If you are using more than two, you’ll either need to skip the cupcake part, resize it to a bigger size than the one used in this tutorial, or find another cupcake/cake image.
Other than the cupcake, it’s important to use the exact same values presented in the tutorial for all the steps, unless you know exactly how to change all of the values if you are using a different font or font Size.
Step 2
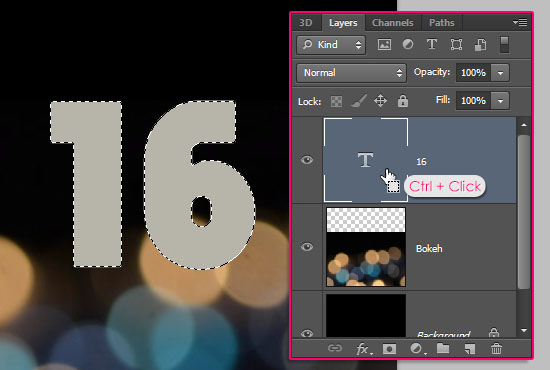
Ctrl/Cmd + click the text layer’s thumbnail to create a selection.
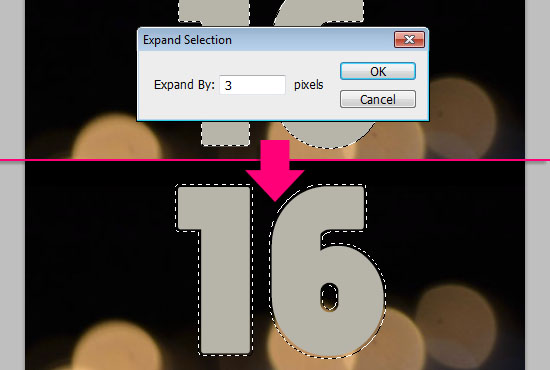
Go to Select > Modify > Expand, and expand the selection 3 px.
Create a new layer on top of the text layer, and make the text layer invisible by clicking the eye icon next to it.
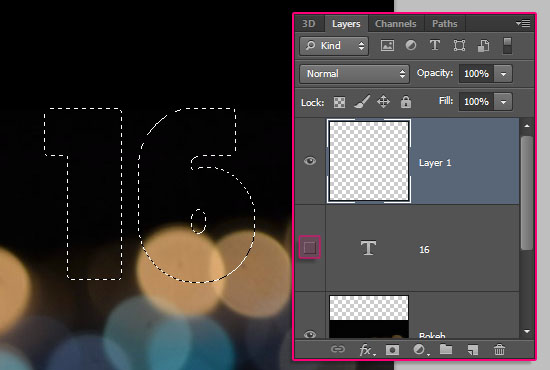
Fill the selection with the same text color, #b7b5a9, using the Paint Bucket Tool.
From now on, we’ll be referring to the text with the word “candles”.
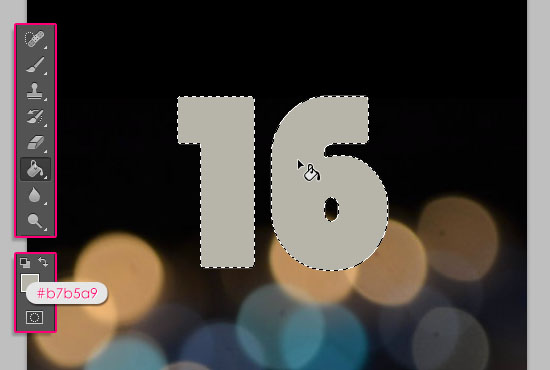
Go to Select > Deselect, or press Ctrl/Cmd + D, to get rid of the selection.
Step 3
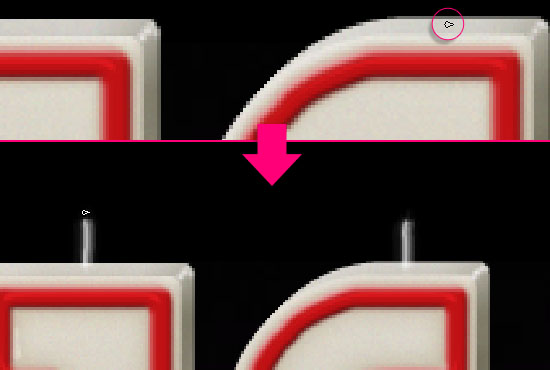
Pick the Rounded Rectangle Tool, make sure that the Shape option is active in the Options bar, and set the Radius value to 5. Then create a 40 x 27 px rounded rectangle right below one of the candles you created.
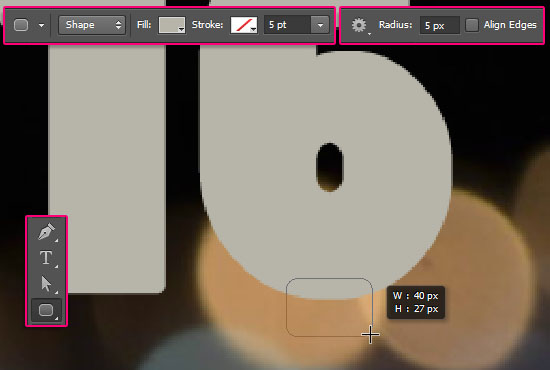
If you have more than one candle, duplicate the shape layer, then use the keyboards’ Arrow Keys to move the copy horizontally under the second candle.

Do the same for all the candles you have.

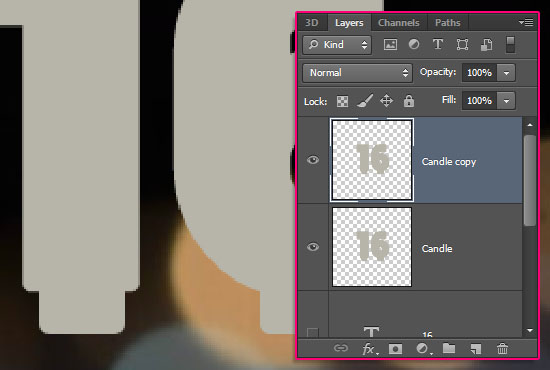
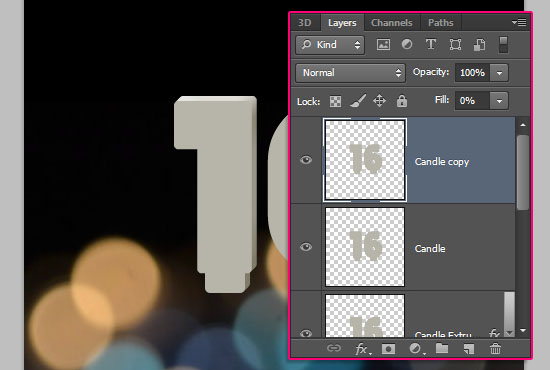
Select the candles’ layer, and all the rounded rectangle shape layers (Ctrl/Cmd + click each layer to select it), then go to Layer > Merge Layers (Ctrl/Cmd + E) to merge them all in one layer.
Rename the merged layer to Candle.
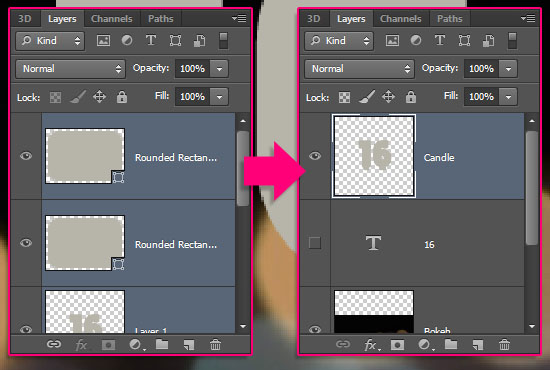
Duplicate the Candle layer.
Step 4
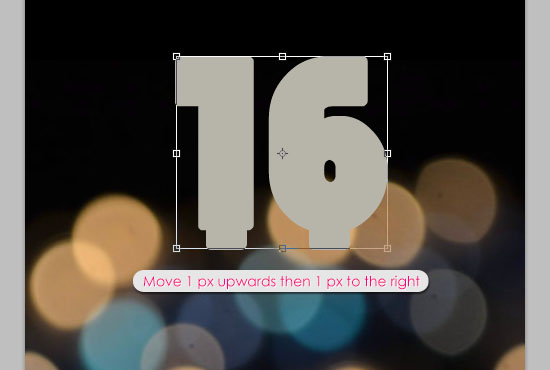
Go to Edit > Free Transform, or press Ctrl/Cmd + T, to enter the Free Transform Mode. This is important for the next step to work.
Press the Up Arrow key once to move the duplicated layer one pixel upwards, then press the Right Arrow key once to move it one pixel to the right.
Hit Enter/Return to accept the changes and get out of the Free Transform Mode.
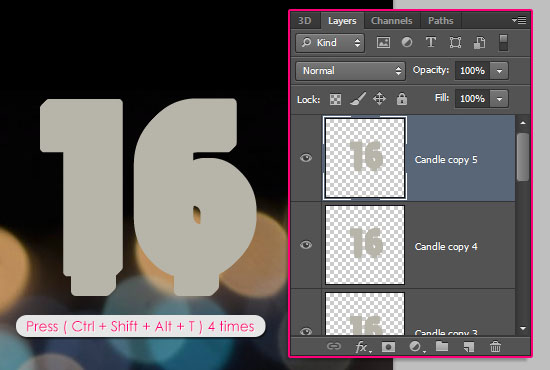
Now, we need four more copies, with the same transformation. This can be easily achieved by pressing Alt + Ctrl/Cmd + Shift + T or Option + Command + Shift + T four times. The last layer created should end with “copy 5”.
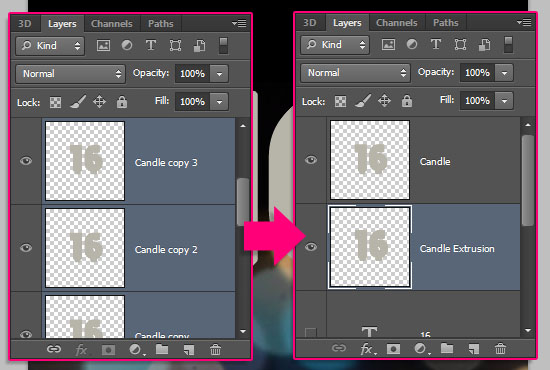
Select all the copy layers, then merge them (Layer > Merge Layers). Rename the merged layer to Candle Extrusion, and move it below the Candle layer.
The font used helps a lot in perfecting the 3D shape, since it has smooth round corners. For fonts that have sharper corners, you might need to fill in the jagged corners with a brush.
Step 5
Double click the Candle Extrusion layer to apply a simple Bevel and Emboss effect, by changing the Size to 21, and the Shadow Mode color to #95927f.

This will create the 3D effect for the extrusion.

Duplicate the Candle layer, then double click it (the Candle layer) to apply the following Layer Style.
– Bevel and Emboss
- Size : 4
- Shadow Mode :
- Color :
#d6d4c9 - Opacity : 50%

– Gradient Overlay
Click the Gradient box to create it.

The gradient uses two colors #bdb4a3 to the left, and #ece9de to the right.
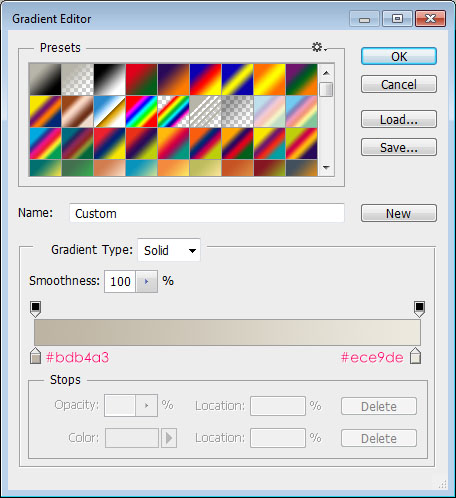
This will style the candles’ front.

Now, double click the Candle copy layer to apply yet another Bevel and Emboss effect.
- Size : 20
- Uncheck the Use Global Light box
- Angle : -162
- Altitude : 74
- Gloss Contour : Ring – Double
- Check the Anti-aliased box
- Highlight Mode : Overlay
- Color :
#fffdfc - Shadow Mode – Opacity : 0%
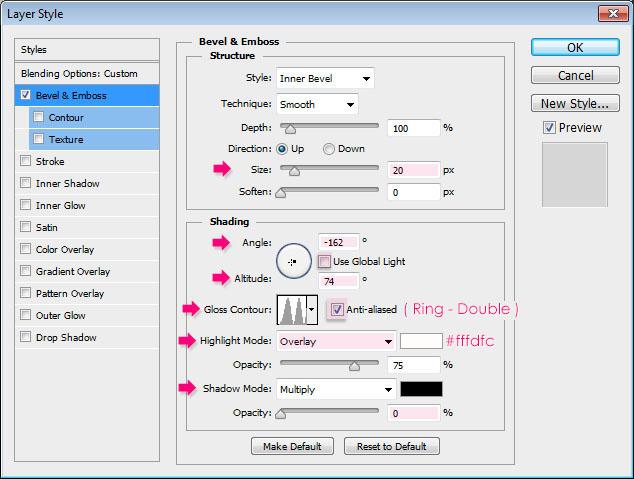
This will create a subtle shiny part that will define the inner area of the candle once the stroke is added.

Step 6
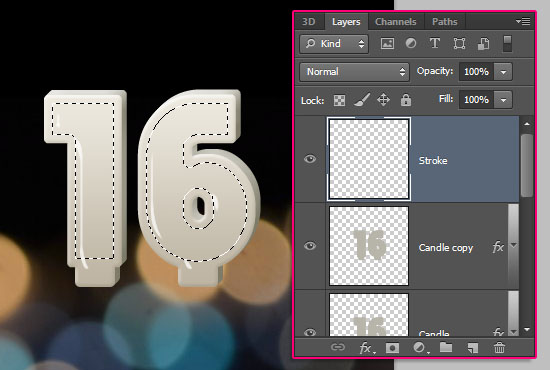
Ctrl/Cmd + click the original text layer’s thumbnail to create a selection.
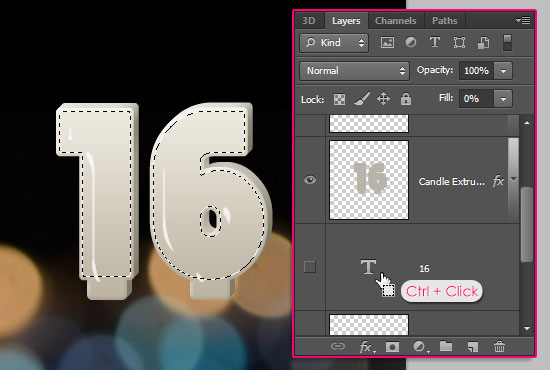
Go to Select > Modify > Contract, and contract the selection 5 px.
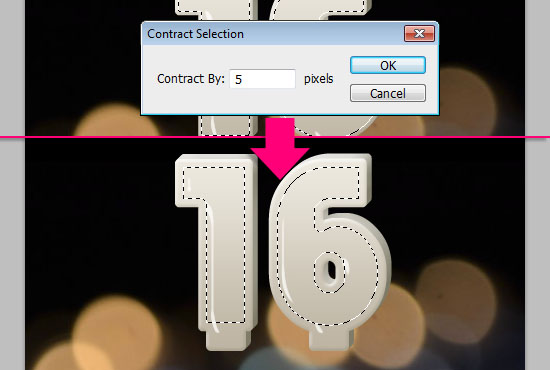
Create a new layer on top of all layers and call it Stroke.
Open the Paths panel (Window > Paths), then press and hold the Alt/Option key, and click the Make work path from selection icon down the panel. A dialog box will appear, and you’ll need to enter a Tolerance value. Smaller values give more precise paths. So we’re going to use the smallest value possible, which is 0.5.
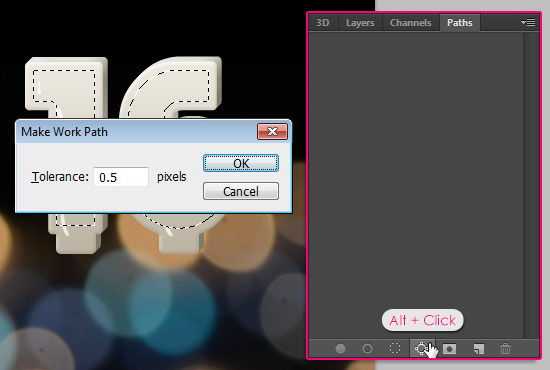
This will convert the selection into a work path.

Step 7
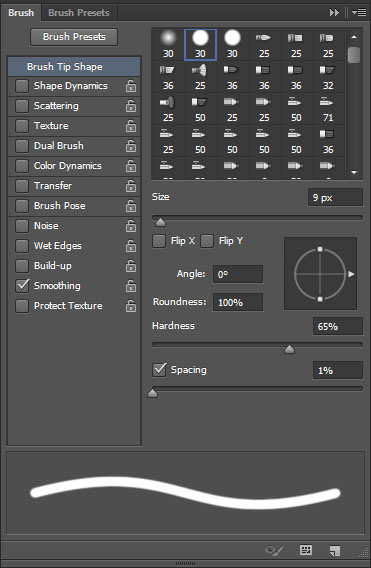
Pick the Brush Tool and open the Brush panel (Window > Brush). Choose a hard round brush, change its Size to 9 px, its Hardness to 65%, and its Spacing value to 1%.
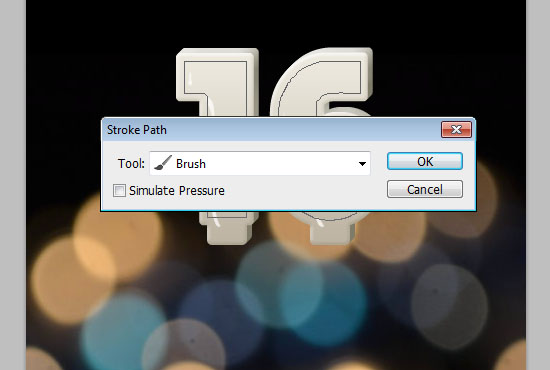
Pick the Direct Selection Tool, set the Foreground color to #c01114, right click the work path and choose Stroke Path.
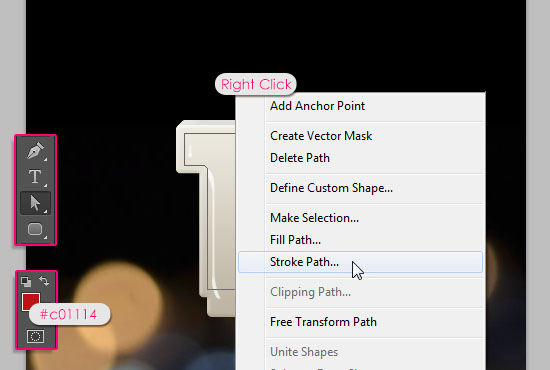
Choose Brush from the Tool drop down menu. The Simulate Pressure box should be unchecked.
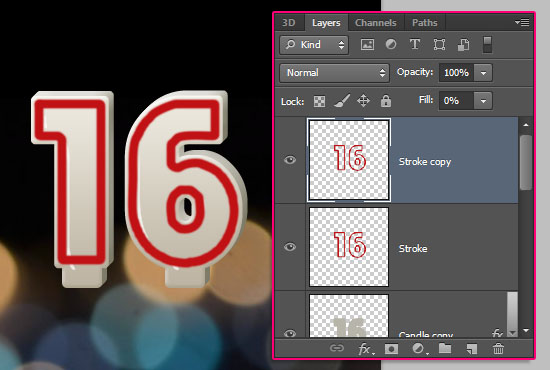
This will stroke the inner part of the candle. Hit Enter/Return to get rid of the path, then duplicate the Stroke layer, and change the copy layer’s Fill value to 0%.
Step 8
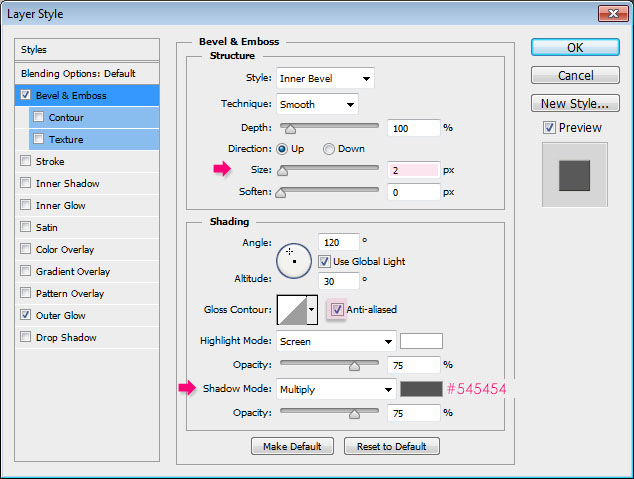
Double click the Stroke layer to apply the following Layer Style:
– Bevel and Emboss
- Size : 2
- Check the Anti-aliased box
- Shadow Mode -> Color :
#545454
– Outer Glow
- Blend Mode : Multiply
- Color :
#e6decf - Size : 11
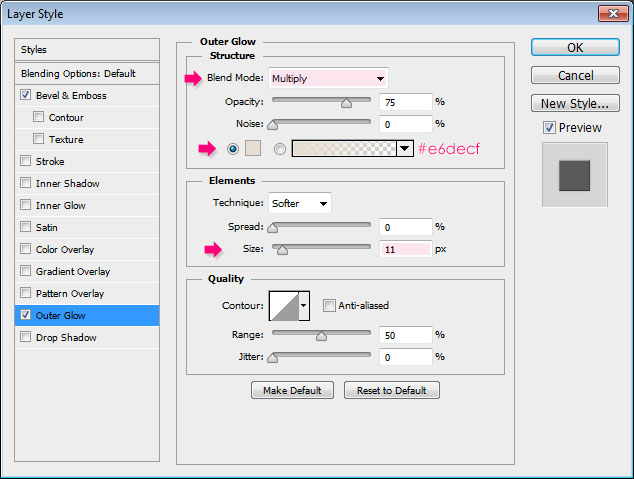
This will add a subtle 3D effect to the stroke.

Double click the Stroke copy layer to apply a simple Bevel and Emboss effect:
- Size : 7
- Uncheck the Use Global Light box
- Angle : 72
- Altitude : 74
- Highlight Mode : Overlay
- Opacity : 48%
- Shadow Mode – Opacity : 0%
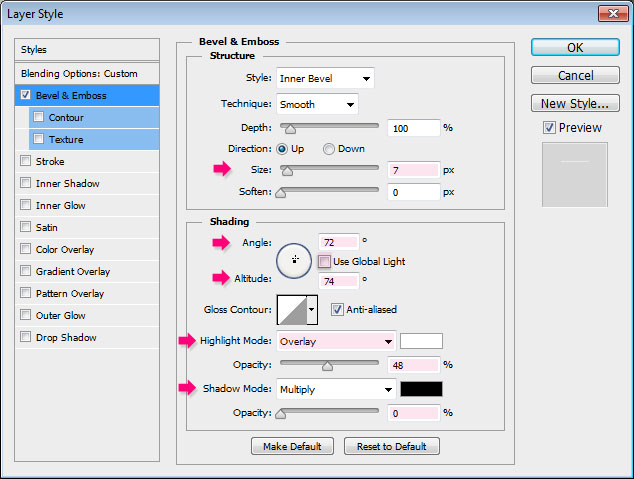
This will add a simple gloss effect to the stroke, making it look more waxy.

Step 9
Pick the Brush Tool once again, choose a 3 px soft round brush, and set the Foreground color to White. Create a new layer below the Stroke layer and call it White Dots.
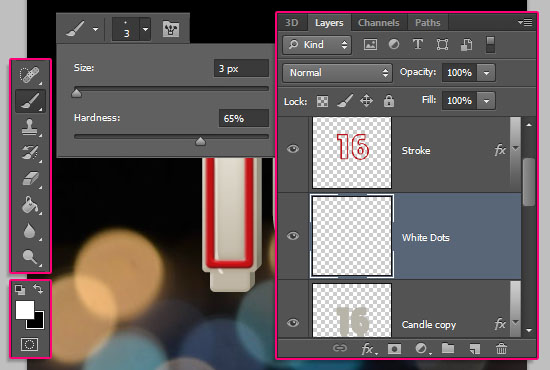
Start clicking to add white dots on the top corners of the candles. Notice that they are dots not lines, so it’s ok, and better, if they are not connected. Those will add some shine to the candles.
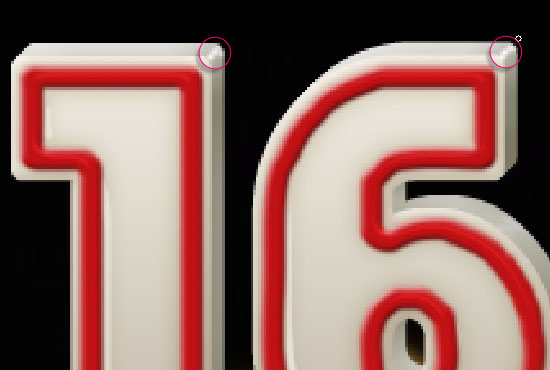
Do the same for any other parts that should actually have some shine. You can try that on different areas, and just erase the ones that don’t look good afterwards.
You can also add more than one line of dots, then blur them all together using the Blur Tool, with the Strength set to 50% in the Options bar.
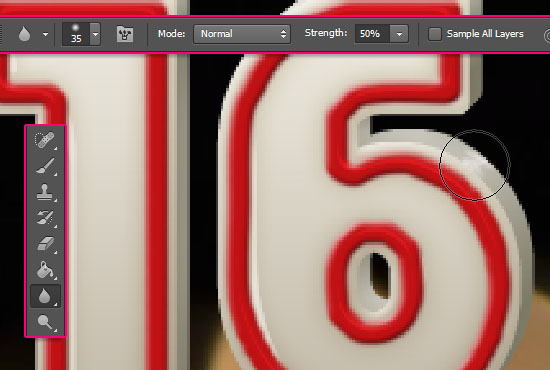
You might as well use the Smudge Tool, reduce the Opacity, change the Blend Mode. Whatever you like to do to make those shiny spots look good.
Step 10
Ctrl/Cmd + click the Candle Extrusion layer to create a selection.
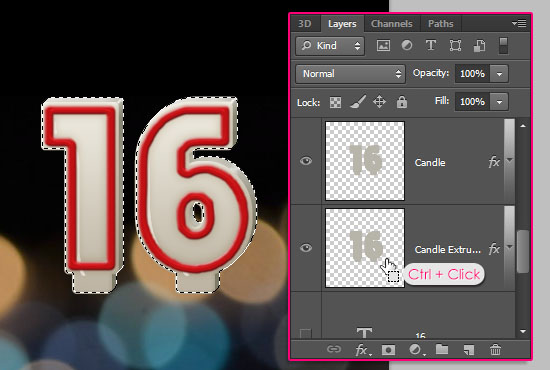
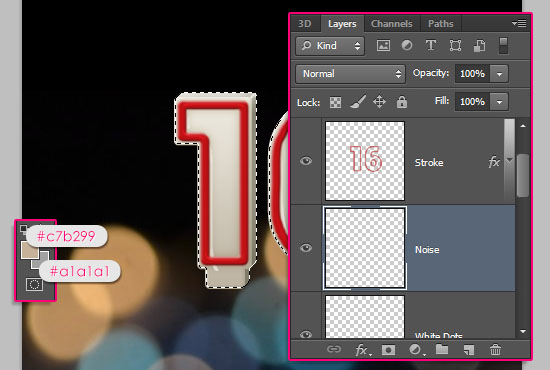
Set the Foreground color to #c7b299 and the Background color to #a1a1a1. Create a new layer between the Stroke and White Dots layer, and call it Noise.
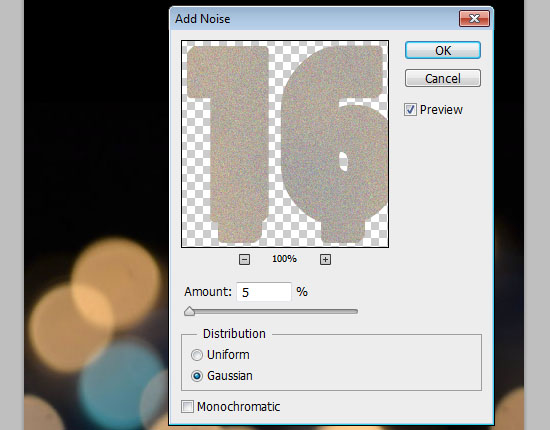
Go to Filter > Render > Clouds. Then press Ctrl/Cmd + D to get rid of the selection.

Go to Filter > Noise > Add Noise. Set the Amount to 5 and choose the Gaussian option under Distribution.
Change the Noise layer’s Blend Mode to Multiply and its Opacity to 20%.

Step 11
Pick the Brush Tool, and choose the Star 14 pixels brush. Set the Foreground color to White, and create a new layer on top of all layers then call it Wick.
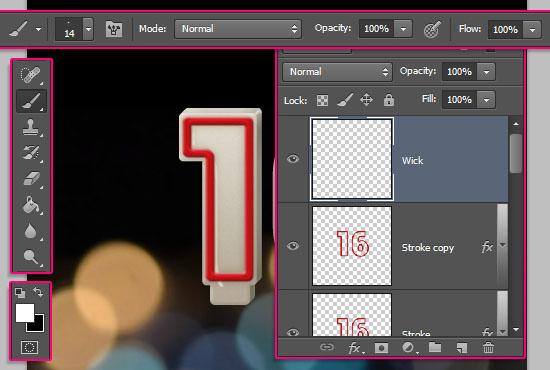
Place the brush in the middle of the extrusion part where you want to add the wick, then click and drag upwards to create it. Don’t worry about making it perfect, it’s not supposed to be so anyway.
If you don’t like the length, you can erase the extra parts, or redraw the wicks once again.

Double click the Wick layer to apply a Gradient Overlay effect:
– Gradient Overlay
- Blend Mode : Multiply
- Choose the Black to White gradient fill
- Check the Reverse box

This will give an illusion of burnt wick tips.

Step 12
Create a new 100 x 100 px document, and create a new layer.
Pick the Brush Tool, open the Brush panel (Window > Brush), and choose a soft round brush. Change its Size to 80, its Angle to 90, and its Roundness to 40.
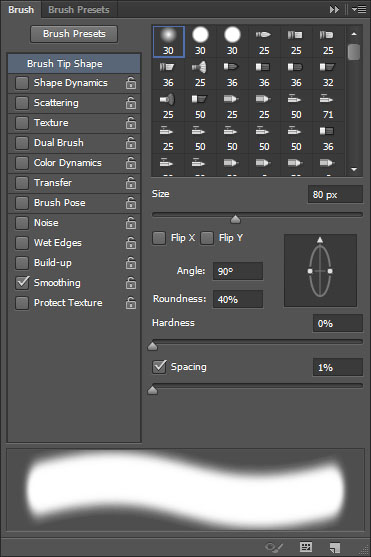
Set the Foreground color to Black, and click once to add the basic flame shape inside the canvas.
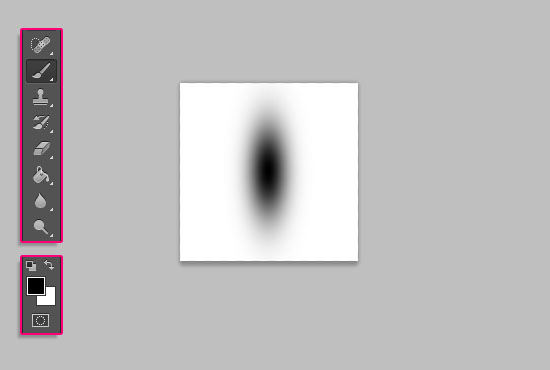
Pick the Eraser Tool, and apply the same previous brush Settings for the Eraser Tool brush tip, except for the Size, which should be set to 50. Place the brush in the lower third of the flame, then click once to erase that part.
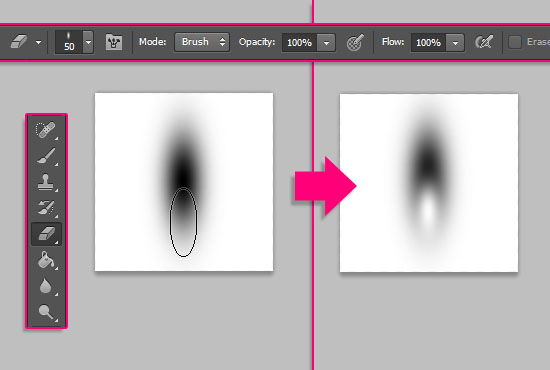
Go to Edit > Define Brush Preset, and type in a name for the brush.
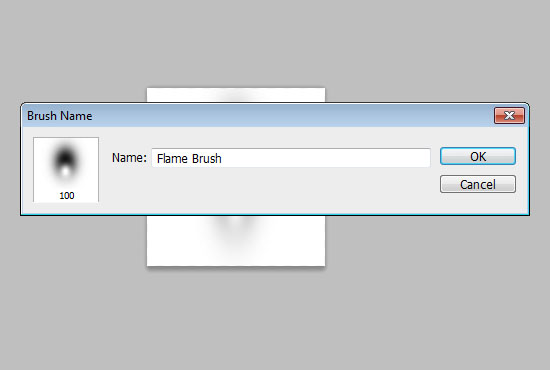
Close the brush document, (you can save it if you like), then go back to the original candles document.
Step 13
In the Brush panel, choose the flame brush, then set its Size to 65.
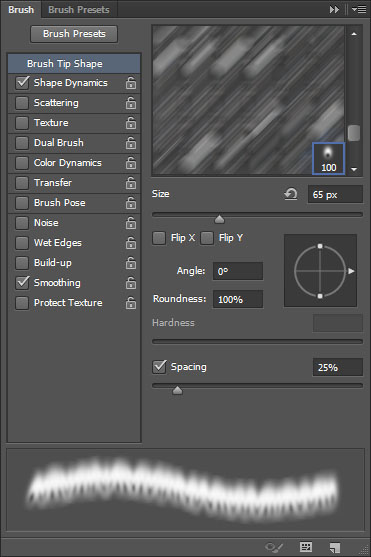
Under Shape Dynamics, set the Size Jitter to 10, and the Angle Jitter to 5. This will help create flames with slightly different sizes and angles each time you click to add one.
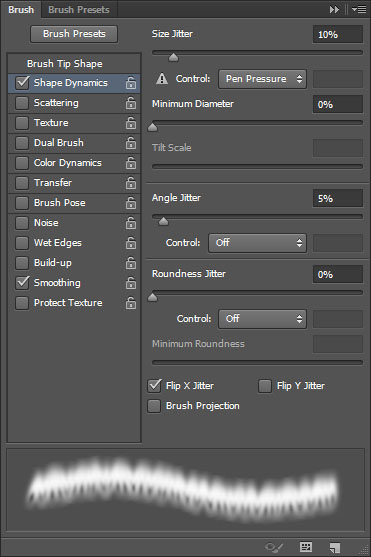
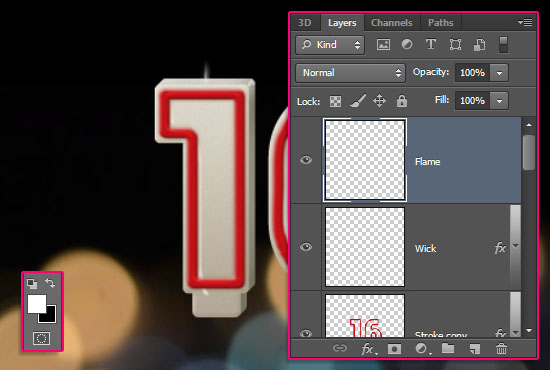
Create a new layer on top of all layers and call it Flame. Set the Foreground color to White.
Step 14
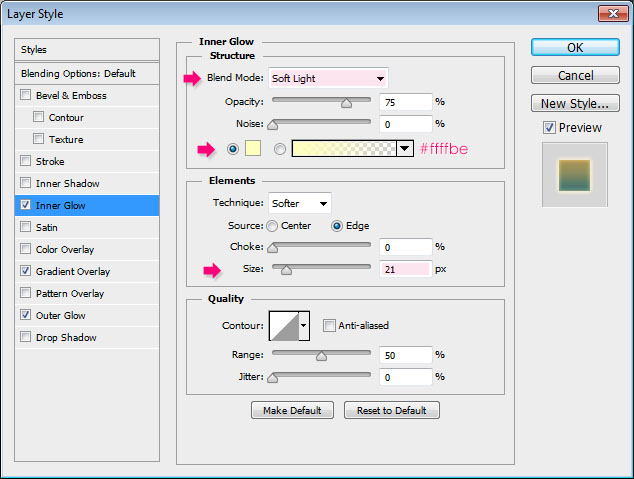
Double click the Flame layer to apply the following Layer Style:
– Inner Glow
- Blend Mode : Soft Light
- Color :
#ffffbe - Size : 21
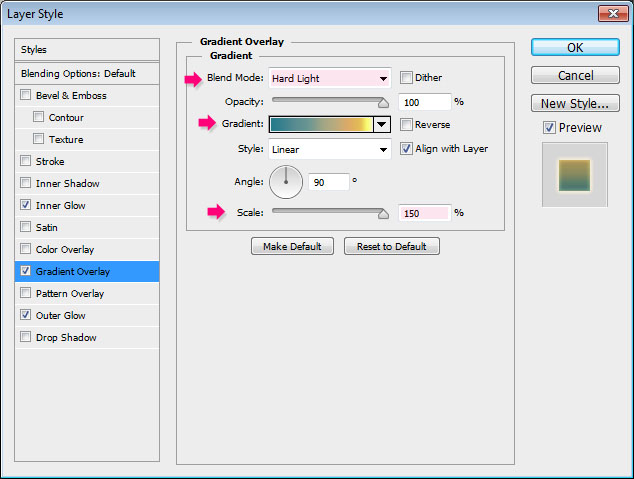
– Gradient Overlay
- Blend Mode : Hard Light
- Scale : 150%
- Choose the gradient shown below from the CSP True Sky Gradients.grd file from the gradients pack
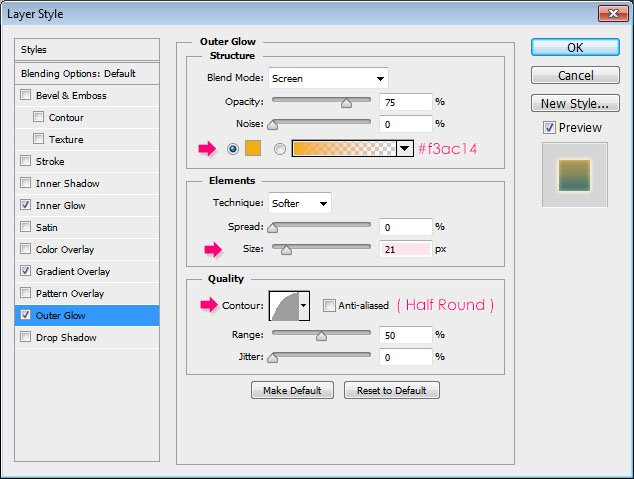
– Outer Glow
- Color :
#f3ac14 - Size : 21
- Contour : Half Round
Place the flame brush on top of the wick, then click once to add the flame.
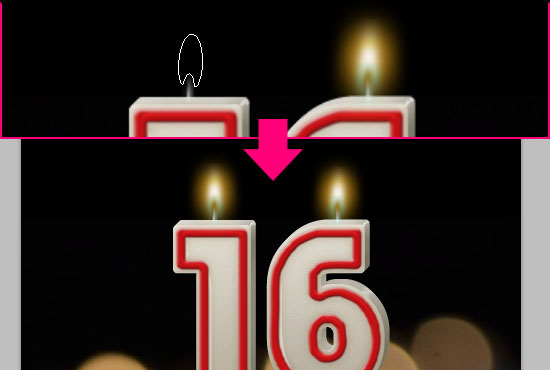
Step 15
The flame creates strong lighting on the top of the candle, which we will try to mimic by adding multiple layers of brightening colors.
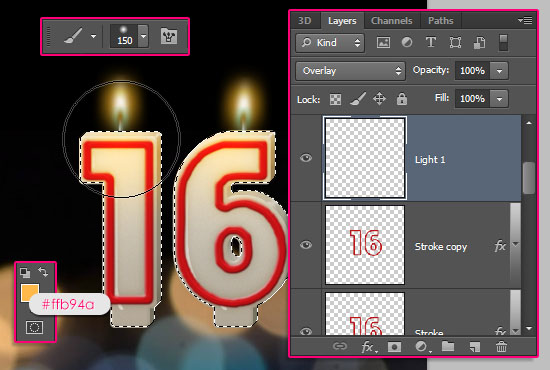
Ctrl/Cmd + click the Candle Extrusion layer’s thumbnail to create a selection. Create a new layer right on top of the Stroke copy layer and call it Light 1, then change its Blend Mode to Overlay. Set the Foreground color to #ffb94a, and choose a 150 px soft round brush.
Place the lower half of the brush inside the selection, then click once on top of each candle to create the first layer of light.
Create a new layer on top of the Light 1 layer and call it Light 2, then change its Blend Mode to Linear Light.
Set the Foreground color to #fff4a9, and choose a 125 px soft round brush. Place the lower half of the brush inside the selection, then click once on top of each candle to create the second layer of light.
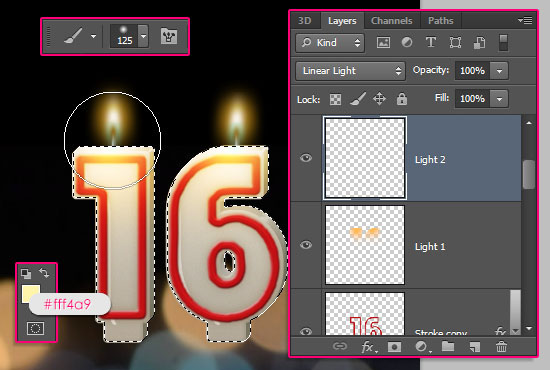
Press Ctrl/Cmd + D to get rid of the selection.
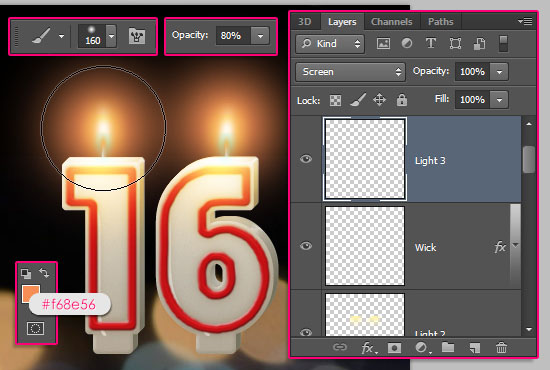
Create a third layer on top of the Wick layer and call it Light 3, then change its Blend Mode to Screen.
Set the Foreground color to #f68e56, and choose a 160 px soft round brush. Place the center of the brush behind the flame, then click once to add more outer glow.
Select all the layers you have, except for the Background and bokeh layers, then go to Layer > Group Layers (Ctrl/Cmd + G). Call the group Candles.
This will place all the candle layers in one group, which will keep everything organized and prevent the mess that could happen when some more new layers are added in the next part.

Save your file for now, and stay tuned for the next part soon get ready to start Part 2.
Did you enjoy this post? Please consider donating to help us cover our server costs.


Wow – i love this tutorial.
Thank you so much.
Very happy you do!
Thanks a lot for the kind comment.
Awesome Am W8 The Part 2 😀
Will be up soon 🙂
Thank you for the comment.
Like it <3 <3 <3 <3
I love your tutorials
Very glad you do 🙂
Thank you very much for the kind words and the support.
My text is too small! I used a 72 dpi 500×500 document and 60 pt text… Still it is too small, if I choose 300 pt the text-size seems to be ok, but then the rest of the effects is out of proportion…
Sorry about that, the Resolution is actually 300, but it was not mentioned in the tutorial.
You’ll need to set the value before you start in order for the effects to be in proportion though.
The tutorial has been updated, really sorry for the inconvenience.
Thank you for pointing this out.
Regards.
Great! That’s something more people should do, make a tutorial in 300 dpi high-res instead of 72 dpi…
Now I try to recalculate it (mostly every used value in px times 4 makes a good effort, but cannot always be done, then you just have to experiment).
I’ll follow the tut again and let you know what the result will be…
And it worked out O.K. now. Awesome! And I made an Animated gif with the flames flickering and dancing, looks good! Thnx for the tut!
That’s great to know!
Would love to see the gif result if you can share a link with us please.
Thank you very much for the kind comment.
Those candles look so real!!!! I did it and they were amazing. It’s my dad’s birthday next sunday and I’m making an e-card for him with this tutorial. Now I’m doing the cupcake part!
Thanks!!!
That’s awesome to know!
Really glad you liked it and going to use it. Part 2 coming soon.
A very happy birthday to your Dad as well 🙂
Thanks for the comment.
oha! exciting tutorial. one of the best in recent times.
That’s awesome to know!
Thank you very much for the kind comment.
Thank you for this enriching tutorial!
My realisation:
http://www.chez-mireilled.com/article-carte-anniversaire-18-ans-115554137.html
Great work!
Thanks a lot for the comment and the link 🙂
I don’t understand step 11, the “star 14 pixel” I can’t find that brush preset
It is the brush tip shown in the Options bar in the screenshot of that step. You can find it among Photoshop’s default brush set. Is it not available for you?
i like it. thaks for your share
Glad you do!
Thanks for the comment 🙂