Elegant Green Text Effect
In this tutorial, we will create a really simple but elegant fresh-looking text effect. We will use layer styles to give the text a metallic look, then, we’ll apply some filters to create the nice texture.
The Final Result
Tutorial Details
- Software Used : Photoshop
- Version : CS5 Extended
- Time : 0:35 – 1:00
Resources
- KabaleMedium font.
Step 1
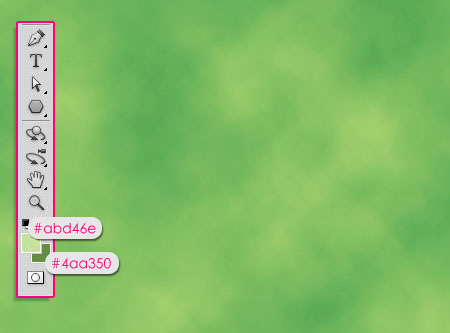
Create a new 1024 x 768 px document. Set the Foreground color to #abd46e and the Background color to #4aa350.
Go to Filter > Render > Clouds.

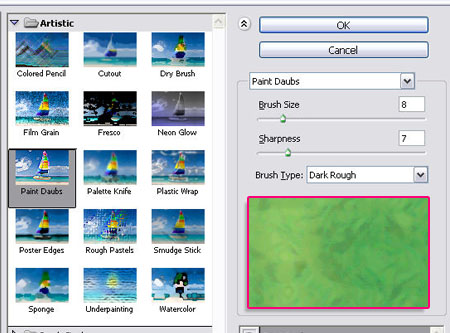
Go to Filter > Artistic > Paint Daubs. Change the Brush Size to 8, and the Sharpness to 7, and choose Dark Rough from the Brush Type drop down menu.

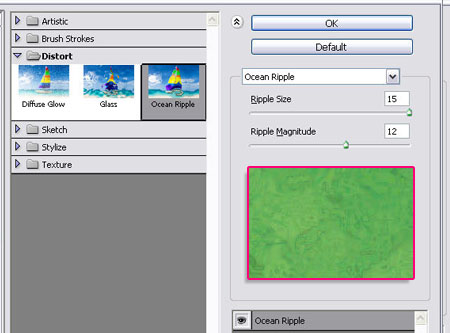
Go to Filter > Distort > Ocean Ripple. Change the Ripple Size to 15, and the Ripple Magnitude to 12.

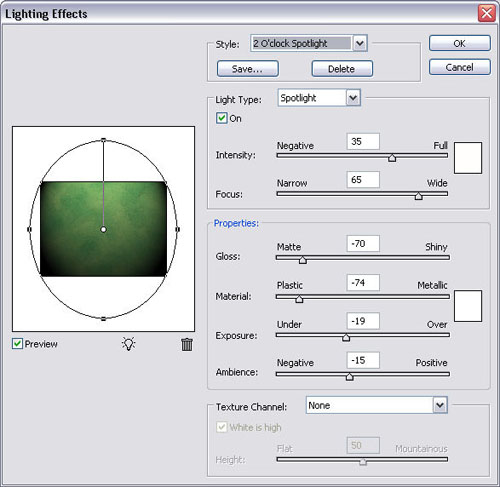
Once again, go to Filter > Render > Lighting Effects and type in the values below. Also, notice that the light above the Preview is modified as well. Try to get a similar result.

You should end up with something similar to this.


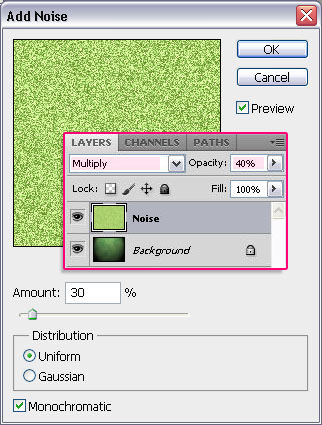
Create a new layer and call it Noise. Then go to Filter > Noise > Add Noise. The Amount should be something around 30%, change the Distribution to Uniform, and check the Monochromatic box.
Change the layer’s Blend Mode to Multiply, and the Opacity to 40%.

Now, we’re done with the Background.
Step 2
Create the text using the font KabaleMedium, the Size 300px, and the color #abd46e.


Double click the text layer and apply the following Layer Style:
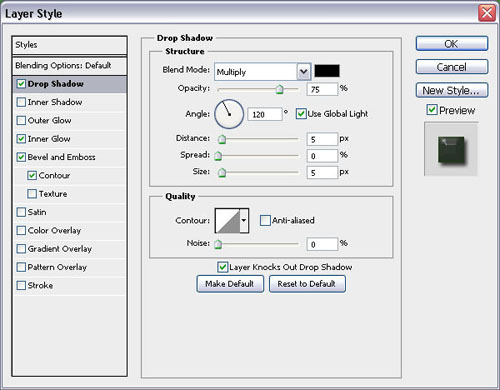
– Drop Shadow
Just use the default values.

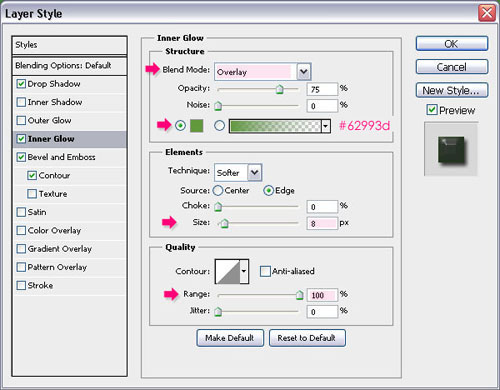
– Inner Glow
- Blend Mode : Overlay
- Color :
#62993d - Size : 8
- Range : 100

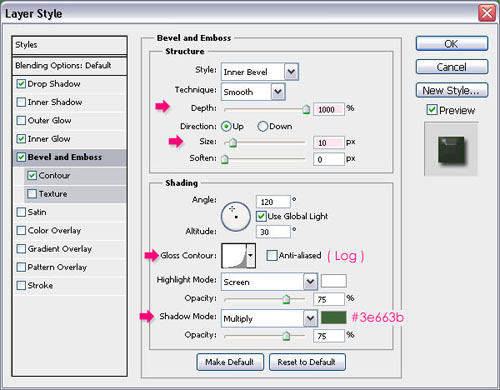
– Bevel and Emboss
- Depth : 1000
- Size : 10
- Gloss Contour : Log
- Shadow Mode – Color :
#3e663b

– Contour
- Contour : Round Slope
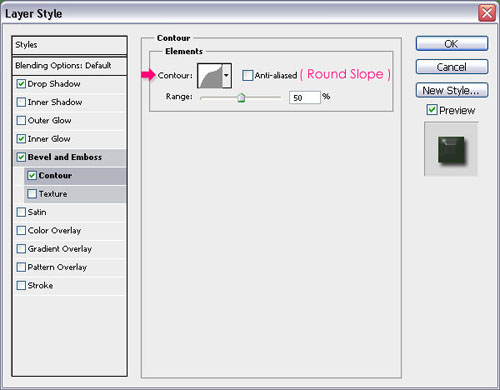

This is what you should get.


Step 3
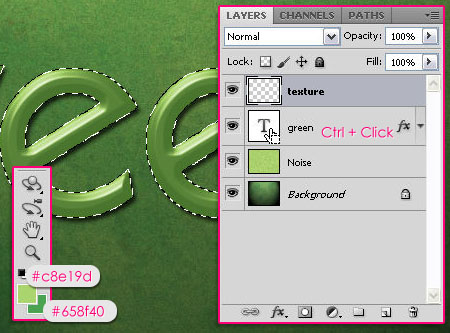
We will choose two slightly different shades of green now. So set the Foreground color to #c8e19d and the Background color to #658f40.
Create a new layer, call it texture, then Ctrl/Cmd and click the text layer’s icon to create a selection.
Fill the selection with the Foreground color.

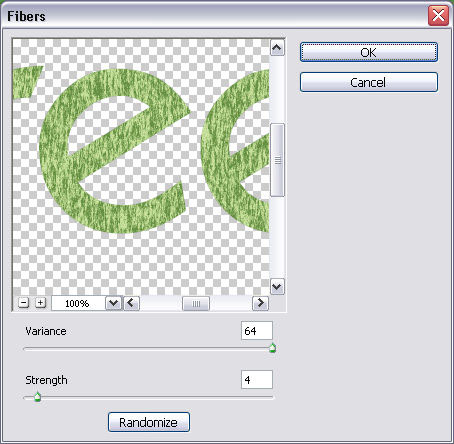
Go to Filter > Render > Fibers, change the Variance to 64, and the Strength to 4.

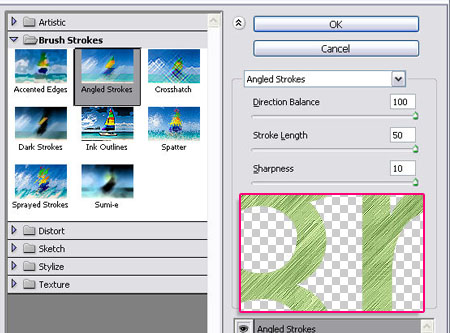
Go to Filter > Brush Strokes > Angled Strokes, change the Direction Balance to 100, the Stroke Length to 50, and the Sharpness to 10.

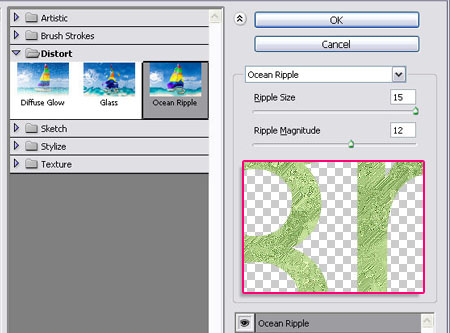
Finally, go to Filter > Distort > Ocean Ripple, change the Ripple Size to 15, and the Ripple Magnitude to 12. Hit OK, and press Ctrl/Cmd + D to get rid of the selection.

The last step is to change the texture layer’s Blend Mode to Soft Light.
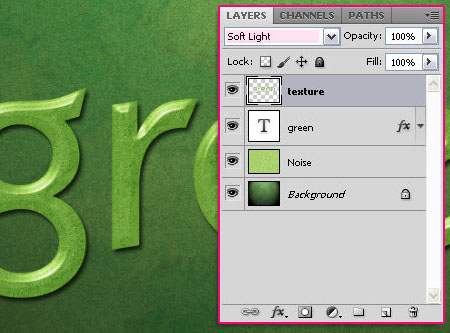

The texture might be simple, but it gives a really nice effect to the text. Here is the final result.
Did you enjoy this post? Please consider donating to help us cover our server costs.






easy to follow ,go on.
Thanks for the comment.
WOw excellent..!!!!!!!…..But am i not able to create it by usinng photoshop CS3?
Thanks for the comment.
Of course you can do it using Photoshop CS3, all filters and styles used are available in the CS3 version as well.
Muito show, valeu mesmo a dica.
Paz.
obrigada, feliz por ter sido útil!
Awesome work!^^
Thank you.
Nice tutorial!…Thanks…^^
Glad you liked it.
Great tutorial, nice outcome, simple procedure… This is a very useful skill to have. Thank you for posting…
Thank you so much!
nice step by step tut
Thanks.
não sabia que falava português,nesse caso,ótimo trabalho,o resultado ficou bem legal,vou tentar depois ;D
I don’t really speak português, I just try to use some phrases here and there 🙂
But Obrigada pelo comentário!
Very nice! So what would it take to have this in purple instead of green? I used Paint shop pro for a long time and new to Photoshop.
Unbelievable talent.. thanks.
You just need to choose two shades of purple instead of the green ones. You can just move the Color Slider to the purple area after typing the original green color code in the Color Value box. Please check the Color Picker overview for more details.
Hope this helps!
Thank you so much for the comment.
Wonderfull, great work, i can do it! Thanks.
Awesome!
Thanks a lot for the comment.
Supér facil y excelente resultado gracias
Glad you liked it.
Muchas gracias for the comment 🙂
Good stuff. Great result and easy to follow. Keep up the good work.
Thank you for the nice comment, appreciate it.
I passed Multimedia class thanks to this. Danke shoen
That’s great to know! Congratulations 😀
Danke shoen for the comment 🙂
danke shoen
Bitte schön 🙂
this was the most helpful thing i have ever incountered. i feel like a better american because i did this. thanks qdog for showing such an amazing and beautiful website
Oh wow! That’s kinda awesome to know!
Thanks a lot for the comment ^_^
really,very nice tutorial
Very glad you like it!
Thanks a lot for the nice words 🙂
I am unable to to ctrl+click operation. please help me to solve this problem.
Thanks